4
T
Q
BJ
233
8
Overview of controls
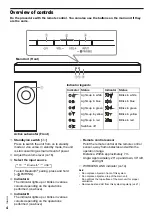
Do the procedure with the remote control. You can also use the buttons on the main unit if they
are the same.
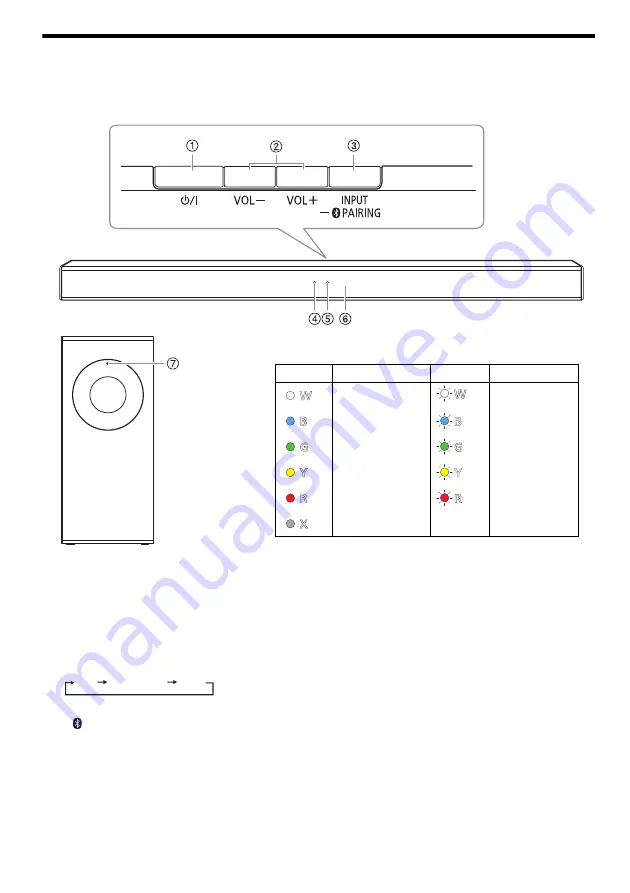
A
Standby/on switch
[
1
]
Press to switch the unit from on to standby
mode or vice versa. In standby mode, the unit
is still consuming a small amount of power.
B
Adjust the volume level (
C
Select the input source
To start Bluetooth
®
pairing, press and hold
[–
PAIRING].
D
Indicator A
The indicator lights up or blinks in various
colours depending on the operations
performed. (
~
above)
E
Indicator B
The indicator lights up or blinks in various
colours depending on the operations
performed. (
~
above)
F
Remote control sensor
Point the remote control at the remote control
sensor, away from obstacles and within the
operation range.
Distance: Within approximately 7 m
Angle: Approximately 20° up and down, 30° left
and right
G
WIRELESS LINK indicator (
Note:
•
Do not place objects in front of this system.
•
Do not place objects on top of the main unit.
Do not block the top surface of the main unit for proper
ventilation.
•
Remove dust and dirt from this system regularly. (
21)
Main Unit (Front)
Active subwoofer (Front)
Indicator legends
Indicator Status
Indicator Status
Lights up in white
Blinks in white
Lights up in blue
Blinks in blue
Lights up in green
Blinks in green
Lights up in yellow
Blinks in yellow
Lights up in red
Blinks in red
Switches off
W
W
B
B
G
G
Y
Y
R
R
X
TV
Bluetooth
®
USB


