background image

RQT88

0

4

27

C

h

anging the pla

y

e

r settings

Video

 tab

Audio

 tab

HDMI

 tab

§

Refer to “Frame still and field still” (

page 38, Glossary).

§

[Southeast\Asia\

§

[The\Middle\East,\South]Africa,]Saudi[Arabia[and[Kuwait[

§

When audio is output from HDMI AV OUT terminal, and the connected 

equipment does not support the item selected, the actual output will 
depend on the performance of this connected equipment.

(Continued on next page)

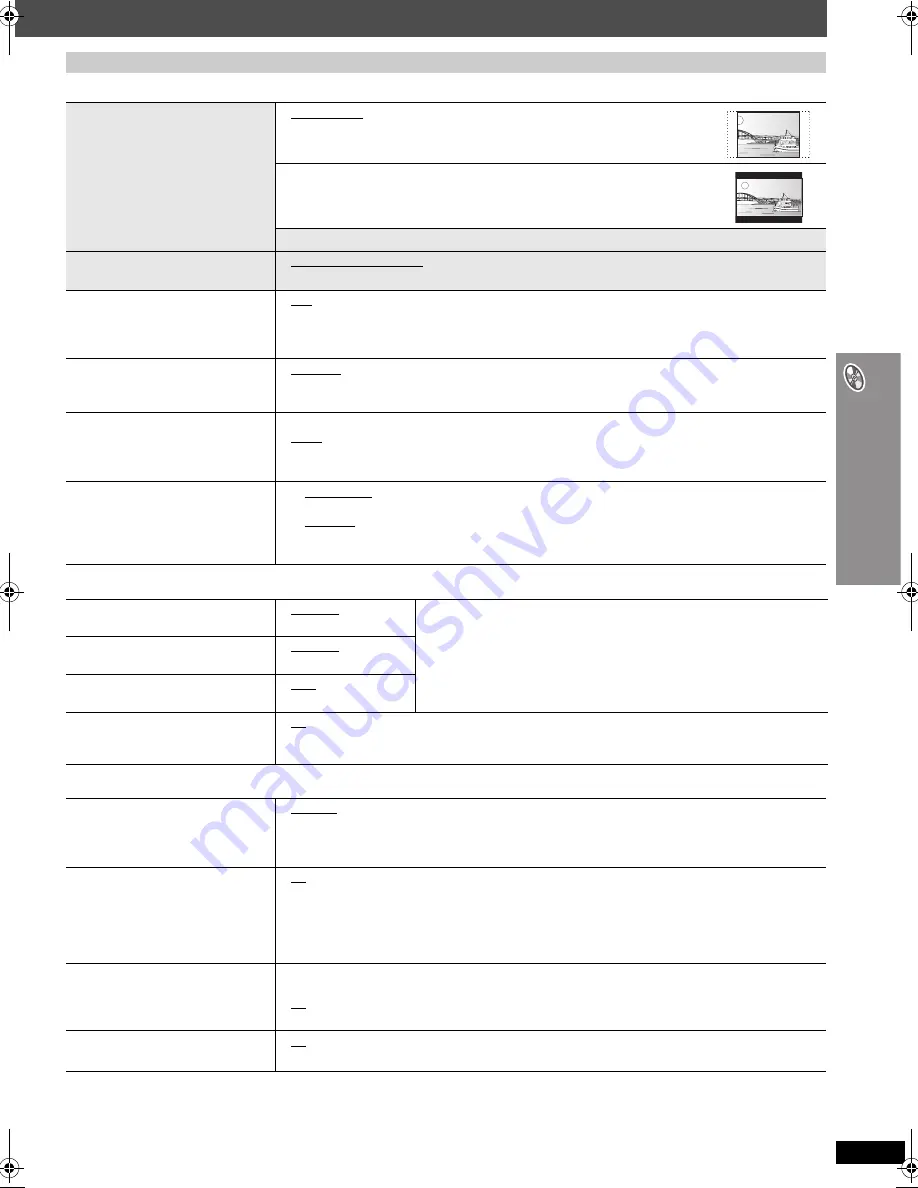
QUICK SETUP enables successive settings of the items in the shaded area.

TV Aspect

Choose the setting to suit your 
television and preference.

4:3 Pan&Scan: Regular aspect television (4:3)

The sides of the widescreen picture are cut off so it fills the screen (unless 
prohibited by the disc).

4:3 Letterbox: Regular aspect television (4:3)

Widescreen picture is shown in the letterbox style.

16:9: Widescreen television (16:9)

TV Type

Select to suit the type of television.

Standard (Direct View TV)

CRT Projector

LCD TV/Projector

Projection TV

Plasma TV

Time Delay

When connected with a Plasma 
display, adjust if you notice the audio is 
out of sync with the video.

0ms

20ms

40ms

60ms

80ms

100ms

Still Mode

Specify the type of picture shown 
when paused.

Automatic

Field

§

:

The picture is not blurred, but picture quality is lower. 

Frame

§

: Overall quality is high, but the picture may appear blurred. 

NTSC Disc Output

Choose PAL 60 or NTSC output when 
playing NTSC discs (

page 15, 

Video systems).

PAL60: When connected to a PAL television.

NTSC: When connected to an NTSC television.
(

[The\Middle\East,\South]Africa,]Saudi[Arabia[and[Kuwait[

: “PAL60” is the factory preset.)

Picture/Video Output

Change the video signal format to be 
output for JPEG, MPEG4 and DivX 
video if picture output is not smooth 
during playback.

§

6

NTSC/PAL60:

Output will depend on “NTSC Disc Output” setting (

above).

PAL

§

7

Automatic

PAL

NTSC/PAL60: 

Output will depend on “NTSC Disc Output” setting (

above).

Dolby Digital

§

8

Bitstream

PCM

Select to suit the type of equipment you connected to the HDMI AV OUT 
terminal (

page 10).

Select “Bitstream” when the equipment can decode the bitstream (digital form 
of multi-channel data). Otherwise, select “PCM”.
(If the bitstream is output to the equipment without a decoder, high levels of 
noise can be output and may damage your speakers and hearing.)

DTS Digital Surround

§

8

Bitstream

PCM

MPEG

§

7, 8

PCM

Bitstream

Dynamic Range Compression

Off

On: Adjusts for clarity even when the volume is low by compressing the range of the lowest sound level 

and the highest sound level. Convenient for late night viewing. (Only works with Dolby Digital)

RGB Range

Set “HDMI Color Space (or HDMI 
Colour Space)” to “RGB” (

page 24, 

Picture Menu).

Standard

Enhanced: When the black and white images are not distinct.

Video Output

(This setting is irrelevant when 
connected through the VIDEO OUT or
S-VIDEO OUT terminal.)

On: When connected through the HDMI AV OUT terminal. Video is output from the HDMI terminal. 

Video is also output from the COMPONENT VIDEO OUT terminal, but only in 480p or 576p 
(progressive).

Off: When connected through the COMPONENT VIDEO OUT terminal. Video is not output from the 

HDMI AV OUT terminal, but from the COMPONENT VIDEO OUT terminal according to the setting 
of the “Video Output Mode” (

page 23, Picture Menu).

Audio Output

On: When audio output is from the HDMI AV OUT terminal. (Depending on the capabilities of the 

connected equipment, audio output may differ from the audio settings of the main unit.)

Off: When audio output is not from the HDMI AV OUT terminal. (The audio is output using the settings of 

the main unit.)

Control with HDMI

(HDAVI Control)

On: The HDAVI Control function is available (

page 34).

Off

8804En_p16-29.fm  Page 27  Friday, July 7, 2006  12:17 PM

Содержание SC-HT892

Страница 1: ...s product please read the instructions completely Please keep this manual for future reference Region Number The Middle East South Africa Saudi Arabia and Kuwait 2 Southeast Asia 3 3 ALL 3 5 2 High quality picture HDMI capability Advanced progressive scan and more page 10 Compatible with a variety of media formats DVD RAM DVD Audio DVD Video DivX and more page 15 High performance sound effects Sou...

Страница 2: ...ANY OTHER MATERIALS DO NOT OBSTRUCT THE VENTILATION VENTS DO NOT OBSTRUCT THE UNIT S VENTILATION OPENINGS WITH NEWSPAPERS TABLECLOTHS CURTAINS AND SIMILAR ITEMS DO NOT PLACE SOURCES OF NAKED FLAMES SUCH AS LIGHTED CANDLES ON THE UNIT DISPOSE OF BATTERIES IN AN ENVIRONMENTALLY FRIENDLY MANNER This product may receive radio interference caused by mobile telephones during use If such interference is ...

Страница 3: ...scs using navigation menus 19 Playing data discs 19 Selecting a track using CD text 20 Playing HighMATTM discs 20 Playing RAM and DVD R RW DVD VR discs 20 Using on screen menus 22 Main menu 22 Other Settings 23 Changing the player settings 26 Using the radio 29 Presetting stations automatically 29 Selecting the preset channels 29 Manual tuning 29 Using an outdoor antenna optional 30 Using sound ef...

Страница 4: ...ours may not correspond with the coloured markings identifying the terminals in your plug proceed as follows The wire which is coloured Blue must be connected to the terminal which is marked with the letter N or coloured Black or Blue The wire which is coloured Brown must be connected to the terminal which is marked with the letter L or coloured Brown or Red WARNING DO NOT CONNECT EITHER WIRE TO T...

Страница 5: ...ime DivX Video on Demand VOD content is encrypted for copyright protection In order to play DivX VOD content on this unit you first need to register the unit Follow the online instructions for purchasing DivX VOD content to enter the unit s registration code and register the unit For more information about DivX VOD visit www divx com vod Display the unit s registration code page 28 DivX Registrati...

Страница 6: ...ely fold the cable in half do not crease pass the folded portion through the hole and then pull the rest of the cable through the base 2 Insert the stand into the base while gently pulling on the end of the cable 3 Secure the stand to the base 4 Adjust the speaker height 1 Loosen the screws until the speaker can slide up and down the stand 2 Raise the speaker to the desired height and then re tigh...

Страница 7: ...t the speaker securely onto the screw s with the hole s Reattaching the speaker cable to the stand 1 Remove the two screws from the stand and remove the metal cover 2 Pull the cable out about 40 cm from the hole in the metal cover and insert the plastic cover 3 Insert the metal cover so it does not disturb the cable and close tightly with the two screws String not included Thread from the wall to ...

Страница 8: ...n damage your speakers and shorten their useful life if you play sound at high levels over extended periods Reduce the volume in the following cases to avoid damage When playing distorted sound When the speakers are reverberating due to a record player a microphone noise from FM broadcasts or continuous signals from an oscillator test disc or electronic instrument When adjusting the sound quality ...

Страница 9: ...r connections 2 FRONT R 1 FRONT L Main unit Insert the wire fully i White j Blue Push 3 SUBWOOFER Be careful not to cross short circuit or reverse the polarity of the speaker wires as doing so may damage the speakers Speaker connections ...

Страница 10: ...evision is an HDMI control compatible television you can operate your television synchronizing with home theater operations or vice versa page 34 Operating both the television and the home theater system Control with HDMI HDAVI ControlTM Make the extra audio connection below when you use HDAVI Control function This audio connection will enable you to play audio from your television through your ho...

Страница 11: ...re quality VIDEO OUT S VIDEO OUT COMPONENTVIDEOOUT PB PR Y COMPONENT VIDEO IN PR PB Y Television not included Back of the main unit Video cables not included To enjoy progressive video Connect to a progressive output compatible television 1 Set Video Output to Off page 27 HDMI tab 2 Set Video Output Mode to 480p or 576p and then follow the instructions on the menu screen page 23 Picture Menu VIDEO...

Страница 12: ...a cable away from other wires and cables Click AM loop antenna FM indoor antenna FM indoor antenna Affix this end of the antenna where reception is best Connect the AC mains lead after all other connections are complete Using an outdoor antenna optional page 30 Re tighten the terminal screw Loosen the terminal screw with a Phillips head screwdriver White Red Black While pushing insert the wire ful...

Страница 13: ... To display the picture from the main unit turn on your television and change its video input mode e g VIDEO 1 AV 1 etc To change your television s video input mode refer to its operating instructions This remote control can perform some basic television operations page 33 To change these settings later Select QUICK SETUP in the Others tab page 28 STEP6 Preparing the remote control R6 LR6 AA 1 3 2...

Страница 14: ... AM TV AUX MUSIC P Return to DVD CD OPEN CLOSE Open Close the disc tray 16 TUNE MODE FM MODE Stop playing 16 Select the tuning mode 29 Adjust the FM reception condition 29 1 MEMORY Play discs 16 Memorize the receiving radio stations 29 4 5 X TUNING W Skip or slow search play 16 Select the radio stations 29 Standby on switch Í I Press to switch the unit from on to standby mode or vice versa In stan...

Страница 15: ...lfunction Cleaning of the lens is generally not necessary although this depends on the operating environment DVD Video DVD V DVD Audio DVD A DVD V DVD V Some DVD Audio discs contain DVD Video content To play DVD Video content select Play as DVD Video in Other Menu page 25 Video CD VCD Including SVCD Conforming to IEC62107 DVD RAM DVD VR MP3 JPEG MPEG4 DivX 1 DVD VR Recorded with devices using Vers...

Страница 16: ...n mixed to 2 channel stereo Using the main unit ADVANCED SURROUND VOLUME Press to skip Press and hold to search during play start slow motion play during pause Motion picture part Press 1 Play to start normal play 6 Adjust the volume 5 Start play The tray is automatically closed To change the sound quality page 31 3 Open the disc tray Stop 2 Select DVD CD Select TV or AUX to enjoy video cassette r...

Страница 17: ...LAY A SRND 1 2 5 6 SLOW SEARCH RETURN SKIP STOP PAUSE TOP MENU DIRECT NAVIGATOR MENU PLAY LIST ENTER CANCEL FL DISPLAY Numbered buttons On screen item select Enter number DVD VR DVD A DVD V VCD CD e g To select 12 S10 1 2 VCD with playback control Press STOP to cancel the PBC function and then press the numbered buttons WMA MP3 JPEG MPEG4 DivX e g To select 123 1 2 3 ENTER Press CANCEL to cancel t...

Страница 18: ...condition All group Program and Random play Press PLAY MODE while stopped All group program and random playback screens appear sequentially All group DVD A __ Program Random off Normal play __ __ To exit the all group program and random mode Press PLAY MODE several times while stopped ONETOUCH PLAY A SRND CANCEL FUNCTIONS PLAY MODE ENTER PLAY Numbered buttons FUNCTIONS e g DVD V Basics Details DVD...

Страница 19: ...iscs WMA MP3 JPEG MPEG4 DivX Playing items in order Playback Menu 1 Press TOP MENU To exit the screen press TOP MENU 2 Press 3 4 to select All Audio Picture or Video and press ENTER Playing from the selected item Navigation Menu 1 Press MENU To exit the screen press MENU 2 Press 2 followed by 3 4 to select the group and press ENTER 3 To play content in the group in order Press ENTER To start play ...

Страница 20: ...ty Penguin Formura one Soccer Baseball Neanderthal Cartoons Trilobites e g CD text 2 Prev 3Return Next 1 New Playlist Item Long Name Display Te PAGE 1 3 Menu1 Menu2 Menu3 Play list1 Play list2 Play list3 Menu Takes you to the next menu which shows play lists or another menu Playlist play starts e g Playlist Group Content All By Artist ENTER RETURN to play to select to exit 0 9 Content title No 1 F...

Страница 21: ...0 NTSC 720k576 PAL You can select up to 8 types of audio and subtitles on this unit 002 group 001 001 group 001 track mp3 002 track mp3 003 track mp3 003 group 001 track mp3 002 track mp3 003 track mp3 001 track mp3 002 track mp3 003 track mp3 004 track mp3 e g MP3 root Manufactured under license from Dolby Laboratories Dolby and the double D symbol are trademarks of Dolby Laboratories DTS and DTS...

Страница 22: ...To display pixel number DivX fps frame per second is also displayed Audio DVD A DVD V DivX with multiple soundtracks To select audio soundtrack DVD VR VCD DivX To select L R or LR DVD V Karaoke disc To select On or Off for vocals Read the disc s instructions for details Signal type data LPCM PPCM ÎDigital DTS MP3 MPEG Signal type kHz Sampling frequency bit ch Number of channels e g 3 2 1ch 1 Low f...

Страница 23: ...Disc Review in the Disc tab page 26 When you find a title program to play Press 1 PLAY This may not work depending on the disc and the play position DVD VR This does not work when playing a playlist page 20 Picture Mode Normal Cinema1 Mellows images and enhances detail in dark scenes Cinema2 Sharpens images and enhances detail in dark scenes Animation Suitable for animation Dynamic Enhances the co...

Страница 24: ...nts is automatically distinguished and output If the picture is distorted select I Interlace or P Progressive depending on which constructing method was used when the contents were recorded to disc Auto I Interlace P Progressive HD Picture Enhancer This works when the HDMI connection is being used and Video Output page 27 HDMI tab is set to On To sharpen the 720p and 1080i picture quality Off 1 2 ...

Страница 25: ...l full screen This may not work depending on the discs recording 16 9 Standard 16 9 4 3 Standard 4 3 European Vista 1 66 1 American Vista 1 85 1 Cinemascope1 2 35 1 Cinemascope2 2 55 1 e g Manual Zoom To zoom in and out manually in 0 01 unit steps from k1 00 to k1 60 in 0 02 unit steps from k1 60 to k2 00 in 0 05 unit steps from k2 00 to k4 00 MPEG4 DivX only To change the steps more quickly press...

Страница 26: ... screen appears 2 Select the tab 3 Select the item 4 Make the settings 5 Press repeatedly to exit Select Go right Select Register Select Register QUICK SETUP enables successive settings of the items in the shaded area Audio Choose the audio language English Language options 1 Original 2 Other 3 Subtitle Choose the subtitle language Automatic 4 English Language options 1 Other 3 Menus Choose the la...

Страница 27: ...uring playback 6 NTSC PAL60 Output will depend on NTSC Disc Output setting above PAL 7 Automatic PAL NTSC PAL60 Output will depend on NTSC Disc Output setting above Dolby Digital 8 Bitstream PCM Select to suit the type of equipment you connected to the HDMI AV OUT terminal page 10 Select Bitstream when the equipment can decode the bitstream digital form of multi channel data Otherwise select PCM I...

Страница 28: ... Bhutani 6890 Bihari 6672 Breton 6682 Bulgarian 6671 Burmese 7789 Byelorussian 6669 Cambodian 7577 Catalan 6765 Chinese 9072 Corsican 6779 Croatian 7282 Czech 6783 Danish 6865 Dutch 7876 English 6978 Esperanto 6979 Estonian 6984 Faroese 7079 Fiji 7074 Finnish 7073 French 7082 Frisian 7089 Galician 7176 Georgian 7565 German 6869 Greek 6976 Greenlandic 7576 Guarani 7178 Gujarati 7185 Hausa 7265 Hebr...

Страница 29: ...o select MANUAL Each time you press the button MANUAL PRESET 3 Press X TUNING W to tune to the lowest frequency FM 87 50 AM 522 or 520 4 Press and hold MEMORY Release the button when FM AUTO or AM AUTO is displayed The tuner presets all the stations it can receive into the channels in ascending order SET OK is displayed when the stations are set and the radio tunes to the last preset station ERROR...

Страница 30: ...After changing the setting previously preset frequencies will be cleared Preset them again Use outdoor antennas if radio reception is poor Disconnect the antenna when the unit is not in use Do not use the outdoor antenna during an electrical storm Main unit only Using an outdoor antenna optional Leave the AM loop antenna connected AM outdoor antenna Using a vinyl wire not included Run a piece of v...

Страница 31: ...e heard clearly even if the acoustics of your room are not optimal The unit automatically selects the most suitable setting according to the type of playback source Press H BASS DVD V DVD VR H BASS ON factory preset H BASS OFF When another source is selected H BASS OFF factory preset H BASS ON The setting you make is retained and recalled every time you play from the same type of source DVD VR DVD...

Страница 32: ...stem Preparation To avoid distorted sound make sure that any equalizer function of your external device is turned off Setting the sleep timer Muting the sound ONETOUCH PLAY A SRND VOLUME EXT IN ENTER MUTING SLEEP FUNCTIONS MONO SLP ST H BASS SRD PGM HDCD E 1 W MONO SLP ST MODE AC PRG RDS DTS PL A PS PTY CD DVD D Using headphones 1 Reduce the volume and connect the headphones not included Headphone...

Страница 33: ...ay be reversed on some discs VOLUME MIN MIC LEVEL MAX Solo discs Off Vocals off On Vocals on Duet discs Off Vocals off V1iV2 Both parts V1 Part 1 only V2 Part 2 only Operating other equipment You can use the remote control to operate a Panasonic television Connect your equipment referring to Cable TV box or video cassette recorder connection page 11 Note The remote control may not work properly wi...

Страница 34: ...hen play starts on the home theater system You can select whether audio is output from the home theater system or the television by using the television settings For details refer to the operating instructions of your television When audio is output from the home theater speakers The television speakers are automatically muted You can control the volume setting using the volume or mute button on t...

Страница 35: ...d S10 on the remote control until Initialized or Initialised disappears from the television Turn the unit off and on again All settings will return to the default values The HDAVI Control function does not respond Depending on the condition of the home theater system or the connected equipment it may be necessary to repeat the same operation so that the function can work correctly 34 It takes time...

Страница 36: ...levision Others Use a multi system or PAL television The system used on the disc does not match your television PAL discs cannot be correctly viewed on an NTSC television This unit can convert NTSC signals to PAL 60 for viewing on a PAL television NTSC Disc Output in Video tab Ensure that the unit is connected directly to the television and is not connected through a video cassette recorder Mobile...

Страница 37: ... unit off and then back on Alternatively turn the unit off disconnect the AC mains lead and then reconnect it If the service numbers fail to clear note the service number and contact a qualified service person D MIX is flashing DVD A Down mixing is the process of remixing the multiple channel audio found on some discs into two channels The disc contains single channel or multiple channel signals w...

Страница 38: ...ventional connections it transmits uncompressed digital video and audio signals on a single cable This unit supports high definition video output 720p 1080i from the HDMI AV OUT terminal To enjoy high definition video a high definition compatible television is required I P B MPEG 2 the video compression standard adopted for use with DVD Video codes frames using these 3 picture types I Intra coded ...

Страница 39: ...tandard MPEG4 Simple Profile video system G 726 audio system 5 Conforming to IEC62107 6 MPEG 1 Layer 3 MPEG 2 Layer 3 7 Windows Media Audio Ver 9 0 L3 Not compatible with Multiple Bit Rate MBR Pick up Wavelength DVD CD 662 785 nm Laser power DVD CD CLASS 1 CLASS 1M Audio output Disc Number of channels 2 1ch FL FR SW Video system PAL625 50 PAL525 60 NTSC Composite video output Output level 1 Vp p 7...

Страница 40: ...Matsushita Electric Industrial Co Ltd Web Site http panasonic net RQT8804 L F0706NK0 p ...

Отзывы: