
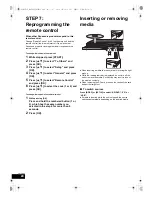


TV
Radio
33
VQT2W23
Linked operations with
the TV
(VIERA Link “HDAVI Control
TM
”)
Preparation
1
Set “VIERA Link” to “On” (
>
41).
(The default setting is “On”.)
2
Set the “HDAVI Control” operations on the connected
equipment (e.g., TV).
3
Turn on all “HDAVI Control” compatible equipment and
select this unit’s input channel on the connected TV so that
the “HDAVI Control” function works properly.
Also when the connection or settings are changed,
repeat this procedure.
∫
Setting the audio link with the TV
With the remote control;
≥
Select the actual TV audio connection on the main unit.
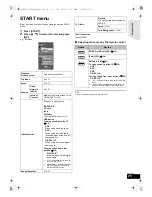
1
Press [START] and press [
3
,
4
] to select “To Others” and
press [OK].
2
Press [
3
,
4
] to select “Setup” and press [OK].
3
Press [
3
,
4
] to select “TV / Device Connection” and press
[OK].
4
Press [
3
,
4
] to select “TV Audio Input”.
5
Press [
2
,
1
] to switch “AUX”, “ARC” or “DIGITAL IN”.
Whenever the connection or settings are changed, reconfirm
the points above.
∫
Setting the audio link with the STB
With the remote control;
≥
Select the STB input channel on the TV.
1
Press [EXT-IN] to select “D-IN”.
2
Press [STATUS] to select “CABLE/SATELLITE AUDIO
ON”.
≥
If the input channel of the STB on the TV is changed or if you
want to change the device allocated for the linked
operations, select “CABLE/SATELLITE AUDIO OFF” in step
2
above and then repeat steps
1
to
2
.
≥
VIERA Link “HDAVI Control”, based on the control functions provided by
HDMI which is an industry standard known as HDMI CEC (Consumer
Electronics Control), is a unique function that we have developed and
added. As such, its operation with other manufacturers’ equipment that
supports HDMI CEC cannot be guaranteed.
≥
This unit supports “HDAVI Control 5” function.
“HDAVI Control 5” is the newest standard (current as of December, 2009)
for Panasonic’s HDAVI Control compatible equipment. This standard is
compatible with Panasonic’s conventional HDAVI equipment.
≥
Please refer to individual manuals for other manufacturers’ equipment
supporting VIERA Link function.
You can turn on this unit and the TV, and start play with a
single press of a button.
While the unit and the TV are in standby mode;
Press [
1
PLAY].
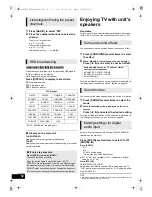
You can select whether audio is output from the unit’s
speakers or the TV speakers by using the TV menu settings.
Home Cinema
This unit’s speakers are active.
≥
When this unit is in standby mode, changing the TV
speakers to this unit’s speakers in the TV menu will
automatically turn the unit on and select, “AUX”
**
, “ARC”
**
or
“D-IN” (DIGITAL IN)
**
as the source.
≥
You can control the volume setting using the volume or mute
button on the TV’s remote control.
≥
If you turn off this unit, TV speakers will be automatically
activated.
TV
TV speakers are active.
≥
The volume of this unit is set to “0”.
≥
Audio output is 2-channel audio.
≥
When switching between this unit’s speakers and TV speakers, the TV
screen may be blank for several seconds.
≥
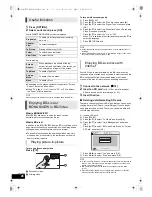
Insert TR
When the following operations are performed, the television
will automatically switch the input channel and display the
corresponding action. When the television is off, the television
will automatically turn on.
j
When play starts on the unit
j
When an action that uses the display screen is performed
(e.g., DIRECT NAVIGATOR screen)
[For[the[United[Kingdom[and[Republic[of[Ireland[
j
BD-Video, DVD-Video:
When playback stops, the TV will automatically return to TV
tuner mode.
≥
When you switch the TV input to TV tuner mode, this unit will
automatically switch to “AUX”*, “ARC”* or “D-IN”* (DIGITAL IN)*.
≥
This function does not work when the iPod/iPhone selector is
chosen. (
>
35)
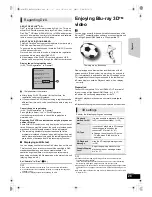
What is VIERA Link “HDAVI Control”?
VIERA Link “HDAVI Control” is a convenient function
that offers linked operations of this unit, and a
Panasonic TV (VIERA) under “HDAVI Control”.
You can use this function by connecting the equipment
with an HDMI cable. See the operating instructions for
connected equipment for operational details.
Setting the audio link
One touch play
Speaker Selection
Automatic input switching
(Power on link)
SCBTT755_350EBGN_VQT2W23.book 33 ページ 2010年6月18日 金曜日 午後4時58分


