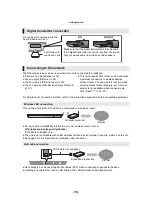
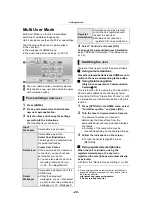
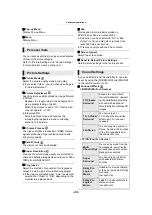
Panasonic SC-BTT500W Скачать руководство пользователя страница 22

Getting started

- 22 -

Multi User Mode

Multi User Mode is a function that enables 
switching of multiple settings easily.
Up to 4 people can use the unit with their own settings.

The following settings can be personalized.

The user icon

The wallpaper of HOME menu

The audio and picture settings (

>

32, 35)

A

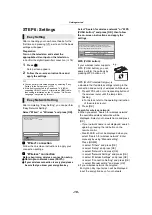
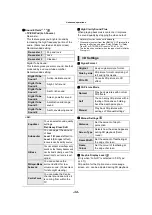
The user name and icon currently selected

B

Personalize a new user and switch the users 
with coloured buttons.

1

Press [HOME].

2

Press a coloured button that indicates 
new user personalization.

3

Select an item and change the settings 
according to the indications.

The following items can be set.

4

Select “Confirm” and press [OK].

To change the personalized user information

Select “Edit User Information” from Setup menu. 
(

>

39)

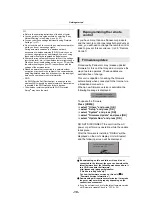
There are three ways to switch the user as follows.

Using coloured buttons

Press the coloured buttons in the HOME menu to 
switch to the user corresponding to the button.

Using facial recognition

(Only when connected to Communication 
Camera 

>

30)

This is a function for fun using the Communication 
Camera and enables user switching by facial 
recognition. Perform “Create from Photos” (

>

left) 

to personalize your facial photo before using this 
function.

1

Press [OPTION] in the HOME menu, select 
“Facial Recognition” and press [OK].

2

Turn the face to Communication Camera.

The camera captures your face and 
determines the closest face from the 
personalized user photos, and then displays 
the results.

Accuracy of the recognition may be 
reduced depending on the captured image.

3

Follow the indications on the screen.

To redo the facial recognition, press 
[RETURN].

Using registered smartphones

When the unit is turned on using the 
registered smartphone, the user who 
registered the smartphone will automatically 
be selected.

Perform the “Remote Device Settings”. (

>

38)


To use smartphones as a remote control, installation of 

dedicated software is required. For more details, refer to 

the following website.

http://panasonic.jp/support/global/cs/

(This site is in English only.)

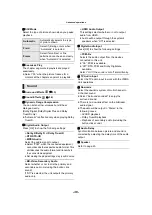
Personalizing a new user

Input 
Nickname

Personalize a user name.

Select Icon

Personalize a user icon.

Select from Illustrations

The image can be selected from 
prepared illustrations.

Create from Photos

If the Communication Camera is 
connected, you can shoot and 
personalize your photo.

You can also select a photo in 
recording media as an icon. 
(

>

32, “Icon Registration”)

Select 
Wallpaper

Personalize a background of the 
HOME menu.

Other than prepared 
wallpapers, you can also select 
a photo in recording media as a 
wallpaper. (

>

32, “Wallpaper”)

HOME

Home Cinema

Videos

Music

Photos

Network

EXT IN

FM Radio

Sound

Others

iPod

User 1

A

User 1

Register 
2nd user

B

OK

Register 
Smartphone

Smartphone used as a remote 
control can be registered with 
respect to each user.

Multiple users cannot be 
registered for one smartphone.

Switching the user

Содержание SC-BTT500W

Страница 1: ...ng this product Please read these instructions carefully before using this product and save this manual for future use Firmware updates Panasonic is constantly improving the unit s firmware to ensure...

Страница 2: ...amage the speakers Hold the speaker firmly to avoid injury by dropping the speaker when carrying You can damage your speakers and shorten their useful life if you play sound at high levels over extend...

Страница 3: ...ies may be applicable for incorrect disposal of this waste in accordance with national legislation For business users in the European Union If you wish to discard electrical and electronic equipment p...

Страница 4: ...gs 18 Inserting or removing media 20 Enjoying TV with unit s speakers 20 HOME menu 21 Multi User Mode 22 Playback Playback 23 Using the iPod iPhone 25 TV Radio VIERA Link HDAVI Control 27 Enjoying TV...

Страница 5: ...re using this unit Package contents SUBWOOFER FRONT CENTER SURROUND SA BTT880 SB HF5600 SB HS8800 SB HC5600 SB HW490 SUBWOOFER FRONT CENTER SURROUND SB HF5000 SB HW190 SB HC5000 SB HS5000 SA BTT500 SH...

Страница 6: ...ith the cloth This unit s lens Clean discs Wipe with a damp cloth and then wipe dry Disc and card handling precautions Handle discs by the edges to avoid inadvertent scratches or fingerprints on the d...

Страница 7: ...ideo Video DVD R Video AVCHD MKV Xvid JPEG MPO FLAC MP3 WAV DVD R DL DVD RW Video AVCHD R RW R DL Music CD Music CD DA CD R CD RW MKV Xvid JPEG MPO FLAC MP3 Music CD DA WAV SD Memory Card from 8 MB to...

Страница 8: ...upplied with such cards or otherwise customer provided To protect the card s contents move the record prevention tab on the SD card to LOCK This unit is compatible with SD Memory Cards that meet SD Ca...

Страница 9: ...P 2 While SLEEP is displayed press jSLEEP several times to select the time in minutes Timer selection is up to 120 minutes Select OFF when cancelling the setting To confirm the remaining time Press an...

Страница 10: ...signal sensor Distance within approx 7 m Angle Approx 20e up and down 30e left and right 10 Display 11 Dock for iPod iPhone 26 1 AC IN terminal 17 2 Speaker terminals 13 3 Cooling fan 4 LAN port 16 5...

Страница 11: ...To allow for proper ventilation and to maintain good airflow around the wireless system position it with at least 5 cm of space on all sides Do not use the wireless system or the digital transmitter...

Страница 12: ...supplied securely 3 Slide the speaker cable into the groove 4 Attach the speaker 5 Tighten the screw supplied securely After connecting the speaker cable 13 press the cable into the groove To prevent...

Страница 13: ...he AC mains lead until all other connections are complete BTT880 BTT500W When connecting the surround speakers to the wireless system Connect the speaker cables to the terminals of the same colour Con...

Страница 14: ...aking the digital audio connection make settings to suit the type of audio from your digital equipment 36 1 If the HDMI terminal on the TV is labelled HDMI ARC the connection of the optical digital au...

Страница 15: ...ot be output from this system Even while the unit is in the standby mode you can change the input signal HDMI1 IN CABLE SAT or HDMI2 IN by pressing EXT IN on the remote control When the connecting dev...

Страница 16: ...on your wireless router refer to http panasonic jp support global cs This site is in English only The unit is not compatible with public wireless LAN services provided in airports stations cafes etc S...

Страница 17: ...reless system after all connections are complete AC IN AC mains lead supplied To a household mains socket AC mains lead supplied To a household mains socket The cord with a ferrite core is for the wir...

Страница 18: ...the settings by pressing WPS button on it WPS Wi Fi Protected SetupTM is a standard that facilitates settings relating to the connection and security of wireless LAN devices 1 Press WPS button or corr...

Страница 19: ...hange the remote control code to prevent this occurrence 39 Remote Control Occasionally Panasonic may release updated firmware for this unit that may add or improve the way a feature operates These up...

Страница 20: ...ou connect a iPod iPhone USB memory or a USB HDD The USB port on the rear panel is only for the Communication Camera Enjoying TV with unit s speakers 1 Connect the TV and the main unit 14 2 Press EXT...

Страница 21: ...elector is switched it may take time to play back the selected video and or audio To save on electricity the unit is turned off automatically if there is no button operation for about 30 minutes when...

Страница 22: ...your face and determines the closest face from the personalized user photos and then displays the results Accuracy of the recognition may be reduced depending on the captured image 3 Follow the indic...

Страница 23: ...position The position is cleared if the tray is opened On BD Video discs including BD J the resume play function does not work Press PAUSE Press PAUSE again or 1PLAY to restart play Search While play...

Страница 24: ...DMI Video Format or 24p Output 35 When playing back 3D photos from Photos screen select from the 3D list Still pictures in 2D are played back in 2D If 2D and 3D indications are not displayed press the...

Страница 25: ...ur iPhone in the following case When the network functions on this unit are in use wirelessly When the surround speakers on this unit are in use wirelessly About recharging the battery iPod iPhone wil...

Страница 26: ...iPod iPhone display facing out Carefully insert and remove the iPod iPhone to ensure long lasting product enjoyment 1 Press HOME 2 Select iPod and press OK 3 Select the item to play Repeat this proce...

Страница 27: ...remote control you can perform various playback operations and settings See the operating instructions of the TV for more details The buttons that you can use for this unit vary depending on the TV F...

Страница 28: ...V and the audio is output from the speakers of this unit When HDMI Standby Pass Through is set to Yes 35 this unit will not turn on Connecting the HDMI cable The setting for audio output is not necess...

Страница 29: ...setting Select a radio broadcast 1 Press RADIO to select FM 2 Press SEARCH6 or SEARCH5 to select the frequency To start automatic tuning press and hold SEARCH6 SEARCH5 until the frequency starts scrol...

Страница 30: ...menu items When restricting the use of VIERA Connect 38 Network Service Lock When the audio is distorted 37 Audio Auto Gain Control When wrong time is displayed 38 Time Zone Summer Time If using slow...

Страница 31: ...e Control Panel About support format of DLNA client 49 To exit from Home Network Press HOME You can use the smartphone etc as the Digital Media Controller DMC to play back contents from DLNA server on...

Страница 32: ...l Random Select whether or not to play random Start Slideshow Start the slideshow Status Show the status messages Rotate RIGHT Rotate LEFT Rotate the still picture Wallpaper Set the still picture to t...

Страница 33: ...either Video or Film depending on the material to be played back 24p Movies and other material recorded on DVD Video at 24p are output at 24p Only when you have selected On in 24p Output 35 and play d...

Страница 34: ...ft rich sound Digital Tube Sound 4 A clear powerful sound Digital Tube Sound 5 A distinctive mid range sound Digital Tube Sound 6 A soft enveloping sound Equalizer You can select sound quality setting...

Страница 35: ...ent must also be 1080p compatible 24p Output When this unit is connected to a TV supporting 1080 24p output using an HDMI cable movies and other material recorded at 24p are output at 24p When playing...

Страница 36: ...he primary audio only HDMI Audio Output This setting selects whether or not to output audio from HDMI Audio will be output through the system s speakers when Off is selected Digital Audio Input Press...

Страница 37: ...ted settings individually Press OK to show the following settings LAN Connection Mode Select the LAN connection method Select Wireless Master when you make a direct wireless connection between this un...

Страница 38: ...estrict Internet access when BD Live functions are used If Limit is selected Internet access is permitted only for BD Live contents which have content owner certificates The following items use the sa...

Страница 39: ...the unit s display If Automatic is selected the display is set to bright and only dimmed during playback Edit User Information Change the user information registered in the HOME menu Quick Start Speed...

Страница 40: ...he same distance from the seating position If either distance 1 or 2 is less than 3 measure the distance and adjust the time to make up for the difference see the table below 1 2 3 Primary listening d...

Страница 41: ...lity when these sound effects modes are used with some sources If this occurs turn the sound effects modes off Speaker installation option Consult a qualified building contractor when attaching the sp...

Страница 42: ...ng to the speaker Use a string of less than 2 0 mm which is capable of supporting over 10 kg e g BTT880 Front speaker A String not supplied B Rear of the speaker 2 Thread a string from the wall to the...

Страница 43: ...erly Change the batteries in the remote control 9 The remote control and main unit are using different codes If SET is displayed on the unit s display when a button is pressed on the remote control ch...

Страница 44: ...the Setup menu is set to Automatic images may not be output depending on the connection method After removing the disc from this unit select Set before play in the Setup menu and select 2D Playback in...

Страница 45: ...make sure that the optical audio output of the equipment is set to PCM Disc cannot be played The disc is dirty 6 The disc is not finalized 8 Still pictures JPEG do not play back normally The images th...

Страница 46: ...AES Simultaneous use with a microwave cordless telephone etc at 2 4 GHz may result in connection interruptions or other problems On the Wireless Settings screen 37 the continuous lighting of at least...

Страница 47: ...eck and correct the speaker cable connections There is something unusual Check the unit using the troubleshooting guide If the service number remains displayed do the following If the service number r...

Страница 48: ...al k 1 Sampling frequency 32 kHz 44 1 kHz 48 kHz Audio Format PCM Dolby Digital DTS FM TUNER SECTION Frequency range 87 50 MHz to 108 00 MHz 50 kHz step Antenna terminals 75 unbalanced SPEAKER SECTION...

Страница 49: ...ile format Extension Reference MP3 MP3 mp3 This unit supports ID3 tags but only titles artist names and album names can be displayed JPEG JPG jpg MOTION JPEG and Progressive JPEG are not supported You...

Страница 50: ...ffect wireless performance iPhone iPod iPod classic iPod nano and iPod touch are trademarks of Apple Inc registered in the U S and other countries Display languages list Language code list ENG FRA DEU...

Страница 51: ...anasonic com Source code is also freely available to you and any other member of the public via our website below http panasonic net avc oss bdplayer AWBPP12 html For the software categorized as 5 inc...

Страница 52: ...enne enheten Installer denne enheten slik at nettst pselet umiddelbart kan trekkes fra stikkontakten Produkt Dette produktet anvender en laser Betjening av kontroller eller justering eller andre inngr...

Отзывы: