background image

17

G

e

tti

n

g

 started

VQT4Z38

This unit has built in Wi-Fi

®

 and can be connected to a wireless router.

For up-to-date compatibility information on your wireless router, refer to

http://panasonic.jp/support/global/cs/

(This site is in English only.)

The unit is not compatible with public wireless LAN services (Hotspot etc.) provided in airports, 
stations, cafes, etc.

See page 2 for the precautions of wireless LAN connection.

Use category 5 or above straight LAN cables (STP) when connecting to peripheral devices.

Inserting any cable other than a LAN cable in the LAN terminal can damage the unit.

STEP 4: Connecting the AC mains lead

Connect only after all other connections are complete.

This unit consumes a small amount of AC power (

>

48) even when turned off. For the purpose of 

power conservation, the unit can be disconnected if you will not be using it for extended period of 
time.

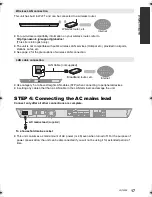
Wireless LAN connection

Wireless router, etc.

Internet

LAN cable connection

LAN Cable (not supplied)

Internet

Broadband router, etc.

AC mains lead 

(supplied)

To a household mains socket

SC-BTT230EB-VQT4Z38_mst.book  17 ページ  2013年3月19日 火曜日 午前9時27分

Содержание SC-BTT230

Страница 1: ...oduct and save this manual for future use Model number suffix EB denotes UK model Firmware updates Panasonic is constantly improving the unit s firmware to ensure that our customers are enjoying the latest technology Panasonic recommends updating your firmware as soon as you are notified For details refer to Firmware updates 19 or http panasonic jp support global cs This site is in English only ...

Страница 2: ... cross short circuit or reverse the polarity of the speaker wires as doing so may damage the speakers Hold the speaker firmly to avoid injury by dropping the speaker when carrying You can damage your speakers and shorten their useful life if you play sound at high levels over extended periods Do not touch the front area of the speakers Hold by the sides Place speakers on flat secure surfaces To av...

Страница 3: ... be used in combination with a chemical symbol In this case it complies with the requirement set by the Directive for the chemical involved This unit adopts the following technology for copyright protection Cinavia Notice This product uses Cinavia technology to limit the use of unauthorized copies of some commercially produced film and videos and their soundtracks When a prohibited use of an unaut...

Страница 4: ... 18 Inserting or removing media 20 Enjoying TV with unit s speakers 20 HOME menu 21 Multi User Mode 22 Playback Playback 23 Using the iPod iPhone 25 TV Radio VIERA Link HDAVI Control 27 Enjoying TV and STB with unit s speakers 28 Listening to the Radio 29 Advanced operations VIERA Connect Enjoying Internet Service 30 Home Network feature 31 Option menu 32 Setup menu 35 Speaker settings 40 Changing...

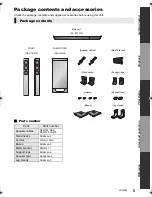
Страница 5: ...is unit Parts number Package contents FRONT SUBWOOFER SA BTT230 SB HTB570 SB HW490 Main unit Metal bracket Stand necks Leg stands Support legs Speaker feet Screws Speaker cables Bases Parts Parts number Speaker cables REE1789 RED REE1790 WHITE Stand necks RGK2444 S Screws XYN5 J14FJK Bases RGK2465 S Metal bracket RML0761 1 Support legs RGK2464 K Speaker feet RKAX0042 K Leg stands RGK2463 S ...

Страница 6: ...s lens Clean discs Wipe with a damp cloth and then wipe dry Disc and card handling precautions Handle discs by the edges to avoid inadvertent scratches or fingerprints on the disc Do not attach labels or stickers to discs Do not use disc cleaning sprays benzine thinner static electricity prevention liquids or any other solvent Clean any dust water or foreign matter from the terminals on the rear s...

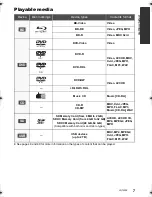
Страница 7: ...DVD Video Video DVD R Video AVCHD MKV Xvid JPEG MPO FLAC MP3 WAV DVD R DL DVD RW Video AVCHD R RW R DL Music CD Music CD DA CD R CD RW MKV Xvid JPEG MPO FLAC MP3 Music CD DA WAV SD Memory Card from 8 MB to 2 GB SDHC Memory Card from 4 GB to 32 GB SDXC Memory Card 48 GB 64 GB Compatible with both mini and micro types AVCHD AVCHD 3D MP4 MPEG2 JPEG MPO USB devices up to 2 TB MKV MP4 MPEG2 Xvid JPEG M...

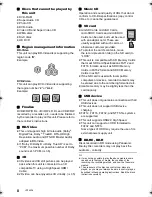
Страница 8: ... be used with an adaptor card These are usually supplied with such cards or otherwise customer provided To protect the card s contents move the record prevention tab on the SD card to LOCK This unit is compatible with SD Memory Cards that meet SD Card Specifications FAT12 and FAT16 formats as well as SDHC Memory Cards in FAT32 format and SDXC Memory Cards in exFAT If the SD card is used with incom...

Страница 9: ...es to select the time in minutes Timer selection is up to 120 minutes Select OFF when cancelling the setting To confirm the remaining time Press and hold the button again 13 TV operation buttons Í TV Turn the television on and off AV INPUT Switch the input select i j VOL Adjust the volume 14 Adjust the volume of the main unit 15 Select audio 23 16 Mute the sound MUTE flashes on the unit s display ...

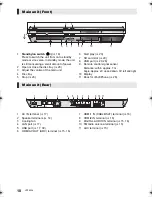
Страница 10: ...port 20 26 9 Remote control signal sensor Distance within approx 7 m Angle Approx 20e up and down 30e left and right 10 Display 11 Dock for iPod iPhone 26 1 AC IN terminal 17 2 Speaker terminals 14 3 Cooling fan 4 LAN port 17 5 USB port 17 30 6 HDMI AV OUT ARC terminal 15 16 7 HDMI1 IN CABLE SAT terminal 16 8 HDMI2 IN terminal 16 9 DIGITAL AUDIO IN terminal 15 16 10 FM radio antenna terminal 15 11...

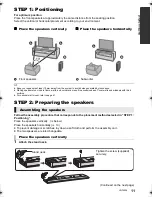
Страница 11: ...bass Cover walls and windows with thick curtains For optional wall mount refer to page 41 STEP 2 Preparing the speakers Follow the assembly procedure that corresponds to the placement method selected in STEP 1 Positioning Place the speakers vertically below Place the speakers horizontally 13 To prevent damage or scratches lay down a soft cloth and perform the assembly on it The two speakers are in...

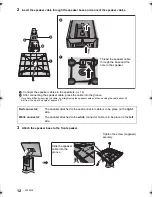
Страница 12: ...the white connector cable is to be place on the left side Thread the speaker cable through the base and the hole in the speaker 3 Connect the speaker cables to the speakers 14 4 After connecting the speaker cable press the cable into the groove If you have difficulty inserting the cable try straightening the speaker cable and then bending the cable about 20 mm from the tip at an angle of approx 45...

Страница 13: ...e is to be place on the right side White connector The speaker attached to the white connector cable is to be place on the left side Tighten the screw supplied securely Metal bracket 1 Thread the speaker cable through the hole in the speaker 2 Connect the speaker cables to the speakers 14 3 After connecting the speaker cable press the cable into the groove If you have difficulty inserting the cabl...

Страница 14: ... and read the appropriate operating instructions Do not connect the AC mains lead until all other connections are complete Connect the speaker cables to the terminals of the same colour Place the speakers using the support legs and speaker feet Align the projecting parts on the speaker with support leg Tighten the screw supplied securely Support leg Speaker foot Connecting the speaker cables Push ...

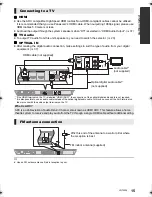
Страница 15: ... HDMI ARC the connection of the optical digital audio cable is not required 2 It is also possible to use an audio cable instead of the optical digital audio cable In this case connect the AUX terminal on the main unit with the audio output terminal on the TV Use an FM outdoor antenna if radio reception is poor Connecting to a TV What is ARC ARC is an abbreviation of Audio Return Channel also known...

Страница 16: ...vices can be used when this unit is connected to broadband Firmware can be updated 19 You can enjoy BD Live 24 You can enjoy VIERA Connect 30 You can access other devices Home Network 31 This unit supports Wi Fi DirectTM and can make a wireless connection to wireless devices without router You can use this function when enjoying Home Network feature etc Internet access is not available while conne...

Страница 17: ...ry 5 or above straight LAN cables STP when connecting to peripheral devices Inserting any cable other than a LAN cable in the LAN terminal can damage the unit STEP 4 Connecting the AC mains lead Connect only after all other connections are complete This unit consumes a small amount of AC power 48 even when turned off For the purpose of power conservation the unit can be disconnected if you will no...

Страница 18: ... WPS button on it WPS Wi Fi Protected SetupTM is a standard that facilitates settings relating to the connection and security of wireless LAN devices 1 Press WPS button or corresponding button of the wireless router until the lamp starts flashing For details refer to the operating instruction of the wireless router 2 Press OK Search for wireless network When you select Search for wireless network ...

Страница 19: ... to change the remote control code to prevent this occurrence 40 Remote Control Occasionally Panasonic may release updated firmware for this unit that may add or improve the way a feature operates These updates are available free of charge This unit is capable of checking the firmware automatically when connected to the Internet via a broadband connection When a new firmware version is available t...

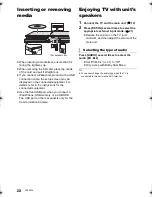
Страница 20: ...connect a iPod iPhone USB memory or a USB HDD The USB port on the rear panel is only for the Communication Camera Enjoying TV with unit s speakers 1 Connect the TV and the main unit 15 2 Press EXT IN several times to select the appropriate external input mode 21 Reduce the volume on the TV to its minimum and then adjust the volume of the main unit Press AUDIO several times to select the audio M1 M...

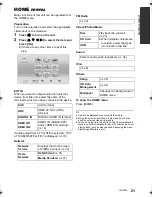
Страница 21: ... the selector is switched it may take time to play back the selected video and or audio To save on electricity the unit is turned off automatically if there is no button operation for about 30 minutes when not playing back such as when paused displaying the menu displaying still pictures etc AUX AUX terminal ARC HDMI AV OUT ARC terminal DIGITAL IN DIGITAL AUDIO IN terminal HDMI IN1 HDMI IN2 HDMI1 ...

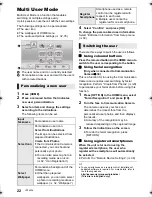
Страница 22: ...ur face and determines the closest face from the personalized user photos and then displays the results Accuracy of the recognition may be reduced depending on the captured image 3 Follow the indications on the screen To redo the facial recognition press RETURN Using registered smartphones When the unit is turned on using the registered smartphone the user who registered the smartphone will automa...

Страница 23: ...art from this position The position is cleared if the tray is opened On BD Video discs including BD J the resume play function does not work Press PAUSE Press PAUSE again or 1PLAY to restart play Search While playing press SEARCH6 or SEARCH5 Music and MP3 The speed is fixed to a single step Slow motion While paused press SEARCH6 or SEARCH5 BD Video and AVCHD SEARCH5 only The speed increases up to ...

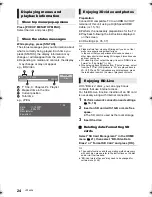
Страница 24: ...DMI Video Format or 24p Output 36 When playing back 3D photos from Photos screen select from the 3D list Still pictures in 2D are played back in 2D If 2D and 3D indications are not displayed press the red button to switch the view of playback contents With BD Live discs you can enjoy bonus contents that use Internet access For this BD Live function insertion of an SD card is necessary along with I...

Страница 25: ...not receive calls Avoid using Wi Fi mode on your iPhone while the network functions on this unit are in use wirelessly About recharging the battery iPod iPhone will not be recharged after the battery charge completion When connecting with a dedicated USB cable iPod iPhone will start recharging when this unit is on IPOD CHARGING will be shown on the main unit s display during iPod iPhone charging i...

Страница 26: ... iPod iPhone display facing out Carefully insert and remove the iPod iPhone to ensure long lasting product enjoyment 1 Press HOME 2 Select iPod and press OK 3 Select the item to play Repeat this procedure if necessary Album artwork If album artwork is not contained in the data will appear on TV Depending on the software version of your iPod iPhone the album artwork may not appear properly Some ope...

Страница 27: ...ng the TV remote control you can perform various playback operations and settings See the operating instructions of the TV for more details The buttons that you can use for this unit vary depending on the TV For details refer to the operating instructions of the TV The operation of this unit may be interrupted when you press certain buttons on the TV remote control This unit supports HDAVI Control...

Страница 28: ...V and the audio is output from the speakers of this unit When HDMI Standby Pass Through is set to Yes 36 this unit will not turn on Connecting the HDMI cable The setting for audio output is not necessary when the unit is connected to the STB with an HDMI cable Connecting the optical digital audio cable When this unit and the STB are connected by an optical digital audio cable the settings below ar...

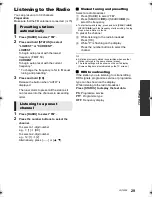
Страница 29: ...d presetting Select a radio broadcast 1 Press RADIO to select FM 2 Press SEARCH6 or SEARCH5 to select the frequency To start automatic tuning press and hold SEARCH6 SEARCH5 until the frequency starts scrolling Tuning stops when a station is found To preset the channel 3 While listening to the radio broadcast Press OK 4 While P is flashing on the display Press the number buttons to select the chann...

Страница 30: ...e possible using the Setup menu items When restricting the use of VIERA Connect 39 Network Service Lock When the audio is distorted 38 Audio Auto Gain Control When wrong time is displayed 38 Time Zone Summer Time If using slow Internet connection the video may not be displayed correctly A high speed Internet service with a speed of at least 6 Mbps is recommended Be sure to update the firmware when...

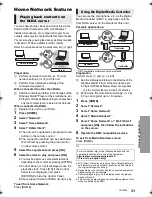
Страница 31: ...de the Control Panel About support format of DLNA client 49 To exit from Home Network Press HOME You can use the smartphone etc as the Digital Media Controller DMC to play back contents from DLNA server on the Renderer this unit Possible applications DMC compatible software should be installed Preparation Perform steps 1 and 2 left 3 Add the contents and folder to the libraries of the Windows Medi...

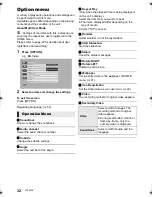
Страница 32: ...ime is being displayed on the unit s display Select the item that you want to repeat The items displayed differ depending on the type of media Select Off to cancel Random Select whether or not to play random Start Slideshow Start the slideshow Status Show the status messages Rotate RIGHT Rotate LEFT Rotate the still picture Wallpaper Set the still picture to the wallpaper of HOME menu 21 Icon Regi...

Страница 33: ...ars around contrasting sections of the picture Chroma Process The high resolution processing of HDMI chroma signals produces a high resolution picture with rich picture quality Detail Clarity The picture is sharp and detailed Super Resolution Pictures of normal image quality are corrected to sharp and detailed images when output as 1080i 1080p from HDMI AV OUT Progressive Select the method of conv...

Страница 34: ... Logic II Sound Settings 2 1ch Cinema Surround Expand the sound field forward backward upward right and leftward providing a sound with force that better matches 3D images 2ch Stereo You can play any source in stereo Sound will be output to the front speakers and the subwoofer only Re master 1 Pop and rock Re master 2 Jazz Re master 3 Classical Digital Tube Sound 1 A crisp delicate sound Digital T...

Страница 35: ... change the settings To exit the screen Press HOME Picture Mode 33 Picture Adjustment 33 Chroma Process 33 Detail Clarity 33 Super Resolution 33 3D Settings Original Keep original picture format Side by side 3D picture format comprising of left and right screens 2D to 3D Converts 2D pictures to 3D effect Normal Play back pictures with normal 3D effects Soft You can enjoy 3D pictures with a feeling...

Страница 36: ...elevision that supports Deep Colour is connected Contents Type Flag Depending on the playback content the TV will output adjusting to the optimal method when a TV that supports this function is connected HDMI Standby Pass Through Even if this unit is in standby mode a device connected with this unit can output videos and sound to the TV Moreover you can switch the HDMI input terminal by pressing E...

Страница 37: ...nd is corrected by adjusting the delay time of the audio output Speaker Refer to page 40 3D BD Video Playback Select the playback method of 3D compatible video software 3D AVCHD Output Select the output method of 3D AVCHD videos 3D Type Select the format of the connected TV Change the settings for 3D on the TV also when Side by side is selected 3D Playback Message Set to display or hide the 3D vie...

Страница 38: ...omatically to the standard volume while using the VIERA Connect Depending on contents this function effect will not work Select Off when the audio is distorted Time Zone By selecting the time zone it is possible to set the unit s time to match your location Some VIERA Connect contents require the time zone to be set Set the time zone if necessary Summer Time Select On when using Daylight Saving ti...

Страница 39: ...able On Screen Messages Choose whether to show status messages automatically VIERA Link Set to use HDAVI Control function when connected via HDMI cable to a device that supports HDAVI Control Select Off when you do not want to use HDAVI Control Power Off Link Select the desired power off link setting of this unit for VIERA Link operation 27 This works depending on the settings of the connected VIE...

Страница 40: ...em Information Press OK to show the following settings Software Licence Information about the software used by this unit is displayed Firmware Version Information Display firmware version of this unit and wireless LAN module Default Settings This returns all values in the Setup menu and the Option menu to the default settings except for some settings of network ratings remote control code language...

Страница 41: ... these sound effects modes are used with some sources If this occurs turn the sound effects modes off Speaker installation option Consult a qualified building contractor when attaching the speakers to a wall Improper attachment may result in damage to the wall and speakers and personal injury You can attach all of the speakers except subwoofer to a wall The wall or pillar on which the speakers are...

Страница 42: ...1 Thread a string to the speaker Use a string of less than 2 0 mm which is capable of supporting over 10 kg A String not supplied B Rear of the speaker 2 Thread a string from the wall to the speaker and tie tightly C Screw eye not supplied D Wall or pillar E Approx 150 mm F Approx 120 mm A 34 mm B 100 mmC 436 mm D 20 mm E 238 mmF 576 mmG 248 mm To prevent tipping falling of the speakers When mount...

Страница 43: ...normal phenomenon when using VIERA Link HDAVI Control 4 or later For details please read the operating instructions for the TV The remote control does not work properly Change the batteries in the remote control 9 The remote control and main unit are using different codes If SET is displayed on the unit s display when a button is pressed on the remote control change the code on the remote control ...

Страница 44: ... the unit s display 3 Repeatedly press 1 right on the remote control until 05 P N is displayed on the unit s display 4 Press and hold OK for at least 3 seconds The system switches from PAL to NTSC or vice versa The system used on the disc doesn t match your television jPAL discs cannot be correctly viewed on an NTSC television When 3D BD Video Playback in the Setup menu is set to Automatic images ...

Страница 45: ...ation with an optical digital audio cable 15 If there is no sound from the equipment connected to this unit s DIGITAL AUDIO IN terminal please make sure that the optical audio output of the equipment is set to PCM Disc cannot be played The disc is dirty 6 The disc is not finalized 8 Still pictures JPEG do not play back normally The images that were edited on the PC such as Progressive JPEG etc may...

Страница 46: ... connection interruptions or other problems On the Wireless Settings screen 38 the continuous lighting of at least 4 Reception indicators is the target for a stable connection If 3 or fewer indicators are lit or the connection is being interrupted change the position or angle of your wireless router and see if the connection state improves If there is no improvement connect to a wired network and ...

Страница 47: ...er Check and correct the speaker cable connections There is something unusual Check the unit using the troubleshooting guide If the service number remains displayed do the following If the service number remains displayed despite doing the above request service from the dealer Inform the dealer of the service number when requesting service IPOD OVER CURRENT ERROR The iPod iPhone is drawing too muc...

Страница 48: ...0 nm CDs 660 nm DVDs 405 nm BDs Laser power No hazardous radiation is emitted with the safety protection AMPLIFIER SECTION RMS TTL POWER OUTPUT 320 W 1 kHz 10 total harmonic distortion FRONT 60 W per ch 6 100 Hz 10 total harmonic distortion SUBWOOFER 200 W per ch 3 Audio Input AUX k 1 Digital Audio Input Optical k 1 Sampling frequency 32 kHz 44 1 kHz 48 kHz Audio Format PCM Dolby Digital DTS SPEAK...

Страница 49: ...P3 MP3 mp3 This unit supports ID3 tags but only titles artist names and album names can be displayed JPEG JPG jpg MOTION JPEG and Progressive JPEG are not supported You may not be able to play back the file if you have edited the folder structure or the file name on a PC or other device MKV MKV mkv The video file and subtitles text file are inside the same folder and the file names are the same ex...

Страница 50: ...ffect wireless performance iPhone iPod iPod classic iPod nano and iPod touch are trademarks of Apple Inc registered in the U S and other countries Display languages list Language code list ENG FRA DEU ITA ESP NLD SVE NOR DAN POR RUS English French German Italian Spanish Dutch Swedish Norwegian Danish Portuguese Russian JPN CHI KOR MAL VIE THA POL CES SLK HUN FIN Japanese Chinese Korean Malay Vietn...

Страница 51: ...g jp panasonic com Source code is also freely available to you and any other member of the public via our website below http panasonic net avc oss bdplayer AWBPP12 html For the software categorized as 5 includes as follows 1 This product includes software developed by the OpenSSL Project for use in the OpenSSL Toolkit http www openssl org 2 This product includes software developed by the Universit...

Страница 52: ...For further support on your product please visit our website www panasonic co uk Direct Sales at Panasonic UK Order accessory and consumable items for your product with ease and confidence by phoning our Customer Communications Centre Monday Friday 9 00 am 5 00 pm Excluding public holidays Or go on line through our Internet Accessory ordering application at www pas europe com Most major credit and...

Отзывы: