background image

RQT6693

Cassette deck operations

10

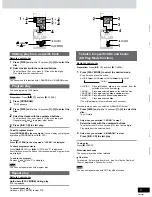
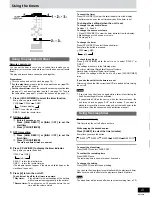
You can use either deck 1 or deck 2 for tape playback.

Use normal position tapes.
High position and metal position tapes can be played, but the unit will
not be able to do full justice to the characteristics of these tapes.

1

Press [

:

, TAPE].

The unit comes on.
If a cassette was loaded, play starts automatically (One touch play).

2

Press [

c

,


DECK 1] or [

c

,


DECK 2] and insert the

cassette.

Insert with the side to be played
facing towards you and the
exposed tape facing down.
Close the holder by hand.

3

Press [

:

, TAPE] to start playback.

To play on the other side of the tape, turn the tape over and press
[

:

, TAPE].

To stop tape playback
Press [

L

, STOP].

To fast-forward or rewind
Press [

g

/REW/

3

] (rewind) or [

f

/FF/

4

] (fast-forward).

To select between loaded decks
Press [DECK 1/2] (remote control: [PLAY MODE]).

Notes

Tape playback is momentarily interrupted if you open the other deck.

Tapes exceeding 100 minutes are thin and can break or get caught
in the mechanism.

Tape slack can get caught up in the mechanism and should be
taken up before the tape is played.

Endless tapes can get caught up in the deck’s moving parts if used
incorrectly.

Cassettes

Recording

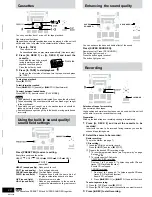
You can enhance the bass and treble effect of the sound.

Press [SUPER SOUND EQ].

Remote control: Press [S.SOUND EQ].
The button light comes on.
Press the button again to cancel.
The button light goes out.

Enhancing the sound quality

SLEEP

SLEEP

CLOCK

CLOCK
 TIMER

 TIMER

PL

PLAY

REC

REC

AUTO OFF

UTO OFF

DISC

DISC

PROGRAM

PROGRAM

S.SOUND EQ

S.SOUND EQ

PRESET EQ

PRESET EQ

MUTING

MUTING REW

REW

CLEAR

CLEAR

CD DISP

CD DISP DIMMER

DIMMER PLAY MODE

PLAY MODE

FF

FF

1

2

3

4

5

6

7

8

9

0

10

10

CD

CD

AUX

AUX

TUNER

TUNER

BAND

BAND

TAPE

TAPE

VOL

VOL

VOL

VOL

SUPER
SOUND EQ

S.SOUND EQ

SLEEP

SLEEP

CLOCK

CLOCK
 TIMER

 TIMER

PL

PLAY

REC

REC

AUTO OFF

UTO OFF

DISC

DISC

PROGRAM

PROGRAM

S.SOUND EQ

S.SOUND EQ

PRESET EQ

PRESET EQ

MUTING

MUTING REW

REW

CLEAR

CLEAR

CD DISP

CD DISP DIMMER

DIMMER

PLAY MODE

PLAY MODE

FF

FF

1

2

3

4

5

6

7

8

9

0

10

10

CD

CD

AUX

AUX

TUNER

TUNER

BAND

BAND

TAPE

TAPE

VOL

VOL

VOL

VOL

PLAY MODE

Front side

SLEEP

SLEEP

CLOCK

CLOCK
 TIMER

 TIMER

PL

PLAY

REC

REC

AUTO OFF

UTO OFF

DISC

DISC

PROGRAM

PROGRAM

S.SOUND EQ

S.SOUND EQ

PRESET EQ

PRESET EQ

MUTING

MUTING REW

REW

CLEAR

CLEAR

CD DISP

CD DISP DIMMER

DIMMER

PLAY MODE

PLAY MODE

FF

FF

1

2

3

4

5

6

7

8

9

0

10

10

CD

CD

AUX

AUX

TUNER

TUNER

BAND

BAND

TAPE

TAPE

VOL

VOL

VOL

VOL

SLEEP

SLEEP

CLOCK

CLOCK
 TIMER

 TIMER

PL

PLAY

REC

REC

AUTO OFF

UTO OFF

DISC

DISC

PROGRAM

PROGRAM

S.SOUND EQ

S.SOUND EQ

PRESET EQ

PRESET EQ

MUTING

MUTING REW

REW

CLEAR

CLEAR

CD DISP

CD DISP DIMMER

DIMMER PLAY MODE

PLAY MODE

FF

FF

1

2

3

4

5

6

7

8

9

0

10

10

CD

CD

AUX

AUX

TUNER

TUNER

BAND

BAND

TAPE

TAPE

VOL

VOL

VOL

VOL

Selection of tapes for recording
Use normal position tapes.
High position and metal position tapes can be used, but this unit will
not be able to record or erase them correctly.

Preparation:
Wind up the leader tape so recording can begin immediately.

1

Press [

c

, DECK 2] and insert the cassette to be

recorded.

Insert with the side to be recorded facing towards you and the
exposed tape facing down.

2

Select the source to be recorded.

Radio recording:
Tune in the station. (

A

 page 7)

CD recording:

1

Insert the CD(s) you want to record.
Press [

:

/

J

, CD] and then [

L

, STOP].

2

Prepare the desired CD recording mode.

To record programmed tracks (

A

  “Program play” on page

9: steps 1–3).

To record specific CDs/tracks
1-DISC/ALL-DISC recording
Do steps 1 to 2 on page 9: “To listen to specific CDs and
tracks (CD Play Mode function)”.
Ensure CD is stopped.

1-SONG recording
1. Do steps 1 to 2 on page 9: “To listen to specific CDs and

tracks (CD Play Mode function)”.
Ensure CD is stopped.

2. Press [

g

/REW/

3

] or [

f

/FF/

4

] to select the track.

Tape-to-tape recording:

1

Press [

:

, TAPE] and then [

L

, STOP].

2

Press [

c

, DECK 1] and insert the cassette you want to record.

3

Press [

REC] to start recording.

Using the built-in sound quality/
sound field settings

Press [PRESET EQ] to select a setting.

Every time you press the button:

HEAVY

SOFT

CLEAR

EQ-OFF

(cancelled)

DISCO

LIVE

HALL

HEAVY (sound quality) : Adds punch to rock
SOFT (sound quality) : For background music
CLEAR (sound quality): Clarifies higher sounds
DISCO (sound field)

: Produces sound with the same kind of

lengthy reverberations heard at a disco

LIVE (sound field)

: Makes vocals more alive

HALL (sound field)

: Adds an expansiveness to the sound to

produce the atmosphere of a great concert
hall.

Note

You cannot use PRESET EQ and SUPER SOUND EQ together.

Содержание SC-AK310

Страница 1: ...operating or adjusting this product please read these instructions completely Please keep this manual for future reference As an ENERGY STAR Partner Panasonic has determined that this product meets the ENERGY STAR guidelines for energy efficiency P PC The illustrations show SC AK310 For U S A only ...

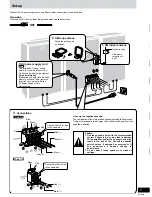
Страница 2: ...time 12 Using the timers 13 Troubleshooting guide 14 Maintenance 14 Specifications 15 Product Service 15 Limited Warranty ONLY FOR U S A Back cover Customer Services Directory ONLY FOR U S A Back cover Table of contents WARNING TO REDUCE THE RISK OF FIRE ELECTRIC SHOCK OR PRODUCT DAMAGE DO NOT EXPOSE THIS APPARATUS TO RAIN MOISTURE DRIPPING OR SPLASHING AND THAT NO OBJECTS FILLED WITH LIQUIDS SUCH...

Страница 3: ...rly at plugs convenience receptacles and the point where they exit from the apparatus 11 Only use attachments accessories specified by the manufacturer 12 Use only with the cart stand tripod bracket or table specified by the manufacturer or sold with the apparatus When a cart is used use caution when moving the cart apparatus combination to avoid injury from tip over 13 Unplug this apparatus durin...

Страница 4: ...g to be used for a long period of time Store in a cool dark place Replace if the unit does not respond to the remote control even when held close to the front panel Use R6 AA UM 3 Please check and identify the supplied accessories Use numbers indicated in parentheses when asking for replacement parts Only for U S A To order accessories contact 1 800 332 5368 or web site http www panasonic com AC p...

Страница 5: ...e vinyl tip of the antenna wires and speaker cords 3 Connections Use only the supplied speakers The combination of the main unit and speakers provide the best sound Using other speakers can damage the unit and sound quality will be negatively affected SC AK310 SC AK110 Caution Use the speakers only with the recommended system Failure to do so may lead to damage to the amplifier and or the speakers...

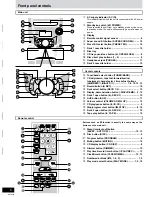
Страница 6: ...P DEMO 8 12 Deck 1 open button c DECK 1 10 AUX button AUX 11 Volume control VOLUME DOWN UP 12 CD play pause button J CD 8 Stop program clear button L STOP 8 10 Deck 2 open button c DECK 2 10 Tape play button TAPE 10 Remote control Buttons such as 2 function in exactly the same way as the buttons on the main unit Sleep timer auto off button SLEEP AUTO OFF 12 13 Disc button DISC 9 Program button PRO...

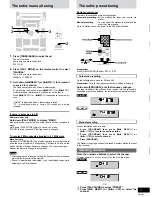
Страница 7: ...stops when it finds a clear station To stop during the process press g REW 3 or f FF 4 Under excessive interference a station may not be found Press g REW 3 or f FF 4 repeatedly to tune step by step TUNED is displayed when a radio station is tuned ST is displayed when a stereo FM broadcast is being received If noise is excessive in FM Remote control only Hold down PLAY MODE to display MONO Monaura...

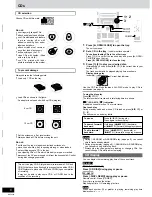
Страница 8: ...e coming off or with adhesive exuding from under labels and stickers attach scratch proof covers or any other kind of accessory write anything on the CD clean CDs with liquids Wipe with a soft dry cloth use CDs printed with label printers available on the market To prevent damage Always observe the following points Load only 1 CD on the tray Load CDs as shown in the figure An adaptor is not needed...

Страница 9: ...EAR CLEAR CD DISP CD DISP DIMMER DIMMER PLAY MODE PLAY MODE FF FF 1 2 3 4 5 6 7 8 9 0 10 10 CD CD AUX AUX TUNER TUNER BAND BAND TAPE TAPE VOL VOL VOL VOL To listen to specific CDs and tracks CD Play Mode function Remote control only Preparation Press J CD and then L CLEAR 1 Press PLAY MODE to select the desired mode Every time you press the button ALL DISC 1 RANDOM 1 SONG 1 DISC A RANDOM ALL DISC ...

Страница 10: ... AUTO OFF UTO OFF DISC DISC PROGRAM PROGRAM S SOUND EQ S SOUND EQ PRESET EQ PRESET EQ MUTING MUTING REW REW CLEAR CLEAR CD DISP CD DISP DIMMER DIMMER PLAY MODE PLAY MODE FF FF 1 2 3 4 5 6 7 8 9 0 10 10 CD CD AUX AUX TUNER TUNER BAND BAND TAPE TAPE VOL VOL VOL VOL SLEEP SLEEP CLOCK CLOCK TIMER TIMER PL PLAY REC REC AUTO OFF UTO OFF DISC DISC PROGRAM PROGRAM S SOUND EQ S SOUND EQ PRESET EQ PRESET EQ...

Страница 11: ...across a window or other convenient location Leave the loop antenna connected Note Disconnect the outdoor antenna when the unit is not in use Do not use the outdoor antenna during an electrical storm Optional antenna connections AM outdoor antenna not included AM loop antenna included External unit connections An analog player with a built in phono equalizer can be connected For details refer to t...

Страница 12: ...ct tuner or AUX as the source AUTO OFF goes out It comes on again when you select CD or tape To cancel Hold down AUTO OFF again This is a 12 hour clock 1 Switch on the power 2 Press CLOCK TIMER to select CLOCK Every time you press the button 3 within 7 seconds or so Press g REW 3 or f 4 FF to set the time 4 Press CLOCK TIMER to finish setting the time The display will return to whatever was displa...

Страница 13: ...ion with the play record timer Make sure the unit is off before the play record timer s start time Note The sleep timer will be turned off when you start recording from a CD Using the play record timer Remote control only You can set the timer to come on at a certain time to wake you up play timer or to record a radio station or from the aux source record timer The play and record timers cannot be...

Страница 14: ...quipment to fully format the disc before recording There is a problem with the disc mechanism A power failure may have occurred The tray will open automatically Remove the disc from the tray and after ensuring there is no disc in the tray close it The unit will make the disc changing noises for a few moments and then it should operate normally Common Problems No sound Sound stops Sound is unfixed ...

Страница 15: ...zer 3 SB AK310 only The labels HIGH and LOW on the rear of the speakers refer to High frequency and Low frequency AMPLIFIER SECTION SC AK110 Power output 10 Total harmonic distortion 60Hz 16kHz both channels driven 60W per channel 6 Ω Power output 10 Total harmonic distortion 1kHz both channels driven 80W per channel 6 Ω Input sensitivity AUX 250mV Input Impedance AUX 13 3 kΩ Specifications AMPLIF...

Страница 16: ...lightning damage modification or commercial use such as in a hotel office restaurant or other business rental use of the product service by anyone other than a Factory Servicenter or other Authorized Servicer or damage that is attributable to acts of God THERE ARE NO EXPRESS WARRANTIES EXCEPT AS LISTED UNDER LIMITED WARRANTY COVERAGE THE WARRANTOR IS NOT LIABLE FOR INCIDENTAL OR CONSEQUENTIAL DAMA...

Отзывы: