background image

16

O

the

r pl

a

yb

ac

k

 fu

nc

tio

n

s

RQ

TX02

75

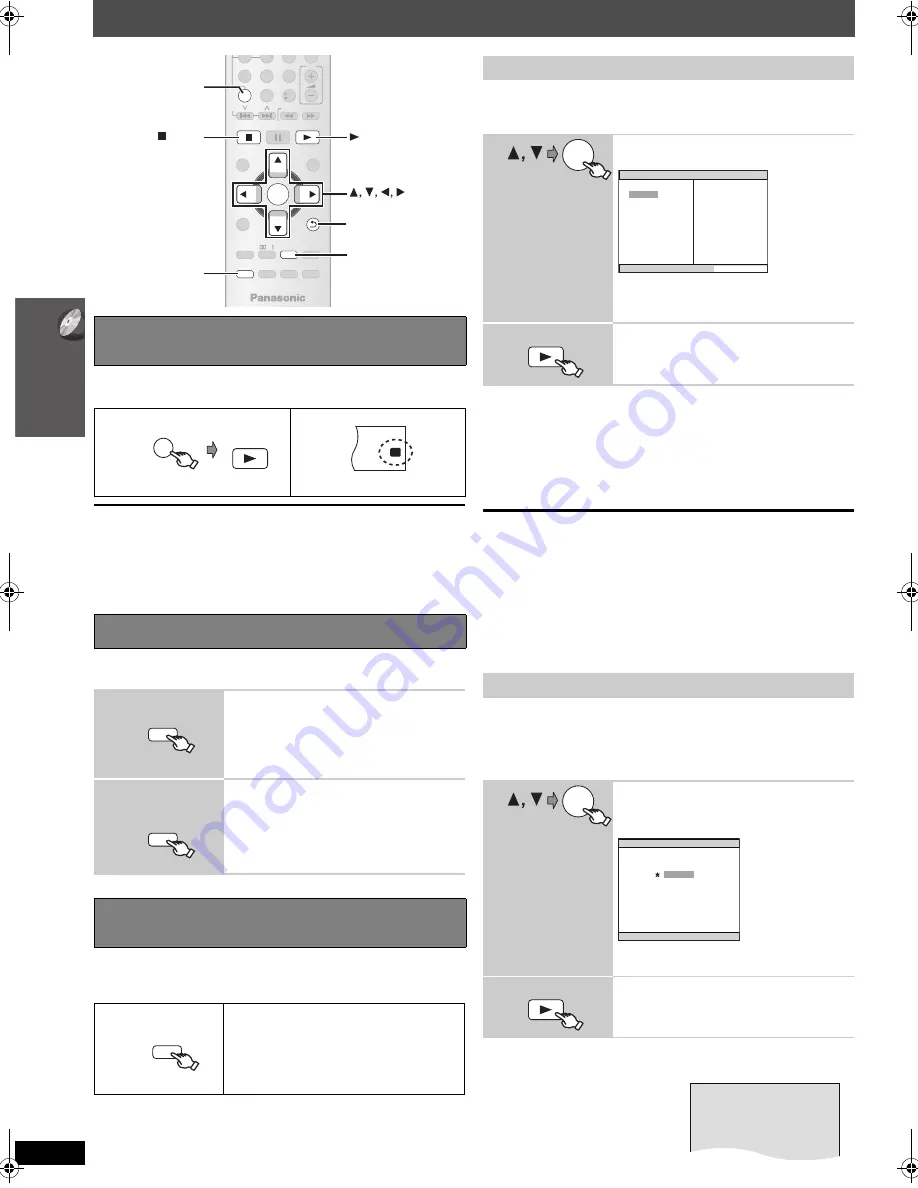
Other playback functions

This feature allows you to play all loaded CDs sequentially. Select an 
applicable disc before playing (

 15, Selecting a disc).

If all loaded discs are DVDs, CD Mode does not work.

Video CD playback control is disabled.

You cannot turn CD Mode on or off during program or random mode.

If you want to play a DVD, press and hold [–CD MODE] again while 
stopped to cancel CD Mode. (CD Mode is also canceled when you 
switch the unit to standby, select another source, or when the disc tray is 
opened.)

This works only when the elapsed play time can be displayed. It also 
works with all JPEG content.

Items shown differ depending on the type of disc and playback mode.

To enjoy program or random play with:

– 1 disc : ensure CD Mode (

 above) is off

– all discs: ensure CD Mode is on

[DVD-VR]

 Select “DATA” in “DVD-VR/DATA” (

 22, “OTHERS” menu) to 

play WMA, MP3 or JPEG contents.

[DVD-V]

 Some items cannot be played even if you have programmed 

them.

All-Disc program (when CD Mode is on)

[VCD]


[CD]


You can program all the items on all the discs.

1

Press [

3

,

4

], and then press [OK] to select the disc.

2

Press [

3

,

4

], and then press [OK] to select the track.

3

Repeat step 

1

 and 

2

 to program other items.

To return to the previous menu, press [-RETURN].

4

Press [

1

PLAY].

To select all the items

Press [

3

,

4

] to select “ALL” and press [OK].

To clear the selected program

1

Press [

1

] and then press [

3

,

4

] to select the program.

2

Press [CANCEL].

To clear the whole program

Press [

1

] several times to select “CLEAR ALL”, and then press [OK]. 

The whole program is also cleared when the disc tray is opened, the unit 
is turned off or another source is selected.

All-Disc random (when CD Mode is on)

[VCD]


[CD]


You can playback all the items on all the discs in random order.

Press [

1

PLAY].

e.g. 

[CD]

Playing CDs sequentially (CD Mode)

[VCD] [CD] [WMA] [MP3]

While stopped

Repeat play

1

During play

Show the repeat mode.

2

While the repeat 
mode is displayed

Select an item to be repeated.

e.g. 

[DVD-V]

`

TITLE 

---. 

`

CHAP. 

---. 

`

OFF

^-------------------------------------------------}

To cancel, select “OFF”.

Program and Random play

[DVD-V] [VCD] [CD] [WMA] [MP3] [JPEG]

While stopped

Select the play mode.

Program and random playback screens 
appear sequentially.

Program 

------------------------------------------) 

Random

^--- 

Exit program and random screens

 (}

— 

S

LEEP


REPEAT

-FL DI

S

PLAY

-PLAY MODE

VOL

OK

MUTE

S

UBWOOFER

—  

CH 

S

ELECT

FUNCTION

S

CANCEL

S

OUND

LEVEL

TOP MENU

MENU

DIRECT

NAVIGATOR

S

TART

PLAY
LI

S

T

S

LOW/

S

EARCH

PLAY

PAU

S

E

S

TOP

S

KIP

-

CD

MODE

4

5

6

7

8

9

0

10

— 

W.

S

RD

PLAY

OK

CANCEL

S

TOP

DI

S

C

−CD MODE

-

RETURN


S

ETUP

-

RETURN

-

PLAY MODE

REPEAT

PL

-

CD

MODE

DI

S

C

PLAY

(press and hold)

W1 W2

CD

P.MODE

— 

REPEAT

-

PLAY MODE

(press and hold)

— 

REPEAT

-

PLAY MODE


REPEAT

-

PLAY MODE

Program play (up to 30 items)

1-Disc program

[DVD-V]


[VCD]


[CD]


[WMA]


[MP3]


[JPEG]

 You can program all the items on a 

disc in the selected tray.

1

Select an item.

e.g. 

[DVD-V]

Repeat this step to program other items.

To return to the previous menu, press 
[-RETURN].

2

Start play.

Random play

1-Disc random

[VCD]


[CD]


You can playback all the items on a disc in the selected tray in 

random order.

[DVD-V]


[WMA]


[MP3]


[JPEG]


You can playback selected item(s) on a disc in 

the selected tray in random order.

1

(Only when the disc has groups or multiple titles.)

Select a group or title.

e.g. 

[DVD-V]

¢

” represents selected. To deselect, press 

[OK] again.

2

Start play.

OK

DVD-V  PROGRAM

SELECT TITLE

TITLE CHAP.

TITLE  1

TITLE  2
TITLE  3
TITLE  4

1
2
3
4
5
6
7
8
9

10

S TA R T: P L AY

CLEAR ALL

PLAY

OK

DVD-V  RANDOM
S E L E C T    T I T L E

TITLE  1

TITLE  2

TITLE  3

P R E S S   P L AY  T O   S T A R T

PLAY

ALL DI

S

C RANDOM

PRE

SS

 PLAY TO 

S

TART

RQTX0275-P_eng.book  Page 16  Tuesday, March 17, 2009  9:34 AM

Содержание SAPT665 - DVD HOME THEATER SOUND SYSTEM

Страница 1: ... America One Panasonic Way Secaucus New Jersey 07094 http www panasonic com C Panasonic Corporation 2009 Printed in Malaysia Region number The player plays DVD Video marked with labels containing the region number 1 or ALL Example 1 ALL 2 4 1 As an ENERGY STAR Partner Panasonic has determined that this product meets the ENERGY STAR guidelines for energy efficiency Dynamic sound with big diameter s...

Страница 2: ... of electric shock to persons CAUTION CAUTION TO REDUCE THE RISK OF ELECTRIC SHOCK DO NOT REMOVE SCREWS NO USER SERVICEABLE PARTS INSIDE REFER SERVICING TO QUALIFIED SERVICE PERSONNEL The exclamation point within an equilateral triangle is intended to alert the user to the presence of important operating and maintenance servicing instructions in the literature accompanying the appliance RISK OF EL...

Страница 3: ...Playing data discs 17 Playing RAM and DVD R RW DVD VR discs 17 Using on screen menus 18 Changing the player settings 20 Selecting the delay time of the speakers 23 Using the VIERA LinkTM HDAVI ControlTM 24 One touch play 24 Auto input switching 24 Power off link 24 Speaker control 25 VIERA Link Control only with TV s remote control for HDAVI Control 2 or later 25 Using sound effects 26 Setting the...

Страница 4: ...by the manufacturer 12 Use only with the cart stand tripod bracket or table specified by the manufacturer or sold with the apparatus When a cart is used use caution when moving the cart apparatus combination to avoid injury from tip over 13 Unplug this apparatus during lightning storms or when unused for long periods of time 14 Refer all servicing to qualified service personnel Servicing is requir...

Страница 5: ...MP3 MPEG Audio Layer 3 An audio compression method that compresses audio to approximately one tenth of its size without any considerable loss of audio quality Playback control PBC If a Video CD has playback control you can select scenes and information with menus Progressive Interlaced NTSC the video signal standard has 480 interlaced i scan lines whereas progressive scanning uses twice the number...

Страница 6: ...nt netted area of the speakers Hold by the sides e g Center speaker step 1 Positioning 120 30 30 Front speaker left Front speaker right Center speaker Main unit Subwoofer right Surround speaker left Surround speaker Center speaker Put on a rack or shelf Vibration caused by the speaker can disrupt the picture if it is placed directly on the TV Main unit To allow for proper ventilation and to mainta...

Страница 7: ...ible you can operate your TV synchronizing with home theater operations or vice versa 24 Using the VIERA LinkTM HDAVI ControlTM Make the audio connection above when you use VIERA Link HDAVI Control function All Panasonic televisions that have 480p input connectors are compatible Consult the manufacturer if you have another brand of TV COMPONENT VIDEO Connect to terminals of the same color This con...

Страница 8: ...king this connection make settings to suit the type of audio from your digital equipment 28 2 Speaker connections 3 Radio antenna connections OPTICAL OUT Optical digital audio cable Do not bend sharply when connecting OPTICAL IN CENTER SUBWOOFER FRONT 6 5 2 1 4 3 L R L R SURROUND Connecting the speakers to the main unit Connect to terminals of the same color Speaker Terminal connector color 1 FRON...

Страница 9: ...ectly in front of the unit Using an FM AM outdoor antenna optional FM ANT 75 AM ANT EXT LOOP LOOP ANT GND Main unit Leave the AM loop antenna connected AM outdoor antenna Using a vinyl wire not included Run a piece of vinyl wire horizontally across a window or other convenient location 5 0 m to 12 m 16 ft to 39 ft FM outdoor antenna Using a TV antenna not included The antenna should be installed b...

Страница 10: ...7 8 9 0 10 ONE TOUCH PLAY RADIO EXT IN INPUT VOL iPod TV DVD W SRD PL DISC RETURN SETUP OK 1 Turn on the unit 2 Select DVD CD 3 Show the setup menu 4 Select OTHERS 5 Select QUICK SETUP 6 Select SET 7 Select YES 8 Follow the messages and make the settings MENU LANGUAGE TV TYPE TV ASPECT To return to the previous screen press RETURN 9 Finish QUICK SETUP 10 Exit DVD RETURN SETUP press and hold SET MA...

Страница 11: ...en FM AUTO or AM AUTO is displayed e g Main unit Press and hold MEMORY The tuner tunes to the lowest frequency and starts to preset all the stations it can receive into the channels in ascending order SLEEP REPEAT FL DISPLAY PLAY MODE VOL MUTE SUBWOOFER CHSELECT FUNCTIONS CANCEL SOUND LEVEL TOP MENU MENU DIRECT NAVIGATOR START PLAY LIST RETURN SETUP SLOW SEARCH PLAY PAUSE STOP SKIP CD MODE 1 2 3 4...

Страница 12: ...7 Select or confirm menu items Frame by frame 15 8 Show a disc menu or play list 15 17 9 Show on screen menu 18 Turn Dolby Pro Logic II on off 26 Cancel 16 Select sound mode Turn Whisper Surround on off 26 TV operations Aim the remote control at the Panasonic TV and press the button Í TV Turn the TV on off INPUT Change the TV s video input mode r s Adjust the TV volume This may not work properly w...

Страница 13: ...mode or vice versa In standby mode the unit is still consuming a small amount of power 14 2 5 DISC SELECTOR Select a disc directly 14 3 Disc exchange Open the disc tray to exchange the disc 14 4 Open Close the disc tray 14 5 Turn Subwoofer Boost on off 27 6 Select the source DVD CD FM AM AUX D IN IPOD 7 Skip or slow search play Select the radio stations 11 14 8 Stop playing Select the tuning mode ...

Страница 14: ...start slow motion play during pause Press 1 Play to start normal play Open all the disc trays To select a desired tray below Selecting the desired tray Press OPEN CLOSE again to close all the disc trays Load the disc Load double sided discs so the label for the side you want to play is facing up Press EXCHANGE to load discs one by one For DVD RAM remove the disc from its cartridge before use Do no...

Страница 15: ... iPod TV DVD W SRD PL 1 SLOW SEARCH SKIP STOP PAUSE TOP MENU DIRECT NAVIGATOR OK FL DISPLAY RETURN MENU PLAY LIST DISC DISC 2 ONETOUCH PLAY 5 Numbered buttons ONE TOUCH PLAY STOP PAUSE SKIP SLOW SEARCH OK Select Confirm OK Selecting a disc Disc information screen is displayed To exit the screen press DISC e g DVD V Enter number DVD VR DVD V VCD CD e g To select 12 S10 1 2 VCD with playback control...

Страница 16: ... is selected All Disc random when CD Mode is on VCD CD You can playback all the items on all the discs in random order Press 1 PLAY e g CD Playing CDs sequentially CD Mode VCD CD WMA MP3 While stopped Repeat play 1 During play Show the repeat mode 2 While the repeat mode is displayed Select an item to be repeated e g DVD V TITLE CHAP OFF To cancel select OFF Program and Random play DVD V VCD CD WM...

Страница 17: ... 6 7 8 9 0 10 ONE TOUCH PLAY RADIO EXT IN INPUT VOL iPod TV DVD W SRD PL DISC STOP TOP MENU DIRECT NAVIGATOR MENU PLAY LIST OK SKIP RETURN RETURN SETUP DATA DISC ROOT OK Perfume My favorite1 My favorite2 My favorite3 Underwater Fantasy planet City of cascade Infinite unit Lady Starfish Metal Glue Life on Jupiter Starpersons1 Starpersons2 Group Folder Content File WMA MP3 JPEG OK 1 While picture is...

Страница 18: ...D VR VCD To select L R L R or L R DVD V Karaoke disc To select ON or OFF for vocals To select OFF V1 V2 or V1 V2 for vocal selections Actual operations depend on the disc Read the disc s instructions for details Signal type data LPCM PPCM D DTS MP3 MPEG Signal type kHz Sampling frequency bit ch Number of channels 3 2 1ch 0 No surround 1 Mono surround 2 Stereo surround left right 1 Low frequency ef...

Страница 19: ...he dialogue recorded in the center channel OFF ON Dolby PLII OFF MOVIE MUSIC 26 Using Dolby Pro Logic II JPG DATE PLII HDMI STATUS To show HDMI information below Confirming HDMI information HD ENHANCER This works when the HDMI connection is being used with VIDEO PRIORITY 22 HDMI menu is set to ON To sharpen the 720p 1080i and 1080p picture quality OFF 1 weakest to 3 strongest VIDEO FORMAT This wor...

Страница 20: ...SETUP RETURN Menu OK SET RETURN DISC EXIT SETUP SETTING STATE AUDIO SUBTITLE MENUS RATINGS PASSWORD ENGLISH AUTO ENGLISH 8 NO LIMIT Display the current setting of the items below Item Setting OK OK RETURN SETUP press and hold QUICK SETUP enables successive settings of the items in the shaded area AUDIO Choose the audio language ENGLISH FRENCH SPANISH ORIGINAL 1 OTHER 2 SUBTITLE Choose the subtitle...

Страница 21: ... will automatically be set in sync STILL MODE Specify the type of picture shown when paused AUTO FIELD 4 The picture is not blurred but picture quality is lower FRAME 4 Overall quality is high but the picture may appear blurred BLACK LEVEL Change the black level of the picture LIGHTER DARKER VIDEO OUT I P Select PROGRESSIVE only if connecting to a progressive output compatible TV INTERLACE PROGRES...

Страница 22: ... not from the HDMI AV OUT terminal The audio is output using the settings of the main unit RGB RANGE This works only when COLOR SPACE in Menu 4 HDMI is set to RGB 19 STANDARD ENHANCED When the black and white images are not distinct VIERA Link ON The VIERA Link HDAVI Control function is available 24 OFF JPEG TIME Set the speed of the slideshow Factory preset 3 SEC 1 SEC to 15 SEC in 1 unit steps 1...

Страница 23: ... Bengali Bangla 6678 Bhutani 6890 Bihari 6672 Breton 6682 Bulgarian 6671 Burmese 7789 Byelorussian 6669 Cambodian 7577 Catalan 6765 Chinese 9072 Corsican 6779 Croatian 7282 Czech 6783 Danish 6865 Dutch 7876 English 6978 Esperanto 6979 Estonian 6984 Faroese 7079 Fiji 7074 Finnish 7073 French 7082 Frisian 7089 Galician 7176 Georgian 7565 German 6869 Greek 6976 Greenlandic 7576 Guarani 7178 Gujarati ...

Страница 24: ...for TV ASPECT 1 21 VIDEO menu and LANGUAGE 2 22 DISPLAY menu will automatically follow to the settings of the TV This may not work if the corresponding setting you have made for your TV is not available on this unit 1 When using VIERA Link HDAVI Control with HDAVI Control 3 compatible TV 2 When using VIERA Link HDAVI Control with HDAVI Control 2 or later compatible TV Auto lip sync Available when ...

Страница 25: ...te control refer to the below illustration for operation buttons 1 Select this unit s operation menu by using the TV menu settings For details refer to the operating instructions of your TV The START menu will be shown e g DVD V The START menu can also be shown by using a button on the TV s remote control e g SUB MENU When DVD CD is selected as the source this works only during stop mode This does...

Страница 26: ...MUSIC OFF Dolby Pro Logic II is an advanced decoder that derives 5 channel surround from stereo sound sources whether or not it has been specifically Dolby Surround encoded PLII lights when there is effect This does not work when audio is output from HDMI AV OUT terminal You can adjust the volume of the surround speakers to get the best surround effect 27 Adjusting the speaker level You can enhanc...

Страница 27: ...usly stored is overwritten when another station is stored in the same channel preset FM frequency step Main unit only The step is factory set to 0 2 MHz but you can change it to receive broadcasts allocated in 0 1 MHz steps 1 Press SELECTOR to select FM 2 Press and hold SELECTOR After a few seconds the display changes to show the current minimum frequency Continue to hold the button down The minim...

Страница 28: ...isconnecting the iPod turn the main unit off or reduce the volume of the main unit to its minimum Connect the iPod not included firmly Recharging starts when the iPod is inserted Hold the dock when connecting disconnecting the iPod Attach the dock adapter which should be supplied with your iPod to the dock for the stable use of the iPod If you need an adapter consult your iPod dealer To operate th...

Страница 29: ...B 160GB iPod nano 2nd generation aluminum 2GB 4GB 8GB iPod 5th generation video 60GB 80GB iPod 5th generation video 30GB iPod nano 1st generation 1GB 2GB 4GB iPod 4th generation color display 40GB 60GB iPod 4th generation color display 20GB 30GB iPod 4th generation 40GB iPod 4th generation 20GB iPod mini 4GB 6GB Compatibility depends on the software version of your iPod To use the iPod touch featu...

Страница 30: ...scs and Photo CD DVD RAM that cannot be removed from their cartridge 2 6 GB and 5 2 GB DVD RAM and Chaoji VCD available on the market including CVD DVCD and SVCD that do not conform to IEC62107 Disc handling precautions Do not attach labels or stickers to discs This may cause disc warping rendering it unusable Do not write on the label side with a ball point pen or other writing instrument Do not ...

Страница 31: ...20 kbps JPEG DVD RAM DVD R RW CD R RW JPG jpg JPEG jpeg JPEG files taken on a digital camera that conform to DCF Standard Design rule for Camera File system Version 1 0 are displayed Files that have been altered edited or saved with computer picture editing software may not be displayed This unit cannot display moving pictures MOTION JPEG and other such formats still pictures other than JPEG e g T...

Страница 32: ...and hold OK and the corresponding numbered button 1 or 2 for at least 2 seconds 12 LOADING The iPod is not ready Wait for this display to disappear Disconnect the iPod and then reconnect it firmly 28 General operation No response when any buttons are pressed This unit cannot play discs other than the ones listed in these operating instructions The unit may not be operating properly due to lightnin...

Страница 33: ...t AUDIO OUT in the HDMI menu is set to ON If the input source is bitstream set the sound setting to PCM on the external equipment 22 No sound from the TV Confirm the audio connection Press RADIO EXT IN to select the corresponding source 7 8 28 No surround sound Press PLII to turn on Dolby Pro Logic II or turn on Surround Enhancer 26 Picture The picture on the TV is not displayed correctly or disap...

Страница 34: ...or disc THIS DISC MAY NOT BE PLAYED IN YOUR REGION Only DVD Video discs that include or have the same region number as the one on the rear panel of this unit can be played Cover page U S Patent Nos 6 836 549 6 381 747 7 050 698 6 516 132 and 5 583 936 This product incorporates copyright protection technology that is protected by U S patents and other intellectual property rights Use of this copyri...

Страница 35: ... Vp p 75 PR output level 0 7 Vp p 75 Terminal Pin jack Y green PB blue PR red 1 system HDMI AV output Terminal 19 pin type A connector HDAVI Control This unit supports HDAVI Control 3 function Front speakers SB HF665 Type 2 way 2 speaker system Bass reflex Speaker unit s Impedance 3 Tweeter 6 cm 23 8z Cone type Woofer 16 cm 61 2z Cone type Input power IEC 130 W Max Output sound pressure 83 dB W 1 ...

Страница 36: ...S PRODUCT OR ARISING OUT OF ANY BREACH OF THIS WARRANTY As examples this excludes damages for lost time travel to and from the servicer loss of media or images data or other memory content The items listed are not exclusive but are for illustration only ALL EXPRESS AND IMPLIED WARRANTIES INCLUDING THE WARRANTY OF MERCHANTABILITY ARE LIMITED TO THE PERIOD OF THE LIMITED WARRANTY Some states do not ...

Страница 37: ...New Jersey 07094 http www panasonic com C Panasonic Corporation 2009 Impreso en Malaisia Número de región El reproductor reproduce DVD Vídeo etiquetado con el número de región 1 o ALL Ejemplo 1 ALL 2 4 1 Como socio de ENERGY STAR Panasonic ha determinado que este producto satisface las directrices de ENERGY STAR sobre el rendimiento energético Sonido dinámico con altavoz de diámetro grande 6 Conec...

Страница 38: ...empre listo para ser utilizado Para desconectar completamente este aparato de la red de CA desconecte el enchufe del cable de alimentación del receptáculo de CA Nota FCC Este equipo ha sido probado y se ha comprobado que satisface los límites de los dispositivos digitales de Clase B de acuerdo con la Parte 15 de las Reglas FCC Estos límites han sido diseñados para proporcionar una protección razon...

Страница 39: ...subwoofer 27 Uso de Subwoofer Boost 27 Ajuste del nivel de los altavoces 27 Gozar de la radio FM AM 27 Sintonización manual 27 Control de otro equipo 28 Reproducción del audio del televisor 28 Uso del audio digital 28 Uso del iPod 28 Opciones de instalación de los altavoces 29 Discos que pueden reproducirse 30 Mantenimiento 31 Guía para solucionar problemas 32 Especificaciones 35 Garantía limitada...

Страница 40: ...ficados en estas instrucciones 12 Use sólo la base tripié soporte o mesa especificada o aquellas vendidas con el aparato Cuando necesite moverlo tenga cuidado de no provocar lesiones 13 Desconecte esta unidad durante tormentas eléctricas y durante largos periodos sin uso 14 Todo servicio debe realizarlo un centro de servicio autorizado El servicio es requerido cuando el aparato o el cordón de alim...

Страница 41: ...o que comprime audio a aproximadamente una décima parte de su tamaño sin que se produzca ninguna pérdida considerable de calidad de audio Control de reproducción PBC Si un Vídeo CD tiene control de reproducción usted podrá seleccionar escenas e información con los menús Progresivo entrelazado NTSC el estándar de la señal de vídeo tiene 480 líneas de exploración entrelazadas i mientras la exploraci...

Страница 42: ...ral paso 1 Posicionamiento 120 30 30 Altavoces delanteros izquierdo Altavoces delanteros derecho Altavoz central Aparato principal Subwoofer derecho Altavoces de sonido envolvente Altavoces de sonido envolvente izquierdo Altavoz central Colocar el altavoz sobre un estante o anaquel La vibración causada por el altavoz puede distorsionar la imagen si éste se coloca directamente sobre el televisor Ap...

Страница 43: ...VIERA Link podrá utilizar el televisor sincronizándolo con operaciones de cine en casa o viceversa 24 Uso de VIERA LinkTM HDAVI ControlTM Realice la conexión de audio arriba cuando utilice la función VIERA Link HDAVI Control Todos los televisores Panasonic que poseen conectores de entrada 480p son compatibles Si tiene un televisor de otra marca consulte al fabricante del mismo COMPONENT VIDEO Haga...

Страница 44: ...realizada esta conexión realice los ajustes necesarios sobre el tipo de audio de su equipo digital 28 2 Conexiones de los altavoces 3 Conexiones de la antena de radio OPTICAL OUT Cable óptico de audio digital Evite que se doble demasiado al conectarlo OPTICAL IN CENTER SUBWOOFER FRONT 6 5 2 1 4 3 L R L R SURROUND Conexión de los altavoces al dispositivo principal Haga la conexión a los terminales ...

Страница 45: ... 23 ft directamente enfrente del aparato Uso de una antena exterior de FM AM opcional FM ANT 75 AM ANT EXT LOOP LOOP ANT GND Aparato principal Deje conectada la antena de cuadro AM Antena externa AM Usando un cable de vinilo no incluido Haga correr horizontalmente un pedazo de cable de vinilo a través de una ventana u otra ubicación conveniente 5 0 m a 12 m 16 ft a 39 ft Antena exterior de FM Uso ...

Страница 46: ... 3 4 5 6 7 8 9 0 10 ONE TOUCH PLAY RADIO EXT IN INPUT VOL iPod TV DVD W SRD PL DISC RETURN SETUP OK 1 Encienda el aparato 2 Seleccione DVD CD 3 Acceda al menú setup 4 Seleccione OTHERS 5 Seleccione QUICK SETUP 6 Seleccione SET 7 Seleccione YES 8 Siga los mensajes y haga los ajustes IDIOMA DEL MENÚ TIPO DE TV ASPECTO TV Para volver a la pantalla anterior pulse RETURN 9 Finalice QUICK SETUP 10 Pulse...

Страница 47: ...Suelte el botón cuando aparezca FM AUTO o AM AUTO Ej Aparato principal Mantenga pulsado MEMORY El sintonizador sintoniza la frecuencia más baja y empieza a presintonizar todas las emisoras que puede recibir en los canales en orden ascendente SLEEP REPEAT FL DISPLAY PLAY MODE VOL MUTE SUBWOOFER CHSELECT FUNCTIONS CANCEL SOUND LEVEL TOP MENU MENU DIRECT NAVIGATOR START PLAY LIST RETURN SETUP SLOW SE...

Страница 48: ...lista de reproducción 15 17 9 Visualización del menú en pantalla 18 Activación desactivación de Dolby Pro Logic II 26 Cancelación 16 Selección del modo de sonido Activación desactivación del Whisper Surround 26 Operaciones de TV Apunte el mando a distancia al televisor Panasonic y pulse el botón Í TV Encendido apagado del televisor INPUT Cambio del modo de entrada de vídeo del televisor r s Ajuste...

Страница 49: ...do de alimentación en espera el aparato consume una pequeña cantidad de corriente 14 2 5 DISC SELECTOR Seleccione directamente un disco 14 3 Cambio del disco Abra la bandeja del disco para cambiarlo 14 4 Apertura Cierre de la bandeja del disco 14 5 Activación desactivación de Subwoofer Boost 27 6 Selección de la fuente DVD CD FM AM AUX D IN IPOD 7 Salto o reproducción lenta Selección de emisoras d...

Страница 50: ...a durante la pausa Pulse 1 Reproducción para iniciar la reproducción normal Abra todas las bandejas del disco Para seleccionar una bandeja deseada abajo Seleccionar la bandeja deseada Pulse de nuevo OPEN CLOSE para cerrar la bandeja Cargue el disco Cargue los discos de dos caras de forma que la etiqueta de la cara que quiera reproducir quede hacia arriba Pulse EXCHANGE para cargar los discos uno a...

Страница 51: ...DVD W SRD PL 1 SLOW SEARCH SKIP STOP PAUSE TOP MENU DIRECT NAVIGATOR OK FL DISPLAY RETURN MENU PLAY LIST DISC DISC 2 ONETOUCH PLAY 5 Botones numerados ONE TOUCH PLAY STOP PAUSE SKIP SLOW SEARCH OK Seleccionar Confirmar OK Seleccionar un disco Se visualiza la pantalla de información del disco Para salir de la pantalla pulse DISC Ej DVD V Introducción del número DVD VR DVD V VCD CD Ej Para seleccion...

Страница 52: ... fuente Aleatoria de todos los discos cuando está encendido el modo CD VCD CD Puede reproducir todos los detalles en todos los discos en orden aleatorio Pulse 1 PLAY Reproducir los CDs de manera secuencial Modo CD VCD CD WMA MP3 Durante la parada Reproducción repetida 1 Durante la reproducción Otras funciones de reproducción 2 Mientras se muestra el modo de repetición Seleccione la opción que dese...

Страница 53: ...DE 1 2 3 4 5 6 7 8 9 0 10 ONE TOUCH PLAY RADIO EXT IN INPUT VOL iPod TV DVD W SRD PL DISC STOP TOP MENU DIRECT NAVIGATOR MENU PLAY LIST OK SKIP RETURN RETURN SETUP DISCO DE DATOS ORIGEN OK Perfume My favorite1 My favorite2 My favorite3 Underwater Fantasy planet City of cascade Infinite unit Lady Starfish Metal Glue Life on Jupiter Starpersons1 Starpersons2 Grupo Carpeta Contenido Archivo WMA MP3 J...

Страница 54: ...oke Para seleccionar ENCEN o APAGADO para la voz Para seleccionar APAGADO V1 V2 o V1 V2 para la selección de voces Las operaciones reales dependen del disco Lea las instrucciones del disco para detalles Tipo de señal datos LPCM PPCM D DTS MP3 MPEG Tipo de señal kHz Frecuencia de muestreo bit ch Número de canales 3 2 1ch 0 No hay sonido envolvente 1 Sonido envolvente mono 2 Sonido envolvente estére...

Страница 55: ...o grabado en el canal central APAGADO ENCEN Dolby PLII APAGADO PELÍCULA MÚSICA 26 Uso de Dolby Pro Logic II JPG DATE PLII ESTADO HDMI Para mostrar información de HDMI abajo Confirmación de la información HDMI POTENCIADOR HD Esto funciona cuando la conexión HDMI se está utilizando con la opción PRIORIDAD VÍDEO 22 Menú HDMI ajustada en ENCEN Para ofrecer una calidad de imagen 720p 1080i y 1080p más ...

Страница 56: ...CO SALIR SETUP ESTADO AJUSTE AUDIO SUBTÍTULOS MENÚS ACCESO CONTRASEÑA INGLÉS AUTOMATICO INGLÉS 8 SIN LÍMITE Muestra el ajuste actual de los elementos siguientes Elemento Ajuste OK OK RETURN SETUP mantenga pulsado el botón CONFIG RÁPIDA permite hacer ajustes sucesivos de los elementos del área sombreada AUDIO Elija el idioma de audio INGLÉS FRANCÉS ESPAÑOL ORIGINAL 1 OTROS 2 SUBTÍTULOS Elija el idi...

Страница 57: ... FIJA Especifique el tipo de imagen que se va a mostrar cuando se haga una pausa AUTOMATICO CAMPO 4 La imagen no está borrosa pero la calidad de la misma es inferior CUADRO 4 La calidad general es alta pero la imagen puede aparecer borrosa NIVEL DEL NEGRO Cambia el nivel de negro de la imagen MÁS CLARO MÁS OSCURO SAL VÍD I P Seleccione PROGRESIVO sólo si el aparato está conectado a un televisor co...

Страница 58: ...el aparato principal GAMA RGB Esto sólo funciona cuando ESPACIO COLOR del Menú 4 HDMI se ajusta a RGB 19 NORMAL AUMENTAR Cuando las imágenes en blanco y negro no se diferencian bien VIERA Link ENCEN La función VIERA Link HDAVI ControlTM está disponible 24 APAG TIEMPO JPEG Ajuste la velocidad de la presentación de imágenes Ajuste de fábrica 3 SEG De 1 SEG a 15 SEG en unidades de 1 De 15 SEG a 60 SE...

Страница 59: ...s 6570 Aimara 6589 Albanés 8381 Alemán 6869 Amharico 6577 Árabe 6582 Armenio 7289 Asamés 6583 Azerbaiyano 6590 Bashkirio 6665 Bengalí 6678 Bielorruso 6669 Bihari 6672 Birmano 7789 Bretón 6682 Búlgaro 6671 Butanés 6890 Cachemiro 7583 Camboyano 7577 Catalán 6765 Checo 6783 Chino 9072 Coreano 7579 Corso 6779 Croata 7282 Danés 6865 Eslovaco 8375 Esloveno 8376 Español 6983 Esperanto 6979 Estonio 6984 F...

Страница 60: ...iguen automáticamente a los ajustes del televisor Esto puede no funcionar si el ajuste correspondiente seleccionado para el televisor no está disponible en este aparato 1 Si se utiliza VIERA Link HDAVI Control con un televisor compatible con HDAVI Control 3 2 Si se utiliza VIERA Link HDAVI Control con un televisor compatible con HDAVI Control 2 o posterior Sincronía labial automática Disponible al...

Страница 61: ...or consulte la ilustración de abajo para saber qué botones debe utilizar 1 Seleccione el menú de manejo del aparato mediante los ajustes del menú del televisor Para obtener más información consulte las instrucciones de funcionamiento del televisor Aparecerá el menú START Ej DVD V El menú START también se puede mostrar pulsando un botón del mando a distancia del televisor Ej SUB MENU Cuando DVD CD ...

Страница 62: ...IC OFF Dolby Pro Logic II es un decodificador avanzado que extrae 5 canales de sonido envolvente de fuentes de sonido estéreo tanto si se han codificado con Dolby Surround como si no PLII se enciende cuando se aplica el efecto No funciona cuando el audio se emite desde un terminal HDMI AV OUT Puede ajustar el volumen de los altavoces de sonido envolvente para obtener el mejor efecto ambiental 27 A...

Страница 63: ...la misma presintonización de canal se guarda otra emisora Intervalo de frecuencia FM Sólo aparato principal El intervalo fue ajustado en fábrica a 0 2 MHz pero puede cambiarlo para recibir emisiones asignada en intervalos de 0 1 MHz 1 Pulse SELECTOR para seleccionar FM 2 Mantenga pulsado SELECTOR Después de algunos segundos la visualización cambia para mostrar la frecuencia mínima actual Siga mant...

Страница 64: ...ir el volumen al mínimo Conecte el iPod no incluido firmemente La recarga se inicia cuando se inserta el iPod Sujete la base cuando conecte desconecte el iPod Conecte el adaptador de base suministrado junto con su iPod a la base para hacer un uso estable del iPod Si necesita un adaptador póngase en contacto con el distribuidor de su iPod Para trabajar con la pantalla del iPod pulse FUNCTIONS La re...

Страница 65: ...generación vídeo 4GB 8GB iPod classic 80GB 160GB iPod nano 2ª generación aluminio 2GB 4GB 8GB iPod 5ª generación vídeo 60GB 80GB iPod 5ª generación vídeo 30GB iPod nano 1ª generación 1GB 2GB 4GB iPod 4ª generación pantalla en color 40GB 60GB iPod 4ª generación pantalla en color 20GB 30GB iPod 4ª generación 40GB iPod 4ª generación 20GB iPod mini 4GB 6GB La compatibilidad depende de la versión de so...

Страница 66: ...D RAM que no pueden sacarse de sus cartuchos DVD RAM de 2 6 GB y 5 2 GB y Chaoji VCD disponibles en el mercado incluyendo CVD DVCD y SVCD que no cumplan con la norma IEC62107 Precauciones para manejar los discos No adhiera etiquetas o pegatinas en los discos Puede deformarse el disco y luego no podría utilizarse No escriba en la cara de la etiqueta con un bolígrafo u otro instrumento de escritura ...

Страница 67: ... kbps CD R RW 8 11 02 12 16 22 05 24 kHz 8 a 160 kbps 32 44 1 y 48 kHz 32 a 320 kbps JPEG DVD RAM DVD R RW CD R RW JPG jpg JPEG jpeg Se muestran los archivos JPEG tomados en una cámara digital que cumplan con la norma DCF Design rule for Camera File system versión 1 0 Los archivos que han sido modificados editados o guardados con un software informático de edición de imágenes pueden no mostrarse E...

Страница 68: ...ero que se muestre 1 o 2 mantenga pulsado OK y el botón numerado correspondiente 1 o 2 durante al menos 2 segundos 12 LOADING El iPod no está listo Espere a que desaparezca esta pantalla Desconecte el iPod y a continuación vuelva a conectarlo firmemente 28 Funcionamiento general No hay respuesta cuando se pulsan los botones Este aparato no puede reproducir discos que no sean los indicados en estas...

Страница 69: ...N la opción SALIDA AUDIO del Menú HDMI Si la fuente de entrada es en el formato de flujo de datos ajuste la configuración del sonido del equipo externo en PCM 22 No hay sonido del televisor Confirme la conexión de audio Pulse RADIO EXT IN para seleccionar la fuente correspondiente 7 8 28 No hay sonido envolvente Pulse PLII para activar Dolby Pro Logic II o active el potenciador de sonido envolvent...

Страница 70: ... PUEDE SER REPRODUCIDO EN SU REGIÓN Sólo se pueden reproducir los discos DVD Vídeo que incluyen o tienen el mismo número de región que el que aparece en el panel posterior de este aparato Cubierta Fabricado bajo licencia de Dolby Laboratories Dolby Pro Logic y el símbolo de la doble D son marcas comerciales de Dolby Laboratories Fabricado bajo licencia según las Patentes de los Estados Unidos 5 45...

Страница 71: ...PB 0 7 Vp p 75 Nivel de salida PR 0 7 Vp p 75 Terminal Toma de contactos Y verde PB azul PR rojo 1 sistema Salida HDMI AV Terminal Conector de tipo A 19 contactos HDAVI Control Este aparato es compatible con la función HDAVI Control 3 Altavoces delanteros SB HF665 Tipo Sistema de 2 altavoces de 2 vías Reflejo de graves Unidad es de altavoz altavoces Impedancia 3 Altavoz de frecuencias altas Tipo c...

Страница 72: ...36 RQTX0275 ...

Отзывы: