background image

49

Timer and others

RQT6345

Changing settings

Change the settings to suit your preferences and to suit the unit to
the environment in which it is being used.
These settings are retained in memory until they are changed, even
if the unit is turned off.

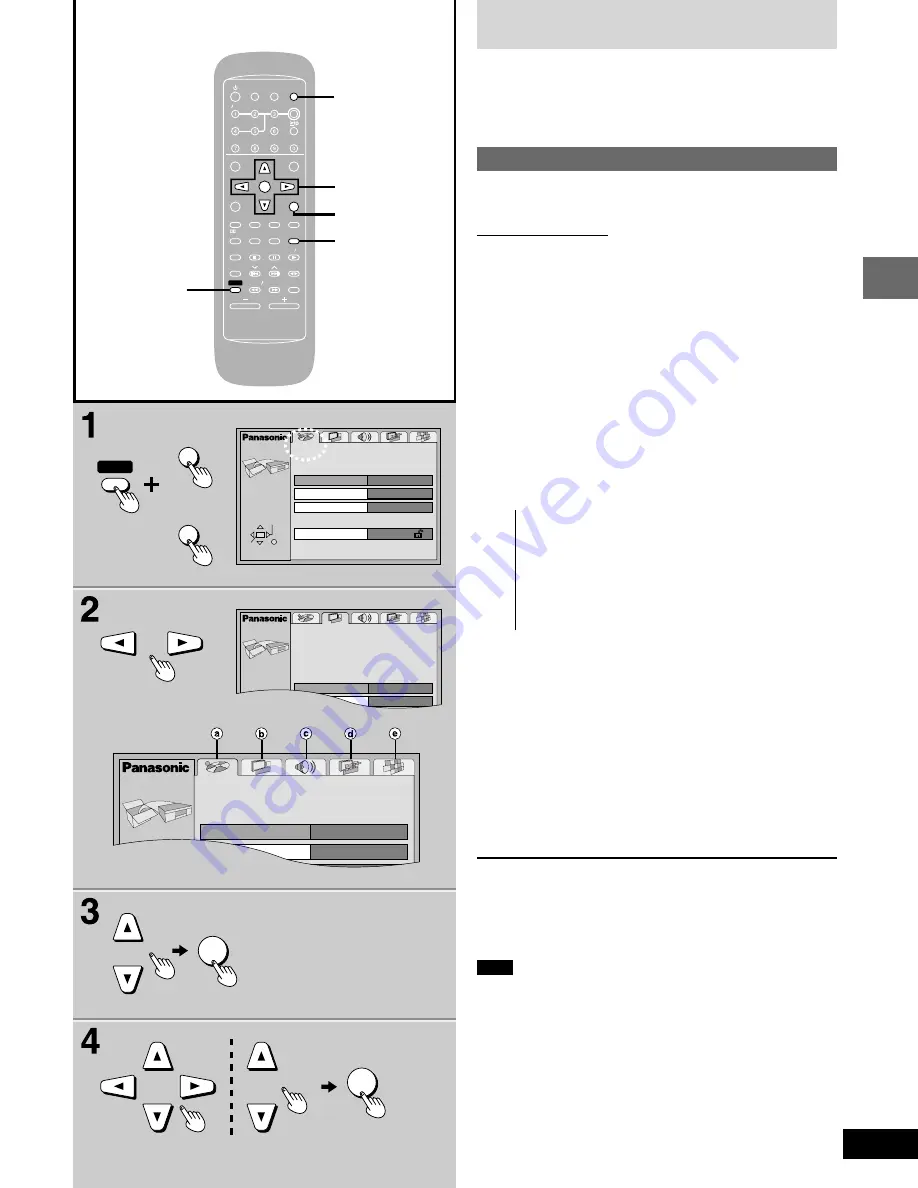
Common procedures

See pages 50–53 for menu and option details.

Remote control only

Preparation:
Press [SELECTOR] to select “DVD/CD”.

For Australia, N.Z., the Middle East, South Africa and Asia

Press [SHIFT] + [SET UP].

For U.S.A., Canada and others

Press [SHIFT] + [ACTION].

The QUICK SETUP screen appears when you press
[SHIFT] + [ACTION] (or [SET UP]) the first time after pur-
chase (

 page 13).

2

Press [

;

], [

:

] to select the menu’s

tab.

The screen changes to display the menu.

Disc menu (

a

)

Video menu (

b

)

Audio menu (

c

)

Display menu (

d

)

Others (

e

)

3

Press [

8

8

8

8

8

], [

9

9

9

9

9

] to select the item you

want to change and press [ENTER].

4

For Australia, N.Z., the Middle East and South Africa

Press [

8

8

8

8

8

], [

9

9

9

9

9

], [

;

;

;

;

;

], [

:

:

:

:

:

] to select the

option and press [ENTER].

For U.S.A., Canada and others

Press [

8

8

8

8

8

], [

9

9

9

9

9

] to select the option and

press [ENTER].

The screen now shows the menu again.

To return to the previous screen

Press [RETURN].

To exit the settings menu

Press [SHIFT] + [ACTION] (or [SETUP]).

Note

The SETUP menu cannot be accessed while program mode
(“PRGM” is displayed, 

 page 22) or random mode (

 page 23) is

on.
Press [PLAY MODE] to turn the mode off.

The SETUP menu cannot be accessed while CD MANAGER
(

 page 24) is on.

Press [CD MANAGER] to select “NORMAL”.

ENT

NTER

MIX 

MIX 2CH

CH

SLEEP

EEP

AUTO 

O OF

OFF

ACTIO

CTION

MUT

UTING

DIMMER

DIMMER

TV 

V POWER

ER

TV  

V  VIDEO

IDEO

S.S

.SRND

ND

A-B REP

A-B REPEAT

CL

CLEAR

AR

3D AI

3D AI

ANGLE

NGLE

MENU

MENU

TOP MENU

OP MENU

SUB 

SUB TITLE

TITLE

AUD

UDIO

TEST

EST

GUI DISP

GUI DISP

RETURN

URN

MARKER

ER

SHIFT

CH SE

CH SELECT

ECT

TV CH UP

V CH UP

TV CH 

V CH DOWN

WN

PLAY MODE

Y MODE

SELECT

SELECTOR

OR

SOUND EQ

SOUND EQ

REP

REPEAT

SLO

SLOW  S

W  SEARCH

RCH

PL

PL

SUBW

SUBWOOFER

OFER

DVD 

D CD

CD

TAPE

PE

TUNER

UNER

DISC

DISC

VOLUME

POSITION

POSITION

MEMOR

MEMORY

2

3

4

1

SELECTOR

RETURN

1

SHIFT

ACTIO

CTION

MUT

UTING

SET UP

SET UP

MUT

UTING

SETUP

SELECT  TAB

ENTER

RETURN

Menus

English

Disc

Audio

English

Subtitle

Automatic

Ratings

Level 8   

SETUP

SELECT  TAB

TV Aspect

4:3 Pan&Scan

Video

Still Mode

Automatic

No

Automatic

SETUP

Menus

English

Disc

Audio

English

Subtitle

Automatic

ENT

NTER

ENT

NTER

↔↔

Содержание SADK20 - MINI CD/DVD CHANGER

Страница 1: ... play DVDs marked with labels containing 1 or ALL Example For the Middle East and South Africa The region number of this unit is 2 The unit will play DVDs marked with labels containing 2 or ALL Example For Asia The region number of this unit is 3 The unit will play DVDs marked with labels containing 3 or ALL Example For Australia N Z and Latin America The region number of this unit is 4 The unit w...

Страница 2: ...eas except U S A and Canada RQLS0233 VISIBLE AND INVISIBLE LASER RADIATIONWHEN OPEN AVOID DIRECT EXPOSURETO BEAM DANGER FDA 21 CFR IEC60825 1 VISIBLE AND INVISIBLE LASER RADIATIONWHEN OPEN AVOID EXPOSURETO BEAM CAUTION RAYONNEMENT LASERVISIBLE ET INVISIBLE EN CAS D OUVERTURE EXPOSITION DANGEREUSE AU FAISCEAU ATTENTION SYNLIG OG USYNLIG LASERSTRÅLING VED ÅBNING UNDGÅ UDSÆTTELSE FOR STRÅLING ADVARSE...

Страница 3: ... pc For Australia and N Z N2QAJB000059 For the Middle East South Africa and Asia N2QAJB000054 For U S A Canada and Latin America N2QAJB000053 M Remote control batteries 2 pcs M Power plug adaptor 1 pc For areas except U S A Canada Australia N Z and Asia SJP5213 2 CAUTION This equipment has been tested and found to comply with the limits for a Class B digital device pursuant to Part 15 of the FCC R...

Страница 4: ...e safety purpose of the polarized or grounding type plug A polarized plug has two blades with one wider than the other A grounding type plug has two blades and a third grounding prong The wide blade or the third prong are provided for your safety If the provided plug does not fit into your outlet consult an electrician for replacement of the obsolete outlet 10 Protect the power cord from being wal...

Страница 5: ...s on the remote control take the remote control apart spill liquids onto the remote control R6 LR6 AA UM 3 Transmission window Types of discs This unit can playback discs bearing any of the marks L CD R and CD RW discs This unit can play CD DA digital audio and video CD format audio CD R and CD RW that have been finalized a process that enables CD R CD RW players to play audio CD R and CD RW upon ...

Страница 6: ...it can playback only NTSC system discs Note The bottom part of the picture may be cut off if the Video CD played does not comply with standards Disc symbols used in these operating instruc tions The functions you can use depend on the type of disc you play These marks are used to indicate which type of disc is available for use Feature can be used with DVD Video Feature can be used with Video CD C...

Страница 7: ...d system Failure to do so may lead to damage to the amplifier and or the speakers and may result in the risk of fire Consult a qualified service person if damage has occurred or if you experi ence a sudden change in performance Do not attempt to attach these speakers to walls using methods other than those described in this manual Notes on speaker use You can damage your speakers and shorten their...

Страница 8: ...ve speaker wires Be sure to connect only positive red or gray wires to positive terminals and negative black blue or gray with blue line wires to negative terminals Incorrect connection can damage the speakers TV not included You can connect through the S VIDEO terminal if your TV has an S VIDEO terminal page 47 Connect directly to your TV Do not connect the unit through a video cassette recorder ...

Страница 9: ... before using the unit again U S A and Canada 0 25 W Australia and N Z 0 6 W Others 0 8 W For your reference Information you enter into the unit s memory except for time re mains intact for up to a week after the AC power supply cord is disconnected AM loop antenna Twist the vinyl tip and pull off Stand the antenna up on its base Keep loose antenna cord away from other wires and cords Voltage sett...

Страница 10: ...button REC STOP 38 9 Headphones jack PHONES 46 CD MANAGER button CD MANAGER 24 CINEMA mode button and indicator CINEMA 18 Disc direct select buttons and disc indicators DISC 1 DISC 5 Disc tray open close button c OPEN CLOSE 14 Disc tray Display DOLBY PRO LOGIC button and indicator 0 PL 34 Super surround button and indicator S SRND 36 Super 3D AI EQ button SUPER 3D AI 32 Sound EQ button SOUND EQ 31...

Страница 11: ...U 14 15 Cursor buttons 8 9 13 15 17 31 Enter button ENTER 13 15 20 V GUI display button GUI DISP 25 0 Marker button MARKER 20 1 Super surround button S SRND 36 2 Play mode select button PLAY MODE 22 23 3 Sound EQ button SOUND EQ 31 Stop button L 14 30 5 Shift button SHIFT See below 6 Disc slow search button SLOW SEARCH 17 7 Display dimmer button DIMMER 46 8 Muting button MUTING 46 9 Disc button DI...

Страница 12: ... the time For U S A and Canada 12 hour clock For others 24 hour clock The example shows how to set the 12 hour clock for 4 25 p m 1 Press POWER f f f f f I f f f f f I to turn the unit on 2 Press CLOCK TIMER to display CLOCK Each time you press the button CLOCK rPLAY rREC Original display 3 Within 5 seconds or so Press g 3 or f 4 to set the time The time display can be changed in one minute units ...

Страница 13: ...ca and Asia Press SHIFT SET UP to show the QUICK SETUP screen For U S A Canada and others Press SHIFT ACTION to show the QUICK SETUP screen The QUICK SETUP screen appears when you press SHIFT ACTION or SET UP the first time after purchase and assists you to make necessary settings 2 For Australia N Z the Middle East and South Africa Press 8 9 to select the menu language and press ENTER For U S A C...

Страница 14: ... 12 j 1 2 Items can only be selected with the numbered buttons when playing Video CDs See below for other menu operations 2 If play does not start after step 1 Press DVD CD CD MP3 discs Group and track names are displayed on the television Press SUB TITLE to change the display 3 Adjust the volume Use the CD MANAGER s ALL DISC mode to play CDs and Video CDs in succession page 24 To stop the disc Pr...

Страница 15: ...is no disc on the selected tray or the disc is set incorrectly NO PLAY When the disc does not correspond to the unit and cannot be played 96kHz 24bit When the disc is one with high quality sound recorded with a sam pling frequency of 96 kHz and 24 bits Using menus to play MP3 discs CD MP3 discs Remote control only This unit can play MP3 files recorded on CD R RW with a computer Files are treated a...

Страница 16: ...he position is cleared when The unit is turned off The disc is changed or removed A source other than DVD CD is selected Press L to clear the position Position Memory function Press SHIFT POSITION MEMORY to memorize a position during play This position is saved even if you change or remove the disc change the source or turn the unit off When you reselect or reinsert the disc reselect DVD CD or tur...

Страница 17: ...e also advances each time you press J You cannot move backwards with Video CD Press DVD CD to resume play Slow motion play Remote control only 1 Press J during play 2 Press SLOW SEARCH or Backward Forward Each press increases the speed of the slow motion There are 5 speeds You cannot move backwards with Video CD To resume play Press DVD CD to resume play D C ENT NTER MIX MIX 2CH CH SLEEP EEP AUTO ...

Страница 18: ...tton lights and the CINEMA display appears on the screen Each time you press the button Cin 1 Mellows images and enhances detail in dark scenes Cin 2 Sharpens images and enhances detail in dark scenes Nor Normal mode Factory preset For your reference You can make finer adjustments to the picture if desired page 27 Digital picture mode User mode Switching angles Remote control only Some DVDs allow ...

Страница 19: ... 26 for a key to language abbreviations To clear display the subtitles 1 Press SUB TITLE 2 Press 3 Press 8 or 9 to select ON or OFF For your reference Soundtrack and subtitle languages can be set before play with the unit s menus pages 50 51 Some discs are designed to start in a certain language despite the setting You can only select the languages recorded on the disc Note Some discs allow change...

Страница 20: ...sily at a later time To mark a position 1 Press MARKER during play The marker display appears 2 Press ENTER at the point you want to mark To mark another position 1 Press MARKER to display the marker display 2 Press the cursor buttons or to select another marker 3 Press ENTER Recalling a marked position Press MARKER The marker display appears Press the cursor buttons or to highlight the required m...

Страница 21: ...EAT Current title is repeated c REPEAT OFF Repeat mode is canceled CD MP3 disc d TRACK REPEAT Current track is repeated e GROUP REPEAT Current group is repeated f REPEAT OFF Repeat mode is canceled Video CD CD All tracks on the disc are repeated Original display Repeat mode is canceled To cancel repeat play Press REPEAT to clear When playing Video CDs and CDs you can combine random play page 23 or...

Страница 22: ...0 seconds 1 5 to select the disc 3 Select the track with the numbered buttons To select tracks numbered 10 and over Press j then the two digits e g To select track 21 j 2 1 Repeat steps 2 and 3 to program all tracks you want in the required order Step 2 is not necessary when selecting a track from the disc currently displayed 4 Press DVD CD All the tracks are played in the selected order To exit p...

Страница 23: ...on Press SELECTOR to select DVD CD Ensure a Video CD or CD is in the play position tray Random play is not possible if the play position tray contains a DVD MP3 disc or is empty 1 While stopped Press PLAY MODE to select RAN DOM 1 DISC or RANDOM ALL DISC Each time you press the button PRGM RANDOM 1 DISC RANDOM ALL DISC Original display 2 Press DVD CD Random play starts Random play is canceled when ...

Страница 24: ...ay position tray contains a DVD MP3 disc or is empty 1 While stopped Press CD MANAGER to select the desired mode Each time you press the button 1 TRACK 1 DISC ALL DISC NORMAL 1 TRACK 1 track mode 1 DISC 1 disc mode ALL DISC All disc mode NORMAL The function is canceled You can choose the disc after step 1 Press DISC 1 DISC 5 on the main unit to select the disc Remote control Press DISC then within...

Страница 25: ...ressing 8 8 8 8 8 9 9 9 9 9 When numbers are displayed e g title No the numbered buttons are also effective for setting When numbers are entered with the numbered buttons press ENTER to register the setting To clear the icons Press RETURN until the menus disappear To change the position of the menus You can lower the position of the icons on the screen if they are cut off for some reason 1 Press t...

Страница 26: ... surround 1 Mono surround 2 Stereo surround left right 1 Center 2 Front left Front right 3 Front left Front right Center A Audio Subtitle language ENG English SVE Swedish CHI Chinese FRA French NOR Norwegian KOR Korean DEU German DAN Danish MAL Malay ITA Italian POR Portuguese VIE Vietnamese ESP Spanish RUS Russian THA Thai NLD Dutch JPN Japanese Others Disc information Progress indicator Indicate...

Страница 27: ...arts of the picture Brightness 0 to 15 Brightens the picture Color 7 to 7 Adjust the shade of the picture s color Content A B repeat page 21 ENTER start point ENTER finish point To cancel ENTER Repeat play page 21 C Chapter T Title OFF Marker page 20 You can mark up to 5 positions to play again ENTER so the unit is ready to accept markers To mark a position ENTER at the desired point To mark anoth...

Страница 28: ...s tuned STEREO is displayed when a stereo FM broadcast is being received 4 Adjust the volume If noise is excessive in FM Press REV MODE FM MODE BP to dis play MONO This mode improves sound quality if reception is weak but broad casts are heard in monaural Press REV MODE FM MODE BP again to cancel the mode The mode is also canceled when you changed the frequency Leave MONO off for normal listening ...

Страница 29: ... Do the following once each for FM and AM Preparation Tune to the frequency where presetting is to begin page 28 Press and hold J MEMORY Release the button when the frequency starts changing The tuner presets the stations it can receive into the channels in as cending order When finished the last station memorized is tuned in Manual presetting Preset the stations one at a time 1 Press TUNER BAND t...

Страница 30: ...ayed Both sides are played forward reverse Play stops at the end of the reverse side Both sides are played repeatedly until L TUNE MODE L is pressed Finding a place on a tape To fast forward and rewind Press g 1 or f 2 while the tape is stopped Remote control g 1 or f 2 To resume play press TAPE To find the beginning of a track TPS Tape program sensor Press g 1 or f 2 during play Remote control g ...

Страница 31: ...rol 1 Press SOUND EQ to select MANUAL 2 Within 10 seconds Change the sound quality with the cursor buttons 1 Select the sound range to be adjusted with or 2 Adjust the level with 8 or 9 Repeat step 2 to set the desired sound quality The original display is restored on the display panel in about 10 seconds To cancel Press SOUND EQ to select FLAT The changes you make are stored and automatically rec...

Страница 32: ...on Main unit Press SUPER 3D AI Remote control Press SHIFT 3D AI The current AI EQ mode is displayed Press again to select another 3D level Each time you press the button AI EQ 3D AI 1 3D AI 2 3D AI 1 Adds a surround effect to the AI EQ 3D AI 2 Adds a stronger surround effect to the AI EQ Adjusting the sound quality Remote control only 1 Turn on AI EQ and select the level 2 Within 10 seconds Change...

Страница 33: ...s DVDs that have been recorded with Dolby Digital Not all Dolby Digital sources are record ed with 5 1 6 channels Some sources marked Dolby Digital may be recorded in Dolby Surround a 2 channel system Software encoded with Dolby Digital can be identified with this mark DVD DOLBY PRO LOGIC page 34 Dolby Pro Logic is a decoding system that was developed to get a better sense of presence from sources...

Страница 34: ...PE PE TUNER UNER DISC DISC VOLUME POSITION POSITION MEMOR MEMORY SHIFT pPL MIX 2CH 1 1 PL SHIFT MIX MIX 2CH CH DIMMER DIMMER MIX 2ch DIGITAL Enjoying surround sound See page 35 for speaker level adjustments DOLBY DIGITAL Play a DOLBY DIGITAL source 0DIGITAL is displayed B To down mix Dolby Digital 5 1 ch signals to 2 channels Remote control only Press SHIFT MIX 2CH To cancel press SHIFT MIX 2CH ag...

Страница 35: ... sound Speaker level adjustments If the level of the speakers appears to be different while listening to a source adjust the level of the speakers to the same apparent level Remote control only Preparation DOLBY DIGITAL Turn off the other surround systems DOLBY PRO LOGIC Press SHIFT 0PL to turn the light on 1 Press SHIFT TEST to output a test signal Lch Front left Cch Center Rch Front right RSch R...

Страница 36: ...WOOFER OFER DVD D CD CD TAPE PE TUNER UNER DISC DISC VOLUME OLUME POSITION POSITION MEMOR MEMORY SHIFT S SRND CH SELECT 8 9 S SRND SHI SHIFT TOP MENU OP MENU CH SE CH SELECT ECT 2 1 Enjoying surround sound SUPER SURROUND Press S SRND to select MOVIE or MUSIC The button lights Each time you press the button MUSIC MOVIE STEREO SOUND off To cancel Press S SRND so the indicator turns off Note Turn sup...

Страница 37: ...ia Disconnect the microphones 1 Press SELECTOR to select TAPE 2 Press REV MODE FM MODE BP to select the reverse mode 3 Press REC STOP Preparatory steps Do these steps before each recording Wind up the leader tape so recording can begin immediately 1 Press c OPEN and insert the cas sette to be recorded on The tape direction is automatically set to To record on the reverse side Press TAPE twice then...

Страница 38: ... TUNE MODE The CD stops and the tape stops after making a 4 sec ond silent interval To record programmed tracks Video CD and CD only 1 Program the tracks page 22 steps 1 3 2 Press REC STOP to start recording Play starts To stop recording press REC STOP Disc play stops automatically Recording with CD MANAGER page 24 CD Record discs after selecting the required CD MANAGER mode 1 TRACK 1 DISC ALL DIS...

Страница 39: ...top recording Press REC STOP B To reduce noise while recording an AM broadcast Beat proof function Press REV MODE FM MODE BP while recording Each time you press the button BP 1 BP 2 Select the position where there is less noise Enjoying karaoke For the Middle East South Africa and Asia You can enjoy karaoke only while playing DVD and Video CDs DVD Follow the steps described on page 40 Video CDs Fo...

Страница 40: ... POSITION MEMOR MEMORY MIC MIC ECHO ECHO SHIFT 3 3 2 SHI SHIFT VOLUME OLUME 3 2 MIC MIC AUDIO 2 1 3 Vocal 1 OFF Enjoying karaoke Enjoying karaoke with karaoke DVD Remote control only 1 Insert the disc and start play page 14 2 1 Press AUDIO during play 2 Press the cursor buttons to highlight the illustrated icon 3 Press the cursor buttons 8 9 to turn the vocals on or off Solo Duet OFF No vocal OFF ...

Страница 41: ...R UNER DISC DISC VOLUME POSITION POSITION MEMOR MEMORY MIC MIC ECHO ECHO SHIFT 3 2 3 VOLUME OLUME 3 2 SHIFT MIC MIC AUD UDIO Enjoying karaoke Enjoying karaoke with karaoke Video CDs Remote control only 1 Insert the disc and start play page 14 2 Press AUDIO Each time you press the button L R LR L Only left channel sound No vocal R Only right channel sound Vocal LR Left channel sound is heard from t...

Страница 42: ...R UNER DISC DISC VOLUME OLUME POSITION POSITION MEMOR MEMORY MIC MIC ECHO ECHO SHIFT ECHO SELECTOR MIC A SHI SHIFT ECHO ECHO SELECTOR a REC STOP Enjoying karaoke Adding an echo effect Remote control only Press SHIFT ECHO Each time you press the button ECHO 1 ECHO 2 ECHO 3 ECHO OFF off The effect increases with the level To record your karaoke performance Preparation Do the preparatory steps page 3...

Страница 43: ... the disc you want to play and press L TUNE MODE Tape Press SELECTOR to select TAPE and insert a cassette The radio Press TUNER BAND and tune in the desired station Set the volume for timer play 1 Press CLOCK TIMER to select rPLAY Each time you press the button CLOCK rPLAY rREC Original display 2 ON time setting 1 Within 8 seconds Press g 3 or f 4 to select the start time 2 Press CLOCK TIMER 3 OFF...

Страница 44: ...ress CLOCK TIMER to select rREC Each time you press the button CLOCK rPLAY rREC Original display 2 ON time setting 1 Within 8 seconds Press g 3 or f 4 to select the start time 2 Press CLOCK TIMER 3 OFF time setting 1 Press g 3 or f 4 to select the finish time 2 Press CLOCK TIMER 4 Press rPLAY rREC to display rREC Each time you press the button rPLAY rREC Original display 5 Prepare for recording pa...

Страница 45: ... set Check the following before turning the unit off again If playing tapes or making a recording Reset tape direction If playing discs Make sure the desired disc is selected Note If you turn the unit off and on again while a timer is functioning the finish time setting will not be activated If the unit is on the timer will not function The unit must be in the standby mode If AUX is selected as th...

Страница 46: ...splay indicates the strength of the sound in each tonal range b Peak hold display The peak sound value of each sound range is held on the display for about one second after it occurs c Aurora display The peak sound value of each sound range is displayed in inverted form Dimming the display Remote control only The display is dimmed and all indicators except for the AC IN indica tor are turned off f...

Страница 47: ...ayer with a built in phono equalizer is recommended C TV with an S VIDEO terminal The S VIDEO output terminal achieves a more vivid picture than VIDEO OUT terminal by separating the color and lumi nance signals before transmitting them to the television Actual results depend on the television 75Ω coaxial cable not included FM outdoor antenna not included AUDIO OUT S VIDEO IN S VIDEO cable See the ...

Страница 48: ...g to an external source Preparation Press POWER f I f I to turn the unit on 1 Press SELECTOR to select AUX Each time you press the button TUNER TAPE DVD CD AUX 2 Operate the unit See the unit s manual for details on operation and connection Recording an external source Preparation Press POWER f I f I to turn the unit on Do the preparatory steps page 37 Press SELECTOR to select AUX Each time you pr...

Страница 49: ...ow shows the menu again To return to the previous screen Press RETURN To exit the settings menu Press SHIFT ACTION or SETUP Note The SETUP menu cannot be accessed while program mode PRGM is displayed page 22 or random mode page 23 is on Press PLAY MODE to turn the mode off The SETUP menu cannot be accessed while CD MANAGER page 24 is on Press CD MANAGER to select NORMAL ENT NTER MIX MIX 2CH CH SLE...

Страница 50: ...uage in the Display menu page 52 Menu Changing ratings When level 0 7 is selected Unlock Player Change Level Change Password Temporary Unlock Automatic Field Frame PAL60 Factory setting for Australia N Z the Middle East and South Africa NTSC Factory setting for Asia Options For Australia N Z the Middle East and South Africa Automatic English French German Italian Spanish Portuguese Swedish Dutch O...

Страница 51: ...e PAL 60 When connected to a PAL television NTSC When connected to an NTSC or a multi system television Field Less blurred field stills are shown Select if jittering occurs when Automatic is selected Frame Sharper frame stills are shown Select if small text or fine patterns cannot be seen clearly when Automatic is selected The password screen is shown when you select Ratings if levels 0 to 7 have ...

Страница 52: ...oose the preferred language for these menus and the on screen messages On Screen Messages Choose whether to show on screen messages or not QUICK SETUP Answer questions to make basic settings Changing settings Summary of settings Audio Display Others Main menu Menu Options Off On On Off On Off Center 0 1 3 2 6 3 9 5 3 ms Surround L R 0 5 3 10 6 15 9 ms For Australia N Z the Middle East and South Af...

Страница 53: ... range compression on in the following cases For clear dialogue when listening at low volume When sound is distorted while playing multi channel DVD audio through two channels When the center surround speakers cannot be located in the ideal position ...

Страница 54: ...aroese 7074 Fiji 7073 Finnish 7082 French 7089 Frisian 7176 Galician 7565 Georgian 6869 German 6976 Greek 7576 Greenlandic 7178 Guarani 7185 Gujarati 7265 Hausa 7387 Hebrew 7273 Hindi 7285 Hungarian 7383 Icelandic 7378 Indonesian 7365 Interlingua 7165 Irish 7384 Italian 7465 Japanese 7487 Javanese 7578 Kannada 7583 Kashmiri 7575 Kazakh 7589 Kirghiz 7579 Korean 7585 Kurdish 7679 Laotian 7665 Latin ...

Страница 55: ...the center and surround speakers Difference between D1 and D2 50 cm 11 2 feet 100 cm 3 feet 150 cm 5 feet 200 cm 6 feet Delay time 1 3 ms 2 6 ms 3 9 ms 5 3 ms Calculating delay time Surround speaker delay time If D1 W D3 then set delay time to 0 ms If D1 D3 then set delay time as follows Difference between D1 and D3 200 cm 6 feet 400 cm 12 feet 600 cm 18 feet Delay time 5 3 ms 10 6 ms 15 9 ms Chan...

Страница 56: ...his unit s cables If possible in your area turn the AC power supply cord s plug or connector over to reverse the plug s polarity Incorrect operation performed Read the instructions and try again You plugged the power supply cord in for the first time or there was a power failure recently Set the time Check and correct the speaker cords connection If this does not fix the problem there is a power s...

Страница 57: ...CD is in the play position tray Select disc as the source Cancel program and random play or select NORMAL with CD MANAGER Reset the unit to its original factory settings by doing the following 1 Press L TUNE MODE on the main unit and 10 on the remote control at the same time for about 3 seconds until the message Initialized disappears from the television screen 2 Turn the unit off and on again Pro...

Страница 58: ...s with a sampling rate of 32 kHz This unit is compatible with multi session but if there are a lot of sessions it takes more time for play to start Keep the number of sessions to a minimum to avoid this To have this unit play files in a cer tain order prefix folder and file names with numbers in the order you want to play them This may not work in all cases Glossary Video Frame Frames are the stil...

Страница 59: ...59 References RQT6345 Servicenter List ONLY FOR U S A ...

Страница 60: ...c Consumer Electronics Company Division of Matsushita Electric Corporation of America One Panasonic Way Secaucus New Jersey 07094 Panasonic Sales Company Division of Matsushita Electric of Puerto Rico Inc Ave 65 de Infantería Km 9 5 San Gabriel Industrial Park Carolina Puerto Rico 00985 Panasonic Consumer Electronics Company or Panasonic Sales Company collective ly referred to as the Warrantor wil...

Страница 61: ...SC SECTION Disc DVD Video 8 cm 12 cm single sided single layer 8 cm 12 cm single sided double layer 8 cm 12 cm double sided double layer One layer per side Video CD CD 8 cm 12 cm CD R RW Video Signal system NTSC Output level Composite video 1 Vp p 75 Ω S VIDEO Y 1 Vp p 75 Ω S VIDEO C 0 286 Vp p 75 Ω NTSC Audio Sampling frequency CD 44 1 kHz DVD 48 kHz 96 kHz Decoding 16 20 24 bit linear Wow and fl...

Страница 62: ...S VIDEO Y 1 Vp p 75 Ω S VIDEO C 0 300 Vp p 75 Ω PAL 0 286 Vp p 75 Ω NTSC Audio Sampling frequency CD 44 1 kHz DVD 48 kHz 96 kHz Decoding 16 20 24 bit linear Wow and flutter Below measurable limit D A converter Delta sigma DAC Pick up Beam Source Semiconductor Laser Wavelength DVD 658 nm VCD CD 790 nm SPEAKER SECTION Front speakers SB DK20 Type 2 way speaker system Speakers Woofer 12 cm cone type T...

Страница 63: ... 1 Vp p 75 Ω S VIDEO Y 1 Vp p 75 Ω S VIDEO C 0 300 Vp p 75 Ω PAL 0 286 Vp p 75 Ω NTSC Audio Sampling frequency CD 44 1 kHz DVD 48 kHz 96 kHz Decoding 16 20 24 bit linear Wow and flutter Below measurable limit D A converter Delta sigma DAC Pick up Beam Source Semiconductor Laser Wavelength DVD 658 nm VCD CD 790 nm SPEAKER SECTION Front speakers SB DK20 Type 2 way speaker system Speakers Woofer 12 c...

Страница 64: ...ed that this product meets the ENERGY STAR guidelines for energy efficiency The model number and serial number of this product can be found on either the back or the bottom of the unit Please note them in the space provided below and keep for future reference Main unit Front speakers Center speaker Surround speakers Subwoofer MODEL NUMBER SERIAL NUMBER Apparatus Claims of U S Patent Nos 4 631 603 ...

Отзывы: