background image

GS

DVD Stereo System

Operating Instructions

Model No. SC-PM50D

Thank you for purchasing this product.
For optimum performance and safety, please read 
these instructions carefully.
Please keep this manual for future reference.

GA

VQT4L45-2

リワヱヶヵ

ヱンユヴユヵチユヲ

Safety precautions ................................. 2
Caution for AC mains lead ..................... 3
Accessories ............................................ 4
About Discs/Files ................................... 4
Control reference guide ......................... 6
Preparation.............................................. 8
System setup ........................................ 10
Discs/USB operation ............................ 12
DVD/VCD operation .............................. 17
Picture operation (JPEG) ..................... 18
Listening to the radio ........................... 19
Clock setting ......................................... 20
Sleep timer setting ............................... 20
Timer setting ......................................... 21
External equipment operation ............. 22
Changing the main unit and remote 
control mode ......................................... 23
About USB device ................................ 23
Reference information ......................... 24
Troubleshooting guide ......................... 25
Specifi cations ....................................... 27


Table of contents

GN

Содержание SA-PM50D

Страница 1: ...ons 2 Caution for AC mains lead 3 Accessories 4 About Discs Files 4 Control reference guide 6 Preparation 8 System setup 10 Discs USB operation 12 DVD VCD operation 17 Picture operation JPEG 18 Listening to the radio 19 Clock setting 20 Sleep timer setting 20 Timer setting 21 External equipment operation 22 Changing the main unit and remote control mode 23 About USB device 23 Reference information...

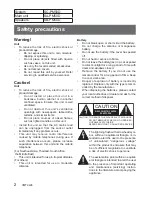
Страница 2: ...ates For others This unit is intended for use in moderate climates Safety precautions CAUTION RISK OFELECTRIC SHOCK DO NOTOPEN TO REDUCE THE RISK OF ELECTRIC SHOCK DO NOT REMOVE SCREWS NO USER SER VICEABLE PARTS INSIDE REFER SERVICING TO QUALIFIED SERVICE The lightning flash with arrowhead sym bol within an equilateral triangle is in tended to alert the user to the presence of uninsulated dangerou...

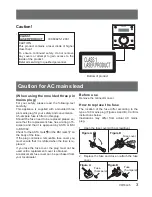
Страница 3: ...e cover the plug must not be used until a replacement cover is obtained A replacement fuse cover can be purchased from your local dealer Before use Remove the connector cover How to replace the fuse The location of the fuse differ according to the type of AC mains plug Figures A and B Confirm instructions below Illustrations may differ from actual AC mains plug 1 Open the fuse cover with a screwdr...

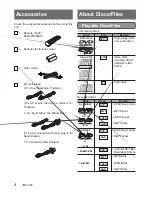
Страница 4: ...tralia New Zealand Type Icon Details DVD R RW DVD Video Format MP3 format JPEG format DivX format DVD R DL R DL DVD Video Format DivX Format R RW RDL VR R RWVideo Recording Format CD R RW MP3format JPEGformat DivX format Commercial discs About Discs Files Playable Discs Files Recorded discs Type Icon Details DVD Video High quality video and audio discs Video CD Video discs Including SVCD conforms ...

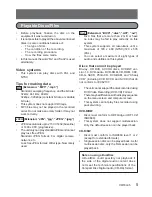
Страница 5: ...on disc only the first session can be played back Before playback finalize the disc on the equipment it was recorded on It is not possible to play all the above mentioned discs in some conditions because of The type of disc The condition of the recording The recording procedure How the files were made In this manual the word file and track is used alternately Video systems This system can play dis...

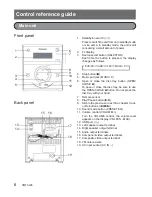
Страница 6: ...not press the disc tray with your hand 7 Remote sensor 8 Play Pause button i 9 Skip to the previous or next title chapter track or file buttons f e 10 Sound mode button PRESET EQ 11 Volume control VOLUME Turn the VOLUME control the volume level appears on the display VOL MIN MAX 12 USB port 13 Left speaker output terminal 14 Right speaker output terminal 15 Audio output terminals 16 Component vide...

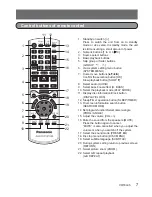
Страница 7: ...en information search button SEARCH MODE 14 Set program function Select camera angle PROG ANGLE 15 Adjust the volume VOL 16 Mute the sound from the speakers MUTE Press the button again to cancel MUTE is also cancelled when you adjust the volume or when you switch off the system 17 Select the sound mode PRESET EQ 18 Disc top menu button DISC MENU 19 Select subtitle language SUBTITLE 20 During syste...

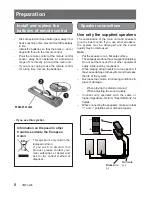
Страница 8: ...creased Note Put the speakers on a flat safe surface Thesespeakersdonothavemagneticshielding Do not put them near PCs or other equipment easily influenced by magnetism When playing at high levels for a long period it maycausedamagetothesystemanddecrease the life of the system Decrease the volume in following conditions to prevent damage When playing the distorted sound When adjusting the sound qua...

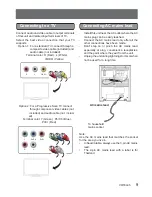
Страница 9: ... Green Pb Cb Blue Pr Cr Red VIDEO R L L R Pr Cr Y Pb Cb Install this unit near the AC outlet where the AC mains plug can be easily reached Connect the AC mains lead only after all the other connections have been made Don t step on or pinch the AC mains lead especially at plug convenience receptacles and the point where they exit from the unit Unplug the unit during lightning storms or when not be ...

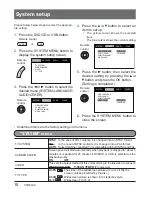
Страница 10: ...ting 1 Press the DVD CD or USB button 2 Press the SYSTEM MENU button to display the system setup screen 3 Press the b or a button to select the desired menu SYSTEM LANGUAGE AUDIO OTHER ヴ ヺ ヴ ヵ ユ ヮ ヮ ユ ワ ヶ 4 Press the o or p button to select an item to set up The yellow cursor shows the selected item The blue cursor shows the current setting 5 Press the a button then select the desired setting by p...

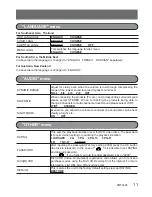
Страница 11: ...RE LANGUAGE menu AUDIO menu OTHER menu DYNAMIC RANGE Adjust for clarity even when the volume is low through compressing the range of the lowest sound level and highest sound level FULL 6 8 4 8 2 8 OFF DOWN MIX When connecting the products TV etc not corresponding surround sound please select STEREO When connecting the products being able to change 2 channels to multi channel surround sound please ...

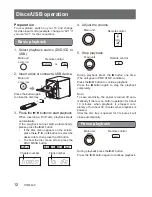
Страница 12: ...ration To view picture switch on your TV and change its video input mode example change to AV1 if you use AV1 for the connection 1 Select playback source DVD CD or USB 2 Insert a disc or connect a USB device 3 Press the i button to start playback When inserting a DVD disc playback starts automatically If the playback cannot start automatically please press the i button If the disc menu appears on ...

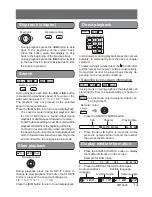
Страница 13: ...d or reverse For MP3 when searching to next file or previous file playback will start from the beginning of the file For DivX in reverse direction when searching to the beginning of current file normal playback will start In forward direction when searching to the end of current file the unit goes to stop mode Remote control Skip track chapter f e Remote control Main unit d c Remote control Search...

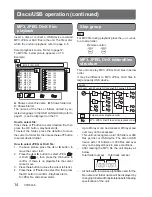
Страница 14: ... the o or p button to select file then press the OK button to confirm Playback starts To JPEG file slide show starts MP3 JPEG DivX files playback MP3_01 101 MP3 01 MP3_01 02 MP3_02 03 MP3_03 04 MP3_04 05 MP3_05 06 MP3_06 07 MP3_07 08 MP3_08 09 MP3_09 001 101 002 102 003 103 004 104 005 105 006 106 007 107 008 108 009 109 A D C B Skip group A D C B Remote control A D C B A D C B Discs USB operation...

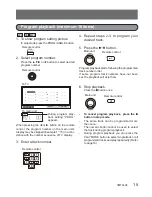
Страница 15: ...ck number order If some program track numbers have not been set the playback will skip them 6 Stop playback Press the n button once To cancel program playback press the n button in stop mode The same track can be programmed more than once The numeric button cannot be used to select the track during program playback During program playback you can press the PLAY MODE button to select single track o...

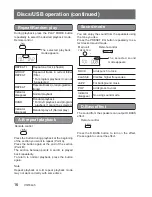
Страница 16: ...isappear No using sound mode Repeat Random play Sound mode Remote control D Bass effect Remote control Press the D BASS button to turn on the effect Press again to cancel the effect Remote control 01 03 CH 001 035 MODE PLAY 01 03 CH 001 035 PRESET EQ 01 03 CH 001 035 PRESET EQ Main unit A B repeat playback Press the button during playback at the beginning of the section you want to repeat Point A ...

Страница 17: ...button repeatedly during playback until the desired subtitle language appears on the screen Note This operation works only with discs on which multiple subtitle languages are recorded Selecting audio Remote control Selecting audio soundtrack language Pressthebuttonrepeatedlyduringplaybackuntil the desired language appears on the screen Note This operation works only with discs on which multiple au...

Страница 18: ...ton the picture changes in the UP DOWN mirror image Press the p button the picture changes in the LEFT RIGHT mirror image 2 Press the a button the picture turn in the clockwise direction Press the b button the picture turn in the counter clockwise direction Remote control Remote control Picture zoom During the slide show or pause mode Press the ZOOM button repeatedly to select the desired zoom lev...

Страница 19: ... to 20 stations can be preset RADIO Remote control ANGLE PROG Remote control Press and hold for 2 seconds 1 Select FM 2 Search a receivable station 3 Preset the station 4 Repeat steps 2 3 to add more preset stations Up to 20 stations can be preset To overwrite a preset station please select a new desired number and preset directly RADIO Remote control Remote control ANGLE PROG Remote control f e A...

Страница 20: ...tomatically turns off the power after a preset time has elapsed In power on mode SLEEP TIMER 0 Remote control SLEEP TIMER 0 30 60 90 120 OFF DISPLAY CLOCK SLEEP SLEEP appears 3 Select minutes in same method described above 4 The clock starts Confirmation current time In standby mode press the DISPLAY CLOCK button After 5 minutes current time disappears In power on mode press and hold the DISPLAY C...

Страница 21: ...ayed back DISC USB FM can be set as source to be played back When selecting FM as the source to be played back press the e or f button to select preset station Source setting is completed Whole timer setting is completed 6 Turn on the Timer Setting As soon as the 0 lights on the display the timer will function every day The power will be turned on at the on time the 0 remains blinking In power on ...

Страница 22: ...USIC P is selected but an audio cable is not connected after 10 minutes the power will turn off automatically For Australia New Zealand When an external equipment has been connected but no signal from the external equipment is received after 10 minutes the power will turn off automatically Remote control Main unit External equipment operation VOLUME SLEEP TIMER 0 Remote control 0 indicator disappe...

Страница 23: ...in USB device even if their formats are listed before page5 When playing back the files with large transmission rate the picture or sound may be lost during playback Some USB large capacity storage device may not be recognized and work normally For the data losing during playback of the USB large capacity storage device will not be responsibility It is possible to affect the unit when operating th...

Страница 24: ... DivX videos ABOUT DIVX VIDEO ON DEMAND This DivX Certified device must be registered in order to play purchased DivX Video on Demand VOD movies To obtain your registration code locate theDivXVODsectioninyourdevicesetupmenu Gotovod divx comformoreinformationonhow to complete your registration DivX version cannot be upgraded on this product DivX DivX DivX Certified and associated logos are trademar...

Страница 25: ...t operate correctly because of lightning static electricity or some other external causes Disconnect the AC mains lead and then connect it again There is condensation Let the system dry for 1 to 2 hours 9 No operations can be done with the remote control Point the remote control at the signal sensor on the main unit to operate Examine that the batteries are installed correctly The batteries are we...

Страница 26: ... the DivX contents are too big Progressive video Page There is a ghosting effect when the progressive output is on Set VIDEO in SYSTEM menu to INTERLACE YUV 10 Picture not in progressive output Set VIDEO in SYSTEM menu to P SCAN YPBPR 10 Radio Page Distorted sound or noise is heard STEREO flickers or does not show Unwind the FM antenna wire and extend it as straight as possible then adjust its pos...

Страница 27: ...t Asia Thailand South Africa the Middle East Power supply AC110 240V 50 60Hz For Australia New Zealand Power supply AC220 240V 50Hz Power consumption Approx 22W Standby power consumption Less than 0 5W Operating temperature range 0 C to 40 C Operating humidity range 35 to 80 RH no condensation Dimensions W x H x D 152mm x 175mm x 219mm Mass Approx 1 5 kg Amplifier section RMS OUTPUT POWER both cha...

Страница 28: ...claim warranty service when required you should Telephone Panasonic s Customer Care Centre on 132600 or visit our website referred to below and use the Service Centre Locator for the name address of the nearest Authorised Service Centre Send or take the product to a Panasonic Authorised Service Centre together with your proof of purchase receipt as a proof of purchase date Please note that freight...

Отзывы: