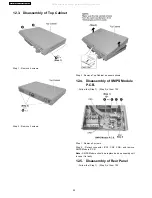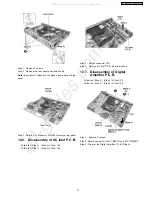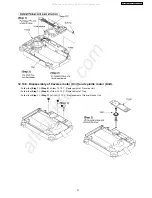
Step 1 : Remove 9 screws.
Step 2 : Remove the rear panel as arrows shown.
Note :
Be careful of catches on the sides when remove the rear
panel.
Step 3 : Detach Fan connector CN2003 to remove rear panel.
12.6. Disassembly of AC Inlet P.C.B.
·
Follow the (Step 1) - (Step 3) of item 12.3.
·
Follow the (Step 1) - (Step 3) of item 12.5.
Step 1 : Detach connector CN1.
Step 2 : Remove AC inlet P.C.B. as arrow shown.
12.7. Disassembly of Digital
Amplifier P.C.B.
·
Follow the (Step 1) - (Step 3) of item 12.3.
·
Follow the (Step 1) - (Step 3) of item 12.5.
Step 1 : Remove 2 screws.
Step 2: Detach connector (CN2, CN2001) and FFC (CN2002).
Step 3: Flip over the Digital Amplifier P.C.B. (Side A).
21
SA-HT330GCT / SA-HT330GCP
All manuals and user guides at all-guides.com
all-guides.com
Содержание SA-HT330GCT
Страница 12: ...10 Disc information 12 SA HT330GCT SA HT330GCP All manuals and user guides at all guides com ...
Страница 13: ...13 SA HT330GCT SA HT330GCP All manuals and user guides at all guides com ...
Страница 16: ...16 SA HT330GCT SA HT330GCP All manuals and user guides at all guides com a l l g u i d e s c o m ...
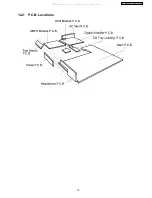
Страница 19: ...12 2 P C B Locations 19 SA HT330GCT SA HT330GCP All manuals and user guides at all guides com ...
Страница 30: ...30 SA HT330GCT SA HT330GCP All manuals and user guides at all guides com ...
Страница 32: ...32 SA HT330GCT SA HT330GCP All manuals and user guides at all guides com ...
Страница 39: ...39 SA HT330GCT SA HT330GCP All manuals and user guides at all guides com ...
Страница 40: ...40 SA HT330GCT SA HT330GCP All manuals and user guides at all guides com ...
Страница 46: ...46 SA HT330GCT SA HT330GCP All manuals and user guides at all guides com a l l g u i d e s c o m ...
Страница 103: ...103 SA HT330GCT SA HT330GCP All manuals and user guides at all guides com ...

