


Item
FL Display
Key Operation
Mode Name
Description
Front Key
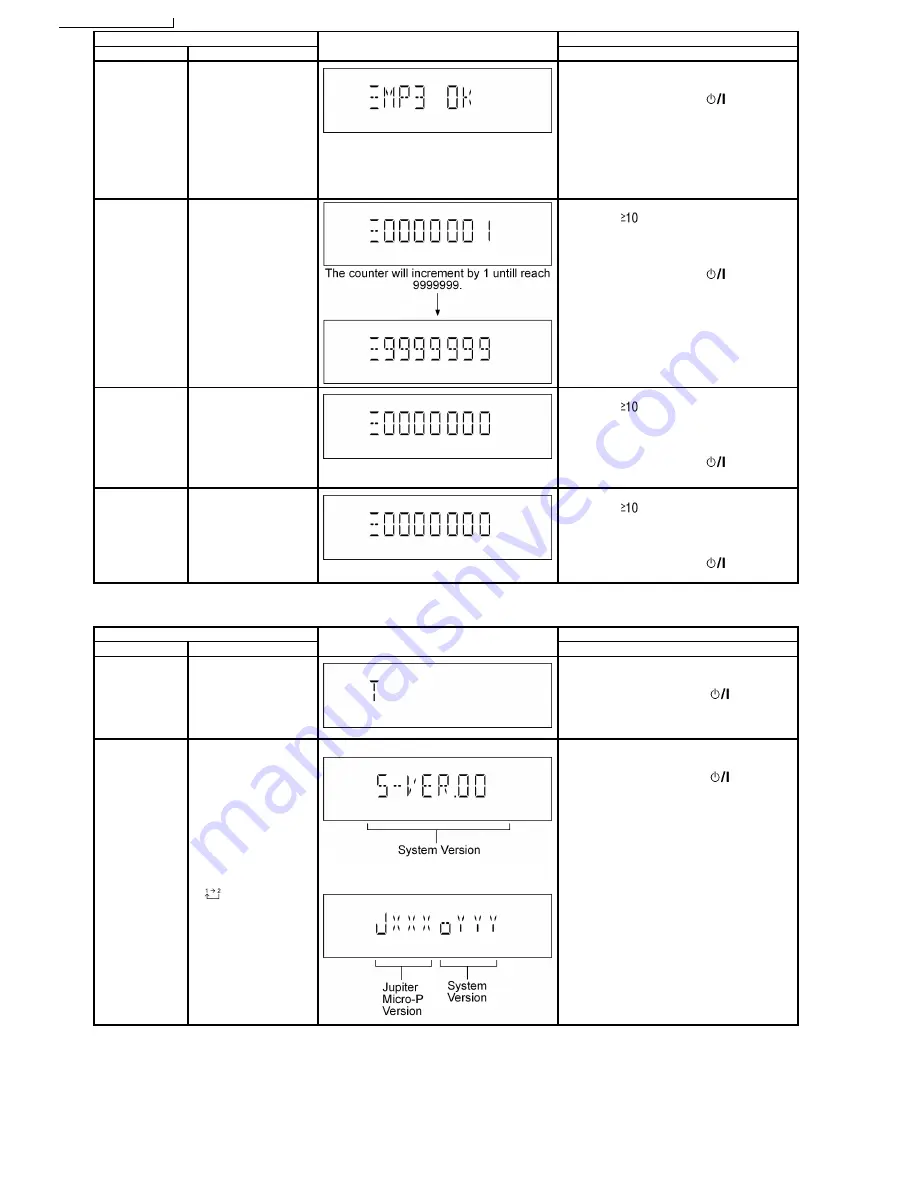
CD-MP3 Reading
& Playing
inspection
To check for the CD-MP3
Reading setting of the
main unit. The volume
will be automatically set
to its respective level (in
dB). During this mode,
treble/bass/EQ will be set
to ‘0’dB & OFF.
(For more information,
refer to section 8.2.4)
In doctor mode:
1.
Press [5] button on remote control.
To exit Doctor Mode, press [
] button on
main unit or remote control.
CD Loading Test
Mode
To determine the
reliability of CD Loading
Unit.
To check for the
open/close operation for
the CD loading unit. It
fails when there is
abnormality in opening or
closing.
In doctor Mode:
1.
Press [
], [1] & [1] button on remote
control.
To cancel, press [PROGRAM] button on remote
control.
To exit Doctor Mode, press [
] button on
main unit or remote control.
CD Traverse Unit
Test Mode
To check for the traverse
unit operation. In this
mode, the first & lost
track is access & read
(TOC). It fails when TOC
is not completed by IDS
or the traverse is out of
focus.
In doctor Mode:
1.
Press [
], [1] & [2] button on remote
control.
To cancel, press [PROGRAM] button on remote
control.
To exit Doctor Mode, press [
] button on
main unit or remote control.
CD Combination
Test Mode
A combination of CD
loading & Traverse unit
test.
In doctor Mode:
1.
Press [
], [1] & [3] button on remote
control.
To cancel, press [PROGRAM] button on remote
control.
To exit Doctor Mode, press [
] button on
main unit or remote control.
7.2.3. Service Mode Table 3
Item
FL Display
Key Operation
Mode Name
Description
Front Key
Self Diagnostic
History
Checking the records for
self-diagnostic.
In service mode:
1.
Press [1] button on remote control.
To exit Service Mode, press [
] button on
main unit or remote control.
To clear history, press & hold [0] for 5 seconds
or more.
Micro-P Version
Display
Checking of various
items and firmware
version.
Note: The micro-
processor version as
shown is an example. It
will be revise when there
is an updates.
FL Display
sequenceDisplay
[
]
(Display 1)
(Display 2)
In service mode:
1.
Press [2] button on remote control.
To exit Service Mode, press [
] button on
main unit or remote control.
16
SA-AK770PL / SA-AK770GCP
Содержание SA-AK770PL
Страница 7: ...7 SA AK770PL SA AK770GCP ...
Страница 10: ...6 Operation Procedures 6 1 Main Unit Key Buttons Operations 10 SA AK770PL SA AK770GCP ...
Страница 11: ...6 2 Remote Control Key Buttons Operations 11 SA AK770PL SA AK770GCP ...
Страница 13: ...6 4 Connecting and Playing a USB Mass Storage Class Device 13 SA AK770PL SA AK770GCP ...
Страница 18: ...18 SA AK770PL SA AK770GCP ...
Страница 25: ...8 3 Main Components and P C B Location 25 SA AK770PL SA AK770GCP ...
Страница 38: ...38 SA AK770PL SA AK770GCP ...
Страница 57: ...57 SA AK770PL SA AK770GCP ...
Страница 72: ...14 1 2 Main P C B 14 1 3 Panel P C B 72 SA AK770PL SA AK770GCP ...
Страница 73: ...14 1 4 SMPS P C B 14 1 5 D Amp P C B 14 1 6 Deck P C B Deck Mechanism P C B 73 SA AK770PL SA AK770GCP ...
Страница 74: ...14 1 7 Tact Switch P C B Mic P C B 14 1 8 Jupiter USB P C B 74 SA AK770PL SA AK770GCP ...
Страница 75: ...75 SA AK770PL SA AK770GCP ...
Страница 76: ...14 2 Waveform Chart 76 SA AK770PL SA AK770GCP ...
Страница 77: ...77 SA AK770PL SA AK770GCP ...
Страница 78: ...78 SA AK770PL SA AK770GCP ...
Страница 80: ...SA AK770PL SA AK770GCP 80 ...
Страница 90: ...90 SA AK770PL SA AK770GCP ...
Страница 120: ...120 SA AK770PL SA AK770GCP ...
Страница 121: ...22 Exploded Views 22 1 Cabinet Parts Location SA AK770PL SA AK770GCP 121 ...
Страница 122: ...SA AK770PL SA AK770GCP 122 ...
Страница 123: ...22 2 Deck Mechanism Parts Locations RAA4407 S SA AK770PL SA AK770GCP 123 ...
Страница 124: ...22 3 Packaging SA AK770PL SA AK770GCP 124 ...


