background image

Earpiece Cleaning

Regular cleaning is necessary to continue using the earpieces comfortably.

1

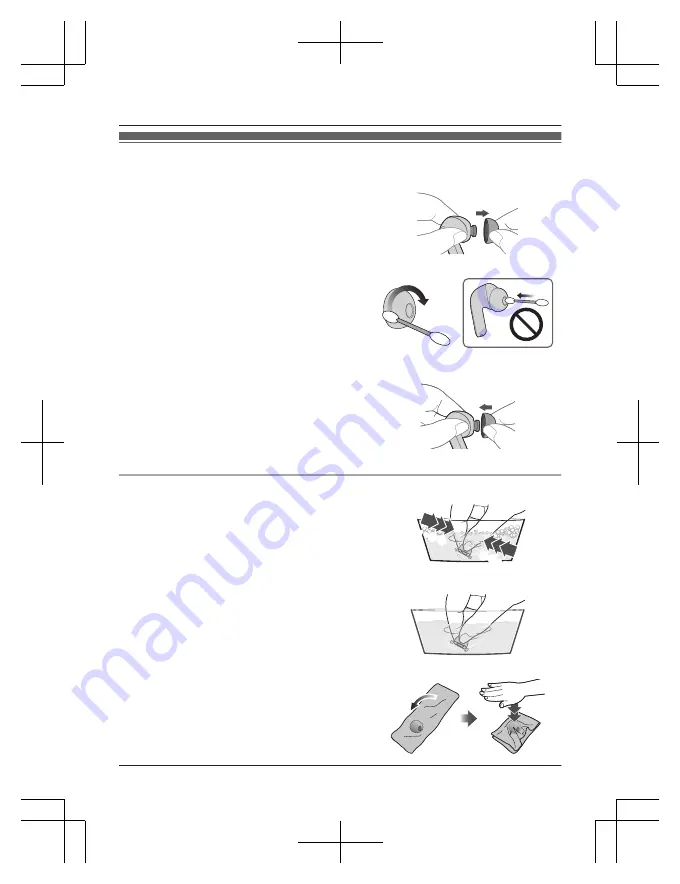
Remove the earpieces.

R

Hold the earpiece with your fingertips and
twist slightly to pull it out.

R

If you clean the earpieces while they are
attached to the earphones, you may damage
the protective mesh on the earphones.

2

Use cotton swab, etc., to gently wipe the
outside of the earpieces to remove foreign
material.

R

Use a diluted neutral detergent to hand wash
the earpieces, and wipe off the moisture well
after washing (page 20, “When the
earpieces are very dirty”
).

3

Attach the earpieces.

R

Make sure the earpieces are fitted firmly onto
the earphones and confirm that they are not at
an angle.

R

Store the earphones in the charging cradle to
protect them from foreign material, etc.,
getting on them.

When the earpieces are very dirty

1

Wash the earpieces with the tips of your
fingers.

(Using a diluted neutral detergent in warm water
is effective.)

2

Rinse well with clean water after washing.

3

Put in between a soft, dry cloth, press firmly
3 to 5 times to ensure the moisture is
eliminated.

R

After washing the earpieces, eliminate the
moisture and dry thoroughly.

・・

・ 

 ・・

・ 

20

Other

Содержание RZ-B310W

Страница 1: ...10W Digital Wireless Stereo Earphones Owner s Manual RZ B310W RZ B110W Thank you for purchasing a Panasonic product Please read these operating instructions before using the unit and save them for fut...

Страница 2: ...istening to music 11 Making a phone call 11 Using the external sound control RZ B310W 12 Activating voice functions 12 Game mode RZ B310W 13 Operating with the touch sensors 13 Other Restoring to the...

Страница 3: ...stant Water resistance is not guaranteed under all conditions n Cautions for use in places where the unit may get wet from spray rain etc Observe the following precautions Incorrect operation cause ma...

Страница 4: ...icator lights red RZ B110W The status indicator flashes red R Check the direction of the USB charging cord terminals and plug in out straight holding onto the plug It may result in malfunction by the...

Страница 5: ...he unit page 3 Note R When the status indicator remains off even after opening the charging cradle lid the earphones cannot be turned on off automatically When using earphones turn the earphones on of...

Страница 6: ...d them R The left earphone has a raised dot indicating the L side To remove attach the earpieces If the earphones fall out easily replace with the earpieces supplied of a different size Removing the e...

Страница 7: ...hone left 2 R side earphone right Touch sensor L left Touch sensor R right R Touching these enables you to perform a variety of operations page 13 Operating with the touch sensors Raised dot indicatin...

Страница 8: ...310W Put the earphones into the charging cradle then close the charging cradle lid RZ B110W Put the earphones into the charging cradle n To turn the earphones on and off manually RZ B310W To power on...

Страница 9: ...4 Confirm that the earphones and the Bluetooth device are connected Important R Depending on the connected Bluetooth device a loud sound may be output during playback Check the volume setting of the B...

Страница 10: ...3 Turn on the Bluetooth device and enable the Bluetooth function on the next device you want to pair 4 From the Bluetooth menu of the Bluetooth device select device name RZ B310W or RZ B110W 5 Confir...

Страница 11: ...rtion is cleared Making a phone call With Bluetooth enabled phones cell phones or smartphones that support the HFP Bluetooth profile you can use the unit for phone calls HFP Hands Free Profile This pr...

Страница 12: ...howling may occur Do not cover and use the unit continuously 1 While wearing the earphones touch and hold the touch sensor L or R for about 3 seconds R The mode is switched each time you touch and hol...

Страница 13: ...the descriptions below RZ B310W Function Touch sensor L Touch sensor R Listening to music Playback pause Touch once Forward a track Touch rapidly 2 times Back a track Touch rapidly 2 times Making a ph...

Страница 14: ...R You can also use just one side of the earphones independently page 14 Using just one earphone Using just one earphone By pairing registering this unit you can also use just one of the earphones inde...

Страница 15: ...h device again Troubleshooting Before requesting service make the following checks If you are in doubt about some of the check points or if the remedies indicated do not solve the problem consult your...

Страница 16: ...the USB charging cord and plug it in again R If the charging time and operating time get shorter the batteries in the earphones and charging cradle may be getting depleted Cannot operate the earphones...

Страница 17: ...Earphones 3 7 V Lithium polymer 45 mAh Charging cradle 3 7 V Lithium polymer 400 mAh Operating time 1 Earphones Approx 5 0 hours Noise cancelling ON AAC Approx 6 0 hours Noise cancelling OFF AAC Appro...

Страница 18: ...ries from empty to full n Bluetooth section RZ B310W RZ B110W Bluetooth system specification Ver 5 3 Wireless equipment classification Class 2 Max RF Power e i r p 4 dBm Frequency band 2402 MHz to 248...

Страница 19: ...C Other system names and product names appearing in this document are in general the registered trademarks or trademarks of the respective developer companies Note that the TM mark and mark do not app...

Страница 20: ...ff the moisture well after washing page 20 When the earpieces are very dirty 3 Attach the earpieces R Make sure the earpieces are fitted firmly onto the earphones and confirm that they are not at an a...

Страница 21: ...e cotton swab to wipe away dirt 1 2 A Clean the charging contacts of charging cradle Use cotton swab to gently clean the charging contacts of the charging cradle 1 Use a cotton swab to the tip of the...

Страница 22: ...points in accordance with your national legislation By disposing of them correctly you will help to save valuable resources and prevent any potential negative effects on human health and the environme...

Страница 23: ...23 Notes...

Страница 24: ...Panasonic System Networks Malaysia Sdn Bhd 2023 PNQP1791ZA PP1222MU0...

Отзывы: