


- 9 -
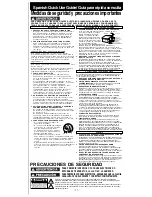
Spanish Quick Use Guide/ Guía para rápida consulta
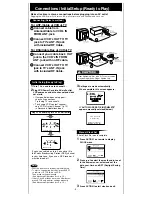
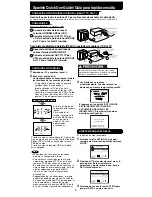
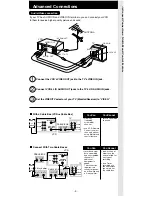
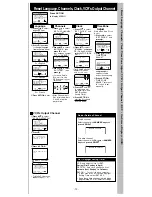
CONEXIONES
Conecte el cable de la antena al
terminal IN FROM ANT del VCR.
Conecte el terminal OUT TO TV del
VCR a la entrada de la antena VHF/UHF
del TV con el cable RF incluido.
Para Ant/Cable
➛
➛
➛
➛
➛
VCR
➛
➛
➛
➛
➛
TV
Para Sistema Digital de Satelite (DSS)/ Convertidor de cable
➛
➛
➛
➛
➛
VCR
➛
➛
➛
➛
➛
TV
Conecte la salida de convertidor de
cable al terminal IN FROM ANT.
Conecte el terminal OUT TO TV del
VCR a la entrada de la antena VHF/UHF
del TV con el cable RF incluido.
1
2
1
2
Realice la conexión de la antena o TV por cable antes de enchufar el cable de CA.
La videograbadora iniciará automáticamente la fijación de los canales y del reloj al enchufar el cable de CA.
2
1
2
1
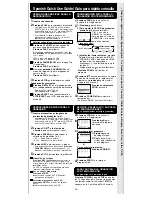
CONEXIONES/CONFIGURACIÓN INICIAL (READY TO PLAY)
1
Encienda el TV y cambie al canal 3.
2
Enchufe el cable de CA.
La videograbadora se encenderá e iniciará
las fijaciones de los canales y del reloj.
• Si la pantalla a continuación no aparece...
verifique todas las conexiones.
Intente sintonizar el TV en el canal 4.
• Para cambiar el canal de salida del VCR,
consulte las instrucciones de “VCR’s Output
Channel (Canal de salida del VCR)” en la
página 12 de las operaciones avanzadas.
Si está usando un convertidor de TV por cable
y en su area hay un canal de Public Broadcast
Station (PBS), ajuste su convertidor al canal
PBS de su area.
Si está usando un receptor DSS, este debe
estar apagado.
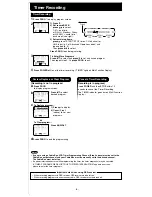
CONFIGURACIÓN INICIAL
3
Las fijaciones se realizan
automáticamente. Cuando termina las
fijaciones, aparecerá la siguiente pantalla.
Si aparece en la pantalla “AUTO CLOCK
SET IS INCOMPLETE (FIJACION
AUTOMATICA DEL RELOJ ES
INCOMPLETO)”, Ajuste el reloj como se
describe a continuación.
AJUSTE MANUAL DEL RELOJ
Si la fijación ha sido incompleta.
1
Presione la tecla ACTION en el control
remoto para visualizar la pantalla del menú
CLOCK.
2
Presione
para seleccionar el mes y
para ajustar. De la misma forma,
seleccione y ajuste la fecha, año, hora y
DST (Hora de Verano).
3
Presione dos veces la tecla ACTION para
poner el RELOJ en marcha y salir.
Enchufe el cable de CA.
Nota
• Los botones de funciones no funcionan
durante la configuración inicial.
• Para retirar un cassette durante el ajuste
automático, presione EJECT en el control
remoto o STOP dos veces en el aparato.
En este caso, los ajustes de los canales y la
hora se deben hacer manualmente. Para los
ajustes seleccione la pantalla MENU.
(Vea la p.12 de Libro de Operaciones
Avanzadas).
• Dependiendo de las condiciones, el ajuste
automático puede durar más de 30 minutos.
En ese caso, presione STOP para detener el
ajuste automático y realice los ajustes
manualmente en la pantalla MENU. (Vea la
p.12 de Libro de Operaciones Avanzadas).
AUTO CLOCK SET
IS I NCOMPLETE
PLEASE SET CLOCK BY
PRESSING ACT I ON KEY
AUTO CLOCK SET
PROCEEDING
CANCEL : STOP
CH AUTO SET PROCEEDING
CANCEL : STOP
Al usar cables coaxiales RF del tipo “tuerca”,
apriételos solamente con los dedos. Un apriete
excesivo puede dañar los terminales.
Al inicio, el idioma de
la pantalla está fijado a
inglés.
Para cambiar el
idioma, seleccione la
pantalla MENU (para
su ayuda vea la
página 12 de las
operaciones
avanzadas.)