background image

31

31

Fonctions avancées

G

AUDITOIRE GÉNÉRAL:
Convient à tous les auditoires.

PG

SUPERVISION PARENTS:
Certaines scènes pourraient ne pas 
convenir à un jeune auditoire.

PG-13

JUGEMENT PARENTS:
Certaines scènes pourraient ne pas 
convenir à des enfants de moins de 13 ans.

R

17 ANS +:
Les enfants de moins de 17 ans doivent 
être accompagnés d’un adulte.

NC-17

+DE 17 ANS SEULEMENT

X

AUDITOIRE ADULTE

ÉMISSIONS TÉLÉ USA Tableau 2

 ÉMISSIONS TÉLÉ USA Tableau 1 

 COTES DES FILMS USA

Classifi cations québécoises

G

Auditoire général

8 ANS +

Non recommandé pourde jeunes 
enfants

13 ANS +

Contenu pourrait ne pas convenir à 
des enfants de moins de 13 ans

16 ANS +

Contenu pourrait ne pasconvenir à 
des enfantsde moins de 16 ans

18 ANS + Adultes seulement

TV-Y

POUR ENFANTS: 
Contenu conçu spécialement pour 
enfants de 2 à 6 ans.

TV-Y7

7 ANS +: 
L’émission comporte des scènes de 
violence burlesque pouvant effrayer de 
jeunes enfants.

TV-G

VISA GÉNÉRAL: 
L’émission comporte peu ou pas de 
scènes de violence, ni paroles 
grossières, ni dialogues ou scènes de 
nature érotique.

TV-PG

SUPERVISION PARENTS: 
L’émission peut contenir des scènes de 
violence, des propos parfois grossiers et 
certains dialogues ou scènes de nature 
érotique.

TV-14

JUGEMENT PARENTS: 
L’émission peut traiter de sujets délicats 
et comporter des scènes de violence, 
des propos grossiers et des scènes de 
nature érotique.

TV-MA

AUDITOIRE ADULTE: 
L’émission peut traiter de sujets délicats 
et comporter des érotiques propos 
grossiers et des scènes érotiques.

FV

Violence-fi ction

V

Violence

S

Sexualité

L

Langage vulgaire

D

Sujet délicat

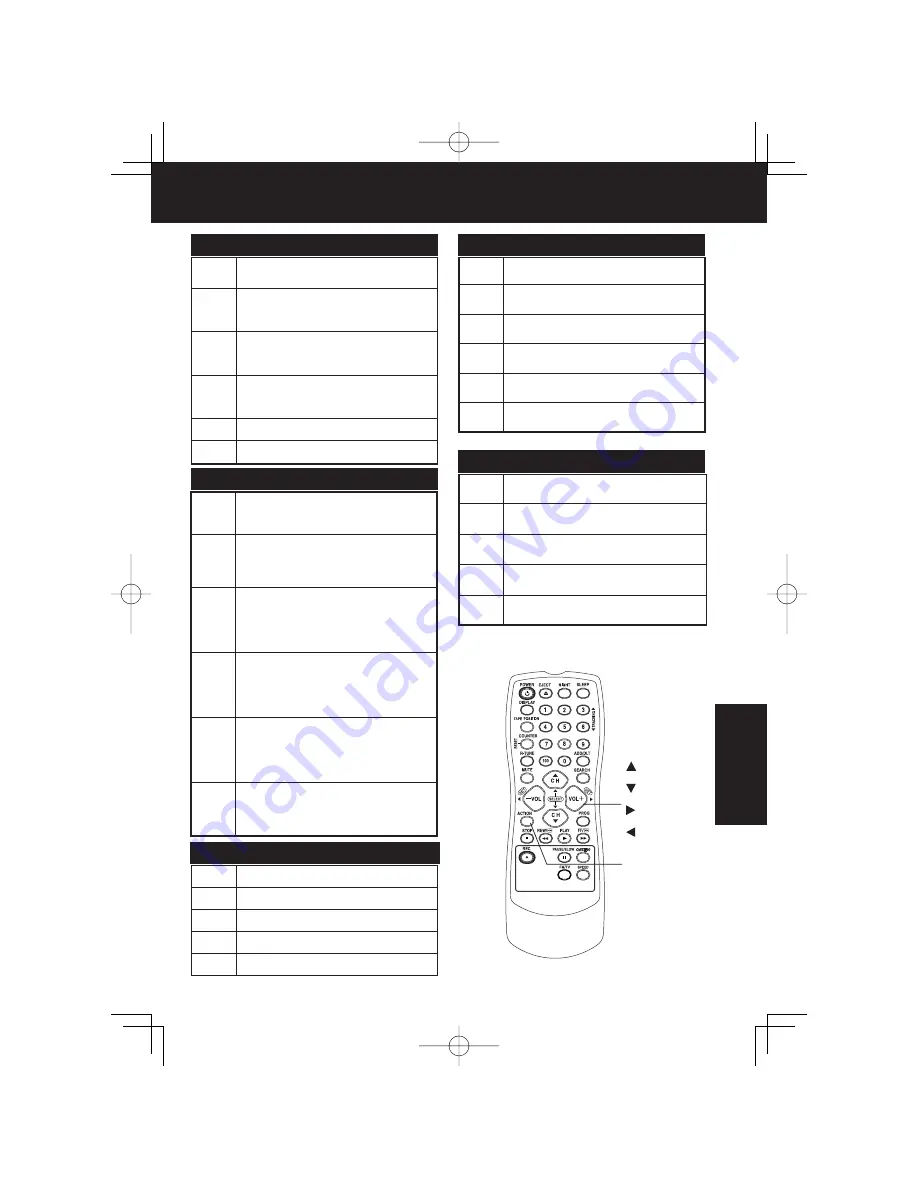
Action

Touches de 
sélection/réglage

  : Avance des 

canaux

  : Régression 

des canaux

  : Augmentation 

du volume

  : Diminution 

du volume

Classifi cations canadiennes

C

Pour enfants

C8+

Pour enfants de 8 ans et plus

G

Auditoire général

PG

Surveillance parentale

14+

14 ans et plus

18+

18 ans et plus

Содержание PV-C1323-K

Страница 1: ... No PV C1323 K PV C1333W K LSQT0715A Basic Operation Initial Setup TV Operation Timer Operation Advanced Operation For Your Information As an ENERGY STAR Participant Panasonic has determined that this product or product model meets the ENERGY STAR guidelines for energy efficiency Combination VCR Operating Instructions For assistance please call 1 800 561 5505 or visit us at www panasonic ca ...

Страница 2: ...htning storm or before leaving unit unused for extended periods of time disconnect all equipment from the power source as well as the antenna and cable system 4 WHEN UNIT IS PLUGGED IN DO NOT OPERATE IF liquid has spilled into unit unit was dropped or otherwise damaged unit emits smoke malodorous or noises Immediately unplug unit and have it inspected by a service technician to avoid potential fir...

Страница 3: ...o avoid any problems CAUTION TO REDUCE THE RISK OF ELECTRIC SHOCK DO NOT REMOVE COVER OR BACK NO USER SERVICEABLE PARTS INSIDE REFER SERVICING TO QUALIFIED SERVICE PERSONNEL RISK OF ELECTRIC SHOCK DO NOT OPEN CAUTION Congratulations Accessories Battery replacement caution Do not mix old and new batteries Do not mix alkaline with manganese batteries Break off the tab to prevent recording Record Tab...

Страница 4: ...diagonal 90 deflection Picture Tube VCR Video Recording System 2 rotary heads helical scanning system Audio Track 1 track Tuner Broadcast Channels VHF 2 13 UHF 14 69 CABLE Channels Midband A through I 14 22 Superband J through W 23 36 Hyperband AA EEE 37 64 Lowband A 5 A 1 95 99 Special CABLE channel 5A 01 Ultraband 65 94 100 125 FM Radio Band Range 87 5 MHz 108 1 MHz General Power Source 120 V AC...

Страница 5: ...onnections Initial Setup Ready to Play 8 Reset Language Channels Clock Time Zone Adjust 10 Playback a Tape 12 Record On a Tape 12 Copy Your Tapes Dubbing 13 TV Operation 14 Picture Adjustment 15 TV Timer Features 16 Closed Caption System 18 FM Radio 20 Timer Recording 22 Tape Operation 24 Special VCR Features 27 V Chip Control Feature 28 On Screen Display OSD 33 Before Requesting Service 34 Limite...

Страница 6: ...sition and amount of tape remaining REC Records the program SEARCH Goes directly to the desired recording Locates end point of recording COUNTER RESET Resets to 0 00 00 at the desired position EJECT Ejects tape POWER Turns unit on or off FM TV Receives FM radio signal MUTE Mutes the sound instantly CHANNEL UP DOWN Selects a channel SELECT UP DOWN Controls navigation around on screen menu ACTION Di...

Страница 7: ...See page 8 AUDIO VIDEO IN Jack For dubbing POWER Turns unit on or off VOLUME UP DOWN Adjusts volume SET BACK SPACE Sets a selected menu or goes back to correct CHANNEL UP DOWN Selects a channel TRACKING UP DOWN Reduces picture noise during Playback and Slow Motion SELECT UP DOWN Controls navigation around on screen menu STOP Stops recording or playback EJECT Ejects tape ACTION Press together with ...

Страница 8: ...cks Finger tighten only Please make all cable or antenna connections before power on Cable TV Converter Box CH AUTO SET PROCEEDING PROCEEDING AUTO CLOCK SET CANCEL STOP 4 Connecting IN from ANT CABLE Press COMBO on the remote for Combo mode Press POWER on the remote or unit 2 UNIT rear view UNIT rear view For DSS Cable Box Connect the OUT jack on your cable box to the VHF UHF terminal on the unit ...

Страница 9: ...nd set the date year time and DST Daylight Saving Time SET CLOCK DST ON SET COMPLETED 2 6 2003 THU 12 00PM SET START ACT ION 3 Press ACTION twice to start CLOCK and exit 3 1 2 Turn the unit Power on POWER ACTION SELECT SET CH UP CH DOWN VOL UP VOL DOWN Note to CABLE System Installer This reminder is provided to call the CABLE Cable TV System Installers attention to Article 820 40 of the NEC that p...

Страница 10: ...CT I ON SEL BLOCAGE 1 Press to select language icon 2 Press ACTION repeatedly For English MAIN MENU HELLO LANGUAGE SET ACT I ON SELECT TV EX I T CLOCK CH LOCK For Spanish For French Language MAIN MENU EX I T CLOCK CH LANGUAGE SET ACT I ON SELECT LOCK TV Channels Clock Press ACTION to display MAIN MENU 3 Press to select EXIT Press ACTION to exit 1 Press to select CH MAIN MENU CLOCK CH SET ACT ION S...

Страница 11: ... To add channel Select channel with number keys and press ADD DLT CHANNEL 08 DELETED To delete channel Select channel with CH or number keys and press ADD DLT ACTION key on the unit Using keys CH UP CH DOWN VOLUME UP VOLUME DOWN Whenever the menu or program screen is displayed CHANNEL UP DOWN function as and VOLUME UP DOWN function as only On Remote On Unit On Unit You can operate the menu screen ...

Страница 12: ...earch Press FF or REW Press PLAY to release Still Freeze picture Press PAUSE SLOW Press PLAY to release Slow Motion picture Hold down PAUSE SLOW in Still mode Press PLAY to release Frame by Frame picture Press PAUSE SLOW in Still mode Press PLAY to release Press SPEED to select recording speed see page 4 SP Standard Play LP Long Play SLP Super Long Play Selected speed is displayed Press REC to sta...

Страница 13: ...ress PAUSE SLOW to start dubbing Press STOP to stop dubbing Selecting Input Mode Method 1 Press CH The display will change as follows Method 2 a Press ACTION for MAIN MENU b Press to select TV then press ACTION for SET UP TV screen c Press to select INPUT SELECT and then press to select TUNER or LINE d Press ACTION twice to exit this mode Unauthorized exchanging and or copying of copyrighted recor...

Страница 14: ...previous sound level Phones Connect an earphone not supplied or headphones not supplied to the Phones Jack NIGHT Mode Color and picture intensity levels are adjusted so the screen is easier on your eyes during night time use Press NIGHT to set NIGHT mode NIGHT mode may be selected when watching TV or playing a tape Press NIGHT to cancel Previous settings are restored NIGHT mode is cancelled when p...

Страница 15: ...T LOCK TV COLOR T INT BRIGHTNESS P ICTURE SHARPNESS NORMAL END ACT I ON SELECT ADJUST COLOR T INT BRIGHTNESS P ICTURE SHARPNESS NORMAL SELECT SET END ACT I ON 5 2 Picture Adjustment COLOR Control Adjust colour intensity TINT Control Adjust for natural flesh tones BRIGHTNESS Control Adjust picture brightness PICTURE Control Adjust picture intensity by adjusting both contrast and colour level in the...

Страница 16: ...tion order 4 Press to select ALARM ON or OFF When ON is selected an alarm will gradually increase in volume for one minute or until cancelled by pressing any button including VOL To Make Corrections use and to move back and correct 5 Press PROG to set ON TIMER ON TIMER SET is displayed ON TIMER Indicator lights on the unit To Cancel ON TIMER Repeat steps 1 and 2 Then press ADD DLT to clear the tim...

Страница 17: ... 15 countdown will restart from 15 00 If current time remaining is 9 15 countdown will restart from 10 00 Alarm will sound at 0 00 Press any button to stop The volume of the alarm gradually increases for one minute and then continues to beep until any button is pressed Pressing TIMER FM repeatedly on the unit will change display as follows Press TIMER FM on the unit to display the instant alarm CA...

Страница 18: ...e CAP C1 or C2 A narration of selected TV programs is displayed Check TV program listings for CC Closed Caption broadcasts Caption Mode TEXT C1 or C2 The lower half of the screen will be blocked out When the TV station broadcasts information such as program listings it will appear in this space Caption Mode OFF Closed Caption Text narration will not be displayed NOTES The closed caption or text si...

Страница 19: ...Caption narration if available is displayed when MUTE button is pressed Press ACTION to display MAIN MENU 1 Press to select TV 2 Press ACTION to display SET UP TV screen 1 Press to select CAPTION 2 Press to display CAPTION screen 1 Press to select CAPTION MODE 2 Press repeatedly to select OFF Press MUTE to mute the sound and display closed captioning To cancel press MUTE again CAPTION CAPT I ON MO...

Страница 20: ...adio is This unit has an FM radio with built in antenna 9 station preset and a band range of 87 5 108 1 MHz You can set the On Timer page 16 to wake up to your favourite radio station FM ANTENNA Setup 1 2 Make sure FM tuning is done correctly see FM Radio Setup Press ACTION to display MAIN MENU 1 Press to select TV 2 Press ACTION to display SET UP TV screen Press ACTION twice to end setup FM 1 87 ...

Страница 21: ...press DISPLAY If DISPLAY is pressed again the unit status screen appears How to use the FM radio FM 1 87 5MHz 12 00PM 1 2 Press FM TV on the remote or press TIMER FM twice on the unit to display FM radio mode To cancel press FM TV on the remote or TIMER FM twice on the unit POWER POWER VIDEO IN AUDIO IN VOL CH STOP EJECT REW PLAY REPEAT FF REC TIMER FM ACTION REC ON TIMER PROG TIMER TIMER FM SELEC...

Страница 22: ...CEL ADD DLT SELECT SET END PROG Press PROG twice to exit this mode If you re using a cable box make sure that it is tuned to the desired channel and the power is left on for timer recording PROG TIMER indicator lights on the unit 5 2 3 7 FRI TODAY DATE START STOP CH SP SELECT SET END PROG 1 Press to select TIMER PROGRAMMING 2 Press to display screen If a program is already in memory press and to s...

Страница 23: ...ce or Clear Program Contents Recording is not in progress 2 minutes before Timer recording is performed PLEASE PREPARE FOR TIMER REC appears and or the PROG TIMER Indicator flashes Be sure a cassette with record tab is loaded and the unit is in Stop mode If the start times of two programs overlap the lower numbered program will have priority If the start time for a Timer Recording comes up during ...

Страница 24: ...RCH FF REVERSE SEARCH REW EX I T SEARCH INDEX SEARCH Tape Operation POWER POWER VIDEO IN AUDIO IN VOL CH STOP EJECT REW PLAY REPEAT FF REC TIMER FM ACTION REC ON TIMER PROG TIMER REW FF SEARCH FF REW NUMBER Keys 2 Play begins at search end To search forward or back 1 index press FF or REW while screen left is displayed 10 sec FORWARD SEARCH FF REVERSE SEARCH REW INDEX SEARCH NOTE indicates start p...

Страница 25: ...yback begins if tape has no record tab Auto Rewind Tape reaches its end Rewind Stop Playback Auto Eject Repeat Play is OFF Tape with no record tab reaches its end Rewind Stop Eject DETECTING TAPE POSITION only appears the first time a cassette is inserted and it takes several seconds for correct indication to appear The present tape position indication is displayed Press TAPE POSITION or wait 5 se...

Страница 26: ... select skip time in Play mode No indication appears Commercial Skip By pressing the CM ZERO button in Playback mode you can skip over 1 to 3 minutes of recorded tape in just a few seconds Repeat Play Set to see a recording over and over Playback repeats when tape end is reached or unrecorded portion over 30 seconds is detected In PLAY mode press PLAY REPEAT on the unit to turn ON PLAY REPEAT ON P...

Страница 27: ...If unit is connected to equipment which has blue back feature selecting ON will have no effect on the other equipment VCR Lock All operations are prohibited except Timer recording and tape eject Useful for families with small children VCR LOCK ACT IVATED VCR LOCK OFF 4 Press ACTION to display MAIN MENU Press ACTION twice to return to the normal screen Notes VCR Lock is cancelled automatically afte...

Страница 28: ...E Step 2 not necessary when changing rating or secret code Take care that you are not observed entering the secret code To Make Corrections Press repeatedly to move the cursor Press number keys to make the correction V Chip Control Feature SELECT SET CH UP CH DOWN VOL UP VOL DOWN ADD DLT NUMBER Keys ACTION V Chip Control Feature is This unit has a built in V Chip Control which allows you to block ...

Страница 29: ...ss to select CHANGE SETTINGS 2 Press to display screen You may select from standard TV ratings chart 1 or customize to a specific content rating chart 2 4 Press to select and to set ratings to be blocked See page 31 Ratings highlighted in Green will be blocked Ratings in white letters will not be blocked Note Blocking Process of V Chip Control Feature Setup US MOVIES OFF CHANGE SETT I NGS US TV PR...

Страница 30: ...MS Some TV shows such as news sports weather bulletins and emergency information usually have no ratings 3 1 Press to select CHANGE SETTINGS 2 Press to display screen 4 1 Press to select VIEW E PROGRAMS 2 Press to set YES or NO 5 Repeatedly press to select and to set ratings to be blocked See ratings chart on next page Press ACTION four times to exit this mode 1 1 Press to select NEXT PAGE 2 Press...

Страница 31: ...or sexual dialogue or situations PARENTAL GUIDANCE May contain infrequent coarse language limited violence some suggestive sexual dialogue and situations PARENTS CAUTIONED May contain sophisticated themes sexual situations strong language and more intense violence MATURE AUDIENCE May contain mature themes profane language graphic violence and sexual situations US TV PROGRAMS RATINGS Chart 2 US TV ...

Страница 32: ...en power is turned off or power failure occurs Deactivate V Chip Control Enter your secret code steps 1 3 page 28 Then set US MOVIES and or US TV PROGRAMS and or CANADIAN ENGLISH LANGUAGE and or CANADIAN FRENCH LANGUAGE to OFF using and Ratings set on pages 29 30 are retained and will be in effect when V Chip Control is activated again STOP 11 00AM 0 12 34 SP NO V CHIP DATA CH08 If DISPLAY is pres...

Страница 33: ... Function Display On Screen Display OSD OSD CAUTION Page PLEASE SET CLOCK BY PRESSING ACTION KEY If you attempt to set or review a Timer Recording or set the On Timer and the Clock is not set 8 11 CHECK CASSETTE RECORD TAB If you press REC and a cassette is inserted with no record tab 3 12 TO CANCEL TIMER REC HOLD DOWN STOP KEY FOR APPROX 3 SEC If you press STOP during a Timer Recording 23 NO CASS...

Страница 34: ...rding may not be performed or continued if a power interruption of more than 1 minute occurs before or during a Timer Recording even after power is restored No playback picture or the playback picture is noisy or contains streaks Adjust TRACKING control in either direction P 4 Try Head Cleaning P 4 VCR cannot be controlled Make sure VCR LOCK is set to off P 27 Make sure unit is not in a Timer Reco...

Страница 35: ...EXPRESS LIMITED WARRANTY IS IN LIEU OF ALL OTHER WARRANTIES EXPRESS OR IMPLIED EXCLUDING ANY IMPLIED WARRANTIES OF MERCHANTABILITY OR FITNESS FOR A PARTICULAR PURPOSE IN NO EVENT WILL PANASONIC CANADA INC BE LIABLE FOR ANY SPECIAL INDIRECT OR CONSEQUENTIAL DAMAGES In certain instances some jurisdictions do not allow the exclusion or limitation of incidental or consequential damages or the exclusio...

Страница 36: ...hones 14 Picture Adjustment 15 Playback 12 R Rapid Tune 14 Record 12 Record Playback Speed Settings 4 Remote Control Buttons 6 Repeat Play 26 Reset all unit Memory Functions 9 Reverse Search 12 Rewind 12 S Selecting Input Mode 13 Sleep Timer 17 Slow Motion 12 Special VCR Features 27 Specifications 4 Still Freeze Picture 12 Stop 12 T Tape Erasure Prevention 3 Tape Position Display 25 Timer Program ...

Страница 37: ...mbiné télé magnétoscope Manuel d utilisation Modèles PV C1323 K PV C1333W K LSQT0715A Fonctions de base Réglage initial Fonctionnement du télé viseur Fonctionnement de la minuterie Fonctions avancées Autres fonctions À titre de partenaire du programme ENERGY STAR Panasonic assure que cet appareil ou ce modèle satisfait aux normes d efficacité énergétique du programme Pour de l aide composez le 1 8...

Страница 38: ... exposé à la pluie l humidité ou a subi un choc violent le débrancher et le faire vérifier par un technicien qualifié avant de l utiliser 3 En cas d orage Pendant un orage ou si l appareil n est pas utilisé pendant une période prolongée débrancher tout équipement des prises de courant ainsi que l antenne ou le câble 4 Avec l appareil branché NE PAS UTILISER L APPAREIL SI un liquide a été répandu à...

Страница 39: ...ation dans un triangle équilatéral indique que le manuel d utilisation inclus avec l appareil contient d importantes recommandations quant au fonctionnement et à l entretien de ce dernier Il faut donc le lire attentivement Félicitations Accessoires Avertissement Ne pas utiliser une pile neuve avec une pile usagée Ne pas utiliser une pile alcaline avec une pile au manganèse Briser la languette Lang...

Страница 40: ...ée 2 Heures 4 Heures 5 Heures 20 Minutes SLP Ultra longue durée 3 Heures 6 Heures 8 Heures Affichage Tube image Tube image de 33 cm 13 po mesuré en diagonale à 90 Magnétoscope Système d enregistrement vidéo Balayage hélicoïdal à 2 têtes rotatives Système audio 1 piste Bloc d accord Canaux télévisés VHF 2 à 13 UHF 14 à 69 Canaux câblodistribués Bande moyenne A à I 14 à 22 Bande supérieure J à W 23 ...

Страница 41: ...ture 12 Enregistrement 12 Duplication Copie de cassettes 13 Visionnement 14 Réglage de l image 15 Minuterie du téléviseur 16 Affichage des sous titres 18 Radio FM 20 Enregistrement différé 22 Fonctions de défilement 24 Caractéristiques spéciales 27 Discrétion parentale 28 Affichages à l écran 33 Guide de dépannage 34 Garantie Liste des centres de service 35 Index 36 Fonctions de base Réglage initi...

Страница 42: ...Repérage rapide de l enregistrement désiré Repère la fin des enregistrements Remise à zéro du compteur Remise à 0 00 00 à la position désirée Éjection Éjection de la cassette Interrupteur Mise en hors marche de l appareil FM Téléviseur Réception radio dans la bande FM Réglage silencieux Coupure instantanée du son Changement de canal Sélection d un canal Sélection Pour naviguer dans le menu affiché...

Страница 43: ...ors marche de l appareil Volume Réglage du volume Réglage recul Règle un menu sélectionné ou recul pour corriger Changement de canal Sélection d un canal Pistage Réduction du bruit vidéo pendant la lecture et le ralenti Sélection Pour naviguer dans le menu affiché à l écran Arrêt Arrêt de l enregistrement ou de la lecture en cours Éjection Éjection de la cassette Action Appuyer de pair avec la tou...

Страница 44: ... COURS REGLAGE AUTOMATIQUE DE L HORLOGE ANNULER APP STOP 4 Raccordements Appuyer sur COMBO sur la télécommande pour accéder au mode télé magnétoscope Appuyer sur POWER sur la telecommande ou l appareil 2 Panneau arrière Câblosélecteur Récepteur DSS Au moyen d un câble RF relier la prise OUT du câblosélecteur à la borne VHF UHF de l appareil Réglage initial pour le raccordement à une antenne câblod...

Страница 45: ...ans le logement Réglage manuel de l horloge Si le réglage automatique de l horloge n a pas fonctionné régler de la manière suivante 1 2 Appuyer sur ACTION sur la télécommande pour faire afficher le menu REGLAGE HORLOGE Appuyer sur pour sélectionner le mois et appuyer sur pour régler Régler la date l année l heure et l heure avancée HR ETE de la même façon 2 5 2003 MER 12 00PM REGLAGE TERMINE 3 App...

Страница 46: ...onner REGLAGE AUTO puis appuyer sur Une fois le réglage automatique des canaux terminé le réglage automatique de l horloge s amorce Si l horloge a été réglée manuellement le réglage automatique de l horloge n est pas fait automatiquement 1 Appuyer sur pour sélectionner CANAL 2 Appuyer sur ACTION 4 Appuyer sur et sur pour sélectionner et régler le mois la date l année l heure et l heure avancée HR ...

Страница 47: ...iques puis appuyer sur ADD DLT Commande ACTION sur le combiné Il est possible de naviguer dans les menus au moyen des touches de commande du combiné Pour afficher le menu appuyer simultanément sur les touches STOP EJECT et REW sans qu il n y ait de cassette dans l appareil Pour quitter le menu recommencer comme décrit ci dessus avec ou sans cassette dans l appareil jusqu à ce que l écran normal ap...

Страница 48: ...nce image par image Appuyer sur PAUSE SLOW en mode arrêt sur image Appuyer sur PLAY pour désactiver Appuyer sur SPEED pour sélectionner la vitesse de défilement voir page 4 SP Standard LP Longue durée SLP Ultra longue durée La vitesse sélectionnée s affiche Appuyer sur REC pour lancer l enregistrement Pour ne pas enregistrer certains passages appuyer sur PAUSE SLOW pour interrompre l enregistremen...

Страница 49: ...entrée ci dessous Appuyer sur REC puis immédiatement sur PAUSE SLOW pour mettre en mode attente Appuyer sur PAUSE SLOW pour amorcer la duplication Appuyer sur STOP pour arrêter la duplication Sélection du mode d entrée Méthode 1 Appuyer sur CH L affichage change dans I ordre suivant Méthode 2 a Appuyer sur ACTION pour afficher le menu b Appuyer sur pour sélectionner TELE puis appuyer sur ACTION po...

Страница 50: ...e de courant NUIT Utiliser CH ou les touches numériques pour sélectionner un canal 2 CA 08 3 Appuyer sur VOL ou VOL pour régler le volume 24 Prise de casque d écoute Interrupteur Volume Changement de canal Visionnement Liste des préparatifs tous les raccordements ont été faits l appareil est branché Utilisation de la touche 100 Pour sélectionner les canaux 100 à 125 au moyen des touches numériques...

Страница 51: ...r sélectionner et régler NORMAL de manière à rétablir tous les réglages implicites Appuyer sur ACTION à trois reprises pour quitter ce mode 5 2 Action Interrupteur Réglage silencieux Changement de canal Volume Touche 100 Syntonisation rapide Touches numériques Nuit Couleur Pour régler l intensité des couleurs Nuances Pour obtenir une carnation plus naturelle Brillance Pour régler la brillance de l...

Страница 52: ...ssion de n importe quelle touche y compris VOL Pour procéder à des corrections Utiliser les touches et pour passer au réglage à corriger 5 Appuyer sur PROG pour compléter le réglage de la minuterie de mise sous tension Le message MINUTERIE DE MISE SOUS TENSION REGLEE est affiché L indicateur de minuterie s allume sur le panneau avant 1 Appuyer sur pour sélectionner MINUTERIE MISE S TENSION 2 Appuy...

Страница 53: ...5 ou 10 minutes Voir le tableau à gauche Exemple S il reste 12 15 le compte à rebours redémarre à 15 00 S il reste 9 15 le compte à rebours redémarre à 10 00 L alarme se déclenche à 0 00 Appuyer sur n importe quelle touche pour mettre l alarme hors fonction Le volume de l alarme augmente graduellement pendant une minute puis se poursuit jusqu à ce qu une touche soit pressée Une pression répétée de...

Страница 54: ...ide télé pour la liste de telles émissions Mode sous titres TEXTE C1 ou C2 Le bas de l écran est réservé pour l affichage de textes télédiffusés par certaines stations tels que liste de programmes télé informations diverses etc Mode sous titres NON Aucun sous titre n est affiché même si une émission codée pour malentendants est diffusée Enregistrement et lecture d une émission avec sous titres tex...

Страница 55: ...sous titrage une pression de la touche MUTE appelle l affichage des sous titres Appuyer sur ACTION pour afficher l écran MENU 1 Appuyer sur pour sélectionner TELE 2 Appuyer sur ACTION pour afficher l écran REGLAGE TELEVISEUR 1 Appuyer sur pour sélectionner SOUS TITRES 2 Appuyer sur pour afficher l écran SOUS TITRES 1 Appuyer sur pour sélectionner MODE S TITRES 2 Appuyer sur à plusieurs reprises po...

Страница 56: ...né pour afficher l écran du mode radio FM Radio FM L appareil possède une radio FM avec antenne intégrée II est possible de présyntoniser 9 stations dans une bande de fréquence de 87 5 108 1 MHz La minuterie de mise en contact différée page 16 peut également être réglée pour se réveiller au son de la radio Réglage de l antenne FM 1 2 S assurer de bien syntoniser la station dans la bande FM voir ci...

Страница 57: ...uveau l écran d état apparaît Écoute de la radio FM FM 1 87 5MHz 12 00PM 1 2 Appuyer sur FM TV sur la télécommande ou TIMER FM à deux reprises sur le combiné pour afficher l écran du mode radio FM Pour annuler le mode radio FM appuyer à nouveau sur FM TV sur la télécommande ou TIMER FM à deux reprises sur le combiné POWER POWER VIDEO IN AUDIO IN VOL CH STOP EJECT REW PLAY REPEAT FF REC TIMER FM AC...

Страница 58: ...que le contact est établi sur le câblosélecteur et que le canal approprié est syntonisé L indicateur d enregistrement différé apparaît sur le panneau avant 5 2 3 1 Appuyer sur pour sélectionner PROGRAMMATION MINUTERIE 2 Appuyer sur pour afficher Si un programme a déjà été mémorisé appuyer sur et pour sélectionner un numéro de programme libre Appuyer sur pour sélectionner et ou pour régler la DATE ...

Страница 59: ...pparaît et ou l indicateur d enregistrement différé clignote Vérifier si une cassette avec languette de prévention d effacement a été insérée dans l appareil et que l appareil est en mode arrêt Si les heures du début de l enregistrement de deux programmes se chevauchent le programme auquel est assigné le plus petit numéro a la priorité Si l heure du début d un enregistrement différé survient penda...

Страница 60: ...lement POWER POWER VIDEO IN AUDIO IN VOL CH STOP EJECT REW PLAY REPEAT FF REC TIMER FM ACTION REC ON TIMER PROG TIMER Rebobinage Avance accélérée Recherche Avance accélérée Rebobinage Touches numériques 2 Appuyer sur FF ou REW pour lancer la recherche La lecture s amorce à la fin de la recherche Pour poursuivre la recherche ou reculer d un index appuyer sur FF ou REW pendant l affichage de l écran...

Страница 61: ...nguette de protection Rebobinage automatique Fin de bande Rebobinage Arrêt Éjection automatique après lecture la lecture en reprise est réglée à NON Cassette en fin de bande sans languette de protection Rebobinage Arrêt Éjection L affichage RECHERCHE POSITION BANDE apparaît seulement à la première insertion d une cassette l indication de la position de la bande s affiche après plusieurs secondes L...

Страница 62: ...ion de la touche CM ZERO en mode lecture il est possible de sauter de 1 à 3 minutes d enregistrement en seulement quelques secondes sautde1min sautde2min sautde3min Lecture en reprise Cette fonction permet de répéter plusieurs fois la lecture d un même enregistrement En fin de bande ou si un passage vierge de plus de 30 secondes est détecté la lecture recommence En mode lecture appuyer sur PLAY RE...

Страница 63: ...u magnétoscope Toute opération autre que l enregistrement différé et l éjection est interdite Cela s avère particulièrement utile pour des parents ayant de jeunes enfants 4 Appuyer sur ACTION pour afficher l écran MENU Appuyer à deux reprises sur ACTION pour revenir à l écran normal Le mode verrouillage du magnétoscope est automatiquement annulé après 24 heures si l horloge a été réglée En mode ar...

Страница 64: ...u de personne d autre Pour apporter des corrections Appuyer à répétition sur pour déplacer le curseur puis sur les touches numériques pour faire les corrections Fonction de discrétion parentale puce antiviolence Le combiné est équipé d une fonction de discrétion parentale qui permet de bloquer la réception d émissions cote TELE USA de films cote FILMS USA de classifications canadiennes ou classifi...

Страница 65: ... visa Certains films tels que de vieux longs métrages ou des films étrangers peuvent ne pas avoir de cote 4 Appuyer sur pour sélectionner et appuyer sur pour régler BLOQUE ou DEBLOQUE Voir page 31 5 Appuyer sur ACTION pour faire afficher à nouveau le menu de BLOCAGE et poursuivre le réglage selon les instructions données à la page 29 ou appuyer à trois reprises sur ACTION pour quitter 5 Appuyer à ...

Страница 66: ...t pas affiché se reporter à la section Entrer le mot de passe à la page 28 2 1 Appuyer sur pour sélectionner CANADA QUEBEC 2 Appuyer sur pour régler OUI ou NON Classifications québécoises 6 Émissions exemptées Certaines émissions de télévision telles que bulletins de nouvelles reportages sportifs bulletins météo et informations d urgence ne font généralement l objet d aucune classification 3 1 App...

Страница 67: ...ion comporte des scènes de violence burlesque pouvant effrayer de jeunes enfants TV G VISA GÉNÉRAL L émission comporte peu ou pas de scènes de violence ni paroles grossières ni dialogues ou scènes de nature érotique TV PG SUPERVISION PARENTS L émission peut contenir des scènes de violence des propos parfois grossiers et certains dialogues ou scènes de nature érotique TV 14 JUGEMENT PARENTS L émiss...

Страница 68: ...t étapes 1 3 page 28 puis mettre la sélection de classifications choisie émissions télé films US Canada à NON au moyen des touches et Les réglages effectués aux pages 29 30 sont conservés en mémoire et seront rappelés lors de la réactivation de la puce antiviolence Une pression sur la touche DISPLAY fait afficher la classification même quand la fonction de discrétion parentale est désactivée Class...

Страница 69: ... été réglée 8 11 VERIFIER CASSETTE LANGUETTE DE PROTECTION Si la touche REC de la télécommande ou de l appareil a été pressée et que la cassette utilisée n est munie d aucune languette de prévention d effacement 3 12 POUR ANNULER L ENREGISTREMENT DIFFERE APPUYER SUR LA TOUCHE STOP PENDANT ENVIRON 3 SECONDES Si la touche d arrêt est pressée durant un enregistrement différé 21 AUCUNE CASSETTE INSERE...

Страница 70: ...y a pas d image à la lecture ou l image est parasitée ou comporte des lignes Utiliser la commande de pistage TRACKING pour régler l image P 4 Vérifier si le nettoyage des têtes réussit à régler le problème P 4 Les commandes du magnétoscope n ont aucun effet S assurer que la fonction de verrouillage du magnétoscope est désactivée P 27 S assurer qu un enregistrement différé n a pas été programmé Tél...

Страница 71: ...ARANTIE EXPRESSE OU IMPLICITE EXCLUANT LES GARANTIES IMPLICITES DU CARACTÈRE ADÉQUAT POUR LA COMMERCIALISATION OU UN USAGE PARTICULIER PANASONIC N AURA D OBLIGATION EN AUCUNE CIRCONSTANCE POUR TOUT DOMMAGE DIRECT INDIRECT OU CONSÉCUTIF Certaines juridictions ne reconnaissent pas les exclusions ou limitations de dommages indirects ou consécutifs ou les exclusions de garanties implicites Dans de tel...

Страница 72: ...placement des commandes 6 7 Enregistrement 12 Enregistrement différé 22 Entrer le mot de passe 28 F Fonctions automatiques 25 Fuseau horaire 11 G Garantie Liste des centres de service 35 Guide de dépannage 34 H Heure avancée heure d été 4 Horloge REGLAGE HORLOGE 10 I Importantes mesures de sécurité 2 Insertion des piles 3 L Langue 10 Lecture 12 Lecture au ralenti 12 Lecture en reprise 26 Ligne d é...

Отзывы: