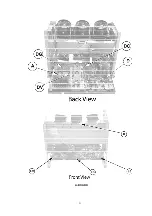
Screen frame removal
1. Remove the speaker grille. Disconnect the cables leading to the
keyboard and the AV panels and remove the keyboard and AV panel
assembly. The assembly is secured by three (3) screws.
2. At this point the front cover is held only by four screws, be careful not
to push the cabinet forward.
3. Remove screws and tilt the assembly forward while lifting it out of
place.
Screen assembly
1. Remove the screen frame. See screen frame removal procedure above.
2. Place screen frame face down on a soft surface.
3. Remove all screen brackets and corner brackets
Note:
The brackets are painted black (permanent marker) on the edge to prevent reflection on image.
Screen assembly
29
Содержание PT47WX34J - 47" PROJECTION TV
Страница 24: ...D656 MAZ41100MF DIODE ZENER 24 ...
Страница 41: ...M006 TXF3A01ECV DAG GND 41 ...
Страница 113: ...5 PTV Location of controls 10 ...
Страница 124: ...A BOARD 21 ...
Страница 125: ...D BOARD 22 ...
Страница 126: ...R BOARD VIEW DC BOARD TOP VIEW 23 ...
Страница 127: ...DC BOARD BOTTOM VIEW DV BOARD 24 ...
Страница 128: ...DG BOARD TOP VIEW DG BOARD BOTTOM VIEW 25 ...
Страница 178: ...19 5 Instructional flow for service mode 75 ...
Страница 179: ...76 ...
Страница 180: ...20 Reference of PDF links color 21 Conductor views 77 ...
Страница 182: ...22 2 Video block diagram 23 Schematic diagrams 23 1 Schematic diagrams notes 79 ...
Страница 183: ...80 ...
Страница 184: ...23 2 Notas de los diagramas esquematicos 81 ...
Страница 185: ...82 ...
Страница 187: ...23 27 Voltages 23 28 Waveforms 24 Parts location 25 Parts list 25 1 Description of abbreviations guide 84 ...
Страница 190: ...87 ...
Страница 193: ...90 ...
Страница 195: ...92 ...
Страница 197: ...94 ...
Страница 199: ...96 ...
Страница 201: ...98 ...
Страница 207: ...Q 104 ...
Страница 209: ...Q 106 ...
Страница 215: ...112 ...
Страница 217: ...114 ...
Страница 220: ...117 ...
Страница 222: ...119 ...

