background image

22

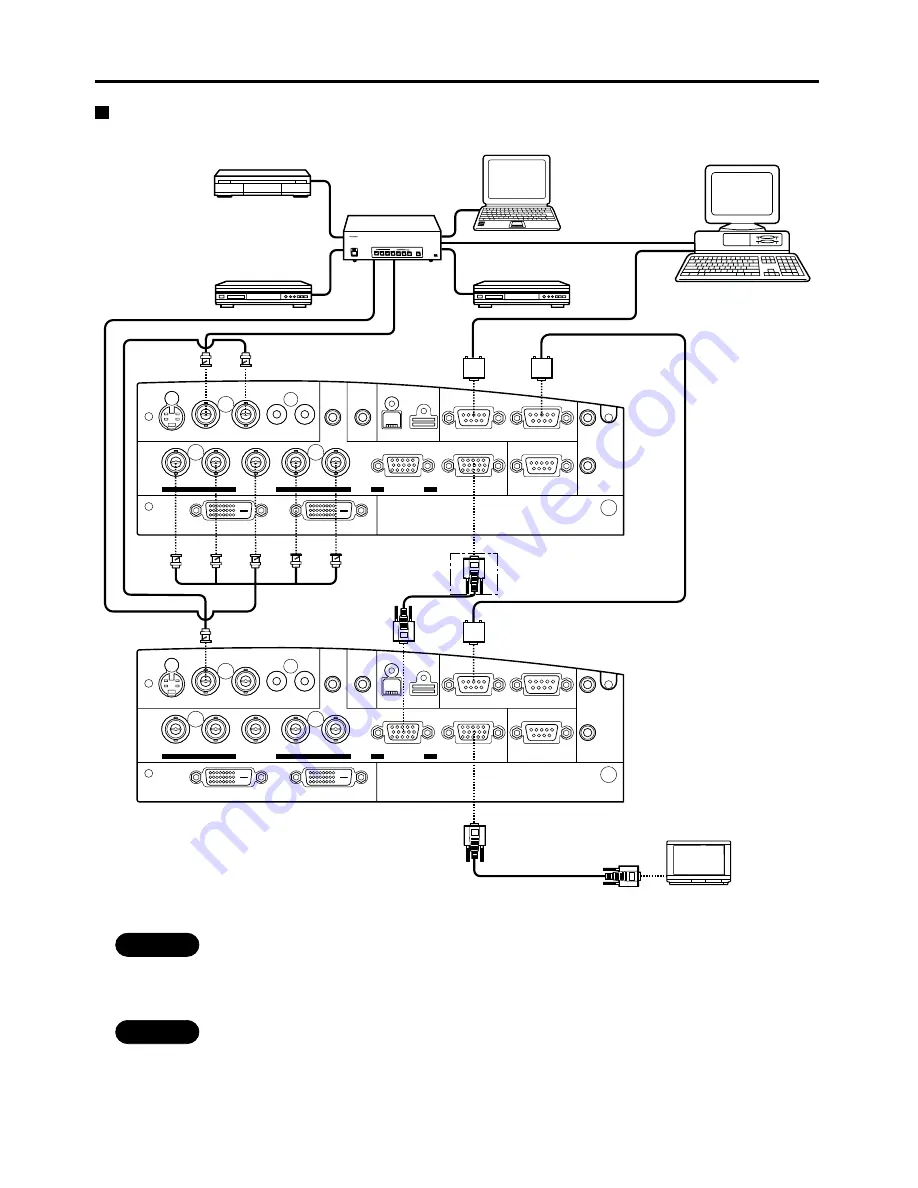
 Example of connecting with system switcher

Setting-up

REMOTE

RGB OUT

OUT

WIRED

IN

IN

OUT

IN

R/R-Y/P

R

G/Y

SYNC/HD

VD

B/B-Y/P

B

IN

OUT

OUT

IN

R

L

USB

SERIAL

S-VIDEO IN

AUDIO IN

RGB

AUDIO AUDIO

VIDEO

RGB 2 IN

OUT

IN

DVI-D

RGB 1 IN

> PC <

TBMU152

OUT

REMOTE

RGB OUT

OUT

WIRED

IN

IN

OUT

IN

R/R-Y/P

R

G/Y

SYNC/HD

VD

B/B-Y/P

B

IN

OUT

OUT

IN

R

L

USB

SERIAL

S-VIDEO IN

AUDIO IN

RGB

AUDIO AUDIO

VIDEO

RGB 2 IN

OUT

IN

DVI-D

RGB 1 IN

> PC <

TBMU152

OUT

OFF

OFF

POWER

ON

INPUT  SELECT

1

2

3

4

5

6

VP

ON/OFF

Signal Selector TW-SWS                 J

Note PC

Control PC

Color monitor with

RGB video ports

Digital STB

DVD player

System switcher

Video deck

* 1

Note

• Read the operating instructions for the system switcher carefully.

Caution

• *1  An asterisk denotes that the second projector requires positioning if the RGB outputs are connected in a

daisy chain. However, the signals should be divided at the signal source if possible.

Содержание PT-L6510U

Страница 1: ...1 LCD Projector Commercial Use Operating Instructions PT L6510U PT L6600U 12345 12345 1234 1234 Model No Read these instructions completely before operating this unit TQBJ 0118 1 ...

Страница 2: ...tion booklet provides all the necessary operating information that you might require We hope it will help you to get the most performance out of your new product and that you will be pleased with your Panasonic LCD projector The serial number of your product may be found on its back You should note it in the space provided below and retain this booklet in case service is required Model number PT L...

Страница 3: ...s uses and can radiate radio frequency energy and if not installed and used in accordance with the instruction manual may cause harmful interference to radio communications Operation of this equipment in a residential area is likely to cause harmful interference in which case the user will be required to correct the interference at his own expense CAUTION Any unauthorized changes or modifications ...

Страница 4: ...ic Menu Operations 28 Returning to the Previous Page 28 Menu Items Shown with White Characters 28 Menu Items Setting 28 Reset the Factory Default 28 Using the INDEX WINDOW function 29 Adjusting the picture 30 PICTURE MODE 30 COLOR 30 TINT 30 BRIGHT 30 CONTRAST 30 SHARPNESS 30 TV SYSTEM 31 Contents W BAL R G B 31 SIGNAL MODE 31 STANDARD 31 Adjusting the position 32 HORIZONTAL POSITION 32 VERTICAL P...

Страница 5: ... and fire may result Do not remove the cover or modify it in any way High voltages which can cause fire or electric shocks are present inside the projector For any inspection adjustment and repair work please contact an Authorized Service Center Clean the power cord plug regularly to prevent it from becoming covered in dust If dust builds up on the power cord plug the resulting humidity can damage...

Страница 6: ... at another person Laser radiation can cause injury to the human eye Caution Do not set up the projector in humid or dusty places or in places where the projector may come into contact with smoke or steam Using the projector under such conditions may result in fire or electric shocks When disconnecting the power cord hold the plug not the cord If the power cord itself is pulled the cord will becom...

Страница 7: ...nd injury or malfunctions may result Replacement of the lamp unit should only be carried out after it has completely cooled off otherwise burns may result Disconnect the power cord plug from the wall outlet as a safety precaution before carrying out any cleaning Electric shocks can result if this is not done Ask an Authorized Service Center to clean inside the projector at least once a year If dus...

Страница 8: ...f the lens with your bare hands If the surface of the lens becomes dirty from fingerprints or anything else this will be magnified and projected onto the screen Moreover when not using the projector cover it with the accessory lens cover Before carrying out cleaning and maintenance be sure to disconnect the power cord plug from the wall outlet Wipe the cabinet with a soft dry cloth If the cabinet ...

Страница 9: ...ports and optional parts that can be used to set up the projection system in diverse ways The following presents some of those setup examples The optional high or low ceiling mount bracket flexibly fits the projector in individual site conditions System 3 PCs equipped with a DVI D port can be attached to the projector for computer image viewing Realization of high clear picture System 4 A variety ...

Страница 10: ... Window Click button page 16 The button acts as the left mouse button if the Mode switch is set to the Computer position Remote control operating indicator lamp The light flashes when any remote control button other than the LASER button is pressed POWER button page 23 Turns the projector ON OFF when the MAIN POWER switch on the projector is set to I AUTO SETUP button page 23 Pressing this button ...

Страница 11: ...his receptacle Do not connect any other cord to this socket MAIN POWER switch page 23 Use this switch to turn I O the commercial line power applied to the projector Burglar lock Attach a commercial burglar prevention cable e g from Kensington to this lock port It is compatible with the Micro Saver Security System from Kensington This security lock is compatible with the Microsaver Security System ...

Страница 12: ...own accordingly ZOOM buttons page 23 Adjust the picture size on the screen with the or buttons FOCUS buttons page 23 Adjust focus with the or buttons AUTO SETUP button page 23 Pressing this button automatically corrects picture positioning on the screen While the Auto setup feature is active the message AUTO SETUP appears on the screen MENU button pages 27 and 28 Main Menu display is switched on a...

Страница 13: ...e to this port Depend on input signal screen aspect will automatically change 16 9 or 4 3 VIDEO IN port pages 20 and 22 Connect a composite video signal source to this port BNC VIDEO OUT port pages 20 and 22 Composite video signal appears at this port BNC AUDIO IN L R jacks page 20 Only a single pair of audio inputs is available Change connections to these jacks according to your choice of video s...

Страница 14: ...lect commands back to the projector s front receiver window as illustrated in figure 2 The effective control range is approx 7 meters 23 feet immediately in front of the receiver windows fig 1 Accessory type AAA dry batteries insert the negative side first REMOTE RGB OUT OUT WIRED IN IN OUT IN R R Y PR G Y SYNC HD VD B B Y PB IN OUT OUT IN R L USB SERIAL S VIDEO IN AUDIO IN RGB AUDIO AUDIO VIDEO R...

Страница 15: ... IS EMITTED FROM THIS APERTURE 1 Do not use old battery with new one 2 Do not use batteries other then the type specified 3 Be sure the batteries are inserted property TQFB385 C A U T I O N Operation indication lamp Using laser pointer The remote control contains a laser source that can appear as a colored spot on the screen which you can use as a pointer The laser beam is activated while the LASE...

Страница 16: ... set to the Computer position Page button Functions as the Page Up button on your PC keyboard Functions as the Page Down button on your PC keyboard Arrow button These buttons functions as the cursor control buttons on your PC R CLICK button This button functions as the right button on your PC mouse Click button This button functions as the left button on your PC mouse REMOTE RGB OUT OUT WIRED IN I...

Страница 17: ...52 Using the remote control in wired mode Two or more projectors can be controlled from a single Remote Control by connecting the Remote Control to the projectors with the accessory Wired Remote Control Cable The wired remote control is particularly useful if the projector is sited in a place where it is exposed to intense ambient light or if an object blocks the path of IR light from the Remote C...

Страница 18: ...5 7 14 9 48 11 0 02 to 0 22 7 8 to 8 21 32 0 03 to 0 30 1 3 16 to 11 13 16 0 04 to 0 38 1 9 16 to 14 61 64 0 05 to 0 45 1 49 64 to 17 23 32 0 06 to 0 60 2 23 64 to 23 10 16 0 08 to 0 76 2 63 64 to 29 59 64 0 09 to 0 91 3 37 64 to 35 53 64 0 11 to 1 06 4 11 64 to 41 47 64 0 12 to 1 21 4 49 64 to 47 41 64 0 14 to 1 37 5 25 64 to 53 15 16 0 15 to 1 52 5 63 64 to 59 27 32 0 17 to 1 67 6 9 16 to 65 3 4...

Страница 19: ...able is plugged into the AUDIO OUT jack the audio signal lines to the internal speakers are automatically cut off Some PC models are not compatible with the PT L6510U L6600U projector The pin assignments on the S VIDEO IN port are as follows The pin assignments on the DVI D input port are as follows interface with TMDS port on PC The pin assignments on the RGB2 input port are as follows Pin Not us...

Страница 20: ...ct PB Green Conect Y Example of connecting with AV products Note Only a single pair of audio inputs AUDIO IN L R is available for the composite and S video also only a signal RGB audio input is available for the RGB1 RGB2 and DVI D You will need to change audio input connections depending on your signal selection If your audio equipment is connected to the projector s AUDIO OUT jack the remote con...

Страница 21: ...m the PC see the data sheet on page 48 If your PC has the resume feature the computer may not function properly until the resume capability is disabled Signals applied to the RGB1 or RGB2 ports appear at the RGB OUT port REMOTE RGB OUT OUT WIRED IN IN OUT IN R R Y PR G Y SYNC HD VD B B Y PB IN OUT OUT IN R L USB SERIAL S VIDEO IN AUDIO IN RGB AUDIO AUDIO VIDEO RGB 2 IN OUT IN DVI D RGB 1 IN PC TBM...

Страница 22: ...IAL S VIDEO IN AUDIO IN RGB AUDIO AUDIO VIDEO RGB 2 IN OUT IN DVI D RGB 1 IN PC TBMU152 OUT OFF OFF POWER ON INPUT SELECT 1 2 3 4 5 6 VP ON OFF Signal Selector TW SWS J Note PC Control PC Color monitor with RGB video ports Digital STB DVD player System switcher Video deck 1 Note Read the operating instructions for the system switcher carefully Caution 1 An asterisk denotes that the second projecto...

Страница 23: ... on the projector will flash orange After a shot period the indicator will illuminate green Making Initial Adjustment Setting input port Roughly adjust the focus with the FOCUS buttons on the rear control panel or with focus ring on the projection lens Choose the projection scheme page 34 Select the input port with the RGB or VIDEO button Projector or remote control Adjust volume level with the VO...

Страница 24: ...ill turn freely without extending further If the picture has keystone distortion do keystone adjustment from the menu page 32 Caution Do not press the LEVELING levers without holding the projector with your hands Otherwise the leveling feet will be unlocked and the projector may drop rapidly onto the projector base surface possibly leading to damage Adjusting vertical position from the menu Altern...

Страница 25: ...to mute both picture and sound Both video and audio are turned off 2 To clear muting press any button on the remote control or projector Apear the picture and sound Still image Motion image FREEZE Advice on the installation of exhaust guides Hot air from the cooling fan vents may in rare cases cause disturbances to the screen image If this should occur install the attached exhaust guides 1 Identif...

Страница 26: ... Pressing the MENU button will not return the screen to Highlight mode To return to Highlight mode temporarily exit Zoom mode then press the D ZOOM button again For PT L6600U 1 Press the Remote Control D ZOOM button The center portion of the picture will be magnified 2 Change magnification with the D ZOOM button Magnification can be changed from 1 0 to 3 0 times for RGB and 1 0 to 2 0 times for co...

Страница 27: ...DARD 32 XGA PICTURE PICTURE MODE COLOR NATURAL 32 SELECT ESC TINT 32 BRIGHT 32 CONTRAST 32 SHARPNESS 08 TV SYSTEM STANDARD AUTO1 4 3 POSITION H POSI V POSI 128 64 SELECT ENTER ESC DOT CLK 34 CLK PHASE 32 KEYSTONE 1 V LINEARITY 32 ASPECT STANDARD POSITION H POSI V POSI 32 16 SELECT ENTER ESC VIDEO SIZE 32 KEYSTON 1 V LINEARITY 32 STANDARD ASPECT AUDIO VOLUME 10 ENTER ESC ESPAÑOL INDEX WINDOW FUNCTI...

Страница 28: ...irect adjustment The prompt ENTER appears for a separate bar graph Reset the Factory Default If the STANDARD option in the PICTURE or POSITION menus is chosen or the STANDARD option in the remote control s FUNC1 button menu is chosen all the parameter values in the menu are reset to the factory default Default Setting in Menu When all the parameter values in the menu are reset to the factory defau...

Страница 29: ...w image Note The aspect ratio of each half of the split screen is 2 3 with the image height extended by 1 5 times the normal height by default Caution As you change the screen size the aspect ratio of the picture also changes Carefully read the caution for S1 signals on page 33 before changing the screen size Note When you execute steps 2 and 3 above the memory is temporarily cleared and the index...

Страница 30: ...itable for projection image viewing under typical location conditions DYNAMIC Picture brightness contrast ratio is increased to suit brighter viewing environments PICTURE PICTURE MODE NATURAL SELECT ADJ ESC BRIGHT COLOR 32 CONTRAST 32 SHARPNESS 00 W BAL R 32 32 W BAL G 32 W BAL B SIGNAL MODE STANDARD 32 XGA ADJ PICTURE PICTURE MODE COLOR NATURAL 32 SELECT ESC TINT 32 BRIGHT 32 CONTRAST 32 SHARPNES...

Страница 31: ...O is chosen a setting closest to the user setting is automatically selected In the example above only USER1 is registered for user address W BAL White balance R G B for RGB DVI signals only White balance may be adjusted for each color to correct reddish or bluish tones in white portions of the picture button Deepens the selected color button Weakens the selected color Note Separate sets of adjustm...

Страница 32: ... KEYSTONE Keystone distortion can be corrected only along either horizontal bound of the picture V LINEARITY After you are finished with keystone adjustment adjust vertical linearity with the or button Vertical linearity is not adjustable if no correction was made to keystone distortion Note A noise may not disappear when adjusting the dot clock or clock phase at UXGA signal mode Clock phase is ad...

Страница 33: ...t containing an aspect sense signal for squeezed videos fed from video equipment If AUTO is chosen the projector automatically compresses the squeezed input video into the 16 9 aspect ratio if it detects the aspect sense signal STANDARD Pressing the ENTER button resets parameter values for all the menu items to the factory default with a STANDARD indicator shown in the upper right corner of the me...

Страница 34: ...e this option if pictures are projected from the front of a reflective screen REAR Choose this if pictures are projected from the back of a translucent screen PROJECTION SCHEME 2 PROJECTION SCHEME 2 is used to choose the appropriate projection scheme from Floor and Ceiling FLOOR Choose this option if the projector is installed on a floor standing base CEILING Choose if the projector is installed o...

Страница 35: ...me of that lamp does not exceed 2000 hours If the cumulative operating time of the other lamp also exceeds 2000 hours when in Dual SINGLE SINGLE1 or SINGLE2 mode the projector will enter Standby mode after 10 minutes If only one lamp is installed in the projector set lamp mode to either SINGLE1 or SINGLE2 SINGLE1 or SINGLE2 is selected If the corresponding lamp is not installed the other lamp will...

Страница 36: ...with USER2 or USER3 SETTING UNIT ID UNIT ID is used to set projector IDs when the user wishes to control two or more projectors either simultaneously or separately ALL The projectors can be simultaneously controlled from any remote control regardless of their ID settings 1 The projector can be controlled from the remote control with its projector ID set to 1 2 The projector can be controlled from ...

Страница 37: ...e If a wrong command is received the projector sends ER401 back to the computer When using control from the remote terminal commands cannot be received at the serial terminal Projector ID supported on the RS 232C interface is 0 ALL to 99 The remote control ID is set from 0 to 3 If a command is sent with a projector ID specified the projector will return answer back only if the ID contained in the ...

Страница 38: ...rning OFF to protect the lamp Parameter 000 Adjustment value 0 063 Adjustment value 63 Parameter VID VIDEO SVD S VIDEO RG1 RGB1 RG2 RGB2 DVI DVI Parameter 0 RGB 1 YPBPR Only 1080i input Parameter 0 Lamp 1 and 2 off 1 Lamp 1 on 2 Lamp 2 on 3 Lamp 1 and 2 on Parameter 0 ALL to 99 Parameter 0 Freeze off 1 Freeze on Parameter 0 Standby 1 Lamp lighting control 2 Lamp lit 3 Lamp off control Parameter 0 ...

Страница 39: ... OFF ON Remote terminal ON OFF RGB VIDEO INPUT SELECT DVI VIDEO RGB DVI switch Pin No Name Remoto terminal ON OFF Lamp RGB VIDEO Switch input modes Switch DVI modes On On VIDEO S VIDEO RGB2 DVI Off Off standby RGB VIDEO RGB1 VIDEO RGB Description When is VIDEO When is RGB When is RGB When is VIDEO When is RGB When is VIDEO When is RGB Short with pin Open Note The POWER RGB and VIDEO buttons on the...

Страница 40: ...ng the steps on page 23 and clean the air filter See page 41 Lights when lamp runtime exceeds 1800 hours Have your dealer replace the lamp unit Wait until the light source lamp cools off before turning the power back on Turn the power off by following the steps on page 23 and consult your dealer Red lamp flasing lamp unit lit PT L6510U Temperature monitor TEMP Red lamp lit lamp unit lit Red lamp l...

Страница 41: ... Power off and remove the power plug Turn the power off by following the steps on page 23 and remove the power plug Caution Be careful not to suck the air filter into the vacuum cleaner Note If dust cannot be removed with a vacuum cleaner it is time to replace the filter Please consult your dealer Replace the air filter when replacing the lamp unit Caution Place the air filter aligning the notch t...

Страница 42: ... unit is not replaced after 1800 hours the power will automatically shut off after 2000 hours and enter standby mode If the power is turned on after 2000 hours it will turn off automatically after approximately 10 minutes and enter standby mode Caution The lamp unit is sold separately Please consult the service parts center at your dealer Lamps other than those indicated above must not be used wit...

Страница 43: ...hold the handle of the lamp unit and gently pull it out from the projector Caution The lamp unit will be hot after it has been used You might get burned if you touch it while it is still hot 5 Install the new lamp unit 7 Install the lamp unit cover and then use a Phillips screwdriver to securely tighten the lamp unit cover fixing 4 screws Caution Firmly install the lamp unit and lamp unit cover If...

Страница 44: ...the and buttons to move the cursor to select OPTION2 Note If the MENU button is pressed the lamp time resetting screen will be cancelled 13 Press the and buttons to select for replacement lamp setting L1 RESET Replace the LAMP1 L2 RESET Replace the LAMP2 L1 L2 RESET Replace the LAMP1 LAMP2 14 Press the POWER button to turn off the power This will reset the cumulative usage time for the lamp unit t...

Страница 45: ...jector correctly adjusted Is the sound input correctly connected Is the volume set to the minimum level See page 23 and 27 Is the shutter or mute turned on See page 25 and 35 Is the cable connected to the AUDIO OUT terminal Are the batteries exhausted Are the battery polarities set correctly See page 14 Are their any obstacles between the remote control and the remote control sensor See page 14 Ar...

Страница 46: ... auto active Hi Lo switching VD TTL compatible high impedance w auto active Hi Lo switching 100 V 120 V AC 50 60 Hz 600 W approx 9 W in Standby mode with fan inactive 1 3 inch diagonal aspect ratio 4 3 with microlens array 3 transmissive LCD panels 3 primary colors Active matrix 786 432 pixels 1 024 x 768 dots x 3 1 to 1 3 F 1 7 to 2 3 f 49 1 to 63 8 2 UHM lamps with 220 W rating each 4 200 lm ANS...

Страница 47: ...onitor output stereo compatible 0 V rms to 2 0 V rms variable High density D sub 15 pin connector female x 1 YPBPR output Y 1 0 V p p including sync signal PBPR 0 7 V p p 75 Ω RGB output 0 7 V p p 75 Ω G Sync 1 0 V p p 75 Ω HD TTL compatible high impedance VD TTL compatible high impedance 9 pin D sub connector female Use the RS 232C serial port For PC Control 9 pin D sub connector female For wired...

Страница 48: ...20 x 1 035i 1 280 x 720 768 x 480i 768 x 576i 720 x 483 H Scanning Frequency kHz 24 8 31 5 31 5 35 0 37 9 37 5 43 3 32 1 35 2 37 9 48 1 46 9 53 7 48 4 56 5 60 0 65 5 68 7 35 5 80 7 94 0 63 9 67 5 77 1 50 1 32 6 52 4 64 0 72 4 78 2 80 0 91 2 46 2 47 6 75 0 87 5 93 8 49 7 68 6 33 8 45 0 15 7 15 6 31 5 V Scanning Frequency Hz 56 4 70 1 59 9 66 7 72 8 75 0 85 0 51 0 56 3 60 3 72 1 75 0 85 1 60 0 70 1 ...

Страница 49: ... 64 495 19 31 64 7 3 64 179 476 18 47 64 495 19 31 64 REMOTE RGB OUT OUT WIRED IN IN OUT IN R R Y PR G Y SYNC HD VD B B Y PB IN OUT OUT IN R L USB SERIAL S VIDEO IN AUDIO IN RGB AUDIO AUDIO VIDEO RGB 2 IN OUT IN DVI D RGB 1 IN PC TBMU152 ...

Страница 50: ...Standards Association Windows is a registered trademark of Microsoft Corporation The rights of trademarks or registered trademarks not specified are recognised Caution This product is a Class A information equipment and complies with the requirements of FCC Using this product in a home environment may cause interference to other electronic apparatus In such an event the user must take the necessar...

Страница 51: ...ISQUES DE FEU OU DE CHOC ÉLECTRIQUE NE PAS EXPOSER CE PRODUIT À L EAU OU À L HUMIDITÉ CONCERNANT LA SÉCURITÉ ATTENTION Cet appareil est équipé d une fiche de courant à trois broches avec mise à la terre Ne pas retirer la broche de mise à la masse de la fiche Cette fiche ne pourra être utilisée que dans une prise avec mise à la terre Ceci est une précaution sécuritaire S il est impossible d insérer...

Страница 52: ...ations nécessaires puissent être faites Ne pas couvrir le filtre et la sortie d air Cela risque de faire surchauffer le projecteur et causer un incendie ou endommager le projecteur Ne pas surcharger la prise de courant Si I alimentation est surchargée par exemple par l utilisation de trop d adaptateurs cela risque de faire surchauffer le projecteur et peut entraîner un incendie Ne pas retirer le c...

Страница 53: ...métalliques tels que des colliers ou des épingles à cheveux Cela peut faire que la pile fuit surchauffe éclate ou prenne feu Garder la pile dans un sachet en plastique et la maintenir éloignée des objets métalliques Isoler la pile à l aide de ruban ou autre avant de la mettre au rebut Si la pile entre en contact avec des objets métalliques ou d autres piles elle peut prendre feu ou éclater Les enf...

Страница 54: ...ter à la chaleur près de cette sortie d air sinon cela peut causer des blessures ou des dommages Le remplacement de l unité de lampe ne devrait être effectué que par un technicien qualifié L unité de lampe a une pression interne élevée Elle peut facilement s endommager si cognée contre des objets durs ou si elle tombe et cela peut causer des blessures ou des mauvais fonctionnements Débrancher la f...

Страница 55: ...uis la couvrir à l aide du capuchon d objectif accessoire À propos de l écran Si l écran utilisé est sale endommagé ou décoloré des projections de bonne qualité ne peuvent pas être Précautions concernant la manipulation obtenues N appliquer aucune substance volatile à l écran et ne pas le laisser se salir ou s endommager Lampe La source lumineuse de cet appareil est une lampe au mercure dont la pr...

Страница 56: ...ériode d attente entre l arrêt et la mise en marche est trop courte cela peut raccourcir la durée de fonctionnement du bloc de lampe ll est recommandé de toujours avoir un bloc de lampe de rechange prêt à l emploi si nécessaire Aussi la durée de vie utile de la lampe peut être prolongée en réglant PUIS LAMPE dans le menu OPTION à FAIBLE Si la lampe n est pas remplacée après que la durée d utilisat...

Страница 57: ...sur le projecteur LCD ou sur la télécommande Le témoin d alimentation s allume en orange 3 Attendez que le ventilateur de refroidissement s arrête et que le témoin d alimentation passe au rouge environ 60 secondes 4 Mettez en position d arrêt l interrupteur principal et débranchez le cordon d alimentation de la prise murale Lorsque le témoin LAMP est allumé sur le projecteur LCD le projecteur ne p...

Страница 58: ... 5 Installez la nouvelle lampe 9 Appuyez sur la touche POWER afin de projeter une image sur l écran 8 Branchez la fiche du cordon d alimentation dans la prise murale et actionnez l interrupteur MAIN POWER Si la mise sous tension ne s effectue pas même une fois que vous avez positionne l interrupteur principal sur I remettez ce dernier sur O vérifiez que la lampe et son cache sont correctement inst...

Страница 59: ...s 13 Appuyez sur les touches et pour sélectionner le paramètre de remplacement de la lampe RAZ L1 remplacement de la lampe 1 RAZ L2 remplacement de la lampe 2 RAZ L1 L2 remplacement de la lampe 1 et de la lampe 2 14 Appuyez sur la touche POWER pour couper l alimentation La durée d utilisation cumulée de la lampe revient à zéro MENU REGL FENETRE IMAGE AUDIO OPTION 2 OPTION 1 ZOOM FOCUS POSITION LAN...

Страница 60: ...E 7 Secaucus NJ 07094 201 392 4443 3330 Cahuenga Blvd West Los Angels CA 90068 323 436 3500 Technical Support 800 524 1448 800 526 6610 FAX 201 392 6514 E Mail pbtssupport panasonic com Panasonic Canada Inc 5770 Ambler Drive Mississauga Ontario L4W 2T3 905 624 5010 Printed in Japan M1002 1122 Professional Industrial Video ...

Отзывы: