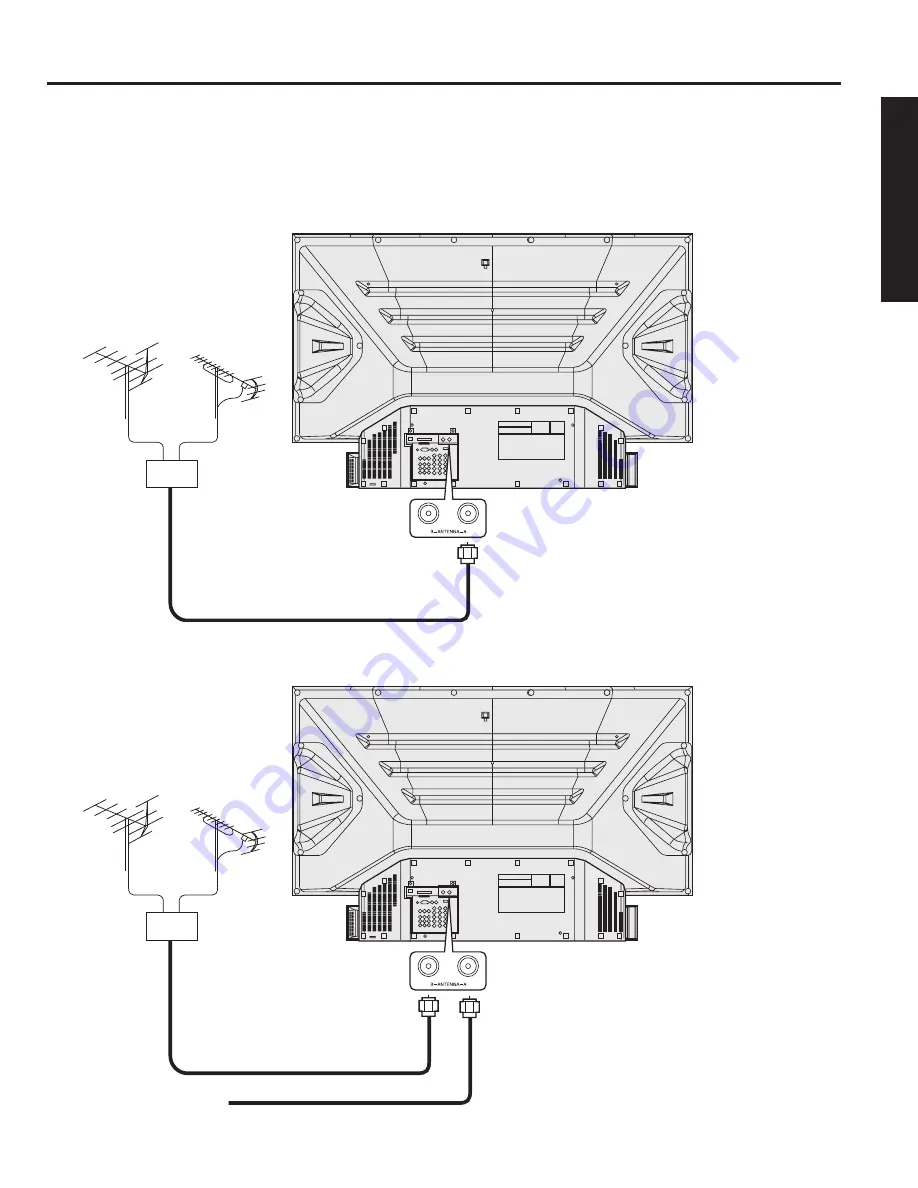
Panasonic PT-60LCX64-B Скачать руководство пользователя страница 15

15

Getting Start 

ed

Antenna Connection 

For proper reception of digital and analog VHF/UHF channels, an external antenna is required. For best reception, 
an outdoor antenna is recommended.
Connect home antenna to either ANT (A) or ANT (B) connection on back of the unit. Select Antenna mode for 
Cable/Antenna, Cable only, Antenna only or in Input Setup under Program Channel in Setup menu.

ANTENNA (A) 
TERMINAL ON THE 
BACK OF THE DEVICE 
DISPLAY

Mixer

Installation

VHF Antenna

UHF Antenna

ANTENNA (B) 
TERMINAL ON THE 
BACK OF THE DEVICE 
DISPLAY

In from cable

Mixer

Antenna and Cable connect:

Antenna connect only:

Note:

When connecting an antenna only, connect to 
Antenna (A). When connecting both an antenna 
and a cable, connect the antenna to Antenna (B).

Содержание PT-60LCX64-B

Страница 1: ...ww panasonic com register For assistance please call 1 888 VIEW PTV 843 9788 or contact us via the web at http www panasonic com contactinfo Puerto Rico For assistance please call 787 750 4300 or visit us at www panasonicpr com Before connecting operating or adjusting this product please read the instructions completely Please keep this manual for future reference This operating instruction book i...

Страница 2: ...rm level and adequately strong The unit could fall causing serious injury to a child or adult and damage to the unit Move any appliance and cart combination with care Quick stops excessive force and uneven surfaces may cause objects to overturn Carefully fallow all instructions 13 Unplug this product during lightning storms or when unused for long periods of time 14 Do not service this unit yourse...

Страница 3: ... Inc under USP4638258 and 4482866 BBE and BBE symbol are registered trademarks of BBE Sound Inc HDMI the HDMI logo and High Definition Multimedia Interface are trademarks or registered trademarks of HDMI Licensing LLC This product incorporates copyright protection technology that is protected by U S patents and other intellectual property rights Use of this copyright protection technology must be ...

Страница 4: ...e limits are designed to provide reasonable protection against harmful interference in a residential installation This equipment generates uses and can radiate radio frequency energy and if not installed and used in accordance with the instructions may cause harmful interference to radio communications However there is no guarantee that interference will not occur in a particular installation If t...

Страница 5: ...Adjustments 54 Lock Feature 56 Closed Caption Feature 66 Channel Caption Feature 69 Color Temp Feature 72 Video NR Noise Reduction Feature 73 3D Y C Feature 74 Setting when 480p signals are input through COMPONENT VIDEO INPUT 75 3D I P Feature 76 Automatically changing screen size 77 RGB IN Input Feature 78 Sleep Timer Feature 79 Information 80 Demo Mode Feature 81 Signal Meter Feature 82 Switchin...

Страница 6: ...eas of excessive heat or moisture Optional External Equipment The Video Audio connection between components can be made with shielded video and audio cables For best performance video cables should utilize 75 Ω coaxial shielded cables Cables are available from your dealer or electronic supply house Before you purchase any cables be sure you know what type of output and input connectors your variou...

Страница 7: ...ion Side view Top view To optimize your viewing comfort please follow the viewing guidelines shown in the diagrams below If viewing for an extended period of time sit as far back from the screen as possible 70º At least 1 6 m PT 43LCX64 1 8 m PT 50LCX64 2 2 m PT 60LCX64 70º 30º 30º At least 1 6 m PT 43LCX64 1 8 m PT 50LCX64 2 2 m PT 60LCX64 ...

Страница 8: ... compartment Two AA size Remote Control Battery Installation CAUTION 1 While pressing in on the catch open cover in direction of arrow 3 Press cover in direction of arrow until it snaps shut Incorrect battery installation can cause the batteries to leak leading to personal injury and or damage to the remote control Observe the following precautions 1 Batteries should always be replaced as a pair A...

Страница 9: ...sion Television with improved picture quality by increasing vertical and horizontal resolution Glossary and Acronyms ATSC Advanced Television Systems Committee Standardization body that developed the Digital Television Terrestrial formats DCF Design rule for Camera File system Unified standard established by Japan Electronics and Information Technology Industries Association JEITA HDMI High Defini...

Страница 10: ... FREEZE TV VCR PIP SPLIT MOVE SWAP PIP CH DVD VCR CH SEARCH OPEN CLOSE PLAY PAUSE STOP REC PIP MAX FF PROG TV VIDEO A ANTENNA B TV VCR DVD DBS RCVR CBL AUX OK M U T E ASPECT BBE R E C A L L Note This section describes TV mode only For other modes see pages 91 97 Illuminated Remote Control Location of Controls 1 2 3 4 5 6 7 8 9 10 11 12 13 14 15 16 17 18 19 20 21 22 23 25 26 27 28 29 30 31 32 24 ...

Страница 11: ...P screen 17 SPLIT Press to display or delete Split screen 18 SAP In analog mode press to access audio modes Stereo SAP or Mono In digital mode press to access next audio track 19 LIGHT Lights all buttons The selected mode button TV VCR etc flashes 20 ANTENNA A B Press to switch to A or B RF antenna input 21 BBE Press to turn BBE OFF or ON 22 RECALL Press to display or delete Channel banner 23 EXIT...

Страница 12: ... P 34 Channel up down buttons P 34 Location of Controls Open A SD CARD slot PC CARD slot Using your finger slide Slot Cover in direction of arrow to open Slot Cover Model PT 50LCX64 unit shown TV VIDEO button P 34 LAMP indicator This indicator lights up when there is a malfunction with the lamp unit PP 98 101 TEMP indicator This indicator lights up when there is an abnormal temperature in the unit...

Страница 13: ...rminals P 18 AV OUT terminals PP 19 20 Input 1 2 terminals P 17 RGB Input 1 terminal P 22 SIDE Input 3 terminals P 17 RGB Input 2 terminal P 22 DIGITAL AUDIO OUT terminal P 21 Antenna A B terminal PP 14 16 DCM INTERFACE POD INTERFACE p 16 Model PT 50LCX64 unit shown HDMI input terminal PP 24 25 SERVICE ONLY Card slot used by a certified service technician only Do not insert any memory card into th...

Страница 14: ...n the video signal input from the video source the picture on the screen may flicker In this case it will be necessary to connect a TBC time base corrector Notes on connections Installation CAUTION For proper reception of analog or digital cable channels a cable service connection is required Cable Connection Connect the cable supplied by your local cable company to ANTENNA A connection on back of...

Страница 15: ...lect Antenna mode for Cable Antenna Cable only Antenna only or in Input Setup under Program Channel in Setup menu ANTENNA A TERMINAL ON THE BACK OF THE DEVICE DISPLAY Mixer Installation VHF Antenna UHF Antenna ANTENNA B TERMINAL ON THE BACK OF THE DEVICE DISPLAY In from cable Mixer Antenna and Cable connect Antenna connect only Note When connecting an antenna only connect to Antenna A When connect...

Страница 16: ...insert a PC card into the DCM INTERFACE POD INTERFACE Choose Cable mode for Antenna A in Input Setup Follow the instructions on screen In from cable DCM Digital Cable Module Connect the Cable antenna to ANT A Cable In input on the back of the unit Insert the DCM Digital Cable Module upper side facing left into the DCM INTERFACE POD INTERFACE slot on the back of the unit 1 2 If you experience keybo...

Страница 17: ...ated on the side of the unit Select the desired VIDEO input position by pressing the TV VIDEO button P 37 When connecting video cables priority is given to the S Video cable when the S Video input terminal and the video input terminal are connected at the same time Similar connections are available at the INPUT 1 2 3 input terminals P 13 Installation S VHS VCR S VIDEO AUDIO VHS VCR VIDEO AUDIO ...

Страница 18: ...t signal allows for more accurate color reproduction The Component signal output terminal indication will differ according to the output device Y PB PR Please read the operating instructions included with the output device Installation DVD Player COMPONENT VIDEO AUDIO Mode type Signal data Information menu display No of dots H X V Horizontal frequency kHz Vertical frequency Hz DTV Format Signals 4...

Страница 19: ...allowed AV Out signal is available when receiving digital channel However all formats will be down converted to NTSC Never connect the VIDEO IN and OUT terminals to the same video recorder as this could cause incorrect operation Even if unit is in Split or PIP mode OUT terminals only output the main picture and sound signals A sub picture including channel search etc will not be output AV terminal...

Страница 20: ...o Out Stereo System A Stereo Amplifier and Speakers AUDIO To listen to the audio through a separate stereo system connect an external audio amplifier to AUDIO OUT on back of unit Note AUDIO OUT terminals cannot be connected directly to external speakers Audio Adjustments Select Speakers Off in Audio menu under Other Adjust menu Set amplifier volume to the preferred level ...

Страница 21: ...ndwidth channels for front left front right center surround left and surround right plus a LFE Low Frequency Effect subwoofer channel For a full Home Theater sound experience an external Dolby Digital decoder and a multichannel amplifier must be connected to the Digital Audio Out jack on the unit Procedure Connect the Digital Audio cable from the Digital Audio Out jack on the unit to the Digital A...

Страница 22: ...is input To obtain the optimum picture quality with the Device Display a vertical scanning frequency of 60 Hz is recommended Do not set the horizontal and vertical scanning frequencies for PC signals which are above or below the specified frequency range Select the desired RGB input position by pressing the TV VIDEO button P 37 Similar connections are available at the RGB IN 1 2 Terminals Pin No S...

Страница 23: ...ots H X V Horizontal frequency kHz Vertical frequency Hz Personal Computer Signals VGA400 70 Hz 640 X 400 31 47 70 08 VGA400 70Hz VGA480 60 Hz 640 X 480 31 47 59 94 VGA 60Hz Macintosh 13 640 X 480 35 00 66 67 MAC 13 VESA400 85 Hz 640 X 400 37 86 85 08 VESA 85Hz VESA480 72 Hz 640 X 480 37 86 72 81 VGA 72Hz VESA480 75 Hz 640 X 480 37 50 75 00 VGA 75Hz VESA480 85 Hz 640 X 480 43 27 85 01 VGA 85Hz SVG...

Страница 24: ...VD player equipped with a HDMI output connection By inputting a High bandwidth Digital Content Protection HDCP high definition picture source to the HDMI terminal of this unit high definition pictures can be displayed on the screen in their digital form The HDMI input terminal is not intended to be used with personal computers This unit is compatible with 1080i 720p and 480p formats Select the out...

Страница 25: ...signal the picture may be displayed with unnatural colors as if red and blue are reversed See UV Timing of Page 53 The Device display is compatible with following formats Please set the connecting device to following format Procedure Audio signal PCM When digital audio is included in the HDMI connection the compatible sampling frequencies are 48 kHz 44 1 kHz 32 kHz See page 55 Video Signal Display...

Страница 26: ...OFF condition when plugged into an AC outlet Press POWER on Device Display or Remote Control to turn power off Note When the AC Cord is unplugged the internal cooling fan stops operating In this case the lamp will be insufficiently cooled and will take a while to turn ON again Power ON Power OFF The Power Indicator blinks Red for about 1 minute and then turns solid Red Turning the Power ON and OFF...

Страница 27: ...check connection of Antenna Cable to the RF IN Terminal then try Auto Scan again PP 30 31 After Auto Scan is completed the unit tunes to the first channel found during auto scan First Time Setup F i r s t T i m e S e t u p I n p u t S e t u p S e t t i n g C a b l e O n l y A u t o S c a n L a n g u a g e O K C H A N G E E X I T M E N U t o r e t u r n F i r s t T i m e S e t u p I n p u t S e t u...

Страница 28: ...o d e V I V I D C o l o r 3 2 T i n t 3 2 B r i g h t n e s s 3 2 P i c t u r e 3 2 S h a r p n e s s 3 2 N o r m a l S e t O t h e r A d j u s t S E L E C T O K M E N U E X I T CH CH VOL VOL OK Press to select desired menu item P i c t u r e P i c M o d e V I V I D C o l o r 3 2 T i n t 3 2 B r i g h t n e s s 3 2 P i c t u r e 3 2 S h a r p n e s s 3 2 N o r m a l S e t O t h e r A d j u s t S E...

Страница 29: ... column P i c t u r e P i c M o d e V I V I D C o l o r 3 2 T i n t 3 2 B r i g h t n e s s 3 2 P i c t u r e 3 2 S h a r p n e s s 3 2 N o r m a l S e t O t h e r A d j u s t S E L E C T O K M E N U E X I T S E L E C T O K M E N U E X I T O t h e r A d j u s t C o l o r T e m p N o r m a l V i d e o N R O f f 3 D Y C O n C o l o r M a t r i x S D 3 D I P O f f I D 1 O n S E L E C T O K M E N U E ...

Страница 30: ... h a n n e l I n p u t S e t u p S e t t i n g C a b l e A n t e n n a A u t o S c a n M a n u a l P r o g r a m S i g n a l M e t e r L a n g u a g e Connect Cable to Antenna A Connect Antenna to Antenna B Change your Input Setup and press OK O K C H A N G E E X I T M E N U t o r e t u r n 3 P r o g r a m C h a n n e l I n p u t S e t u p S e t t i n g C a b l e o n l y A u t o S c a n M a n u a ...

Страница 31: ...nly is selected and DCM is in Auto scan will be skipped If Cable Antenna is selected and DCM is in Antenna B Analog Digital Auto scan will be performed Auto Scan To automatically Scan All available channels Antenna A Analog Antenna A Analog Digital Antenna B Analog and Antenna B Analog Digital CH CH VOL VOL OK CH CH VOL VOL OK 2 3 P r o g r a m C h a n n e l I n p u t S e t u p A u t o S c a n M a...

Страница 32: ...t Program CH icon 1 CH CH VOL VOL OK 2 3 P r o g r a m C h a n n e l I n p u t S e t u p A u t o S c a n M a n u a l P r o g r a m S i g n a l M e t e r L a n g u a g e RF Input Antenna A Channel Add A 2 Channel Del A 66 S E L E C T O K E X I T M E N U t o r e t u r n P r o g r a m C h a n n e l I n p u t S e t u p A u t o S c a n M a n u a l P r o g r a m S i g n a l M e t e r L a n g u a g e RF ...

Страница 33: ...ress to delete channels from memory Press to select CH CH CH VOL VOL OK EXIT P r o g r a m C h a n n e l I n p u t S e t u p A u t o S c a n M a n u a l P r o g r a m S i g n a l M e t e r L a n g u a g e RF Input Antenna A Channel Add A 9 Channel Del A 3 Press OK to add S E L E C T O K C H A N G E E X I T M E N U t o r e t u r n P r o g r a m C h a n n e l I n p u t S e t u p A u t o S c a n M a ...

Страница 34: ... consumption can be reduced if the volume level is lowered POWER TV Or Remote Control Sensor POWER button POWER indicator Volume up down buttons Channel up down buttons 26 Note Refer to Direct Tuning Method See next page Device display operation 1 2 3 4 5 6 7 8 0 9 CH CH VOL VOL OK CH CH VOL VOL OK POWER SAP LIGHT MENU 1 2 3 4 5 6 7 8 0 9 EXIT CH CH VOL VOL R TUNE PIP MIN REW FREEZE TV VCR PIP SPL...

Страница 35: ...mote Control number keys 1 1 Press the number keys on the Remote Control to enter the Channel number Press OK The following is an example of tuning to channel 15 If tuning a digital channel and your channel contains more than one program press PROG and enter the program 1 2 3 etc using the number keys Press OK The following is an example of tuning to channel 15 1 Direct Tuning Example Step Action ...

Страница 36: ...memory of the respective RF input is displayed Press to switch to previously viewed channel Photo Viewer or input modes Switches between the current and last channel or program Device display operation POWER SAP LIGHT MENU 1 2 3 4 5 6 7 8 0 9 EXIT CH CH VOL VOL R TUNE PIP MIN REW FREEZE TV VCR PIP SPLIT MOVE SWAP PIP CH DVD VCR CH SEARCH OPEN CLOSE PLAY PAUSE STOP REC PIP MAX FF PROG TV VIDEO A AN...

Страница 37: ...HDMI IN is displayed Video 1 1 Video 2 1 Video 3 1 Comp 1 1 HDMI 1 RGB 2 1 RGB 1 1 Comp 3 1 Comp 2 1 Card input mode Photo Viewer is selected The input source for picture signals can be changed by pressing TV VIDEO SD on the Remote Control or TV VIDEO on the unit Changing the input signal Device display operation 1 If SKIP is set as the Input Label setting of Channel Caption the mode will not be c...

Страница 38: ...999 ABC Antenna designation Channel Number Channel Caption A 135 99999 ABC Del FAV TV PG13 CC SAP 480i FULL VIVID 14 A 4 PBS Add Delete Favorite Channel Indicator Rating indication Aspect Picture Mode Antenna designation and PIP SPLIT Channel Number PIP SPLIT Channel Caption Time remaining in sleep timer Antenna designation and Channel Number Channel Caption Closed Caption SAP POWER SAP LIGHT MENU...

Страница 39: ...the desired channel to be added or deleted This feature lets you add channels to or delete channels from the Favorite channel list To add a favorite channel 1 2 A 135 99999 ABC Del FAV 480i FULL VIVID A 135 99998 ABC Add FAV 480i FULL VIVID Press OK to add the channel To delete a favorite channel Press OK to delete the channel Press RECALL while viewing an unregistered channel to display Add FAV i...

Страница 40: ...te that by using the aspect ratio 16 9 selection function to change the aspect ratio you may be infringing on the rights of the original copyright owner of that program under copyright protection laws If a 4 3 picture is projected in wide screen distortion may occur around the edges so that part of the picture may no longer be visible We recommend viewing in 4 3 mode so you can enjoy the picture a...

Страница 41: ... a 4 3 picture at maximum size but with aspect correction applied to the center of the screen so that elongation is only apparent at the left and right edges of the screen The size of the picture will depend on the original signal ZOOM ZOOM 16 9 ZOOM mode magnifies the central section of the picture FULL FULL 16 9 FULL will display the picture at its maximum size but with sight elongation TRUE TRU...

Страница 42: ...ure and a moving picture each time FREEZE on the Remote Control unit is pressed Press FREEZE again to resume motion Freezing pictures Freeze Note The video output from AV OUT is not frozen FREEZE TV VCR Press SAP to select the next audio track if available when receiving a digital channel SAP In digital mode Continued on the next page Select Audio Mode for TV Viewing Audio Track 1 of 1 English POW...

Страница 43: ...nel Television Sound Stereo broadcast Select STEREO audio mode If stereo broadcast is weak and the display flickers select MONO audio mode for possibly better results SAP broadcast Secondary Audio Program sub language Select SAP audio mode for the sub language MONO broadcast Normal monaural sound broadcast Receivable Broadcast Types STEREO SAP MONO STEREO SAP MONO STEREO SAP MONO STEREO SAP MONO P...

Страница 44: ...ay the same picture at the same time Only the Analog programming from Antenna A and video inputs signal can be viewed in the PIP screen function A component signal cannot be displayed on a PIP screen Thus when a component signal is displayed on the Main screen the SWAP button becomes invalid When ASPECT is in ZOOM mode PIP feature cannot be used PP 40 41 When the RGB HDMI or Card Photo Viewer inpu...

Страница 45: ... NORMAL Example During Main screen NORMAL Selecting the screen size for PIP screen You can choose PIP screen size of 3 magnifications PIP MIN REW Press to large PIP screen size Initial size 1 2 3 Initial position 2 1 Note The last size chosen is saved and will not be erased even if the power is turned off Note The last position chosen is saved and will not be erased even if the power is turned off...

Страница 46: ...ARD and HDMI input screen cannot be displayed using the Split Screen function The signal input from Antenna B is displayed on the Left screen only It cannot be displayed on the Right screen Splitting the screen Press to split The previously selected screen appears on the left Returning to one screen Press to return Selecting the screen aspect for split screen Press to select modes 4 3 A 5 FULL SPL...

Страница 47: ...1 A 5 Example During SPLIT SCREEN NORMAL RGB input Note Picture quality may change according to the combination of signals input to the left and right screens Split screen SWAP PIP CH DVD VCR CH Select desired input mode of the Right screen TV VIDEO Press to select the desired input mode TV Video 1 Video 2 Video 3 RGB 2 RGB 1 Comp 3 Comp 2 Comp 1 If SKIP is set as the Input Label setting of Channe...

Страница 48: ...nnel search is not available Channel search feature works with analog channels only ATSC channel search is not possible When CARD and HDMI input screen is displayed no search is possible Channel search feature works only if signal is from Antenna A SEARCH OPEN CLOSE A 6 Example Select channel 6 2 5 6 8 10 7 2 5 6 7 10 8 RGB input Channel up and down buttons When or is pressed the next channel up o...

Страница 49: ... menu Press to display the Favorite menu Press to select Favorite icon 1 2 Allows you to create a Favorite channel list from Antenna A or Antenna B CH CH VOL VOL OK Press to select each item 3 4 Press to exit menu EXIT F a v o r i t e S u r f M o d e R F I n p u t C h a n n e l A l l C h a n n e l s A n t e n n a A A 2 3 2 1 4 1 4 2 7 1 1 1 1 2 3 1 S E L E C T O K C H A N G E E X I T M E N U t o r...

Страница 50: ... for watching movies in a darkened room It provides a soft film like picture Standard Recommended for normal viewing conditions with subdued room lighting Note Normal is displayed at default CH CH VOL VOL OK Press repeatedly to select PicMode CH CH VOL VOL OK 3 P i c t u r e P i c M o d e V I V I D C o l o r 3 2 T i n t 3 2 B r i g h t n e s s 3 2 P i c t u r e 3 2 S h a r p n e s s 3 2 N o r m a ...

Страница 51: ...he picture quality becomes sharper Except RGB IN Press button The picture quality becomes softer Contrast Press button Only the Highlights of the image become brighter adding Contrast RGB IN only Press button The Highlights become less bright diminishing Contrast R Level Press button The red component becomes stronger RGB IN only Press button The red component becomes weaker G Level Press button T...

Страница 52: ... 5 P h a s e 0 N o r m a l S e t EXIT Press to set or adjust to desired level See next page Notes This Device Display is equipped with various screen modes If a screen mode with a different aspect from the broadcast program is selected image will appear differently Select the proper screen mode with this in mind Be careful when using this Device Display for commercial purposes or for public use su...

Страница 53: ...ertically H Size Press button Press to enlarge image horizontally RGB input Press button Press to shrink image horizontally Phase Press button Press button Adjust in order to remove any picture interference or contour blurring which may occur in computer images RGB input Color Corr Press OK button With HDMI connection depending on the signal the picture may be displayed with unnatural colors as if...

Страница 54: ...e Balance Emphasize the left right speaker volume Adjust to desired level while viewing picture through the menu overlay Press MENU or wait a few seconds to return to the previous menu screen CH CH VOL VOL OK Mode CH CH VOL VOL OK Press repeatedly to select Mode CH CH VOL VOL OK Note Normal is displayed at default S E L E C T O K M E N U E X I T A u d i o M o d e N o r m a l B a s s 3 T r e b l e ...

Страница 55: ...rs off Surround Enhances audio response when listening to stereo Audio Select Perform input switching of analog audio input and digital audio input when using the HDMI terminal AUTO Automatically performs digital analog input switching according to the input signal type D in digital Forces use of digital audio input signal transmitted via the HDMI terminal A in analog Forces use of analog audio in...

Страница 56: ...Language Ratings These categories are used as guidelines for blocking the programs The default mode for the Lock category is the Unlocked state In this state you can surf the various categories of the Lock menu After you have created a password you are prompted to enter it before you can make any changes in the Lock menu Press MENU to display the Main Menu screen 1 Press to select Lock icon Press ...

Страница 57: ...ord is required to view any of the locked channels 1 3 Press to select Lock icon Press to display the options in the Lock menu Press to select the Lock Set icon CH CH VOL VOL OK CH CH VOL VOL OK Press to display the Lock Set menu 4 Press to select the desired setting Press to set 5 Press to exit menu EXIT Press MENU to display the Main Menu screen Press number keys to enter your secret code 1 2 3 ...

Страница 58: ... Press to select the Channel Lock icon CH CH VOL VOL OK CH CH VOL VOL OK Press to display the Channel Lock menu 4 Press to select Antenna A or B 6 Press to exit menu EXIT Press MENU to display the Main Menu screen CH CH VOL VOL OK Press to select Channel 5 Lock Feature C h a n n e l L o c k R F I n p u t A n t e n n a A C h a n n e l A 2 1 A 2 1 A 4 1 A 4 2 A 7 1 S E L E C T O K C H A N G E E X I ...

Страница 59: ...E L R C F L R M o d e O f f N R G P G P G 1 3 R N C 1 7 X V i e w a b l e V i e w a b l e V i e w a b l e V i e w a b l e V i e w a b l e V i e w a b l e V i e w a b l e V i e w a b l e V i e w a b l e V i e w a b l e V i e w a b l e V i e w a b l e V i e w a b l e V i e w a b l e S E L E C T O K E X I T M E N U t o r e t u r n B l o c k P r o g r a m M P A A U S T V C E L R C F L R M o d e O n N ...

Страница 60: ...locked 5 Press to exit menu EXIT Press to select On or Off Press to select Mode Mode Off Can view NR programs On Cannot view NR programs B l o c k P r o g r a m M P A A U S T V C E L R C F L R M o d e O f f T V N R T V Y T V Y 7 T V G T V P G T V 1 4 T V M A V i e w a b l e V i e w a b l e V i e w a b l e F V V i e w a b l e F V V i e w a b l e D L S V D L S V D L S V V i e w a b l e D L S V D L S...

Страница 61: ...b l e V i e w a b l e V i e w a b l e V i e w a b l e V i e w a b l e V i e w a b l e S E L E C T O K E X I T M E N U t o r e t u r n B l o c k P r o g r a m M P A A U S T V C E L R C F L R M o d e O n E C C 8 G P G 1 4 1 8 V i e w a b l e V i e w a b l e V i e w a b l e V i e w a b l e V i e w a b l e V i e w a b l e V i e w a b l e V i e w a b l e V i e w a b l e V i e w a b l e V i e w a b l e ...

Страница 62: ...i e w a b l e V i e w a b l e V i e w a b l e V i e w a b l e V i e w a b l e V i e w a b l e V i e w a b l e V i e w a b l e S E L E C T O K E X I T M E N U t o r e t u r n B l o c k P r o g r a m M P A A U S T V C E L R C F L R M o d e O n E G 8 a n s 1 3 a n s 1 6 a n s 1 8 a n s V i e w a b l e V i e w a b l e V i e w a b l e V i e w a b l e V i e w a b l e V i e w a b l e V i e w a b l e V i ...

Страница 63: ...ss to display the How Long menu Press MENU to display the Main Menu screen 4 CH CH VOL VOL OK Press to select Time Press to set Press to exit menu EXIT 5 2 Press number keys to enter your secret code H o w L o n g T i m e 1 2 h o u r s The TV will remain locked for the selected duration O K C H A N G E E X I T M E N U t o r e t u r n Press number keys to enter your secret code In Lock menu select ...

Страница 64: ... tune to channels or select video Channel Locked Press OK to enter password for temporary unlock When the rating level is exceeded Following message is displayed if the program you are viewing exceeds the set rating level To view a blocked program you must enter your password Rating Limit Exceeded Press OK to enter password for temporary unlock Note Entering the password will override the block co...

Страница 65: ...en Themes and elements in this program may include mild physical or comedic violence or may frighten children under the age of 7 TV G General Audience It contains little or no violence no strong language and little or not sexual dialogue or situations TV PG Parental guidance suggested The program may contain infrequent coarse language limited violence some suggestive sexual dialogue and situations...

Страница 66: ...O INPUT of 480p or more or from RGB IN Off No display On Display when available On Mute Display when audio is muted CH CH VOL VOL OK Press MENU to display the Main Menu screen Press to select Setup icon Press to display the options in the Setup menu Press to display the Closed Caption menu Press to select Closed Caption icon 1 CH CH VOL VOL OK 2 3 Press to enter the CC Mode field Press to select C...

Страница 67: ...ning You can choose the type of closed captioning service font type font size and font style The colors sub menu lets you set the color of the font foreground text box background on which the text is displayed the font opacity Fore Opacity text box opacity Back Opacity and the outline of the dropshadow if selected under style CH CH VOL VOL OK 1 In Closed Caption menu select Digital CH CH VOL VOL O...

Страница 68: ... also be recorded on tape To avoid this either turn off digital CC or turn on analog CC Closed Caption Feature POWER SAP LIGHT MENU 1 2 3 4 5 6 7 8 0 9 EXIT CH CH VOL VOL R TUNE PIP MIN REW FREEZE TV VCR PIP SPLIT MOVE SWAP PIP CH DVD VCR CH SEARCH OPEN CLOSE PLAY PAUSE STOP REC PIP MAX FF PROG TV VIDEO A ANTENNA B TV VCR DVD DBS RCVR CBL AUX OK M U T E ASPECT BBE R E C A L L Continued from page 6...

Страница 69: ...display the Captions menu Press to select Captions icon 1 2 CH CH VOL VOL OK Press to set 5 Press to select desired preset caption 6 C a p t i o n s P r e s e t L a b e l s M a n u a l L a b e l s I n p u t L a b e l s R F I n p u t A B C C B S F O X N B C P B S C N N E S P N H B O A n t e n n a A A 2 3 S E L E C T O K E X I T M E N U t o r e t u r n CH CH VOL VOL OK Press to select Preset Labels ...

Страница 70: ... e s e t L a b e l s M a n u a l L a b e l s I n p u t L a b e l s R F I n p u t C h a n n e l C a p t i o n A n t e n n a A A 2 3 F O X S E L E C T O K E X I T M E N U t o r e t u r n CH CH VOL VOL OK Press to select Manual Labels Press to enter Manual Labels listed 1 In Channel menu select Caption and press OK to display the Caption menu 2 Note Only input with signal will be selectable CH CH VOL...

Страница 71: ...tion and press OK to display the Caption menu 2 CH CH VOL VOL OK Press to select preset Input Labels for inputs Press to select inputs 3 CH CH VOL VOL OK Press to select another input then repeat procedure for adding more labels to inputs 4 5 Press to exit menu EXIT 9 Press to exit menu EXIT 7 8 Repeat 4 5 and 6 until all captions are added Up to 7 characters per channel Use the remote number keys...

Страница 72: ... color more blue CH CH VOL VOL OK S E L E C T O K M E N U E X I T O t h e r A d j u s t C o l o r T e m p N o r m a l V i d e o N R O f f 3 D Y C O n C o l o r M a t r i x S D 3 D I P O f f I D 1 O n P i c t u r e P i c M o d e V I V I D C o l o r 3 2 T i n t 3 2 B r i g h t n e s s 3 2 P i c t u r e 3 2 S h a r p n e s s 3 2 N o r m a l S e t O t h e r A d j u s t S E L E C T O K M E N U E X I T ...

Страница 73: ...st sub menu 3 CH CH VOL VOL OK EXIT CH CH VOL VOL OK Video NR Noise Reduction Feature P i c t u r e P i c M o d e V I V I D C o l o r 3 2 T i n t 3 2 B r i g h t n e s s 3 2 P i c t u r e 3 2 S h a r p n e s s 3 2 N o r m a l S e t O t h e r A d j u s t S E L E C T O K M E N U E X I T POWER SAP LIGHT MENU 1 2 3 4 5 6 7 8 0 9 EXIT CH CH VOL VOL R TUNE PIP MIN REW FREEZE TV VCR PIP SPLIT MOVE SWAP P...

Страница 74: ... Press to select Other Adjust Press to display the Other Adjust sub menu 3D Y C Feature P i c t u r e P i c M o d e V I V I D C o l o r 3 2 T i n t 3 2 B r i g h t n e s s 3 2 P i c t u r e 3 2 S h a r p n e s s 3 2 N o r m a l S e t O t h e r A d j u s t S E L E C T O K M E N U E X I T S E L E C T O K M E N U E X I T O t h e r A d j u s t C o l o r T e m p N o r m a l V i d e o N R O f f 3 D Y C ...

Страница 75: ...er Adjust CH CH VOL VOL OK Press to display the Other Adjust sub menu CH CH VOL VOL OK Setting when 480p signals are input through COMPONENT VIDEO INPUT P i c t u r e P i c M o d e V I V I D C o l o r 3 2 T i n t 3 2 B r i g h t n e s s 3 2 P i c t u r e 3 2 S h a r p n e s s 3 2 N o r m a l S e t O t h e r A d j u s t S E L E C T O K M E N U E X I T S E L E C T O K M E N U E X I T O t h e r A d j...

Страница 76: ...Other Adjust CH CH VOL VOL OK Press to display the Other Adjust sub menu CH CH VOL VOL OK 3D I P Feature P i c t u r e P i c M o d e V I V I D C o l o r 3 2 T i n t 3 2 B r i g h t n e s s 3 2 P i c t u r e 3 2 S h a r p n e s s 3 2 N o r m a l S e t O t h e r A d j u s t S E L E C T O K M E N U E X I T S E L E C T O K M E N U E X I T O t h e r A d j u s t C o l o r T e m p N o r m a l V i d e o N...

Страница 77: ... 2 Press to select Picture icon Press to display Picture menu Press to select Other Adjust CH CH VOL VOL OK Press to display the Other Adjust sub menu CH CH VOL VOL OK Automatically changing screen size P i c t u r e P i c M o d e V I V I D C o l o r 3 2 T i n t 3 2 B r i g h t n e s s 3 2 P i c t u r e 3 2 S h a r p n e s s 3 2 N o r m a l S e t O t h e r A d j u s t S E L E C T O K M E N U E X I...

Страница 78: ...t desired RGB input Press to set VGA or 480P 1 2 Press to select Picture icon Press to display Picture menu Press to select Other Adjust CH CH VOL VOL OK Press to display the Other Adjust sub menu CH CH VOL VOL OK S E L E C T O K M E N U E X I T O t h e r A d j u s t R G B 1 V G A R G B 2 V G A RGB IN Input Feature S E L E C T O K M E N U E X I T P i c t u r e B r i g h t n e s s 3 2 C o n t r a s...

Страница 79: ... VOL VOL OK Press MENU to display the Main Menu screen Press to select Timer icon Press to display Timer menu 1 2 EXIT O K M E N U E X I T T i m e r S l e e p T i m e r 3 0 Sleep Timer Feature Press repeatedly to select the desired time OFF 30min 60min 90min POWER SAP LIGHT MENU 1 2 3 4 5 6 7 8 0 9 EXIT CH CH VOL VOL R TUNE PIP MIN REW FREEZE TV VCR PIP SPLIT MOVE SWAP PIP CH DVD VCR CH SEARCH OPE...

Страница 80: ...OK CH CH VOL VOL OK Press to display the Other Adjustment menu Press to select Information CH CH VOL VOL OK Press to display Information screen 3 I n f o r m a t i o n S i g n a l 4 8 0 i M E N U E X I T Information S E L E C T O K M E N U E X I T O t h e r A d j u s t P o s i t i o n S i z e I n f o r m a t i o n D e m o M o d e O f f POWER SAP LIGHT MENU 1 2 3 4 5 6 7 8 0 9 EXIT CH CH VOL VOL R ...

Страница 81: ...in the Setup menu Press to select the Other Adj icon CH CH VOL VOL OK CH CH VOL VOL OK Press to display the Other Adjustment menu Press to select Demo Mode CH CH VOL VOL OK Press to set 3 Demo Mode Feature S E L E C T O K M E N U E X I T O t h e r A d j u s t P o s i t i o n S i z e I n f o r m a t i o n D e m o M o d e O n POWER SAP LIGHT MENU 1 2 3 4 5 6 7 8 0 9 EXIT CH CH VOL VOL R TUNE PIP MIN...

Страница 82: ...r Antenna B Displays the signal strength of the ATSC digital channel in either Antenna A or Antenna B 3 5 Press to exit menu 6 EXIT 4 CH CH VOL VOL OK Press MENU to display the Main Menu screen Press to select Setup icon Press to display the options in the Setup menu Press to display the Program Channel menu Press to select Program CH icon 1 CH CH VOL VOL OK 2 Signal Meter Feature P r o g r a m C ...

Страница 83: ...o display the options in the Setup menu Press to display the Program Channel menu Press to select Program CH icon 1 CH CH VOL VOL OK 2 P r o g r a m C h a n n e l I n p u t S e t u p S e t t i n g E n g l i s h A u t o S c a n M a n u a l P r o g r a m S i g n a l M e t e r L a n g u a g e O K C H A N G E E X I T M E N U t o r e t u r n POWER SAP LIGHT MENU 1 2 3 4 5 6 7 8 0 9 EXIT CH CH VOL VOL R...

Страница 84: ...nt and you try to access the Cable Module Info the message Cable Module not present will be displayed on screen To receive the features offered by your cable company you may have to subscribe to those services Note Please contact your cable company regarding availability of the DCM Digital Cable Module The cable module is needed to receive premium digital services where available through the cable...

Страница 85: ...out icon Press to display About menu CH CH VOL VOL OK 1 A b o u t S t a t u s 1022023014 5026017008 9008127346 E X I T M E N U t o r e t u r n POWER SAP LIGHT MENU 1 2 3 4 5 6 7 8 0 9 EXIT CH CH VOL VOL R TUNE PIP MIN REW FREEZE TV VCR PIP SPLIT MOVE SWAP PIP CH DVD VCR CH SEARCH OPEN CLOSE PLAY PAUSE STOP REC PIP MAX FF PROG TV VIDEO A ANTENNA B TV VCR DVD DBS RCVR CBL AUX OK M U T E ASPECT BBE R...

Страница 86: ... so may result in damage to the card and this unit The SD Card and PC Card are precision devices Do not subject them to excessive pressure or strong impacts ROOT DCIM P1000001 jpg P1000002 jpg P1000003 jpg P1000004 jpg P1010001 jpg P1010002 jpg P1010003 jpg P1010004 jpg 100_PANA 101_PANA Folders and Files DCIM Folder The digital camera creates this folder automatically Example If the Card file hie...

Страница 87: ...rd slot SD Card Compact Flash Multi Media Card Smart Media Memory Stick xD Picture Card Compatible Card Front Card Slot P 12 SD Card Press PC Card EJECT TAB twice The media listed in the right column above can be read via the PC Card in the PC Card adaptor Hard disk PC Cards Flash ATA Cards and other recorded media cannot be used Place the selected media onto the PC Card and then insert into the P...

Страница 88: ...ontained in the folder Index Area Operation 1 2 Press to select MENU Press to move to index area Press to set Press to select icon MENU PAGE 1 6 SINGLE SLIDE SD PC MENU PAGE 1 6 SINGLE SLIDE SD PC SD PC When both an SD Card and PC Card are inserted the buttons can be used to select a card in the index area MENU Area Operation To select a page directly enter the page number with the Number Keys the...

Страница 89: ...d Press Each press rotates image 90 Continued in left column of next page SINGLE VIEW SCREEN Press Press Press Press Press Press Press Press Press Photo Viewer SD Card PC Card POWER SAP LIGHT MENU 1 2 3 4 5 6 7 8 0 9 EXIT CH CH VOL VOL R TUNE PIP MIN REW FREEZE TV VCR PIP SPLIT MOVE SWAP PIP CH DVD VCR CH SEARCH OPEN CLOSE PLAY PAUSE STOP REC PIP MAX FF PROG TV VIDEO A ANTENNA B TV VCR DVD DBS RCV...

Страница 90: ...ST TRANSITION NORMAL 2 Press EXIT with SINGLE VIEW screen displayed to return to the Index Area menu When OK is pressed while the Information Screen is displayed the Picture Adjust menu p 50 is displayed Rotation angle is maintained Press OK to stop or resume slide show Note If a file name exceeds 8 characters a file name different from the original is displayed Pressing EXIT returns to SINGLE VIE...

Страница 91: ...cturer of the component and look in the table for the code If the component does not operate with the Remote Control repeat the procedure using another code Some brands have multiple codes If an incorrect code is entered or if the procedure takes longer than 30 seconds the programming will fail Device Operates Default TV TV Panasonic Only Panasonic Code VCR VCR Preset Panasonic Code DVD CD DVD and...

Страница 92: ...s found in each model Write the code numbers from tables in this space This will serve as a reference if you need to program your Remote Control CABLE Cable Box DBS Digital Broadcast System VCR Video Cassette Recorder RCVR Receiver or Amplifier CD Compact Disc Player DVD Digital Versatile Player Other Component Remote Control Quick Reference Guide Operating peripheral equipment Other Component Oth...

Страница 93: ...326 334 GE 324 333 345 Goldstar 306 Gradiente 334 Hitachi 300 323 345 Instant Replay 323 324 Jensen 339 JVC 310 311 334 339 Kenwood 306 310 311 339 LXI 300 305 306 307 308 309 Magnavox 323 324 331 Marantz 310 311 339 Marta 306 Memorex 309 324 MGA 338 340 341 347 348 Minolta 300 345 Mitsubishi 338 340 341 347 348 Multitech 304 347 NEC 310 311 334 339 Olympic 323 324 Codes For VCR Contd Brand Code O...

Страница 94: ...113 Slmark 101 105 Sprucer 105 110 Stargate 105 110 Teleview 101 105 Texscan 144 Tocom 135 Toshiba 104 Unika 125 232 Universal 122 132 Videoway 106 Viewstar 129 130 Zenith 100 117 Zenith Drake Satellite 100 Codes For DVD Brand Code Denon 100 Ferguson 101 JVC 109 Mitsubishi 105 Nordmende 101 Panasonic 100 Philips 103 Pioneer 102 RCA 101 DVD Codes For DVD Contd Brand Code Saba 101 Samsung 110 Sharp ...

Страница 95: ...Brand Code Admiral 120 Aiwa 125 126 Denon 134 135 136 Fisher 104 Garrard 113 Harman Kardon 115 123 Jensen 129 JVC 132 133 Kenwood 100 108 Magnavox 127 Marantz 124 Mclntosh 116 Nakamichi 106 Onkyo 109 114 Codes For Receivers Contd Brand Code Optimus 103 127 130 131 Panasonic 118 119 121 Philips 123 Pioneer 105 107 Quasar 118 119 121 RCA 103 105 127 130 131 Sansui 103 111 139 Sharp 134 137 Sony 122 ...

Страница 96: ... Display TO DO THIS PRESS Turn on off POWER Select a Channel 1 2 3 4 5 6 7 8 0 9 Change Channels Up Down CH CH VOL VOL OK Back to previous channel R TUNE Operating a CABLE BOX Program the Remote Control to use with Cable Box Operating a DBS Program the Remote Control to use with DBS TO DO THIS PRESS Turn on off POWER Display DBS menu OK Menu Navigation CH CH VOL VOL OK Select a Channel 1 2 3 4 5 6...

Страница 97: ... DO THIS PRESS Turn on off POWER Audio Mute RCVR VOl Up Down CH CH VOL VOL OK Tuner Pre set stations Up Down CH CH VOL VOL OK To select AV Inputs or Components Press Remote Control number keys AV1 Press 1 AV2 Press 2 AV3 Press 3 AV4 Press 4 CD Press 5 TUNER Press 6 PHONO Press 7 TAPE Press 8 AUX Press 9 TO DO THIS PRESS Turn on off POWER Display PVR menu MENU PVR Navigation CH CH VOL VOL OK Select...

Страница 98: ...e burns Please allow the lamp to cool before handling or replacing the lamp unit 3 If replacement of the lamp unit becomes necessary during the operation of the Device Display follow the procedure below Lamp unit replacement period The Lamp is a consumable item and it s life varies based on individual usage Panasonic warranties the original Lamp for a period of 18 months from the date of purchase ...

Страница 99: ...on and warning labels on lamp cover Then loosen the lamp cover screw by using a screwdriver Lamp cover handle Screwdriver Lamp cover screw Loosen the lamp unit screw with a screwdriver Then grasp the lamp unit as shown in the diagram and slowly remove from the Device Display Lamp unit screw Lamp unit handle Because the lamp unit is hot immediately after its use touching it may cause burns Please a...

Страница 100: ...imum Lamp life hours exceeded Replace Lamp Flashes red 1 time ever 5 seconds Power shuts off Lamp will not light or light is abnormal Try turning Power On several times If error persists contact service center Flashes red 2 times every 5 seconds Power shuts off Lamp voltage is abnormal Contact service center Flashes red 3 times every 5 seconds Power shuts off Lamp temperature is too high Contact s...

Страница 101: ...t direction Is the antenna receiving any signals reflected off of mountains or buildings Images disappear at the top and bottom of the screen When using 16 9 image software there is no picture at the top and bottom of the screen cinema vision size software etc During ZOOM modes the image is cut off at the top and bottom Has the screen position been changed If so adjust screen positioning 40 41 52 ...

Страница 102: ... Pin Jack AV INPUT 1 3 VIDEO 1 0 Vp p 75 Ω RCA Pin Jack S VIDEO Y 1 Vp p 75 Ω C 0 286 Vp p 75 Ω Mini DIN 4 pin AUDIO L R 0 5 Vrms RCA Pin Jack x 2 COMPONENT VIDEO INPUT 1 3 Y 1 0 Vp p with sync 75 Ω Pin Jack PB PR 0 35 Vp p 75 Ω Pin Jack x 2 AUDIO L R 0 5 Vrms RCA Pin Jack x 2 HDMI HDMI type A Connector AUDIO L R 0 5 Vrms RCA Pin Jack Type 2 Card slot SD Card slot SD Card Multi Media Card PC Card ...

Страница 103: ... Assistance locate your nearest Dealer or Servicenter purchase Parts and Accessories or make Customer Service and Literature requests by visiting our Web Site at http www panasonic com support or contact us via the web at http www panasonic com contactinfo You may also contact us directly at 1 800 211 PANA 7262 Monday Friday 9 am 9 pm Saturday Sunday 10 am 7 pm EST Service in Puerto Rico Matsushit...

Страница 104: ... of the product be removed for shop diagnosis and or repair and then returned Limited Warranty Limits And Exclusions This warranty ONLY COVERS failures due to defects in materials or workmanship and DOES NOT COVER normal wear and tear or cosmetic damage The warranty also does not cover damages which occurred in shipment or failures which are caused by products not supplied by the warrantor or fail...

Страница 105: ...please refer to the terms and conditions of the following GNU GENERAL PUBLIC LICENSE and GNU LESSER GENERAL PUBLIC LICENSE respectively If you wish to get further information as to the software please contact the web site below http www fsf org licenses and http www am linux jp The precise terms and conditions for copying distribution and modification follow TERMS AND CONDITIONS FOR COPYING DISTRI...

Страница 106: ...liance 5 You are not required to accept this License since you have not signed it However nothing else grants you permission to modify or distribute the Program or its derivative works These actions are prohibited by law if you do not accept this License Therefore by modifying or distributing the Program or any work based on the Program you indicate your acceptance of this License to do so and all...

Страница 107: ... most effectively convey the exclusion of warranty and each file should have at least the copyright line and a pointer to where the full notice is found one line to give the program s name and an idea of what it does Copyright C year name of author This program is free software you can redistribute it and or modify it under the terms of the GNU General Public License as published by the Free Softw...

Страница 108: ...uthor s reputation will not be affected by problems that might be introduced by others Finally software patents pose a constant threat to the existence of any free program We wish to make sure that a company cannot effectively restrict the users of a free program by obtaining a restrictive license from a patent holder Therefore we insist that any patent license obtained for a version of the librar...

Страница 109: ...independent of the application Therefore Subsection 2d requires that any application supplied function or table used by this function must be optional if the application does not supply it the square root function must still compute square roots These requirements apply to the modified work as a whole If identifiable sections of that work are not derived from the Library and can be reasonably cons...

Страница 110: ...tself accompanies the executable It may happen that this requirement contradicts the license restrictions of other proprietary libraries that do not normally accompany the operating system Such a contradiction means you cannot use both them and the Library together in an executable that you distribute 7 You may place library facilities that are a work based on the Library side by side in a single ...

Страница 111: ...F ALL NECESSARY SERVICING REPAIR OR CORRECTION 16 IN NO EVENT UNLESS REQUIRED BY APPLICABLE LAW OR AGREED TO IN WRITING WILL ANY COPYRIGHT HOLDER OR ANY OTHER PARTY WHO MAY MODIFY AND OR REDISTRIBUTE THE LIBRARY AS PERMITTED ABOVE BE LIABLE TO YOU FOR DAMAGES INCLUDING ANY GENERAL SPECIAL INCIDENTAL OR CONSEQUENTIAL DAMAGES ARISING OUT OF THE USE OR INABILITY TO USE THE LIBRARY INCLUDING BUT NOT L...

Страница 112: ... ID1 77 Input 1 2 3 terminals 13 J JPEG 9 86 L LAMP indicator 12 100 Left screen 46 Light button 11 M Main screen 44 MPAA 9 59 MSO 8 9 MUTE button 11 N NTSC 9 Number keys 11 35 O OK button 11 P Password 9 56 PCM 9 21 25 PC Card 87 PIP screen 44 POWER button Remote Control 11 26 34 POWER button POWER indicator Unit 12 26 34 100 R R TUNE button 11 36 RECALL button 11 38 Receivable Broadcast Types 43...

Отзывы: