background image

78

For assistance,  please call : 1-800-211-PANA(7262) or
send e -mail to : [email protected]

Spanish Quick Use Guide/Guía Para Uso Rápido

Spanish Quick Use Guide/Guía Para Uso Rápido

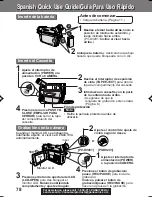
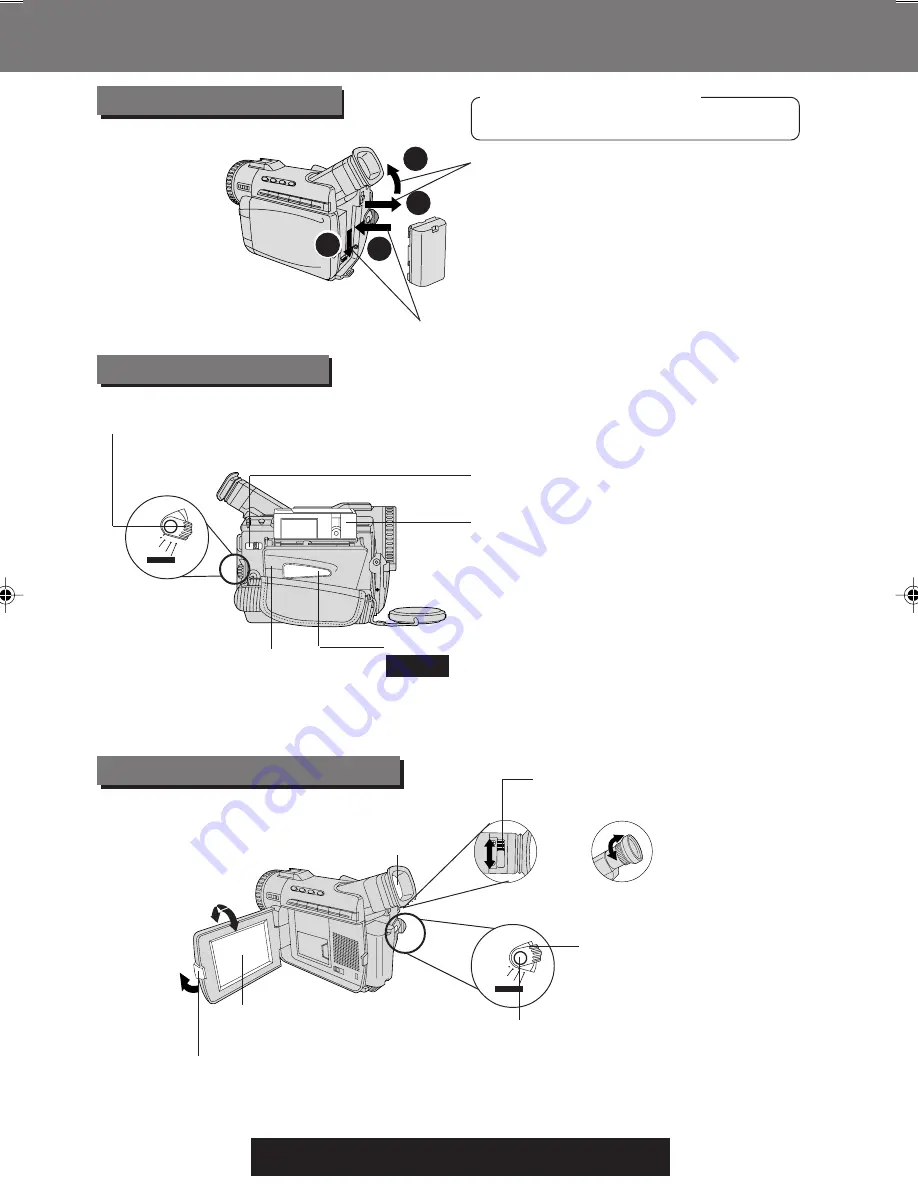
Inserte de la batería

Inserte el Cassette

1

Deslice el visor hacia atrás, haste la
posición de totalmente extendido, y
luego inclínelo hacia arriba.

(PV-DV201: Incline el visor hacia
arriba.
)

2

Coloque la batería y deslicela hacia abajo
hasata que quede bloqueada con un clic.

1

Ajuste el interruptor de
alimentación (POWER) a la
posición VCR o CAMERA.

4

Presione la marca PUSH TO
CLOSE (EMPUJAR PARA
CERRAR) 
para cerrar la tapa
del compartimiento del
cassette.

2

Deslice el interruptor de expulsión
de cinta (TAPE EJECT) 
para abrir la
tapa del compartimento del cassette.

3

Introduzca un cassette con la parte
de la ventana hacia arriba.
• Asegúrese de que la

lengüeta de grabación esté cerrada.
(Página 6.)

Film de protección

Nota

Retire la película protectora antes de
utilizarlo.

1

2

4

3

Antes de comenzar

• Cargue la battería. (Página 11.)

VCR
OFF

CAMERA

M-CARD

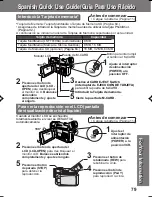
Grabación con la cámara

Cuando el monitor LCD se enchuentra
totalmente abjerto, el visor se DESACTIVA
automàticamente.

180°

90°

VCR
OFF

CAMERA

M-CARD

1

Ajuste el interruptor de
alimentación (POWER)
a la posición CAMERA.

Monitor LCD

2

Ajuste el control lde ajuste de
visión según lo desee.

O

[PV-DV401]

[PV-DV201]

3

Presione el botón de apertura del LCD
(LCD-OPEN) 
para des bloquear el
monitor LCD. Balancée abriéndolo
completamente y ajuste el àngulo.

4

Presione el botón de grabación/
pausa (REC/PAUSE)
 para iniciar la
grabación.
Vuelva a pulsar el botón de
grabación/pausa (REC/PAUSE) 
para
hacer una pausa en la grabación.

Visor

201_401.76-80.p65

01/01/18, 17:09

78

Содержание Palmcorder PV-DV401

Страница 1: ...Spanish Quick Use Guide is included Gu a para r pida consulta en espa ol est incluida R LSQT0364A Models No PV DV201 PV DV401 Digital Video Camcorder Operating Instructions Mini For assistance please...

Страница 2: ...with Part 15 of the FCC Rules Operation is subject to the following two conditions 1 This device may not cause harmful interference and 2 this device must accept any interference received including in...

Страница 3: ...g instructions should be retained for future reference 3 Heed Warnings All warnings on the unit and in the operating instructions should be adhered to 4 Follow Instructions All operating and maintenan...

Страница 4: ...electric shock or other hazards 21 Safety Check Upon completion of any service or repairs to this video unit ask the service technician to perform safety checks to determine that the video unit is in...

Страница 5: ...ctures 42 MAGICVU 0LUX PV DV401 only 42 Program AE 43 Other Digital Functions 44 Picture in Picture PinP 45 Strobe Multi Mode 46 Focus 47 Backlight 47 Audio Video Fade In Out 48 High Speed Shutter 48...

Страница 6: ...98 Me CARD LINK for USB for Windows 98 Me PHOTOVU LINK Movie Messenger for Windows 98 Me ArcSoft Software for Windows 98 Me LSFT0247 Microsoft and Windows are registered trademarks of Microsoft in th...

Страница 7: ...e Palmcorder is connected to a power source the cassette can be inserted and ejected without turning the Palmcorder on To remove the cassette Slide TAPE EJECT to open the Cassette Compartment Cover an...

Страница 8: ...rom one end of the strap 3 Thread the strap with no buckle through the Light Holder so that it faces outward Then reinsert the buckle 1 2 2 1 3 Adjust the Length 1 Insert the Light into the Light Hold...

Страница 9: ...Insert a cassette record tab up window side facing out Make sure the record tab is closed See page 6 Protection Film Note Remove the Protection Film before use 1 2 4 3 Before you begin Charge the Bat...

Страница 10: ...ress REW Button to rewind the tape 4 Press PLAY Button to start playback 5 Press STOP Button to stop playback M CARD Lock Switch Before you begin Charge the Battery See page 11 Memory Card MultiMediaC...

Страница 11: ...harge the Battery within an ambient temperature range of 10 C and 30 C If charging is done in extreme low or high temperatures Battery charge time increases CHARGE Lamp flashes when The Battery is bei...

Страница 12: ...104 F 40 C The Battery may be warm after charging or just after use This is normal Do not use an insufficiently charged or worn out Battery If charging is done in extreme low or high temperatures Batt...

Страница 13: ...hour and minutes To make corrections Press JOG KEY repeatedly to move back to an item and correct A built in Battery maintains clock operation If the Palmcorder is not connected to a power source for...

Страница 14: ...MOSAIC SLIM TRAIL STRETCH GAIN UP WIPE MIX PinP 2 ADJUST CAMERA ADJUST menu is displayed To select PROG AE W BALANCE or H S S High Speed Shutter 3 REC MODE CAMERA REC MODE menu is displayed To select...

Страница 15: ...32 kHz mode 16 bit The sound is recorded in the 16 bit 48 kHz high quality mode INDEX See page 30 DAY An index signal is recorded when recording is restarted after the date has changed since the last...

Страница 16: ...s See page 21 MAGICVU PV DV401 only See page 42 To select one of the 3 MAGICVU modes slide MAGICVU 0LUX Switch to ON DISPLAY See page 19 To select the desired type of display and counter indication di...

Страница 17: ...arch function PHOTO To search for Photo shot pictures SCENE To search for scenes marked with Index signal AUDIO See page 50 To select the desired audio playback mode after performing audio dubbing in...

Страница 18: ...e page 19 Setting to ON resets the counter to zero DATE TIME See page 19 The date and time can be set and displayed on the screen CLOCK SET See page 13 When set to ON the date and time can be set on t...

Страница 19: ...ears when SEPIA or MONO is selected in VCR menu Tape Speed Indication See page 15 Indicates the tape speed SP or LP AY DVM30EA AY DVM60EA Memory Counter M 0 00 00 The Palmcorder will stop whenever it...

Страница 20: ...ations REC Recording PHOTO PhotoShot recording PAUSE Paused during recording PLAY Playback R Repeat Playback CHK Recording Check FF Fast forward REW Rewind FF Search REW Search BLANK Blank Search SEAR...

Страница 21: ...is attempted on a pre recorded LP tape CANNOT REC LP MODE will appear for 5 seconds If excessive moisture condenses in the unit WARNING will flash DEW DETECTED will appear and the Palmcorder will aut...

Страница 22: ...bright objects or bright lights a vertical bar may appear in the picture This is a normal characteristic of the CCD pick up device Try to avoid this whenever possible WARNING Do not leave the Palmcord...

Страница 23: ...0 degrees so it faces the same direction as the lens to record yourself CAMERA mode The picture in the LCD monitor will appear reversed Set SELF REC to MIRROR see page 15 in the Camera mode menu scree...

Страница 24: ...muted in reverse visual search Make sure the SP LP tape speed setting is the same as the recording to eliminate distortion during edit search 2 3REC PAUSE Button 1POWER Switch Edit Search You can visu...

Страница 25: ...ions Rec Pause See page 22 Tele Zoom See page 22 Wide Zoom See page 22 Date Time See page 20 Reset See page 50 PhotoShot See page 41 Display On TV See page 31 Counter Time Code See page 19 Audio Dubbi...

Страница 26: ...R mode menu screen then press JOG KEY to display the CAMERA SET UP or VCR PLAY MODE menu screen 4Rotate JOG KEY to select REMOTE and then press JOG KEY to select VCR 2 See pages 16 17 Leave the other...

Страница 27: ...rder will go into Repeat Playback mode when the tape reaches its end The letter R will appear in the EVF and LCD monitor To exit the Repeat Playback mode turn the Palmcorder OFF 2REWIND SEARCH Button...

Страница 28: ...e may become bluish for an instant or mosaic This is normal during this mode STILL Picture Note Note Note SLOW F ADV Button Fast Forward Rewind Check Press PAUSE during playback Press PLAY or PAUSE to...

Страница 29: ...ch Palmcorder only During Still mode rotate JOG KEY to advance or reverse the picture one frame at a time Variable Speed Search 1 Press PLAY to start playback 2 Press PLAY again 3 Rotate JOG KEY to ad...

Страница 30: ...enu to SCENE See page 17 Ex if you press the button three times S3 will appear If the interval between scenes is less than 1 minute index search may not operate properly Response time from pressing th...

Страница 31: ...cting Please connect the A V Cable securely CATV System Installer This reminder is provided to call the CATV system installer s attention to Article 820 40 of the NEC in USA and to the Canadian Electr...

Страница 32: ...n the subject After capturing an image the number may not decrease or it may decrease by two This is normal While PROCESSING is displayed DO NOT turn off the Palmcorder or unplug the AC Adaptor suppli...

Страница 33: ...images from a cassette tape to a Memory Card 3PLAY Button Before you begin Connect the Palmcorder to a power source See pages 11 12 Set POWER to OFF before inserting a Memory Card See page 10 2POWER S...

Страница 34: ...e MULTI Multi Image screen or NEXT next image Press M STOP to return to the Multi Playback screen DISPLAY Select OFF to remove all displays from the screen DCF Design rule for Camera File system Selec...

Страница 35: ...ting a recorded Memory Card See pages 32 33 1 Slide the M CARD Lock Switch to unlock then set POWER to M CARD The POWER lamp lights red Be sure POWER is fully turned to M CARD position PLAY PUSH PLAY...

Страница 36: ...STOP to return to the Card PhotoShot REC Mode screen See page 32 You can delete all images from the Memory Card easily with this operation Warning Once deleted images cannot be restored 2M DEL Button...

Страница 37: ...SH STOP PUSH SET JOG JOG KEY KEY KEY SELECT CANCEL ROTATE 1 3 6 4 PAGE You can easily format your Memory Card using this operation Warning Formatting permanently removes all image data 1 2 3 4 6 FORMA...

Страница 38: ...mode screen After Photo Title is performed Digital Function turns off There are 12 pre installed files 5Press REC PAUSE to start recording with Photo Title WIPE or MIX screen is displayed at beginnin...

Страница 39: ...sed in both the Recording and Playback VCR modes CAMERA mode VCR mode Other Digital Functions are turned off automatically when the EIS and Digital Zoom are selected A Set POWER to VCR The POWER lamp...

Страница 40: ...select D ZOOM1 or D ZOOM2 once D ZOOM1 from 20X to 40X twice D ZOOM2 from 20X to 300X three times Turn off D ZOOM 3Press REC PAUSE to start recording and press POWER ZOOM to zoom in or zoom out The m...

Страница 41: ...CENE Press MENU twice to exit EPress INDEX SEARCH fast forward or rewind on the remote control Optional page 64 to advance or rewind the tape to playback a PhotoShot scene To view the next PhotoShot I...

Страница 42: ...cording Still Pictures Auto White Balance automatically maintains optimum color balance in most lighting conditions However when using Digital Functions etc you may get better results using the manual...

Страница 43: ...r whitish It is not possible to select the SPORTS mode or PORTRAIT mode together with the GAIN UP in the Digital function camera menu No display SPORTS PORTRAIT LOW LIGHT SPOT LIGHT SURF SNOW Program...

Страница 44: ...ded vertically TRAIL The subject being recorded creates a trail when in motion STRETCH The picture is expanded horizontally GAIN UP Not available during playback Picture sensitivity is increased Only...

Страница 45: ...screen 3 Rotate JOG KEY repeatedly to select D FUNCTION then press JOG KEY to display the CAMERA FUNCTION menu screen 4 Press JOG KEY to select PinP Press MENU twice to exit this menu 5 Aim at the sc...

Страница 46: ...ess PLAY to start playback Press MULTI at the point you want to start capturing A succession of 9 screens will be captured and playback will stop Press MULTI to return to the normal STILL screen Press...

Страница 47: ...is fully turned to CAMERA position 2Press M FOCUS DIAL so that MF Manual Focus appears in the EVF or the LCD monitor 3Press and hold POWER ZOOM T side Telephoto until the lens is at maximum zoom in 4T...

Страница 48: ...page 6 Starting the first scene with fade in is very effective 1 In REC PAUSE mode hold down FADE until the picture fades out 2 Press REC PAUSE to start recording 3 Release FADE and the picture will g...

Страница 49: ...Then press PAUSE where you want dubbing to begin 3 Press A DUB on this unit for 3 seconds or on the remote control optional page 64 to put the Palmcorder in the Audio Dub mode A DUB flashes in the EVF...

Страница 50: ...ly page 64 Optional 16 bit dubbed sound completely erases the original 16 bit recorded sound If you dubbed using 12 bit AUDIO recording and then selected AUDIO MIX in the menu for playback the sound w...

Страница 51: ...S VHS or VHS Cassette Monitor with your TV 1 Insert a pre recorded tape into the source playing Palmcorder and a blank tape with record tab in place into the target VCR Recorder 2 Press PLAY on the P...

Страница 52: ...on the target recording Palmcorder or on the remote control optional page 64 Press PAUSE to pause the tape at the starting point of the dub 5 Simultaneously press PAUSE on both units to begin dubbing...

Страница 53: ...ture on our website at www panasonic com video Software Installation Windows 98 Me 1 Turn on the PC Personal Computer and start up Windows 98 Me 2 Insert the supplied Software CD ROM into the CD ROM d...

Страница 54: ...eft click on Exit to close CARD LINK for USB Monitor If the Locked File Detected dialog box appears while unistalling the CARD LINK for USB close CARD LINK for USB Monitor as described above then clic...

Страница 55: ...n is run automatically and images stored on the memory card are transferred to your PC and saved If an image to be transferred already exists that image will be skipped over and not transferred Before...

Страница 56: ...ing the image to your PC the displayed picture appears abnormal restart the PC application and turn Palmcorder POWER off and then back on Using PC Image Data CARD LINK for USB You can use JPEG or Bitm...

Страница 57: ...the USB Cable supplied or DV interface Cable i LINK CStart up the PHOTOVU LINK Movie Messenger While PHOTOVU LINK Movie Messenger is running do not perform the following operations The PC system may b...

Страница 58: ...ill images are saved to the PC and you can playback the saved images on the Image Browser See page 59 By connecting the Palmcorder and PC with the USB Cable you can transfer Motion images and Still im...

Страница 59: ...age Browser screen To view Still images 3Click on Pictures to display the Still image list 4Double Click on the desired image to open it If the image cannot be opened please refer to the software Help...

Страница 60: ...and so on 1Repeat steps 1 4 on page 57 to run the PHOTOVU LINK Movie Messenger See Note below 2Click IMAGE BROWSER to display the Image Browser screen 3Select E mail Settings from Settings 4Select the...

Страница 61: ...Motion image to be attached then click on Compress Follow the menu to perform the compression settings 5Clicking on Compress will compress the selected image Successfully Done is displayed on the PC s...

Страница 62: ...operating system PHOTOVU LINK Movie Messenger i LINK connection may not work with some DV Interface boards In this case use the software included with the board 1394 i LINK interface must conform to...

Страница 63: ...n for confirmation Note To capture Still images 3Click on STILL CAPTURE at the point you wish to capture an image Repeat step 3 to continue capturing images Captured Still images are saved to the PC a...

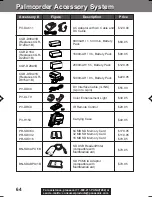
Страница 64: ...SDCAPU 1B BN SDABPU 1B Description AC Adaptor with AC Cable and DC Cable 800mAH 1 h 30 min Battery Pack 1600mAH 3 h Battery Pack 2800mAH 5 h Battery Pack 5300mAH 9 h Battery Pack DV Interface Cable i...

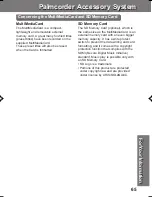
Страница 65: ...be erased when the Card is formatted SD Memory Card The SD Memory Card optional which is the same size as the MultiMediaCard is an external memory card with an even bigger memory capacity It has a wr...

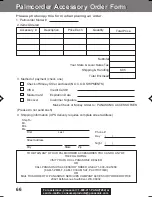
Страница 66: ...ORDER OFFICE 20421 84th Avenue South Kent WA 98032 Ship To Mr Mrs Ms First Last StreetAddress City State Zip Phone Day Night 4 Shipping information UPS delivery requires complete street address Pleas...

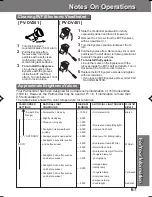
Страница 67: ...lamp Off white Tungsten lamp for photography Halogen lamp Iodine lamp Tungsten lamp Acetylene lamp Kerosene lamp Candlelight KELVIN COLOR TEMPERATURE Fair weather blue sky Slightly cloudy sky Cloudy o...

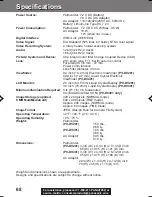
Страница 68: ...ctronic Viewfinder PV DV201 0 44 inch 12 7 mm Liquid Crystal Electronic Viewfinder PV DV401 LCD Monitor 2 5 inch 63 5 mm Liquid Crystal Display PV DV201 3 0 inch 76 2mm Liquid Crystal Display PV DV401...

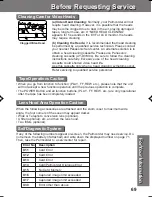
Страница 69: ...ce CloggedVideoHead When you go from function to function PLAY FF REW etc please note that the unit will not accept a new function operation until the previous operation is complete The POWER Button a...

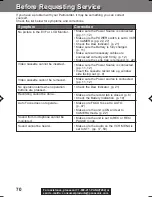
Страница 70: ...tom Make sure the Power Source is connected pp 11 12 Make sure the POWER switch is set to VCR or CAMERA pp 22 27 Check the Dew Indicator p 21 Make sure the Battery is fully charged p 11 Make sure all...

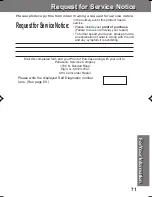
Страница 71: ...7847 Attn Camcorder Repair RequestforServiceNotice Please photocopy this form when making a request for service notice In the unlikely event this product needs service Please include your proof of pur...

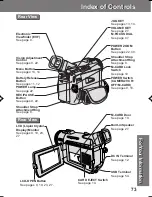
Страница 72: ...nal Microphone Jack PV DV401 only See page 49 Built in Light Mount See page 7 Hand Strap See page 8 Cassette Compartment Cover See page 7 Front View Side View D ZOOM Button See page 40 EIS Button See...

Страница 73: ...OWER Switch CAMERA VCR OFF M CARD See pages 9 10 Rear View REC PAUSE Button See pages 9 22 Battery Release Button See pages 11 12 POWER Lamp See page 22 LCD Liquid Crystal Display Monitor See pages 9...

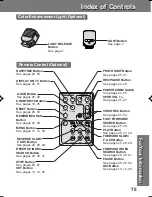
Страница 74: ...ge 24 PAUSE Button See pages 28 29 49 50 51 52 CAMERA STILL Button See pages 45 REC Button See page 52 M DEL Button See pages 35 36 37 CAUTION VCR DC Output Connector See page 12 CHARGE Lamp See page...

Страница 75: ...14 50 VIDEO REC Button See pages 25 52 POWER ZOOM Switch See pages 22 25 SPKR VOL See pages 25 27 REC PAUSE Button See pages 22 25 PHOTOSHOT Button See pages 25 41 DATE TIME Button See pages 20 25 DI...

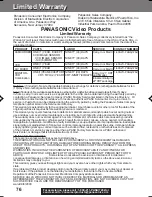
Страница 76: ...se neglect mishandling misapplication alteration modification faultyinstallation set upadjustments improperantenna inadequate signal pickup maladjustment of consumer controls improper operation power...

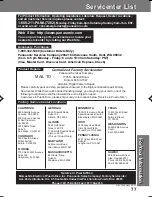
Страница 77: ...MINNESOTA 7850 12th Avenue South Airport Business Center Bloomington MN 55425 OHIO 2236 Waycross Road Civic Center Plaza Forest Park OH 45240 PENNSYLVANIA 2221 Cabot Blvd West Suite B Langhorne PA 19...

Страница 78: ...l compartimento del cassette 3 Introduzca un cassette con la parte de la ventana hacia arriba Aseg rese de que la leng eta de grabaci n est cerrada P gina 6 Film de protecci n Nota Retire la pel cula...

Страница 79: ...inta 4Presione el bot n de reproducci n PLAY para reproducir la cinta 5 Presione el bot n de parada STOP para detener la reproducci n Bot n para interrumpir el cambio al M CARD Para ver la reproducci...

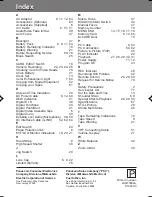
Страница 80: ...Strap 8 High Speed Shutter 48 J Jog Search 29 L Lens Cap 6 8 22 Limited Warranty 76 M Macro Focus 47 MAGICVU 0LUX Switch 42 Manual Focus 47 Memory Counter 19 MENU OSD 14 15 16 17 18 Memory Card 6 10 6...

Отзывы: