background image

57

With a PC

Notes

• Macintosh is a registered trademark of Apple 

Computer, Inc. ArcSoft, the ArcSoft logo, ArcSoft 
PhotoImpression 4 and ArcSoft PhotoBase 4 are 
trademarks of ArcSoft, Inc.

• Microsoft

®

 Windows

®

, Windows Messenger

®

, MSN 

Messenger

®

 and DirectX

®

 are either trademarks or 

registered trademarks of the Microsoft Corporation in 
the United States and/or other countries.

• Intel

®

, Pentium

®

 and Celeron

®

 are the registered 

trademarks or trademarks of the Intel Corporation.

• All other names, company names, product names, 

etc. in these instructions are the trademarks 
or registered trademarks of their respective 
corporations.

• The names of the products you are using may differ 

from the names given in the text. Depending on 
the operating environment and other factors, the 
contents of the screens used in these instructions 
may not necessarily match what you will see on your 
screen.

• Although the screens in these Operating Instructions 

are shown in English for the sake of example, other 
languages are supported as well.

• In this Manual, the Panasonic make digital video 

camera with USB Jack is referred to as Camcorder.

• These instructions do not cover the basic operations 

of the personal computer or de

fi

 ne any terms. For 

this information, refer to the Operating Instructions 
which accompany your personal computer.

• Do not disconnect USB Cable while the operation 

light of Camcorder is on. It may freeze the software 
or destroy the data in transfer.

• We recommend using the AC adaptor as the 

power source for the Camcorder when using USB 
Connection Kit. Data may be lost if the battery power 
is lost while transferring data.

• If the Camcorder is used as a Web Camera while 

virus checking software is running, the Camcorder’s 
operation may stop midway through. In this case, 
exit the Windows Messenger or MSN Messenger, 
reconnect the Camcorder and restart the Windows 
Messenger or MSN Messenger.

• Do not delete the folders in the memory card such as 

picture folder. Memory card may not be recognized if 
folders are deleted.

• When the Camcorder is connected to a personal 

computer in PC Mode, it will not be possible 
to change to other modes. To change modes, 
disconnect the USB cable, switch the Camcorder 
Mode Dial, then reconnect the USB cable.

• When the Tape Recording Mode of the Camcorder is 

switched to the PC Mode, a warning message may 
be displayed. You may simply ignore it.

• When you are using Windows XP or Windows 2000, 

you may install or uninstall this software after logging 
ON by setting the user name to Administrator or to a 
user name having equivalent authority.

• If you install the USB Driver after the USB Cable is 

connected, or if you do not follow these Operating 
Instructions, the Camcorder will not be recognized 
correctly. In this case, delete the USB Driver from 
[Device Manager] as described below, uninstall the 
USB Driver, and re-install it.

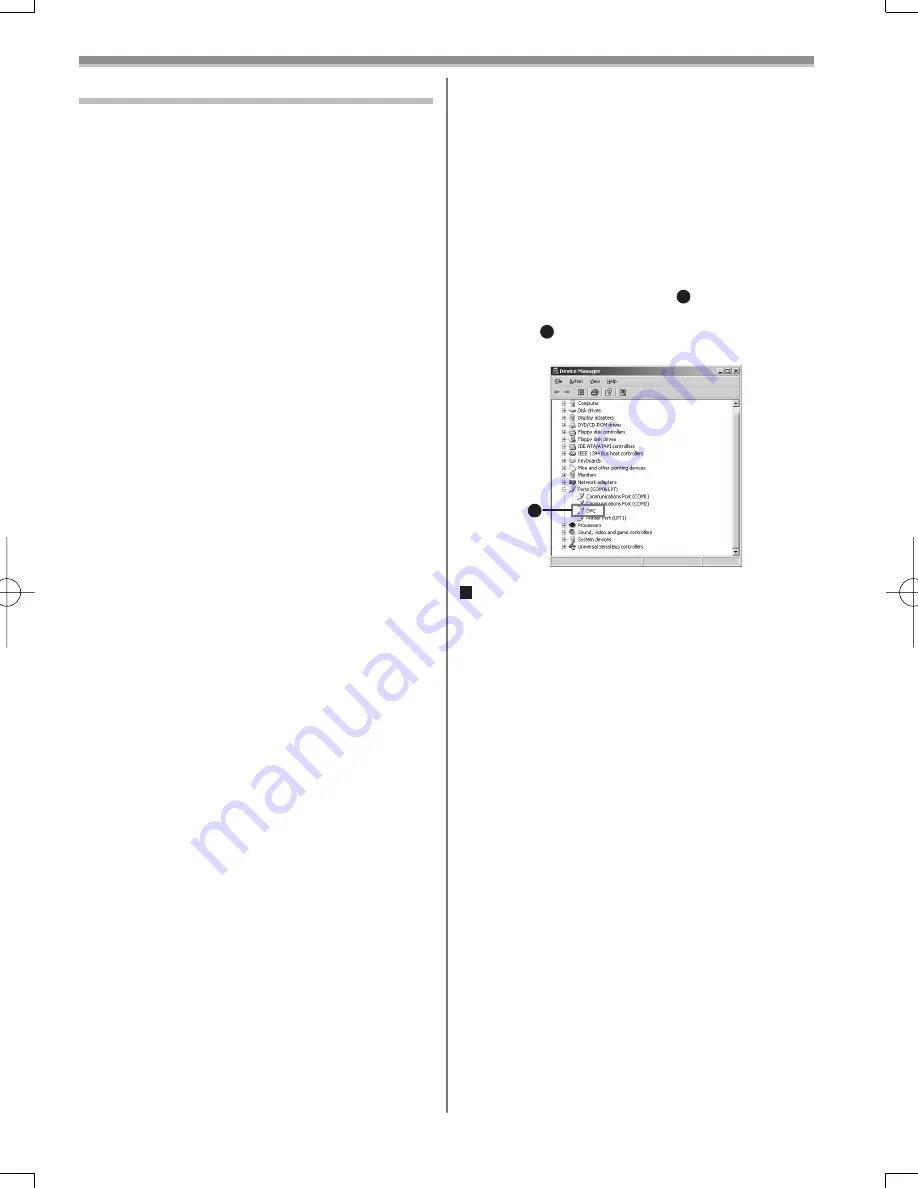
•  With the Camcorder and personal computer 

connected via a USB Cable, open the [Device 
Manager]. Right-click [!DVC] 

1

 in [Ports] or [Other 

devices], and select [Uninstall].

 ([!DVC] 

1

 will differ depending on the OS or 

operating environment of your personal computer.)

1

 About the  SD Memory Card and  

 MultiMediaCard 


 (For 

PV-GS12/PV-GS14/PV-GS15)

SD Memory Card

The SD Memory Card (PV-GS15: Supplied, PV-GS12/ 
PV-GS14: Optional) is virtually the same size as a 
MultiMediaCard. It is an external memory card that is 
available in larger capacities. It has a write protect 
switch to prevent data writing and card formatting, as 
well as a copyright protection function.
• SD Logo is a trademark.

MultiMediaCard (Optional)

The MultiMediaCard is a compact, lightweight and 
removable external memory card.
• All other company and product names in the 

operating instructions are trademarks or registered 
trademarks of their respective corporations.

Files recorded on a SD Memory Card or 
MultiMediaCard

It may not be possible to play back the 

fi

 les on this 

Camcorder recorded on and created by other 
equipment or vice versa. For this reason, check the 
compatibility of the equipment in advance.

Содержание Palmcorder MultiCam PV-GS12

Страница 1: ...14 PV GS15 Digital Video Camcorder Operating Instructions Models No Spanish Quick Use Guide is included Guía para rápida consulta en español está incluida For assistance please call 1 800 211 PANA 7262 or contact us via the web at http www panasonic com contactinfo PV GS15 Shown For PV GS12 PV GS14 PV GS15 For PV GS12 PV GS14 PV GS15 ...
Страница 2: ...s manual as your convenient Camcorder information source This symbol alerts the user that important literature concerning the operation and maintenance of this unit has been included Therefore it should be read carefully in order to avoid any problems The above markings are located on the appliance bottom cover Your Camcorder is designed to record and play back in Standard Play SP mode and Long LP...

Страница 3: ...rrect the interference by one or more of the following measures Reorient or relocate the receiving antenna Increase the separation between the equipment and receiver Connect the equipment into an outlet on a circuit different from that to which the receiver is connected Consult the dealer or an experienced radio TV technician for help FCC Caution To assure continued compliance follow the attached ...

Страница 4: ... power line surges 1 Read Instructions All the safety and operating instructions should be read before the unit is operated 2 Retain Instructions The safety and operating instructions should be retained for future reference 3 Heed Warnings All warnings on the unit and in the operating instructions should be adhered to 4 Follow Instructions All operating and maintenance instructions should be follo...

Страница 5: ...er and power supply should not be exposed to rain or moisture Do not connect the power supply or operate your Camcorder if it gets wet Your Camcorder has been designed for outdoor use however it is not designed to sustain direct exposure to water rain sleet snow sand dust or direct splashing from a pool or even a cup of coffee This action could permanently damage the internal parts of your Camcord...

Страница 6: ...assemble the Software except to the extent either of them is permitted under law or regulation of the country where Licensee resides Matsushita or its distributors or dealers will not be responsible for any defects in the Software or damage to Licensee caused by Licensee s reverse engineering decompiling or disassembly of the Software Article 6 Limitation of Liability The Software is provided AS I...

Страница 7: ...8 3 1 35 mm equivalent 39 5 790 mm 20x zoom lens f2 1 42 mm F1 8 3 1 35 mm equivalent 39 5 790 mm 20x zoom lens f2 1 46 2 mm F1 8 3 4 35 mm equivalent 39 5 869 mm 22x zoom lens f2 1 50 4 mm F1 8 3 6 35 mm equivalent 39 5 948 mm 24x zoom lens Photoshot Tape Feature Yes No No No Mode Dial Tape Recording Mode Tape Playback Mode Tape Recording Mode Tape Playback Mode Card Recording Mode Picture Playba...

Страница 8: ...19 Using the Menu Screen 19 List of Menus 20 Setting Date and Time 23 Internal Lithium Battery Recharge 23 LP Mode 23 Audio Recording Mode 23 Recording Mode About Recording 24 Recording on a Tape 24 Recording a Still Picture on a Tape PV GS9 Only 25 Recording a Still Picture on a Card Photoshot For PV GS12 PV GS14 PV GS15 25 Recording Yourself 26 Recording with the Built in LED Video Light For PV ...

Страница 9: ...For PV GS12 PV GS14 PV GS15 44 Recording Pictures from a Card onto a Tape For PV GS12 PV GS14 PV GS15 44 Audio Dubbing Remote Control Only 44 Copying on an S VHS or a VHS Cassette 45 Using the DV Cable for Recording 45 PC Connection With DV Interface Cable 46 With a PC Using the Software with a Personal Computer 47 Using USB Driver 47 To disconnect USB cable safely 49 Using as a Web Camera 50 Usin...

Страница 10: ...is not fully opened the cassette cannot be ejected 2 Insert a Cassette 3 Close the Cassette Holder by pressing the PUSH mark 2 4 Close the Cassette Compartment Cover by pressing the mark 3 2 1 Inserting a Cassette Inserting a Card For PV GS12 PV GS14 PV GS15 2 Slide the OPEN Lever 3 to open the Card Slot Cover 4 3 While holding the Memory Card with its cut corner facing right 5 insert it into the ...

Страница 11: ...Lamp 2 lights up 2 Set the Mode Dial to Tape Playback Mode 3 Press the Button to rewind the tape 4 Press the Button to start playback 5 Press the Button to stop playback PV GS12 PV GS14 PV GS15 PV GS9 Playing Back a Tape 1 2 1 Set the Mode Dial to Picture Playback Mode Starting the Slide Show Playing back the next picture Playing back the previous picture Stop the Slide Show Pause the Slide Show 2...

Страница 12: ...r CGR D14 PV GS15 Only CGR D08R For PV GS9 PV GS12 PV GS14 1 2 3 4 5 6 7 8 9 1 LCD Monitor Open Knob OPEN p 19 2 LCD Monitor pp 19 68 19 20 21 12 11 10 13 14 15 16 17 18 3 Card Slot Cover Open Lever OPEN For PV GS12 PV GS14 PV GS15 p 18 4 Card Slot For PV GS12 PV GS14 PV GS15 p 18 5 Card Slot Cover For PV GS12 PV GS14 PV GS15 p 18 6 Speaker p 35 7 Recording Check Button p 24 Recording Button REC p...

Страница 13: ...compatible plug in powered microphone can be used Please consult your dealer for more information The microphone may make noises depending on the type used In this case we recommend using the battery with the Camcorder to reduce noises instead of the AC Adaptor 35 Eyepiece Corrector Knob p 19 36 Photoshot Button PHOTO SHOT pp 25 26 37 Cassette Eject Lever OPEN EJECT p 17 38 DC Input Jack DC IN p 1...

Страница 14: ...ion Output Button OSD p 43 52 Display Button DISPLAY p 60 53 Reset Button RESET pp 60 70 54 Recording Button REC p 45 55 Audio Dubbing Button A DUB p 44 56 Cursor buttons for Variable Speed Search Function p 36 Direction Buttons for Playback Zoom Function p 37 50 51 52 53 54 55 56 57 58 59 60 61 62 63 64 57 Slow Motion Still Advance Buttons reverse forward p 36 58 Index Search Buttons reverse forw...

Страница 15: ...neously 2 When the battery in the Remote Control is replaced the mode is automatically reset to VCR1 Mode The above operating ranges are for indoor use Outdoors or under strong light the Camcorder may not operate properly even within the above ranges Selecting Remote Control Modes When 2 Camcorders are used simultaneously they can be operated individually by selecting different Remote Control Mode...

Страница 16: ... h 25 min A Charging Time Maximum Continuous Recording Time B 1 h 30 min indicates 1 hour and 30 minutes Battery CGR D08R PV GS9 PV GS12 PV GS14 or CGR D14 PV GS15 is supplied The times shown in the table are approximate times The numbers indicate the recording time when the Viewfinder is used The numbers in parentheses indicate the recording time when the LCD Monitor is used In actual use the ava...

Страница 17: ...Length Adjuster and pull it Attach the other end of the Shoulder Strap to the other Shoulder Strap Holder in the same way Inserting a Cassette 1 Slide the OPEN EJECT Lever 37 toward the front and pull down to fully open the Cassette Compartment Cover To protect the tape if the cover is not fully opened the cassette cannot be ejected 2 Insert a Cassette 3 Close the Cassette Holder by pressing the P...

Страница 18: ...t Cover and press the center of the Card and then pull it straight out After removing the Card close the Card Slot Cover The Camcorder may be damaged if the Card is forced out when the Card is fully inserted Card Access Lamp 12 Turning on the Camcorder Turn on the power first and then select modes How to Turn on the Power 1 Set the OFF ON Switch 44 to ON while pressing the button 1 The POWER Lamp ...

Страница 19: ...aximum of 90 2 to the downward direction Forcefully rotating the LCD Monitor beyond these ranges will damage the Camcorder Closing the LCD Monitor Push the LCD Monitor until it is securely locked Make sure the Card Slot Cover is closed Adjusting Brightness and Color Level When LCD EVF SET on the LCD EVF Sub Menu is set to YES the following items are displayed LCD Brightness LCD BRIGHTNESS Adjusts ...

Страница 20: ... a Menu is displayed you cannot record or play back Menus can be displayed during playback but not during recording The above operations can be done using the MENU Button Buttons and ENTER Button on the Remote Control p 14 To Return to the Previous Screen Press the Button 17 To Exit the Menu Screen Press the MENU Button again About the Menu Mode Setting The setting selected on the Menu will be ret...

Страница 21: ... 5 DISPLAY Display Setup Sub Menu DISPLAY Display Mode p 60 DATE TIME Date and Time Indication p 60 C DISPLAY Counter Display Mode p 60 C RESET Counter Reset p 71 It resets the counter to zero However it cannot reset the Time Code 6 LCD EVF LCD EVF Setup Sub Menu LCD EVF SET LCD and Viewfinder Adjustment p 19 SELF REC Recording Yourself p 26 EVF ON AUTO Using the Viewfinder p 19 7 INITIAL Initial ...

Страница 22: ...Y Display Setup Sub Menu DISPLAY Display Mode p 60 DATE TIME Date and Time Indication p 60 5 LCD EVF LCD EVF Setup Sub Menu LCD EVF SET LCD and Viewfinder Adjustment p 19 SELF REC Recording Yourself p 26 EVF ON AUTO Using the Viewfinder p 19 6 INITIAL Initial Setup Sub Menu AV JACK AV Jack pp 13 65 REMOTE Remote Control Mode p 15 BEEP SOUND Beep Sound p 61 CLOCK SET Date and Time Setting p 23 INIT...

Страница 23: ...s LP Mode A desired recording speed can be selected with REC SPEED on the RECORDING Sub Menu If LP Mode is selected the recording time becomes 1 5 times longer than that of SP Mode Although the image quality does not decrease with the LP Mode recording mosaic pattern noise may appear on a playback image or some normal functions may be restricted The contents that are recorded in LP Mode are not co...

Страница 24: ...ter with a USB Cable Standby mode is not available Recording on a Tape 1 Set the OFF ON Switch 44 to ON The POWER Lamp 41 lights up 2 Set the Mode Dial 40 to Tape Recording Mode 4 Press the Recording Start Stop Button 43 again to pause the recording The PAUSE Indication is displayed To Check the Recording By pressing the Button 7 briefly in the Recording Pause Mode you can play back the last few s...

Страница 25: ...und is recorded 40 Recording a Still Picture on a Card Photoshot For PV GS12 PV GS14 PV GS15 Still pictures can be recorded on the Memory Card from the Camcorder 19 14 15 13 16 17 Maximum number of images recordable on the supplied PV GS15 Only Card 8MB FINE high image quality approximately 45 pictures NORMAL normal image quality approximately 95 pictures ECONOMY low image quality approximately 19...

Страница 26: ...u to MIRROR Images are recorded normally and no left and right reversal occurs Recording with the Built in LED Video Light For PV GS12 PV GS14 PV GS15 Recording Yourself The Built in LED Video Light lights and the Gain Up mode is set to on Gain Up mode will be brighter than when only the Video Light is on however ghost images will appear 2 Press the LIGHT Button 2 Gain Up mode is set to off To eli...

Страница 27: ... Indication is displayed for a few seconds 19 14 15 13 16 17 36 26 To Take Close up Shots of Small Subjects Macro Close up Function When the zoom magnification is 1X the Camcorder can focus on a subject that is as close as approximately 0 8 inches 20 mm from the Lens Small subjects like insects can be recorded with this function To Use the Zoom Microphone Function Along with the zooming operation ...

Страница 28: ...3 or PHOTO SHOT Button 36 to start recording To Cancel Image Stabilizer Function Set TAPE RECORDING MENU CAMERA EIS OFF For other notes concerning this item see page 62 Fade In Out Functions Fade In Fade In brings out images and sounds gradually from a black screen at the beginning of a scene 1 Keep pressing the FADE Button 16 during the Recording Pause Mode The image fades out gradually 2 When th...

Страница 29: ...e In order to get the best result avoid background colors similar to the skin color of the subject Otherwise this may result in a softer background lacking in detail 1 Press the SOFT SKIN Button 9 The SOFT SKIN Indication appears To obtain the best effect we recommend to take a bust shot so that the upper part from the breast of the subject can be framed in the screen To Cancel the Soft Skin Mode ...

Страница 30: ...ORDING MENU For PV GS12 PV GS14 PV GS15 CAMERA PROG AE a desired mode or The Indication of the selected Mode appears To Cancel the Program AE Function Set the PROG AE on the CAMERA Sub menu to OFF Or set the AUTO MANUAL FOCUS Switch to AUTO For other notes concerning this item see page 63 For other notes concerning this item see page 63 18 19 14 15 13 16 17 1 2 3 4 5 Recording in Natural Colors Wh...

Страница 31: ...tton 17 until the Indication is displayed 4 Point the Camcorder at a full screen white subject 5 Keep pressing ENTER Button 15 until the Indication stops flashing To Resume Automatic Adjustment Press the Button 14 or Button 17 until the AWB Indication is displayed Or set the AUTO MANUAL FOCUS Switch to AUTO 18 14 15 17 Outside of the effective range of Automatic White Balance Adjustment the image ...

Страница 32: ...L Indication appears 18 14 15 17 18 2 Press the ENTER Button 15 until the Iris Indication appears 3 Press the Button 14 or Button 17 to adjust the iris Range of Iris Adjustment CLOSE Closed F16 F2 0 OP Opened 0dB OP 18dB When a value closer to CLOSE is selected the image becomes darker When a value closer to OP 18dB is selected the image becomes brighter The value to which dB is attached indicates...

Страница 33: ...rs of the recorded image are inverted as seen in a negative 12 Sepia Mode SEPIA It records a scene with a brownish tint like the color of old pictures 13 Black White Mode B W It records an image in black and white 14 Solarisation Mode SOLARI It records an image with a painting like effect To Select a Desired Digital Effect Set TAPE RECORDING MENU DIGITAL EFFECT1 or EFFECT2 a desired Digital Effect...

Страница 34: ...mcorder at the scene you want to capture and press the P IN P Button 20 to insert a small still picture A small still picture is displayed in a normal picture If the P IN P Button is pressed again the small still picture is cleared For other notes concerning this item see page 64 Wipe Mode and Mix Mode Wipe Mode Like drawing a curtain the still picture of the last recorded scene gradually changes ...

Страница 35: ... VOLUME indication disappears immediately after adjustment is made To adjust the volume with the Remote Control press the T or W Button to display the VOLUME Indication Press the T Button to increase the volume or press the W Button to decrease the volume The VOLUME indication disappears immediately after adjustment is made The sound volume cannot be adjusted using the Remote Control in Playback Z...

Страница 36: ... pressed Slow Motion Playback proceeds in the forward direction To Resume Normal Playback Press the Button 72 If the Camcorder is left in the Slow Motion Playback Mode for more than 10 minutes the Camcorder switches to the Stop Mode to protect the video heads from excessive wear and tear Still Playback Still Advance Playback This Camcorder is capable of still picture playback and frame advance pla...

Страница 37: ...he last recording While the index signal is being recorded the INDEX Indication flashes for a few seconds If the Camcorder is switched from the Tape Playback Mode to Tape Recording Mode or if the date and time is set before the start of recording the index signal is not recorded Photoshot Index Search 1 Set TAPE PLAYBACK MENU PLAYBACK SEARCH PHOTO 2 Press the Button or Button 58 on the Remote Cont...

Страница 38: ...g EFFECT SEL Sub Menu on the TAPE PLAYBACK MENU To suspend Playback Digital Effect Temporarily Press the OFF ON Button 61 to suspend or restart the digital effect When the digital effect is paused temporarily the selected effect s indication flashes The same operating can be done using EFFECT ON Sub Menu on the TAPE PLAYBACK MENU To Cancel the Digital Effect Press the SELECT Button 59 repeatedly o...

Страница 39: ... The selected file is shown on the entire screen For other notes concerning this item see page 64 Slide Show For PV GS12 PV GS14 PV GS15 The recorded still pictures in the Card can be played back like a Slide Show 1 Set the Mode Dial 40 to Picture Playback Mode 1 2 3 40 20 1 2 3 14 15 13 16 17 20 40 The selected file is marked with a frame 2 Press the Button 15 The SLIDE Indication is displayed Ea...

Страница 40: ... Press the PHOTO SHOT Button 36 4 Select LUMINANCE and press the ENTER Button 15 then press the Button 14 or Button 17 to adjust the title contrast and press the ENTER Button 15 5 Press the Button 14 or Button 17 to adjust the color and press the ENTER Button 15 The dark portion of the image is missing 1 and the colors of the bright portion change in order of black blue green cyan red magenta yell...

Страница 41: ...16 17 40 1 2 To Verify DPOF Setting Select VERIFY in Step 2 The pictures for which 1 or more print is set in DPOF are played back continuously For other notes concerning this item see page 65 4 Press the 13 14 16 17 Button to select a desired title 4 Press the Button 14 or Button 17 to select the number of pictures to be printed and press the ENTER Button 15 Indication 2 is displayed in the pictur...

Страница 42: ...elected picture is marked with a frame To erase 2 files or more repeat this step 3 Press the PHOTO SHOT Button 36 A verification message appears 4 Select YES and press the ENTER Button 15 The selected file is deleted from the Card If NO is selected the file selection is canceled To Select and Delete All Files 1 Set PICTURE PLAYBACK MENU DELETE ALL FILES YES A verification message appears 2 Select ...

Страница 43: ...f the power of both the Camcorder and TV 1 Connect the AV OUT Jack of the Camcorder and the Video and Audio Input Jacks of the TV Connect to the TV with the AV Cable 1 If the TV has an S Video Jack connect the S Video Cable not supplied 2 too For PV GS14 PV GS15 When plugging the pin plug of the AV cable into the AV OUT Jack plug it in as far as it goes For other notes concerning this item see pag...

Страница 44: ...bbing cannot be performed on a recording made in LP Mode p 23 1 Press the Button 69 on the Remote Control where you want to add new sound 2 Press the A DUB Button 55 on the Remote Control 3 To start Audio Dubbing press the Button 69 on the Remote Control To Cancel Audio Dubbing Press the Button 69 on the Remote Control The Camcorder is in the Still Playback Mode again To Play Back the Sound Record...

Страница 45: ...l 1 high quality images and sounds can be dubbed in the digital mode Player Recorder 1 Insert the Cassette and set to Tape Playback Mode Player 2 Press the Button 72 to start playback 1 69 54 70 72 Copying on an S VHS or a VHS Cassette Dubbing After connecting the Camcorder and the VCR as illustrated start the following procedures 1 AV Cable 2 S Video Cable not supplied VIDEO IN AUDIO IN S VIDEO I...

Страница 46: ...y OHCI compliant Firewire Card video Editing software package Personal Computer must be equipped with an DV Terminal During Camcorder playback do not disconnect the DV Interface Cable or turn the Camcorder off as this may cause a PC hang up error 1394 i LINK Interface must conform to OHCI Open Host Controller Interface Specification Recorder 3 While pressing the REC Button 54 press the PLAY Button...

Страница 47: ...uter screen until the installation is complete Setup window will disappear when the installation is complete If a window does not appear automatically click the Start Button on your desktop and then click Run When the Run Box is open type in D InstMenu exe and click OK D applies when the CD ROM drive is drive D Operating environment Despite having the Operating environment indicated it may not be ...

Страница 48: ...DRIVERS You may click Browse to look for and assign the path 5 Finish installation by following the on screen instructions Click Next and proceed with installation After completing the installation Click Finish 6 After the USB Driver is installed please restart your computer Reboot the computer to finish installing USB driver Installation continues after the computer reboots if you selected additi...

Страница 49: ...de Panasonic DVC USB SERIAL Driver for WinXXXX COM X The numeral designation after Win will differ depending on the OS The numeral after COM will differ depending on the operating environment of your personal computer When the Camcorder is in PC Mode USB Mass Storage Device or Panasonic DV DISK Port Driver Windows Me When the Camcorder is in PC Mode USB Disk Some OS such as Windows 98SE may not sh...

Страница 50: ...SP1 or later is needed Microsoft Windows 2000 Professional Microsoft Windows Me Millennium Edition Microsoft Windows 98 Second Edition CPU Intel Pentium ll Celeron 300 MHz or higher including compatible CPU RAM 32 MB or more 64 MB or more recommended 128 MB or more required for Windows XP Free hard disk space At least 250 MB or more Ports USB Jack To use the Camcorder as a Web Camera the additiona...

Страница 51: ...r Using as a Web Camera WEB is displayed on the LCD Monitor of the Camcorder When the Camcorder and personal computer with Windows 2000 are connected via USB Cable a message such as the one below is displayed However testing by the manufacturer has confirmed functionality of this Camcorder with Windows 2000 Click Yes and proceed If you use Windows 98SE the OS installation CD may be required 4 Star...

Страница 52: ...the screen is not displayed if the Windows Messenger setup has already been done For more details please read the corresponding Help file 1 Click Click here to sign in 8 Select DVC in the Microphone menu For other information about Windows Messenger please refer to Help When access is finished close Windows Messenger then turn off the Camcorder Finally disconnect the USB Cable If the Camcorder is ...

Страница 53: ...u 1 5 Click on Audio Tuning Wizard in the Tools menu to confirm that equipment is connected correctly Using the DV STUDIO 3 1E SE Optional Software Following Software is not supplied with the Camcorder LSFT0577 DV STUDIO 3 1E SE K1HA05CD0005 USB Cable The Software allows you to capture a still image from your motion video on the tape and transfer to a PC If you would like to order please refer to ...

Страница 54: ...d any supplementary details or updates Installing DV STUDIO 3 1E SE Optional Software 1 Turn on the personal computer and start up Windows 2 Insert the CD ROM into the personal computer s CD ROM drive Quit all applications The Setup Menu Screen appears 5 After the completion of setup click on Finish 3 Click DV STUDIO 4 Click Next Installation will be completed Sample data is installed concurrently...

Страница 55: ...e procedures for installation connection and startup Please read the Help messages of your software for how to use the ArcSoft Software Using the ArcSoft Software PV GS15 Supplied There are 2 types of image editing software in the ArcSoft Software package Easy to use photo editing program to edit enhance retouch or add special effects to any image Also offers creative solutions for making greeting...

Страница 56: ...ression folder 6 Double click English or French folder 7 Double click PhotoBase Installer or PhotoImpression Installer Installation begins 8 Follow the instructions on the computer screen until the installation is complete For Information on ArcSoft Software TEL 1 510 440 9901 Web Site www arcsoft com To start ArcSoft Software For Windows 1 Select Start All Programs Programs ArcSoft Software Suite...

Страница 57: ...e the folders in the memory card such as picture folder Memory card may not be recognized if folders are deleted When the Camcorder is connected to a personal computer in PC Mode it will not be possible to change to other modes To change modes disconnect the USB cable switch the Camcorder Mode Dial then reconnect the USB cable When the Tape Recording Mode of the Camcorder is switched to the PC Mod...

Страница 58: ...n using software without an indication function indication data such as date are not displayed Depending on the software in use the date and the time may not be displayed correctly About the compatibility of the card files For PV GS12 PV GS14 PV GS15 Data files recorded on an SD Memory Card or a MultiMediaCard by this Camcorder conform with DCF Design rule for Camera File system established by JEI...

Страница 59: ... Recording Mode p 23 MF Manual Focus p 32 Back Light Mode p 29 Sports Mode Program AE p 30 Portrait Mode Program AE p 30 Low Light Mode Program AE p 30 Spotlight Mode Program AE p 30 Surf Snow Mode Program AE p 30 REC Recording p 24 PAUSE Recording Pause p 24 Self Timer Recording p 27 Playback p 35 Still Playback p 36 Fast forward Cue Playback p 35 Rewind Review Playback p 35 Slow Motion Playback ...

Страница 60: ... Recording Mode Digital Effect Modes in EFFECT1 Digital Zoom D ZOOM 1 750 s or faster shutter speed When brightness is insufficient When the MagicPix Function is ON When the Portrait is used When using Card Recording Mode When brightness is insufficient When the MagicPix Function is ON Initializing the Modes You can change the Menu settings back to the shipping condition 1 Set INITIAL INITIAL SET ...

Страница 61: ...60 or 1 100 Photoshot Photoshot Recording results in slightly inferior image quality RapidFire Consecutive Photoshot One more still picture may be recorded after you release the PHOTO SHOT Button The RapidFire Consecutive Photoshot and Title Function cannot be used simultaneously NO CARD Card is not inserted NO DATA There are no recorded files in the card UNPLAYABLE CARD You are attempting to play...

Страница 62: ...will be completely turned off In the Automatic White Balance Mode the color may be recorded unnaturally at the beginning of the recording The zoom magnification differs from when it is in the Quick Start Standby Mode and when the recording starts Self timer Recording When BEEP SOUND on the INITIAL Sub Menu is set to ON the beep sound will be emitted along with the Recording Lamp flashing in the Se...

Страница 63: ... Multi Picture Mode During the Digital Still Picture Mode the Digital Effect Functions cannot be set The MagicPix Function makes the signal charging time of CCD longer up to 30 times longer than usual so that dark scenes that are invisible to the naked eyes can be recorded brightly For this reason a bright dots may be seen but this is not a malfunction The Image Stabilizer Function does not work I...

Страница 64: ...und sub sound If you dub a tape recorded at the 12bit selected as the AUDIO REC on the RECORDING Sub Menu playback sound becomes stereo sound regardless of the AUDIO OUT setting if 12bit AUDIO is set to MIX Index Search Functions Index Search may not be possible at the beginning of the tape Scene Index Search may not function properly if the interval between 2 scene index signals is less than 1 mi...

Страница 65: ...CK on the INITIAL Sub Menu to OUT Picture size may be displayed differently when playing back a Cinema picture on a wide screen TV with Playback Digital Effect Recording Pictures from a Card onto a Tape When recording the Card Image on a Tape its size is transformed into 720 x 480 pixels according to the DV format If you attempt to record a still picture with a large image size on a Tape there may...

Страница 66: ...tape is inserted appear In this case follow the procedure below Blinking in yellow Dew is slightly adhering to the head or the tape Blinking in red Dew has adhered to the head or the tape Cautions for Use When you use your Camcorder on a rainy or snowy day or on a beach make sure that no water enters the Camcorder Water may cause the Camcorder or Cassette to malfunction Irreparable failure may occ...

Страница 67: ...minals from getting clogged with dirt dust or other substances If you drop the Battery accidentally check to see if the Battery body and terminals are deformed Attaching a deformed Battery to the Camcorder or AC Adaptor may damage the Camcorder or AC Adaptor 1 Remove the tape if it is inserted It takes about 20 seconds to open the Cassette Holder This is not a malfunction 2 Leave the Camcorder wit...

Страница 68: ...ure increases it goes back to the normal brightness Cautions for Storage Before storing the Camcorder take the Cassette out and detach the Battery Store all the components in a dry place with a relatively stable temperature Recommended Temperature 59 F to 77 F 15 C to 25 C Recommended Humidity 40 to 60 Camcorder Wrap it with a soft cloth to prevent dust from getting into the Camera Do not leave th...

Страница 69: ...ed focus is automatically adjusted pp 32 71 There are some recording subjects and recording surroundings for which the Auto Focus Function does not operate correctly In this case use the Manual Focus Mode to adjust the focus p 32 Editing Audio dubbing cannot be performed Is the accidental erasure prevention slider on the Cassette open If it is open set to SAVE recording cannot be performed p 17 Ar...

Страница 70: ...ed If you perform audio dubbing on a recording made in 16bit Mode the original sound will be erased If you wish to preserve the original sound be sure to select 12bit Mode at the time of recording Sounds cannot be played back Although a Cassette with no audio dubbing is being played is 12bit AUDIO on the PLAYBACK Sub Menu of the TAPE PLAYBACK MENU set to ST2 To play back a Cassette with no audio d...

Страница 71: ... counter was set to zero Explanation of Terms Digital Video System In a digital video system images and sounds are converted into digital signals and recorded on a tape This complete digital recording is capable of recording and playback with minimal image and sound deterioration In addition it automatically records data such as Time Code and Date Time as digital signals Compatibility with S VHS o...

Страница 72: ...tput Level 1 0 Vp p 75 ohm S Video Output Level For PV GS14 PV GS15 Y Output 1 0 Vp p 75 ohm C Output 0 286 Vp p 75 ohm Audio Output Level Line 316 mV 600 ohm Power Source DC 7 2 7 8 V Power Consumption Recording 4 5 W Mic Input For PV GS14 PV GS15 Mic sensitivity 50 dB 0 dB 1 V Pa 1 kHz Stereo mini jack USB Card reader writer function For PV GS12 PV GS14 PV GS15 USB 2 0 compliant max 12 Mbps No c...

Страница 73: ... i LINK 4 pin to 4 pin 55 00 LSSQ0411 IR Remote Control Call For Pricing RP SD64BPPA RP SD32BPPA RP SD16BPPA 64 MB SD Memory Card 32 MB SD Memory Card 16 MB SD Memory Card Call For Pricing BN SDCAPE 1B USB Reader Writer for SD Memory Card compatible with MultiMediaCard 79 95 BN SDABPE 1B SD PCMCIA Adaptor compatible with MultiMediaCard 79 95 LSFT0577 DV STUDIO 3 1E SE Call For Pricing K1HA05CD0005...

Страница 74: ...th Kent WA 98032 4 Shipping information UPS delivery requires complete street address Please photocopy this form when placing an order 2 Items Ordered 1 Camcorder Model Accessory Description Price Each Quantity Total Price Subtotal Your State Local Sales Tax Shipping Handling 6 95 Total Enclosed 3 Method of payment check one Check of Money Order enclosed NO C O D SHIPMENTS VISA MasterCard Discover...

Страница 75: ...r proof of purchase Failure to do so will delay your repair To further speed your repair please provide an explanation of what is wrong with the unit and any symptom it is exhibiting Mail this completed form and your Proof of Purchase along with your unit to Panasonic Services Company 1705 N Randall Road Elgin IL 60123 7847 Attn Camcorder Repair Request for Service Notice ...

Страница 76: ...ear except CRT CRT Two 2 Years Ninety 90 Days Ninety 90 Days In Home or Carry In 1 888 843 9788 Rechargeable Batteries in exchange for defective item Ten 10 Days Not Applicable Carry In or Mail In 1 800 211 PANA 7262 Tape in exchange for defective item Five 5 Days Not Applicable Carry In or Mail In 1 800 211 PANA 7262 Memory Cards in exchange for defective item Ninety 90 Days Not Applicable Carry ...

Страница 77: ... LISTED UNDER LIMITED WARRANTY COVERAGE THE WARRANTOR IS NOT LIABLE FOR INCIDENTAL OR CONSEQUENTIAL DAMAGES RESULTING FROM THE USE OF THIS PRODUCT OR ARISING OUT OF ANY BREACH OF THIS WARRANTY As examples this excludes damages for lost time cost of having someone remove or re install an installed unit if applicable or travel to and from the servicer loss of media or images data or other memory or ...

Страница 78: ...ry Servicenter Please carefully pack and ship prepaid and insured to the Elgin Centralized Factory Servicenter Customer s in Puerto Rico please ship or carry in to location below Service in Puerto Rico Service in Puerto Rico Matsushita Electric of Puerto Rico Inc Panasonic Sales Company Factory Servicenter Ave 65 de Infantería Km 9 5 San Gabriel Industrial Park Carolina Puerto Rico 00985 Phone 787...

Страница 79: ...ivo puede no causar interferencias perjudiciales y 2 este dispositivo debe aceptar cualquier interferencia recibida incluyendo interferencias que pueden causar un funcionamiento no deseado Nota Este equipo ha sido puesto a prueba y se encontró que cumple con la Parte 15 de las reglas del FCC Estos limites están diseñados para proveer una protección razonable contra interferencias cuando se opera e...

Страница 80: ...cassette 3 Cierre el soporte del cassette presionando la marca PUSH 2 4 Cierre la cubierta del compartimiento del cassette presionando la marca 3 2 1 Inserción de un cassette Inserción de una tarjeta de memoria Sólo para el modelo PV GS12 PV GS14 PV GS15 2 Deslice la palanca OPEN 3 para abrir la cubierta de la ranura de tarjeta 4 3 Mientras sostiene la tarjeta de memoria con su esquina cortada hac...

Страница 81: ...de modo a Modo de reproducción de cinta 3 Presione el botón para rebobinar la cinta 4 Presione el botón para comenzar la reproducción 5 Para parar la reproducción Presione el botón PV GS12 PV GS14 PV GS15 PV GS9 Reproducción de una cinta 1 2 1 Gire el dial de modo a modo de reproducción de foto Comienzo de una presentación Reproducción de la foto siguiente Reproducción de la foto anterior Parada d...

Страница 82: ...ation 60 Date Time Setting 23 Digital Effects 33 Digital Still Picture 25 Digital Zoom 27 DPOF Setting 41 Dubbing 45 DV STUDIO 3 1E SE Optional Software 53 E Erasure Prevention Slider 17 F Fade 28 Formatting a Card 42 F Number 32 H Headphones 64 I Iris 32 L LCD Monitor 19 68 Limited Warranty 76 Lock Setting 41 Low Light Mode 30 M Macro Close up 27 MagicPix Function 29 Manual Focus 32 Memory Stop 7...

Страница 83: ...ode 33 Shutter Speed 32 Simultaneous Motion Still Record Mode 24 Slide Show 39 Slim Mode 33 Slow Motion Playback 36 Solarisation Mode 33 Sound Volume 35 SP LP Mode 23 Spanish Quick Use Guide 79 Sports Mode 30 Spotlight Mode 30 Still Advance Playback 36 Stretch Mode 33 Strobe Mode 33 Surf Snow Mode 30 T Time Code 71 Trailing Effect Mode 33 U USB Connection Kit 47 V Variable Speed Search 36 Video He...

Страница 84: ...nics Company Division of Matsushita Electric Corporation of America One Panasonic Way Secaucus New Jersey 07094 Panasonic Sales Company PSC Division of Matsushita Electric of Puerto Rico Inc Ave 65 de Infanteria Km 9 5 San Gabriel Industrial Park Carolina Puerto Rico 00985 ...

Отзывы: