background image

34

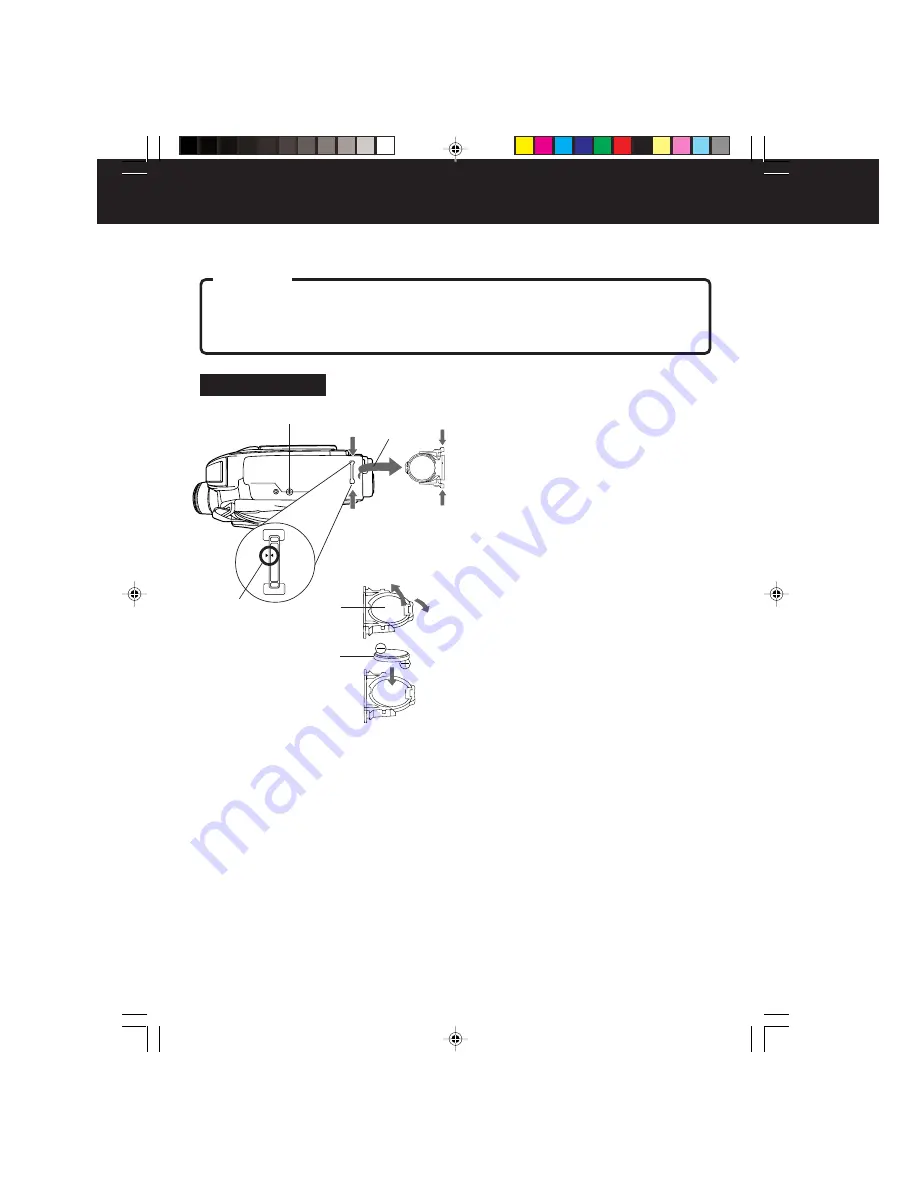
Replacing Clock Battery

Clock Battery

1

While pinching the 2 tabs, pull
Battery Tray out.

2

Bend middle tab out and remove
Battery.

3

Snap new Battery 

(

 mark down) into

Battery Tray.
• Do not reverse the polarity.

4

Insert Battery Tray

 so the triangle

marks meet.

Note:

• Keep Battery out of children’s reach.

Swallowing it may be harmful.

• Improper installation, discharge, or

missing battery causes “CLOCK
BATTERY” to appear.

• Battery life is approximately 5 years.

WARNING:

Replace battery with Panasonic or Newsun type CR2025 only. Use of another battery
may present a risk of fire or explosion.
Caution: Battery may explode if mishandled. Dispose of used battery promptly. Keep
away from children. Do not recharge, disassemble or dispose of in fire.

The clock battery is pre-installed. Follow the steps below if replacement becomes
necessary.

Underside View

1

3

Tripod Mounting Hole

2

4

06.L353-K Infor p31-35

03.1.8, 11:14 AM

34

Содержание Palmcorder Camcorder PV-L353-K

Страница 1: ...er Operating Instructions Please read these instructions carefully before attempting to operate this product Please save this manual Model No LSQT0725A PV L353 K For assistance please call 1 800 561 5505 or visit us at www panasonic ca 01 L353 K Getting p01 08 03 1 8 11 11 AM 1 ...

Страница 2: ...o 1 pc AC Adaptor PV A20 K with DC Power Cable page 10 1 pc CR2025 Clock Battery installed in Camcorder page 34 1 pc Shoulder Strap LSFC0012 page 12 1 pc Audio Video Cable LSJA0390 pages 21 22 1 pc Battery Pack PV BP15 K LSSB0009 pages 9 10 These accessories are provided in order to set up or use your Camcorder Unpack your Camcorder 1 pc Lens Cap LSKM0937 with Lens Cap Strap LSGQ0049 page 12 Batte...

Страница 3: ...n included Therefore it should be read carefully in order to avoid any problems The above markings are located on the appliance s bottom cover This device complies with Part 15 of the FCC Rules Operation is subject to the following two conditions 1 This device may not cause harmful interference and 2 this device must accept any interference received including interference that may cause undesired ...

Страница 4: ...lade wider than the other or 3 wire grounding type plug a plug having a third grounding pin The 2 wire polarized plug will fit into the power outlet only one way This is a safety feature If you are unable to insert the plug fully into the outlet try reversing the plug If the plug still fails to fit contact your electrician to replace your obsolete outlet Do not defeat the safety purpose of the pol...

Страница 5: ...AGE TO THE INTERNAL PARTS OF THE EVF DO NOT EXPOSE YOUR CAMCORDER TO EXTENDED HIGH TEMPERATURE Such as in direct sunlight inside a closed car next to a heater etc This action could permanently damage the internal parts of your Camcorder AVOID SUDDEN CHANGES IN TEMPERATURE If the unit is suddenly moved from a cold place to a warm place moisture may form on the tape and inside the unit DO NOT LEAVE ...

Страница 6: ...oulder and Hand Straps Lens Cap 12 Using MENU Mode 13 Setting the Clock Time Zone Auto Daylight Saving Time 14 15 Built in Light Using the Light 16 Camera Recording Basic Stand by Programmed Recording 17 19 Playing Back Recordings Basic Playback Visual Search Still Picture Tracking TV VCR Playback 20 21 Copying your Tapes dubbing 22 Four Speed Power Zoom 23 Backlight 23 Focus Auto Manual Focus 24 ...

Страница 7: ...o Self Demo stops for 30 seconds when the Back Light is pressed To turn Self Demo back on Set to SELF DEMO ON in MENU screen Before you begin Connect Camcorder to power source Self Demo mode is on when the screen below appears To turn it off follow steps 1 4 below 1 Set POWER to CAMERA 2 Press MENU for MENU mode Press UP or DOWN to select SELF DEMO 3 Press M FOCUS to select OFF 4 Press MENU to exi...

Страница 8: ...ration page 9 See page 20 See page 17 Camera Recording Playback using the LCD Monitor 1 Press LCD OPEN to unlock the LCD monitor Swing it fully open and adjust the angle 2 Set POWER to CAMERA 3 Press RECORD PAUSE to start recording Press RECORD PAUSE again to pause recording 1Press LCD OPEN to unlock the LCD monitor Swing it fully open and adjust the angle 2Set POWER to VCR 3Press REWIND SEARCH to...

Страница 9: ... Charge Battery Pack fully before use 1Plug in AC Adaptor POWER Lamp lights 2Insert Battery A Align left side of Battery with left edge of AC Adaptor B Press Battery down and slide in direction of arrow The CHARGE Lamp flashes then stays lit when charging is complete 3Remove Battery Slide Battery to the left and lift off Charging the Battery Pack Battery Refresh This feature completely discharges ...

Страница 10: ...AC Adaptor POWER Lamp lights This unit will operate on 110 120 220 240 V AC 50 60 Hz An AC plug adaptor may be required for voltages other than 120 V AC Please contact either a local or foreign electrical parts distributor for assistance in selecting an alternate AC plug We recommend using the accessory power plug adaptor VJSS0070 K2DB42E00001 in an area which has special AC outlets CAUTION 1 Conn...

Страница 11: ...ith screwdriver Or slide tab open 2 To record again cover hole with adhesive tape Or slide tab closed Protects tapes from being accidentally erased Erase Protection Tab Cassette Insertion Removal Slide tab type 1 2 SLP playback may contain more picture noise SLP Super Long Play SP Standard Play Cassette type Tape Speed Selector Position TC 20 20 minutes 1 hour 30 minutes TC 30 TC 40 40 minutes 1 h...

Страница 12: ...t your hand as shown 2 Thread strap ends through Strap Rings on Camcorder 3 Re insert the strap ends into buckles Hand Strap 1 2 3 min 25 4 mm 1 inch Attaching the Lens Cap Strap Thread the Strap through the Lens Cap attachment ring as illustrated at left Lens Cap Attaching the Lens Cap Cord to the Hand Strap Remove the Hand Strap from the front clasp and thread the Strap through the loop in the L...

Страница 13: ...TION DETECTION or FADE 5 PROGRAMMED REC page 19 Camcorder starts and stops recording at a preset time 6 DISPLAY SET pages 31 32 DISPLAY SET sub menu is displayed To select DISPLAY or MODE SELECT 7 CLOCK SET pages 14 15 CLOCK SET sub menu is displayed Set the Date and Time 8 STAND BY RELEASE page 18 ON Enables quick resumption of recording from Stand by mode 9 LIGHT MODE page 16 OFF ON Light can be...

Страница 14: ...de Press UP or DOWN to select CLOCK SET 2Press M FOCUS for CLOCK SET menu Press UP or DOWN to select TIME ZONE D S T or DATE TIME 3Press M FOCUS for menu of item selected in step 2 To change the setting TIME ZONE Go to step 3a on page 15 D S T Go to step 3b on page 15 DATE TIME Go to step 3c on page 15 4Press MENU twice to exit VCR MODE CAMERA MODE 1 2 3 4 02 L353 K Getting p09 16 03 1 8 11 11 AM ...

Страница 15: ...s M FOCUS to confirm entry DST AUTO Press or hold down UP or DOWN to select hour then press M FOCUS to set Repeat for minute month day and year Clock starts when year is entered and M FOCUS is pressed EXAMPLE Note Clock may lose or gain up to 2 minutes per month When travelling outside the listed time zones set clock to local time manually To adjust or set clock see Setting Date and Time below The...

Страница 16: ...t in Light Before you begin Connect Camcorder to power source Set POWER to CAMERA EVF or LCD Monitor A Light is on A Light mode is auto 1Press MENU for MENU mode Press UP or DOWN to select LIGHT MODE 2Press M FOCUS to set OFF ON or OFF ON AUTO Press MENU to exit 3Press LIGHT repeatedly for Light ON AUTO or OFF In AUTO light turns itself on off according to lighting conditions 3 CAUTION mark indica...

Страница 17: ...5 To adjust LCD BRIGHT APress MENU for MENU mode Press UP or DOWN to select LCD BRIGHT BPress M FOCUS for LCD BRIGHT SETTING menu Press UP or DOWN to adjust LCD monitor brightness level 4 A B 1 Press LCD OPEN to unlock the LCD monitor Swing LCD monitor fully open and adjust viewing angle 2 Set POWER to CAMERA Be sure POWER is fully turned to CAMERA position EVF or LCD monitor turns on off by the P...

Страница 18: ...han 24 hours has passed before recording was resumed Manual Easy Editing For a smooth transition between scenes if recording is stopped and then started within 24 hours For proper continuity when taping from Stop mode or after attaching a new Battery Easy Edit Stand by ASet POWER to VCR Ba Press REWIND SEARCH to rewind a few seconds of tape b Press PLAY STILL to review recording c Press PLAY STILL...

Страница 19: ...M FOCUS repeatedly to select one of the options shown at left To cancel the setup press MENU twice 4 Press RECORD PAUSE to place Camcorder in stand by mode Recording will be done as scheduled Note Start time may not be set over 24 hours from current time Camcorder shuts off at tape end or 12 hours after Interval Recording starts To cancel set POWER to OFF Set a recording start and stop time Or set...

Страница 20: ...is closed Volume may be adjusted however VOLUME indication will not appear in EVF Using LCD monitor reduces battery operating time Return LCD monitor to locked position when not in use During playback press MENU to adjust LCD monitor brightness page 17 1Press LCD OPEN and swing LCD monitor fully open 2Set POWER to VCR If tape has no record tab auto playback begins EVF or LCD monitor turns on off b...

Страница 21: ...t reverse polarity Replace battery when tape loading unloading takes longer than usual 1 Turn cassette Tape Wheel in direction of arrow to take up any slack 2 Slide RELEASE to open cassette lid 3 Insert the cassette with the window up and on the left then snap lid shut Remove Cassette Insert Cassette in PlayPak 1 Slide RELEASE and wait for lid to open 2 Push cassette out through hole in bottom of ...

Страница 22: ...CR 4 Press PLAY STILL on Camcorder and STILL PAUSE on VCR to start copying 5 Press STOP on both units to stop copying Note Camcorder will only play back tapes recorded in SP or SLP mode Dubbing may reduce picture quality CAUTION Unauthorized exchanging and or copying of copyrighted recordings may be copyright infringement Copying your Tapes dubbing Connections Turn TV on and tune to VCR channel CH...

Страница 23: ...e in one of four speeds ranging from slow 16 seconds to fast 2 seconds Use when subject is darker than surroundings in shadowed area or in front of the light source Before you begin Connect Camcorder to power source Set POWER to CAMERA Press BACK LIGHT while recording to select the level of backlight compensation In normal lighting press BACK LIGHT repeatedly until no indicator is displayed EVF or...

Страница 24: ...VF or LCD monitor Press M FOCUS to remove MF in EVF or LCD monitor if necessary Auto Focus Manual Focus Macro Focus close ups Auto Focus functions up to 12 7 mm 1 2 inch from subject Press W on POWER ZOOM to maximum wide angle Bring Camcorder up close to the subject EVF or LCD Monitor 2 4 3 5 1 Aim the camera at a distant object more than 3 metres away 2 Press M FOCUS so MF Manual Focus appears in...

Страница 25: ... Shutter Before you begin Connect Camcorder to power source Insert cassette with record tab page 11 Set POWER to CAMERA In AUTO mode no indication in EVF or LCD Monitor shutter speed is auto adjusted from 1 60 to 1 350 according to subject brightness AUTO mode is selected each time POWER is set to CAMERA The faster the shutter speed the more light is needed for proper picture and colour quality Hi...

Страница 26: ...nfirm entry Press MENU twice to exit Fade In In RECORD PAUSE mode press FADE so FADE flashes in EVF or LCD monitor Press RECORD PAUSE Recording starts as picture and sound gradually fades in Fade Out While recording press FADE so FADE flashes in EVF or LCD monitor Press RECORD PAUSE Picture and sound gradually fades out and recording is paused If FADE is pressed accidentally press again so FADE di...

Страница 27: ...or FADE menu Press UP or DOWN to select DIGITAL FADE 4 Press M FOCUS for DIGITAL FADE menu Press UP or DOWN to select TYPE Press M FOCUS for TYPE menu Press UP or DOWN to select from 7 different fade types A preview of each fade type is displayed as it is selected 5 Press M FOCUS for DIGITAL FADE menu Press UP or DOWN to select COLOR Press M FOCUS for COLOR menu Press UP or DOWN to select from 8 c...

Страница 28: ...vels may cause picture distortion 4 Press MENU twice to exit 5 Press T on POWER ZOOM Digital Zoom starts when normal zoom reaches maximum 20 Zoom level appears in EVF or LCD monitor POWER ZOOM switch controls digital zoom level Normal zoom resumes when level falls to 20 6 Repeat steps 2 3 to select OFF to cancel this feature Digital Zoom Power Zoom magnification is digitally increased Before you b...

Страница 29: ... EIS is cancelled 2 Press EIS again to cancel when not in use EIS may not function during extreme Camcorder movement recording of subjects with distinct horizontal or vertical stripes low light situations EIS indicator flashes intense fluorescent lighting situations recording of very fast motion Helps stabilize picture when recording in unstable situations Before you begin Connect Camcorder to pow...

Страница 30: ... for MENU mode Press UP or DOWN to select DIGITAL EFFECTS 2 Press M FOCUS for DIGITAL EFFECTS menu Press UP or DOWN to select MOTION DETECTION 3 Press M FOCUS to select ON 4 Press MENU twice for Motion Detection stand by mode If cassette is not inserted will flash Recording will start about 3 seconds after motion is detected Date and time are recorded if displayed in EVF or LCD monitor page 15 Rec...

Страница 31: ... MODE SELECT 4 Press M FOCUS for MODE SELECT menu 5 Press M FOCUS repeatedly to select the following displays 6 Press MENU three times to exit FULL EMPTY Tape Remaining Battery Remaining FULL EMPTY Tape remaining indicator operates a few seconds after tape starts moving Tape remaining and battery charge level can be displayed Before you begin Connect Camcorder to power source 1 06 L353 K Infor p31...

Страница 32: ...ISPLAY DPress M FOCUS to select OFF Press MENU twice to exit Indications are restored the next time Camcorder is turned on Display Off Mode Viewfinder LCD Monitor Indications 1 B C D CAMERA MODE VCR MODE 1 Repeat steps 1 5 on page 31 to select time date date only or no display 2 Start a recording page 17 Only the Date and or Time are recorded A 2 06 L353 K Infor p31 35 03 1 8 11 14 AM 32 ...

Страница 33: ... is recorded 0 00 0 10 0 20 59 50 return to 0 00 and continue 5 TAPE SPEED pages 11 17 SP standard play SLP super long play 6 Digital EIS page 29 7 Digital Zoom page 28 8 VCR MODE VCR MODE appears for 1 minute when POWER is set to VCR or if RECORD PAUSE is pressed in VCR mode 9 DEW If moisture condensation occurs in unit WARNING DEW DETECTED appears and Camcorder will shut off in 15 seconds Wait u...

Страница 34: ...ischarge or missing battery causes CLOCK BATTERY to appear Battery life is approximately 5 years WARNING Replace battery with Panasonic or Newsun type CR2025 only Use of another battery may present a risk of fire or explosion Caution Battery may explode if mishandled Dispose of used battery promptly Keep away from children Do not recharge disassemble or dispose of in fire The clock battery is pre ...

Страница 35: ...tal Hydride Battery Optional HHR V40A 1B Up to 6 hr Battery Pack Rechargeable Nickel Metal Hydride Battery Optional HHR V60A 1B Car Battery Cord Optional PV C16 K Audio Video Cable Supplied LSJA0390 Shoulder Strap Supplied LSFC0012 VCR not supplied Audio Video Cable Supplied LSJA0390 VHS PlayPak Supplied PV P1 K VYMW0009 Optional PV P1 K Compact Video Cassette Tape Optional NV TC20P Optional NV TC...

Страница 36: ...pled Device CCD Lens 20 1 zoom lens F1 1 7 with auto iris control Focal length 2 8 mm 56 0 mm 4 speed power zoom function Viewfinder 8 4 mm 0 33 inch Electronic Viewfinder LCD Monitor 63 5 mm 2 5 inch Liquid Crystal Display Minimum Illumination Required 1 6 lx F1 1 7 0 16 footcandles Operating Temperature 0 C 40 C 32 F 104 F Operating Humidity 10 75 Weight Compact VHS Camcorder 0 874 kg 1 93 Ibs A...

Страница 37: ...ly charged Battery p 9 Firmly connect all necessary cables p 10 Connect Power Source pp 9 10 Insert cassette window side facing out p 11 Connect Power Source pp 9 10 Check for Dew Indication p 33 Make sure record tab is intact p 11 Check Battery Indicator p 31 Check for Dew Indication p 33 Set FOCUS to AUTO p 24 Set POWER to CAMERA p 17 Set unit to REC or Record Pause mode Set HIGH SPEED SHUTTER t...

Страница 38: ... damaged tape If the image on your screen resembles the photograph on the left while playing back a tape the heads may require cleaning b Cleaning the Heads To clean the heads obtain a head cleaning cartridge There is a wide range of cleaning cartridges however using a worn or poor quality cleaning cartridge will shorten head life Be sure to follow the instructions that come with the cassette as e...

Страница 39: ...WILL PANASONIC CANADA INC BE LIABLE FOR ANY SPECIAL INDIRECT OR CONSEQUENTIAL DAMAGES In certain instances some jurisdictions do not allow the exclusion or limitation of incidental or consequential damages or the exclusion of implied warranties so the above limitations and exclusions may not be applicable WARRANTY SERVICE For product operation and information assistance please contact your Dealer ...

Страница 40: ...Switch 7 17 20 POWER ZOOM Button 23 24 28 Programmed Recording 19 Q Quick Operation Guide 8 R RECORD PAUSE Button 17 Record Playback Time 11 Replacing Clock Battery 34 REWIND SEARCH Button 20 S Safety Precautions 3 Self Demo Mode 7 Shoulder Strap 12 Speaker 20 Special Effects 20 Specifications 36 Still Picture 20 STOP Button 20 T Tab 11 TAPE EJECT Switch 11 17 Tracking Control 20 Tripod Mounting H...

Отзывы: