


21
G
e
tt
in
g
S
ta
rt
e
d
REC
OFF
PLAY
PC
MANUAL
REC
VOL
+
VOL
-
-
+
1
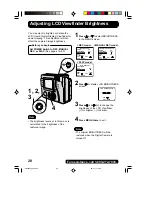
Press
or to select CLOCK SET in
the MENU screen.
2
Press to display CLOCK SET menu.
3
Press or hold down
or to select
hour, then press to set.
• Repeat for minute, month, day and
year.
• Double check all items before exiting
the menu.
4
Press MENU twice to exit.
Clock starts when menu is exited.
<CLOCK SET>
10
: 00
AM
MAY. 24 2000
SEL : SET :
EXIT : MENU
Setting the Clock
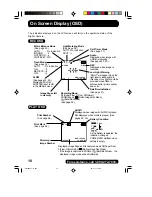
<REC MENU 1/2>
AUDIO
SELF TIMER
BRIGHTNESS
OSD
CLOCK SET
SEL : SET :
EXIT : MENU
ON
OFF
ON
<MANUAL REC MENU 2/3>
WHITE BALANCE
LIGHT METER
SLOW SHUTTER
TIME LAPSE
CLOCK SET
SEL : SET :
EXIT : MENU
AUTO
AUTO
OFF
OFF
<REC mode>
<MANUAL REC mode>
<PLAY mode>
<CLOCK SET>
10 : 00 AM MAY. 24
2000
SEL : SET :
EXIT : MENU
<CLOCK SET>
10
: 00
AM
MAY. 24 2000
SEL : SET :
EXIT : MENU
<CLOCK SET>
10 :
00
AM MAY. 24 2000
SEL : SET :
EXIT : MENU
<CLOCK SET>
10 : 00 AM
MAY.
24 2000
SEL : SET :
EXIT : MENU
<CLOCK SET>
10 : 00 AM MAY.
24
2000
SEL : SET :
EXIT : MENU
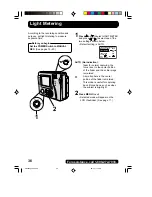
Note
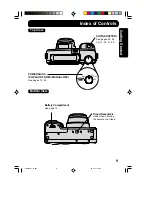
Open the Lens Cover. Set the POWER
Switch to REC, MANUAL REC or PLAY.
(See pages 19~20.) Press MENU to
display the MENU screen.
Before you begin
4
1, 2,
3
• To make corrections, repeat steps 1~3.
• The clock will continue to operate about 8
hours after the battery has been removed.
If you need to set clock again, repeat steps
above.
POWER
LED
<PLAY MENU 2/2>
SLIDE SHOW
OSD
BRIGHTNESS
CLOCK SET
BEEP
SEL : SET :
EXIT : MENU
ON
LOW
SD4090.p1-21.p65
99/11/11, 16:38
21