background image

21

TV
 O

p

e

ra

tio

n

3 Press 

▲▼

 to select “TIME ZONE 

ADJUST” and press SET to subtract 

or add hour(s) as necessary.

4  Press ACTION twice to exit.

(Only when Auto Clock is set.)

1 Press 

▲▼◄►

 to select “CLOCK.”

2 Press SET.

MAIN MENU

DVD

LOCK LANGUAGE

TV

CLOCK

CH

SELECT:

SET:SET

END

:ACTION

SET CLOCK

AUTO CLOCK SET
MANUAL

TIME ZONE ADJUST :+1

SELECT:

SET:SET

END

:ACTION

SET CLOCK

AUTO CLOCK SET
MANUAL

TIME ZONE ADJUST : 0

SELECT:

SET:SET

END

:ACTION

 Time Zone Adjust

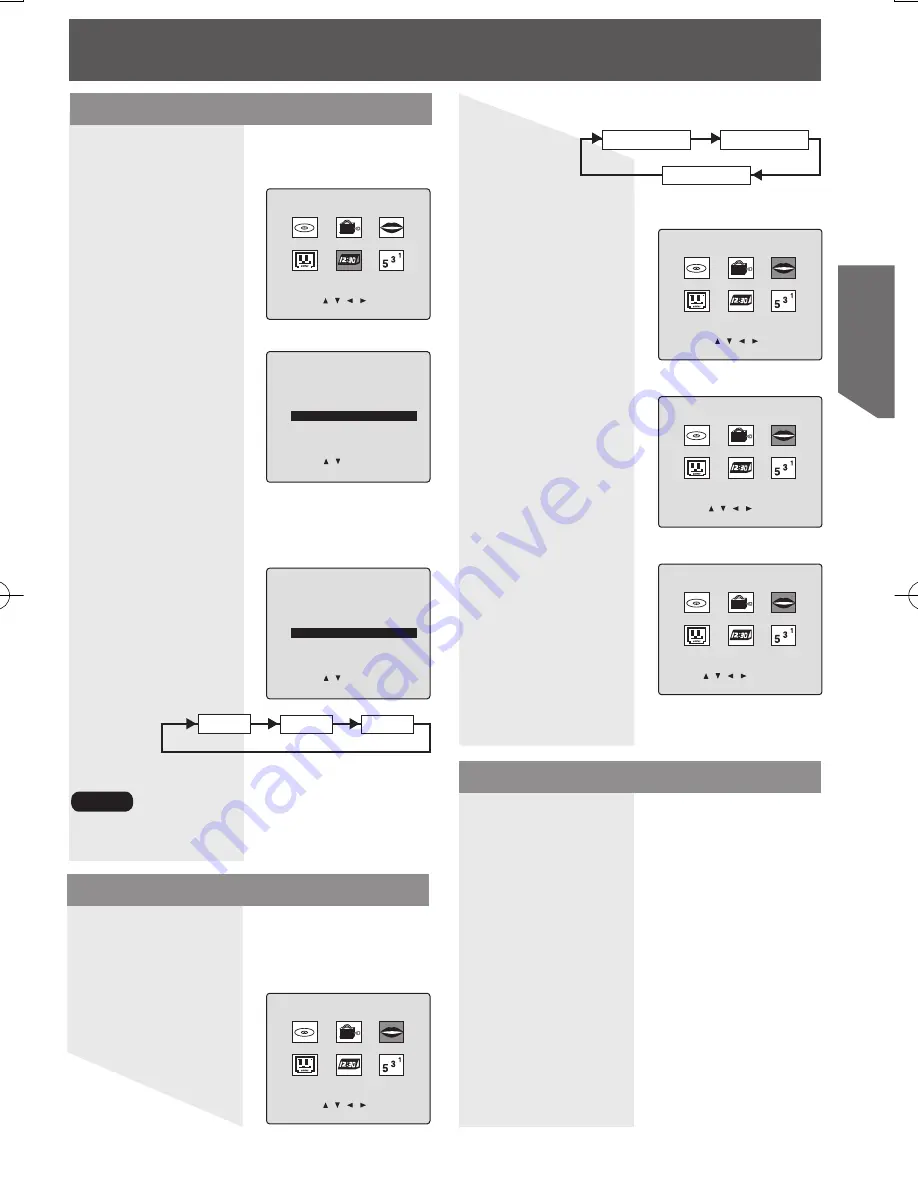
2 Press 

▲▼◄►

 to select “LANGUAGE.”

3  Press SET repeatedly.

1  Press ACTION to display MAIN 

MENU.

4  Press ACTION to exit.

MAIN MENU

DVD

LOCK LANGUAGE

TV

CLOCK

CH

SELECT:

SET:SET

END

:ACTION

For French

MENU

DVD

BLOCAGE LANGUE

TELE

HORLOGE CANAL

SEL.:

REGLER:SET

FIN

:ACTION

For Spanish

MENU PRINCIPAL

DVD

BLOQUEO IDIOMA

TV

RELOJ

CANAL

ELEGIR:

FIJAR:SET

TERMINAR:ACTION

For English

MAIN MENU

DVD

LOCK LANGUAGE

TV

CLOCK

CH

SELECT:

SET:SET

END

:ACTION

 Change Language Setting

 Reset all unit Memory Func tions

Returns to factory setting. Use if relocating 

unit, or if Initial Setup needs to be redone.

• Make sure a tape is not inserted in unit.

1  Turn the unit Power on.

2  Press and hold both PLAY/REPEAT 

and FF on the unit for more than 5 

seconds.

• The power will shut off.

• Please ignore “NO CASSETTE” warning.

3  Perform “Initial Setup” on page 18.

English

Spanish

French

+1

0

-1

• “TIME ZONE ADJUST” returns to “0” if clock is 

set manually.

Note

Содержание OmniVision PV-DM2794

Страница 1: ...play back may depend on recording conditions As an ENERGY STAR Partner Matsushita Electric Corporation of America has determined that this product or product model meets the ENERGY STAR guidelines for energy efficiency Please read these instructions carefully before attempting to connect operate or adjust this product Please save this manual Spanish Quick Use Guide is included Guía para rápida con...

Страница 2: ...back of your unit Please check and identify the supplied accessories Use numbers indicated in parentheses when asking for replacement parts Date of Purchase _______________ Dealer Purchased From__________ Dealer Address_________________ Dealer Phone No _______________ Model No ____________________ Serial No _____________________ 1 Remote Control EUR7724020 2 Batteries AA Congratulations Accessorie...

Страница 3: ...Features 36 Copy Your Tapes Dubbing 38 V Chip Control Features 39 Display Feature 45 Basic Disc Operation 46 Disc Operation In PLAY mode 48 DVD RAM Operation 52 Disc Operation Using Information Screen 54 Special Disc Operation 58 Settings for DVD Operation 62 Warning and Instruction Displays 67 Before Requesting Service 68 Spanish Quick Use Guide Guía rápida de uso en español Conexión 70 Guía rápi...

Страница 4: ...uipment does cause interference to radio or television reception which can be determined by turning the equipment off and on use the equipment in another location and or utilize an electrical outlet different from that used by the receiver If necessary consult the dealer or an experienced radio TV technician for help You may find the booklet Something About Interference available from FCC local re...

Страница 5: ...E OF THIS UNIT USE OF CONTROLS OR ADJUSTMENTS OR PERFORMANCE OF PROCEDURES OTHER THAN THOSE SPECIFIED HEREIN MAY RESULT IN HAZARDOUS RADIATION EXPOSURE DO NOT OPEN COVERS AND DO NOT ATTEMPT TO REPAIR THE UNIT YOURSELF REFER SERVICING TO QUALIFIED PERSONNEL This symbol alerts the user that important literature concerning the operation and maintenance of this unit has been included Therefore it shou...

Страница 6: ...E THE RISK OF ELECTRIC SHOCK FIRE INJURY TO PERSONS OR DAMAGE TO THIS PRODUCT READ AND RETAIN ALL SAFETY AND OPERATING INSTRUCTIONS HEED ALL WARNINGS IN THE MANUAL AND ON THE PRODUCT INSTALLATION 1 POWER SOURCE CAUTION Operate only from power source indicated on unit or in this manual If uncertain have your Electric Utility Service Company or Video Products Dealer verify your home power source 2 P...

Страница 7: ...riods of time disconnect all equipment from the power source as well as the antenna and cable system 4 WHEN UNIT IS PLUGGED IN DO NOT OPERATE IF liquid has spilled into unit unit was dropped or otherwise damaged unit emits smoke odours or noises Immediately unplug unit and have it inspected by a service technician to avoid potential fire and shock hazards Never drop or push any object through open...

Страница 8: ...sor VIDEO HEADS MAY NEED CLEANING PLEASE INSERT HEAD CLEANING CASSETTE OR REFER TO MANUAL END PLAY Loading the Batteries Prevent Accidental Tape Erasure Head Cleaning Tape Speed Setting Type of Video Cassette T60 T120 T160 SP Standard Play 1 Hour 2 Hours 2 Hours 40 Minutes SLP Super Long Play 3 Hours 6 Hours 8 Hours Record Playback Time Playing older or damaged tapes may eventually cause video hea...

Страница 9: ...t be possible to play CD R CD RW DVD R and DVD RAM in all cases due to the type of disc or condition of the recording Note Disc type Disc Logo Indication in these operating instructions DVD Video DVD V DVD Video DVD R 1 DVD RAM 2 DVD RAM CD CD CD DA CD R CD RW DVD RAM discs DVD RAM discs must meet the following conditions for this unit to be able to play them Some parts of the disc for example whe...

Страница 10: ... Only hold disc by edges as shown below Fingerprints dirt and scratches can cause skipping and distortion Do not write on label side of disc Never use record cleaning sprays benzine thinner static electricity prevention liquids or any other solvent Do not try to close disc tray when disc is not properly placed Disc tray Disc If disc is brought from a cold to a warm environment moisture may form on...

Страница 11: ... 14 AUDIO Selects the desired audio mode 15 ANGLE Selects the desired angle in DVD mode 16 REC Records a program 17 PROGRAM Displays SET PROGRAM screen You can set Timer Program and On Timer 18 DVD Set to DVD mode 19 TV VCR Sets to TV VCR mode 20 TRACKING UP DOWN Reduces picture noise during Playback and Slow Motion 21 NUMBER Keys Selects a channel directly 22 ADD DELETE CLEAR Adds or deletes a ch...

Страница 12: ...ure noise during Playback and Slow Motion 16 INPUT Changes input source 17 VCR Operation STOP EJECT STOP Stops playback EJECT Ejects the tape 18 PLAY REPEAT PLAY Begins playback REPEAT Sets to see a recording over and over 19 REWIND SEARCH Rewinds tape and searches previous scene Decreases slow motion speed in Still mode 20 FAST FORWARD SEARCH Fast forwards tape and searches next scene Increases s...

Страница 13: ...this unit consumes 1 5 W of electric power in OFF condition 2 Optical digital audio output connector Outputs audio signal Digital 3 Audio Output Connector L R Outputs audio signal Analog 4 VHF UHF Antenna Input Terminal Input terminal for an antenna or cable box signal 2 3 4 1 ...

Страница 14: ...cting a component to the system are not included with the component or available as an option you may need to fashion a cable to suit the component concerned Read the instruction manual for each system component carefully before connecting it Notes on connections Connecting the RF in Terminal Note to CABLE system installer This reminder is provided to call the CABLE Cable TV System Installer s att...

Страница 15: ...15 Getting Started Connects VCRs and other peripheral equipment AV Input terminal is used Connecting the AV Input Terminal ...

Страница 16: ... of connection digital and analog Connect an amplifier with Dolby Digital or DTS decoders to enjoy surround sound Connect an amplifier to enjoy high quality stereo sound with sampling frequencies of 96 kHz Analog connection Digital connection Connecting the Audio Output Terminal OPTICAL Firmly connect the cable to the connector Speakers example Please see amplifier manual for speaker requirements ...

Страница 17: ...e efficiently recorded on a disc Linear PCM is a signal recording format used in CDs While CDs are recorded in 44 1 kHz 16 bit DVDs are recorded in 48 kHz 16 bit up to 96 kHz 24 bit If you have a Dolby Pro Logic Surround decoder you will obtain the full benefit of Pro Logic from the same DVD movies that provide full 5 1 channel Dolby Digital soundtracks as well as from titles with the Dolby Surrou...

Страница 18: ...LOCK and exit POWER ACTION SET CH AUTO SET PROCEEDING AUTO CLOCK SET PROCEEDING CANCEL STOP 10 25 2004 MON 11 45AM DST ON SETTING CH 10 AUTO CLOCK SET COMPLETED AUTO CLOCK SET IS INCOMPLETE PLEASE SET CLOCK BY PRESSING ACTION KEY SET CLOCK 1 1 2004 THU 12 00AM DST ON SELECT SET SET START ACTION SET CLOCK 10 25 2004 MON 11 45AM DST ON SELECT SET SET START ACTION Case 1 Case 2 Initial Setup Ready to...

Страница 19: ...nnel with NUMBER keys and press ADD DLT To delete channel Select channel with CH or NUMBER keys and press ADD DLT MAIN MENU DVD LOCK LANGUAGE TV CLOCK CH SELECT SET SET END ACTION SET UP CHANNEL ANTENNA CABLE AUTO SET WEAK SIGNAL DISPLAY OFF SELECT SET SET END ACTION CHANNEL 08 ADDED CHANNEL 08 DELETED Automatic Channel Setting 4 Press to select ANTENNA then press SET to set your antenna system TV...

Страница 20: ... Daylight Saving Time To Make Corrections repeatedly press to move to error then correct 6 Press ACTION twice to start the clock and exit this mode SET CLOCK AUTO CLOCK SET MANUAL TIME ZONE ADJUST 0 SELECT SET SET END ACTION MAIN MENU DVD LOCK LANGUAGE TV CLOCK CH SELECT SET SET END ACTION Manual Clock Setting 4 Press to select AUTO CLOCK SET then press SET 3 Press SET SET CLOCK AUTO CLOCK SET MAN...

Страница 21: ...NGUAGE TV CLOCK CH SELECT SET SET END ACTION For French MENU DVD BLOCAGE LANGUE TELE HORLOGE CANAL SEL REGLER SET FIN ACTION For Spanish MENU PRINCIPAL DVD BLOQUEO IDIOMA TV RELOJ CANAL ELEGIR FIJAR SET TERMINAR ACTION For English MAIN MENU DVD LOCK LANGUAGE TV CLOCK CH SELECT SET SET END ACTION Change Language Setting Reset all unit Memory Functions Returns to factory setting Use if relocating un...

Страница 22: ...nd then press SET to select TUNER or LINE 4 Press ACTION twice to exit this mode MAIN MENU DVD LOCK LANGUAGE TV CLOCK CH SELECT SET SET END ACTION SET UP TV CAPTION INPUT SELECT TUNER SET UP VIDEO AUDIO DVD VOL ADJUST 2 SELECT SET SET END ACTION If a remote control button does not work when pressed press the TV VCR button on the remote and try the button again INPUT The diagram at right is an exam...

Страница 23: ...VCR mode only is not output to Audio Output L R Connector Using the Number and 100 keys Audio Mute Surround Sound System Rapid Tune Notes When ON is selected the picture is displayed even when a broadcast signal is weak or non existent ON Picture is displayed regardless of signal condition and may not always be clearly visible OFF Screen turns solid blue when signal is absent or weak 1 Press ACTIO...

Страница 24: ...to select the desired audio mode as described above Arrow shows selection MONO broadcast Normal monaural sound broadcast Example Equipped with TV Noise Reduction for true MTS reproduction TV Noise Reduction is required for good stereo separation and audio fidelity is a registered trademark and is licensed by Technology Licensing MTS Stereo and SAP broadcast Multi channel Television Sound Stereo ma...

Страница 25: ...IMER mode To Make Corrections use and to move back and correct 6 Press PROG to set ON TIMER ON TIMER SET is displayed PROG TIMER Indicator lights up on the unit This unit can be set for auto power off 1 Press PROG to display SET PROGRAM screen 2 Press to select SLEEP TIMER 3 Press SET repeatedly to select the desired time To cancel press SET repeatedly until 0 appears 4 Press PROG to return to the...

Страница 26: ...N INPUT SELECT TUNER SET UP VIDEO AUDIO DVD VOL ADJUST 2 SELECT SET SET END ACTION Closed Caption Mode Feature 3 Press SET to display SET UP TV screen Closed Caption System CAPTION CAPTION MODE OFF CC ON MUTE CAP C1 SELECT SET SET END ACTION Caption Mode CAP C1 or C2 A narration of selected TV programs is displayed Check TV program listings for CC Closed Caption broadcasts Caption Mode TEXT C1 or ...

Страница 27: ...ON MUTE 9 Press SET repeatedly to select desired mode The caption may be broadcast over CAP C1 or C2 MAIN MENU DVD LOCK LANGUAGE TV CLOCK CH SELECT SET SET END ACTION SET UP TV CAPTION INPUT SELECT TUNER SET UP VIDEO AUDIO DVD VOL ADJUST 2 SELECT SET SET END ACTION CAPTION CAPTION MODE OFF CC ON MUTE CAP C1 SELECT SET SET END ACTION CAPTION CAPTION MODE OFF CC ON MUTE CAP C1 SELECT SET SET END ACT...

Страница 28: ...of picture and sound suitable for each program source 1 Press ACTION to display MAIN MENU 2 Press to select TV 3 Press SET to display SET UP TV screen 4 Press to select SET UP VIDEO AUDIO 5 Press SET to display MUSIC Sound suited to music Factory setting SPEECH Sound suited to dialogue NORMAL AUTO Audio AGC Auto Gain Control The sound level is automatically adjusted to suit the program source Low ...

Страница 29: ...ect an item 8 Press to adjust To Reset AUDIO Controls Press and SET to select and set STANDARD All controls return to their factory settings BASS Control To adjust the intensity of low frequency sound TREBLE Control To adjust the intensity of high frequency sound BALANCE Control Controls the difference in audio level between the left and right speaker The levels set here do not affect other audio ...

Страница 30: ...de c Press PLAY to release a Press STILL PAUSE b Press STILL PAUSE in Still mode c Press PLAY to release Press STOP Rapid Rewind tape Press REW SLOW in Stop mode Rewinds a T 120 tape in approx 1 minute Rapid Fast forward tape Press FF SLOW in Stop mode Eject tape Press EJECT on the remote or STOP EJECT on the unit To reduce picture noise see Manual Tracking Control on page 37 Playback a Tape Forwa...

Страница 31: ...isten to Hi Fi stereo playback the unit AUDIO L R jacks must be connected to a stereo amp and speakers There may be a difference in audio level between Hi Fi and normal audio playback Choose audio mode to match recording type 1 Press AUDIO repeatedly to select the audio mode according to the type of broadcast to be recorded The Audio mode selected stays in effect until it is changed Refer to MTS B...

Страница 32: ... each recording Example 2 To cancel press PLAY 6 1 5 7 2 3 4 1 7 5 3 4 6 2 Example 1 To go to rec 2 from rec 4 enter 3 and press REW To go to rec 6 from rec 2 enter 4 and press FF INDEX SEARCH ENTER INDEX NUMBER 1 USING 1 9 KEYS FORWARD SEARCH FF REVERSE SEARCH REW EXIT SEARCH INDEX SEARCH FORWARD SEARCH FF REVERSE SEARCH REW Tape Operation Index Search Note 2 Press FF or REW to start search NUMBE...

Страница 33: ...he CM ZERO button in Playback mode you can skip over 1 2 or 3 minutes of recorded tape as desired No indication appears 2 Press AUDIO repeatedly each press within 5 seconds to select desired mode Select HIFI L R to listen to a regular Hi Fi Stereo recording Select HIFI L or HIFI R to listen only to the left or right channel of a stereo recording This is commonly used for Karaoke music on one chann...

Страница 34: ... SP SLP If you re using a cable box make sure that it is tuned to the desired channel and the power is left on for timer recording PROG TIMER Indicator lights up on the unit SET PROGRAM TIMER PROGRAMMING ON TIMER SLEEP TIMER 0 SELECT SET SET END PROG Timer Recording Set Up to Programs SET SELECT STOP ADD DLT PROG You can set up to 8 programs to be recorded while you are away P DT START STOP CH SPD...

Страница 35: ...ding comes up during a normal recording or One Touch Recording page 31 the Timer Recording will not be performed If there is a power interruption of more than one minute the recording may not be performed or continued If INCOMPLETE appears after all items have been set check all entries and make necessary corrections 1 Press PROG to display SET PROGRAM screen 2 Press to select TIMER PROGRAMMING 3 ...

Страница 36: ...VCR Features Insert a tape in Power off mode Power turns on Play Playback begins if tape has no record tab Tape reaches its end Rewind Stop Tape with no record tab reaches its end Rewind Stop Eject except for Recording Repeat Play must be OFF Auto Playback Auto Rewind Playback Auto Eject Note SET SELECT ACTION TRACKING REC ...

Страница 37: ... CASSETTE warning VCR LOCK ACTIVATED VCR LOCK OFF VCR Lock Continuously analyzes the signal and adjusts for optimum picture quality Use during Playback and Slow Motion mode to reduce picture noise Press the 3 or 6 number key on the remote control or CH on the unit until the picture clears up To return to Auto Tracking press POWER off then on again a few seconds later In Still mode the 3 or 6 numbe...

Страница 38: ...de See page 22 Selecting Input Mode Press REC then press STILL PAUSE immediately to put in Standby mode Press STILL PAUSE to start dubbing Editing starts recording Press STOP to stop dubbing Refer to page 15 Connecting the AV Input Terminal before you operate it Perform operation of steps 3 and 4 on both units at same time Unauthorized exchanging and or copying of copyrighted recordings may be cop...

Страница 39: ...o make the correction 2 Press to select LOCK 3 Press SET to display LOCK screen MAIN MENU DVD LOCK LANGUAGE TV CLOCK CH SELECT SET SET END ACTION LOCK ENTER 4 DIGIT CODE ENTER 0 9 END ACTION Enter Secret Code Notes Changing your secret code You will need your current code 1 While this OSD on screen display is displayed press ADD DLT CLEAR to clear current code 2 Enter new secret code SELECT ACTION...

Страница 40: ...lay LOCK menu and continue with US TV PROGRAMS Ratings page 41 Or press ACTION three times to exit LOCK US MOVIES OFF CHANGE SETTINGS US TV PROGRAMS OFF CHANGE SETTINGS NEXT PAGE SELECT SET SET END ACTION LOCK US MOVIES OFF CHANGE SETTINGS US TV PROGRAMS OFF CHANGE SETTINGS NEXT PAGE SELECT SET SET END ACTION VIEW NR PROGRAMS YES G UNLOCKED PG PG 13 R NC 17 X CONTAINS NO RATING SELECT SET SET END ...

Страница 41: ...R PROGRAMS YES TV Y UNLOCKED TV Y7 FV TV G TV PG V S L D TV 14 V S L D TV MA V S L CONTAINS NO RATING SELECT SET SET END ACTION VIEW NR PROGRAMS YES TV Y UNLOCKED TV Y7 FV TV G TV PG V S L D TV 14 V S L D TV MA V S L FOR ALL CHILDREN SELECT SET SET END ACTION US TV PROGRAMS Ratings FV Fantasy Violence V Violence S Sexual Situations L Adult Language D Sexually Suggestive Dialogue TV Y FOR ALL CHILD...

Страница 42: ...INGS US TV PROGRAMS OFF CHANGE SETTINGS NEXT PAGE SELECT SET SET END ACTION 3 Press to select CANADIAN ENGLISH 4 Press SET to set ON or OFF ON V Chip Control is activated OFF V Chip Control is deactivated 7 Press to select VIEW E PROGRAMS 8 Press SET to set YES or NO 9 Press to select and SET to set ratings to be blocked LOCK CANADIAN ENGLISH OFF CHANGE SETTINGS CANADIAN FRENCH OFF CHANGE SETTINGS...

Страница 43: ...F CHANGE SETTINGS PREVIOUS PAGE SELECT SET SET END ACTION E Exempt PROGRAMS Some TV shows such as news sports weather bulletins and emergency information have no ratings 7 Press to select VIEW E PROGRAMS 8 Press SET to set YES or NO LOCK CANADIAN ENGLISH OFF CHANGE SETTINGS CANADIAN FRENCH OFF CHANGE SETTINGS PREVIOUS PAGE SELECT SET SET END ACTION VIEW E PROGRAMS YES G UNLOCKED 8 ANS 13 ANS 16 AN...

Страница 44: ...Control CH 08 PROGRAM RATING EXCEEDED RATING PG 13 ACCESS CODE ENTER 0 9 Blocking Message To View a Blocked Program Movie CH 08 PROGRAM RATING EXCEEDED RATING 13ANS ACCESS CODE ENTER 0 9 Press NUMBER keys to enter your secret code in the Blocking Message screen V Chip Control is reactivated when power is turned off or power failure occurs 1 Enter your secret code See page 39 LOCK US MOVIES OFF CHA...

Страница 45: ... Signal Display Feature set to OFF see page 23 the screen will turn solid blue 1 Function Status 5 Current Time 2 Rec Time Remaining OTR mode only see page 31 7 Counter 8 Tape Speed See page 8 3 Receivable Broadcast Types See page 24 6 Channel 1 2 3 5 6 8 7 08 PLAY TV VCR Status Clock Display Blue Screen Display Channel Function Display 4 4 Rating level No broadcast signal in TV mode Only when Wea...

Страница 46: ...old disc by its edges only page 10 with printed side up and use guides to place into tray Use 1 3 8 cm or 2 5 12 cm disc CLOSE READING 1 MAIN STORY 2 SUBTITLE 3 AUDIO SOUNDTRACK 4 INFORMATION LOVE STORY Example Basic Disc Operation Play Disc Power turns off after unit is in stop mode with wallpaper displayed for about 5 minutes Auto Power Off function 1 2 To return to Main MENU of DVD play stops P...

Страница 47: ...on Picture RESUME Function Current playback position Forward Skip Reverse Skip Chapter Track Chapter Track Chapter Track Note Whether pictures are advanced by FRAME or FIELD is selected automatically see page 65 RESUME works only with discs for which elapsed play time is displayed during play When a DVD RAM still picture is played back the counter will not be displayed however RESUME will function...

Страница 48: ...U in Play mode to display main menu of DVD 2 Press or NUMBER keys to select an item 2 Press or NUMBER keys to select a title 3 Press SET or PLAY to access Step 3 not necessary when using NUMBER keys Example Example Example TITLE MENU 4 EPILOGUE 2 A PAINFUL SEPARATION 3 MEETING AGAIN 1 PROLOGUE TITLE MENU 4 EPILOGUE 2 A PAINFUL SEPARATION 3 MEETING AGAIN 1 PROLOGUE CHAPTER 1 CHAPTER 2 CHAPTER 3 CHA...

Страница 49: ...ng operation is prohibited by the unit or the disc HOLA AUDIO 3 ESP Dolby Digital 3 2 1ch SELECT AUDIO HELLO AUDIO 1 ENG Dolby Digital 3 2 1ch SELECT AUDIO AUDIO 2 ENG VOCAL ON SELECT AUDIO Audio Soundtrack Language Vocal selection for Karaoke discs Notes Information on the audio stream currently being played back is displayed See page 64 DVD V DVD V LPCM 96 kHz or 48 kHz 16 bit Linear PCM disc 20...

Страница 50: ...d than the one set at Settings for DVD Operation See page 62 2 Press SUB TITLE or NUMBER keys to select desired language 1 Press SUB TITLE in Play mode to display the subtitle selection on screen Display disappears after 5 seconds When no subtitles are offered will be displayed instead of the language number Number of subtitle language being played back HELLO SUBTITLE 1 ENG SELECT SUBTITLE HELLO H...

Страница 51: ...isplay as follows Please refer to pages 54 57 DISPLAY button does not function while main menu of DVD title menu of DVD Direct Navigator or Play List is displayed Selected disc information Selected unit information When appears on the screen while a button is being pressed it means that the corresponding operation is prohibited by the unit or the disc TITLE 2 DVD CHAPTER 11 01 12 34 SELECT SET SET...

Страница 52: ...LOSE 1 Press POWER on the remote or unit 4 Place disc into disc tray 5 Press PLAY to start play Disc tray closes automatically Play begins from the first program title recorded on the DVD RAM Play List Page1 5 No Date Length Title SELECT SET SET END MENU 1 2 3 4 00 01 00 00 03 12 00 15 01 00 03 00 Movie Picture Playback Still Picture Playback Hybrid Playback Partial Playback 2002 12 24 5 15 41AM 2...

Страница 53: ...ailable titles varies with each disc When appears on the screen while a button is being pressed it means that the corresponding operation is prohibited by the unit or the disc Play List Page1 5 No Date Length Title SELECT SET SET END MENU 1 2 3 4 00 01 00 00 03 12 00 15 01 00 03 00 Movie Picture Playback Still Picture Playback Hybrid Playback Partial Playback 2002 12 24 5 15 41AM 2002 12 25 4 31 4...

Страница 54: ... in Play or Stop mode to display On Screen Display 2 Press SET to enter Cursor moves to the right Change the item by pressing and press SET Disc information screen 1 Unit information screen 1 DVD V DVD V a OPERATING MODE The current operation is displayed b Chapter Go directly to a preset chapter number This function does not work with some discs c Disc currently being played The type of disc curr...

Страница 55: ...PEAT MODE REPEAT MODE can be selected 1 Press DISPLAY twice in Play or Stop mode to display On Screen Display 2 Press SET to enter Cursor moves to the right Change the item by pressing and press SET TRACK 2 CD 00 01 23 ENTER 0 9 SET SET NEXT DISPLAY a OPERATING MODE The current operation is displayed PLAY REPEAT DISC RANDOM PLAY SELECT SET SET END DISPLAY Disc information screen 2 Unit information...

Страница 56: ...sing or the NUMBER keys and press SET Disc information screen 3 b Disc currently being played The type of disc currently inserted is displayed a Direct Navigation PROGRAM or PLAY LIST No Go directly to a preset title number DVD RAM PROGRAM 1 DVD VR 01 12 34 SELECT SET SET NEXT DISPLAY PROGRAM 1 DVD VR 01 12 34 ENTER 0 9 SET SET NEXT DISPLAY PROGRAM 1 DVD VR 01 ENTER 0 9 SET SET NEXT DISPLAY a b c ...

Страница 57: ...rrent operation is displayed Direct Navigation PROGRAM PLAY LIST DVD RAM PROGRAM PROGRAM PROGRAM REPEAT PROGRAM REPEAT DISC REPEAT OFF CURRENT PLAYBACK POSITION Example PLAY LIST PLAY LIST PLAY LIST REPEAT PLAY LIST REPEAT ALL PLAY LIST REPEAT OFF CURRENT PLAYBACK POSITION Example PLAY REPEAT PROGRAM SELECT SET SET END DISPLAY a b When appears on the screen while a button is being pressed it means...

Страница 58: ...3 Press SET to display DVD MAIN MENU 4 Press to select PLAY MODE 5 Press SET to display PLAY MODE screen 6 Press to select PROGRAM PLAY 7 Press SET to display screen 8 Press to select a track number Track numbers on disc are displayed 9 Press SET to set Repeat steps 8 9 to select another track The selected track is added on the right side MAIN MENU DVD LOCK LANGUAGE TV CLOCK CH SELECT SET SET END ...

Страница 59: ...isc Information Screen 3 Press DISPLAY again to display Unit Information screen 6 Press SET to set mode Cursor moves to REPEAT To cancel select REPEAT OFF in step 5 then press SET When appears on the screen while a button is being pressed it means that the corresponding operation is prohibited by the unit or the disc MAIN MENU DVD LOCK LANGUAGE TV CLOCK CH SELECT SET SET END ACTION TRACK 2 CD 00 0...

Страница 60: ...MAIN MENU 2 Press to select TV 3 Press SET to display SET UP TV screen 6 Press ACTION twice to return to the normal screen MAIN MENU DVD LOCK LANGUAGE TV CLOCK CH SELECT SET SET END ACTION SET UP TV CAPTION INPUT SELECT TUNER SET UP VIDEO AUDIO DVD VOL ADJUST 2 SELECT SET SET END ACTION DVD Volume Adjust DVD V 4 Press to select DVD VOL ADJUST 5 Press SET to set the level 0 1 or 2 VSS SELECT ACTION...

Страница 61: ... being pressed it means that the corresponding operation is prohibited by the unit or the disc Notes This function not available with DVD RAM ANGLE Indicator lights up on the unit when a scene recorded from different angles is detected The angle number can be set beforehand so that the angle is switched whenever ANGLE Indicator lights up DVDs may contain scenes shot from multiple camera angles all...

Страница 62: ...ubtitle language Factory preset AUTO MENUS To select the language used in title menus or DVD menus Factory preset English English Spanish French Japanese Original Original disc language Other Other language selection 1 AUTO Same language selected for AUDIO If language set for AUDIO is used in playback subtitles will not appear If another language is used during playback the subtitles will appear i...

Страница 63: ...ndonesian 7378 Interlingua 7365 Irish 7165 Italian 7384 Japanese 7465 Javanese 7487 Kannada 7578 Kashmiri 7583 Kazakh 7575 Kirghiz 7589 Korean 7579 Kurdish 7585 Laothian 7679 Latin 7665 Latvian Lettish 7686 Lingala 7678 Lithuanian 7684 Macedonian 7775 Malagasy 7771 Malay 7783 Malayalam 7776 Maltese 7784 Maori 7773 Marathi 7782 Moldavian 7779 Mongolian 7778 Nauru 7865 Nepali 7869 Norwegian 7879 Ori...

Страница 64: ...PUT LPCM DVD OFF Dolby Digital Bitstream dts Bitstream DRC OFF SELECT SET SET END ACTION Dolby Digital OFF Linear PCM of less than 48 kHz 16 bit is output When playing DVDs recorded in linear PCM of over 48 kHz 20 bit no digital audio is output Factory preset PCM When playing DVDs recorded in linear PCM of 48 kHz 20 bit 24 bit or more digital audio converted to 44 1 kHz 16 bit or 48 kHz 16 bit is ...

Страница 65: ...U DVD LOCK LANGUAGE TV CLOCK CH SELECT SET SET END ACTION DVD MAIN MENU DISC LANGUAGES AUDIO OUTPUT STILL MODE AUTO TV MODE 4 3 Pan Scan SELECT SET SET END ACTION Selecting STILL MODE DVD V 1 Press ACTION in Stop mode to display MAIN MENU 2 Press to select DVD 3 Press SET to display DVD MAIN MENU AUTO FIELD Field still or FRAME Frame still is automatically selected during the still mode Factory pr...

Страница 66: ...screen display style for widescreen video material playback 6 Press ACTION twice to exit this mode Factory preset 1 Press ACTION in Stop mode to display MAIN MENU 2 Press to select DVD 3 Press SET to display DVD MAIN MENU 4 3 Letterbox Widescreen video data is played in Letterbox style top and bottom of screen display a black margin MAIN MENU DVD LOCK LANGUAGE TV CLOCK CH SELECT SET SET END ACTION...

Страница 67: ...s at its end two minutes before a Timer Recording is about to begin 34 35 VIDEO HEADS MAY NEED CLEANING PLEASE INSERT HEAD CLEANING CASSETTE OR REFER TO MANUAL END PLAY If head cleaning becomes necessary while playing back a tape 8 VCR LOCK ACTIVATED If you press a function button other than STOP EJECT or POWER while the unit is in VCR Lock mode 37 PLEASE CHECK THE DISC AND FOR STAINS OR SCRATCHES...

Страница 68: ...ot be watched Make sure the selected channel is in unit s memory 19 Channel cannot be selected Only the channel being recorded can be viewed on this unit 31 VCR TV program cannot be recorded Make sure your antenna system TV or CABLE is correctly set 14 Make sure cassette record tab is intact 8 Timer recording cannot be performed Check that clock is set to current time and date 45 Make sure DSS CAB...

Страница 69: ...E button Try selecting it from the DVD menu if available 49 Angle cannot be changed This function is dependent on software availability Even if disc has multiple angles they may be recorded for specific scenes only ANGLE Indicator on unit lights up 61 Miscellaneous Video cassette cannot be inserted Insert the cassette window side up record tab facing you 8 Video cassette cannot be removed Complete...

Страница 70: ...ar un cable para que se adecue al componente involucrado Consulte cuidadosamente el manual de instrucciones de cada componente del sistema antes de conectarlo Notas sobre las conexiones Conexión del terminal de entrada RF Nota para el instalador del sistema de CABLE Este recordatorio tiene la finalidad de llamar la atención a los instaladores del sistema de CABLE televisión por cable sobre el artí...

Страница 71: ...PROCEEDING AUTO CLOCK SET PROCEEDING CANCEL STOP 10 25 2004 MON 11 45AM DST ON SETTING CH 10 AUTO CLOCK SET COMPLETED AUTO CLOCK SET IS INCOMPLETE PLEASE SET CLOCK BY PRESSING ACTION KEY SET CLOCK 1 1 2004 THU 12 00AM DST ON SELECT SET SET START ACTION SET CLOCK 10 25 2004 MON 11 45AM DST ON SELECT SET SET START ACTION Caso 1 Caso 2 Configuración inicial listo para reproducir Si usa una caja de ca...

Страница 72: ... 100 luego 2 luego 5 Ejemplo 2 Para seleccionar el canal 12 primero presione el 1 luego el 2 Ejemplo 3 Para seleccionar el canal 2 primero presione el 2 Selección del modo de entrada Uso del botón CH VOL Uso de la tecla Number y 100 Apagado del audio Sintonización rápida 4 Presione ACTION dos veces para salir de este modo MENU PRINCIPAL DVD BLOQUEO IDIOMA TV RELOJ CANAL ELEGIR FIJAR SET TERMINAR A...

Страница 73: ...genes cuadro a cuadro Detención de una cinta 2 Presione CH o las teclas NUMBER para seleccionar el canal Para entrada de LINEA consulte la página 22 3 Presione SPEED para seleccionar la velocidad de grabación consulte la página 8 4 Presione REC para comenzar la grabación No puede visualizar otro canal durante la grabación No es posible grabar desde un DVD CD a una cinta VHS usando esta unidad Desp...

Страница 74: ...ador PROG TIMER se ilumina en la unidad Mantenga presionado STOP por algunos segundos para cancelar la grabación con temporizador Cualquier grabación diaria o semanal se realizará como estaba programado Grabación con temporizador Cancelar una grabación con temporizador Grabación en progreso Para reemplazar el programa Para borrar un programa a Presione para seleccionar el programa deseado b Presio...

Страница 75: ...al principio aumenta con cada presión adicional del botón hasta 5 niveles 2 Presione PLAY para cancelar 1 Presione SKIP o SKIP durante la reproducción Búsqueda de escena rápida hacia adelante atrás Saltar hacia delante atrás un capítulo o pista Posición de reproducción actual Saltar hacia adelante Saltar hacia atrás Capítulo Pista Capítulo Pista Capítulo Pista 2 Cada vez que se presiona un capítul...

Страница 76: ...nta Función de continuación DVD V DVD RAM DVD V DVD RAM DVD V CD DVD RAM Puede cambiar el idioma de la banda sonora seleccionado en los ajustes de funcionamiento del DVD a un idioma diferente si está disponible 1 Presione AUDIO en el modo de reproducción para exhibir la selección de audio en la pantalla La exhibición desaparece después de cinco segundos 2 Presione AUDIO o las teclas NUMBER para se...

Страница 77: ...oducción El número de títulos disponibles varía con cada disco Play List Pagina1 5 No Fecha Longitud Titulo ELEGIR FIJAR SET TERMINAR MENU 1 2 3 4 00 01 00 00 03 12 00 15 01 00 03 00 Reproducción de película Reproducción de imagen fija Reproducción híbrida Reproducción parcial 2002 12 24 5 15 41AM 2002 12 25 4 31 49AM 2002 12 25 8 24 25AM 2002 12 25 12 45 00AM 3 Presione SET o PLAY para comenzar l...

Страница 78: ...panasonic com For assistance in Puerto Rico call Panasonic Sales Company 787 750 4300 or fax 787 768 2910 In Home service if applicable requires clear complete and easy access to the product by the authorized servicer and does not include removal or re installation of an installed product It is possible that certain in home repairs will not be completed in home but will require that the product or...

Страница 79: ...t develops during or after the warranty period you may contact your dealer or Servicenter If the problem is not handled to your satisfaction then write to the warrantor s Consumer Affairs Department at the addresses listed for the warrantor PARTS AND SERVICE INCLUDING COST OF AN IN HOME SERVICE CALL WHERE APPLICABLE WHICH ARE NOT COVERED BY THIS LIMITED WARRANTY ARE YOUR RESPONSIBILITY Customer Se...

Страница 80: ... is recorded at 30 frames per second Frame still and field still Frames are the still pictures that go together to make a moving picture There are about 30 frames shown each second One frame is made up of two fields A regular television shows these fields one after the other to create frames A still is shown when you pause a moving picture A frame still is made up of two alternating fields so the ...

Страница 81: ... W Power Off Approx 1 5 W Television System EIA Standard NTSC color Speaker 2 pieces 5 W Operating Temperature 5 C 35 C 41 F 95 F Operating Humidity 10 75 Weight 42 kg 92 5 lbs Dimensions W x H x D 772 mm 30 3 8 x 654 mm 25 3 4 x 533 mm 21 Discs played DVD disc DVD Video DVD R 12 cm 5 single sided single layer 12 cm 5 single sided double layer 12 cm 5 double sided double layer one layer per side 8...

Страница 82: ...DOWN button 11 Closed Caption Mode Feature 26 Commercial Skip 33 Connecting the Audio Output Terminal 16 Connecting the AV Input Terminals 15 Connecting the RF in Terminal 14 Copy Your Tapes Dubbing 38 D Digital Auto Tracking 37 Direct Navigator 53 Discs that can be played 9 Disc Handling 10 Disc Languages 62 Disc Operation Using Information Screen 54 Disc Tray 12 DISPLAY button 11 DST Daylight Sa...

Страница 83: ...1 SET button 11 Set Up to Programs 34 SKIP CM SKIP ZERO SEARCH button 11 SKIP SEARCH button 11 Sleep Timer 25 Slow Motion Picture Disc 47 Slow Motion picture Tape 30 Spanish Quick Use Guide 70 SPEED RETURN button 11 STILL PAUSE button 11 Still Freeze picture Tape 30 Still Pause Picture Disc 47 Stop a Record 31 Stop a Tape 30 STOP button 11 Subtitle Language 50 SUB TITLE button 11 SURROUND VSS butt...

Страница 84: ...oration of America One Panasonic Way Secaucus New Jersey 07094 Panasonic Sales Company PSC Division of Matsushita Electric of Puerto Rico Inc Ave 65 de Infantería Km 9 5 San Gabriel Industrial Park Carolina Puerto Rico 00985 Printed in Indonesia LSQT0775 A S0904 0 P LSQT0775 A ...

Отзывы: