background image

46

Por ayuda, llame al 1-800-211-PANA(7262) o envie e-mail a : [email protected]

Spanish Quick Use Guide/Guía para rápida consulta

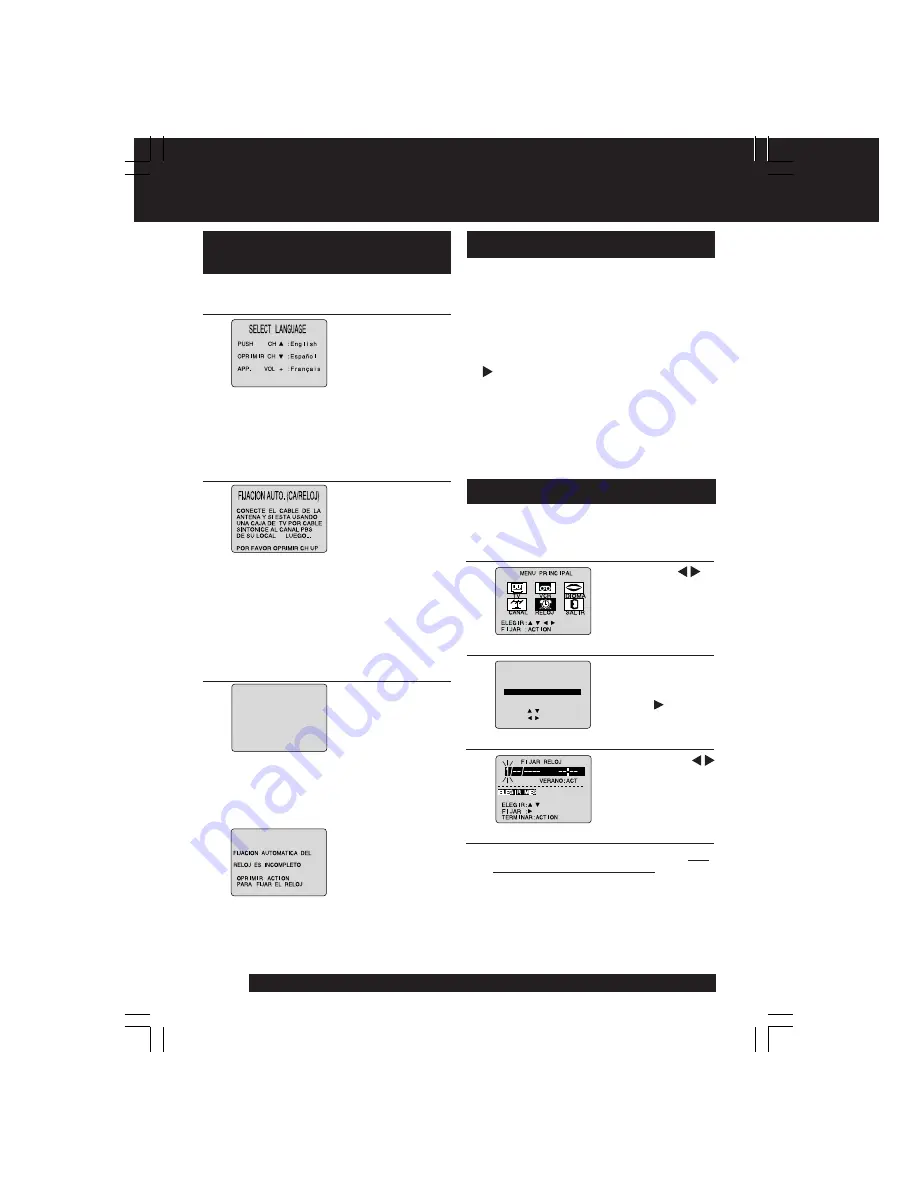
Como realizar la
Configuración Inicial

1

Presione POWER para encender el
videograbador combinado.

Cuando encienda
el VCR por
primera vez,
aparecerá la
pantalla SELECT
LANGUAGE.

2

3

Presione CH 

para seleccionar
Inglés (English).

O

Presione CH 

para seleccionar
Español.

O

Presione VOL +

para seleccionar
Francés (Français).
Aparecerá la
pantalla CHANNEL
/ CLOCK AUTO
SET.

Si el ajuste automático del reloj no se ha
completado, ajuste el reloj manualmente de
la siguiente manera:

1) Presione la tecla ACTION en el control

remoto para visualizar la pantalla del
menú RELOJ.

3) Presione dos veces la tecla ACTION

para poner el RELOJ en marcha y salir.

2) Presione 

▲▼

 para seleccionar el mes y

 para ajustar. De la misma forma,

seleccione y ajuste la fecha, año, hora y
DST (Hora de Verano).

Ajustar de nuevo el reloj

1

Presione ACTION para exhiba el
menú.

Ajuste Manual del Reloj

• Si ajusta el idioma incorrecto, realice

los pasos de la página 9 “Reajuste de
todas las Funciones de Memoria de
la unidad”.

• Active la caja de cables y ajústela al

canal PBS en su huso horario.
Si usted utiliza receptor DSS, este debe
estar apagado.

4

6 /   7 / 2000     M I E 12 : 00PM

HORA  VERAN I EGA: ACT

F  I JAC I ON  AUTOMATICA

COMPLETO

CANAL  F I JADO : CA 1 0

TERMINAR : OPR I M I R  CH  UP

Presione la tecla CH

 para iniciar el

funcionamiento de
CHANNEL / CLOCK
AUTO SET. El ajuste
del CHANNEL /
CLOCK se lleva a cabo
automáticamente, si la
configuración se ha
terminado, se visualiza
la pantalla siguiente.
Si aparece la
pantalla “FIJACION
AUTOMATICA DEL
RELOJ
INCOMPLETO”,
ajuste el reloj
utilizando los
procedimientos de
“AJUSTE MANUAL
DEL RELOJ”
mostrados en la
página 9.

2

Presione 

▲▼


para seleccionar
“RELOJ”.
Presione ACTION.

3

Presione 

▲▼

 para

seleccionar
“MANUAL” y luego
presione  .

F I JAC I ON  AUTOMAT I CA

F I JAR   :

ELEG I R :        

TERM I NAR : ACT I ON

F I JAR  RELOJ

MANUAL

AJUSTE  ZONA  HORA  :  0


4

Presione 

▲▼

 y   

para seleccionar y
ajustar la hora y la
fecha.


5

Presione ACTION dos veces para que
el reloj comience a funcionar y salir
desde este modo.

Содержание Omnivision PV-C911

Страница 1: ...V C931W LSQT0603A For assistance please call 1 800 211 PANA 7262 or send e mail to consumerproducts panasonic com As an ENERGY STAR Partner Matsushita Electric Corporation of America has determined that this product or product model meets the ENERGY STAR guidelines for energy efficiency Basic Operation Initial Setup TV Operation Timer Operation Advanced Operation For Your Information Initial Setup...

Страница 2: ...of the lead in wire to an antenna discharge unit size of grounding conductors location of antenna discharge unit connection to grounding electrodes and requirements for the grounding electrode 2 KEEP ANTENNA CLEAR OF HIGH VOLTAGE POWER LINES OR CIRCUITS Locate an outside antenna system well away from power lines and electric light or power circuits so it will never touch these power sources should...

Страница 3: ...HOCK DO NOT OPEN CAUTION This symbol alerts the user that important literature concerning the operation and maintenance of this unit has been included Therefore it should be read carefully in order to avoid any problems This symbol warns the user that uninsulated voltage within the unit may have sufficient magnitude to cause electric shock Therefore it is dangerous to make any kind of contact with...

Страница 4: ...To record again Battery replacement caution 3 Close the cover 2 Insert batteries as marked 1 Open the cover Do not mix old and new batteries Do not mix alkaline with manganese batteries Loading the Batteries With Power ON press PLAY REPEAT on the unit for 7 seconds to deactivate the SELF DEMO Mode Repeat this to display demo screen SELF DEMO Mode Date of Purchase Dealer Purchased From Dealer Addre...

Страница 5: ...in it s place IMPORTANT NOTES This cord can only be used in vehicles equipped with DC 12V or 24V negative ground batteries Check your car s owner s manual Use the only the Car Battery cord packed with your unit To avoid a loss voltage do not attach an extension to the Car Battery cord When unit is not in use disconnect the Car Battery cord from the cigarette lighter socket to save car battery Repl...

Страница 6: ...consumerproducts panasonic com Location of Controls Remote Control Buttons Model PV C921 PV C931W remote shown EJECT button When EJECT is pressed the tape is ejected from Cassette Compartment If EJECT is pressed during recording the unit will not respond to the command ...

Страница 7: ...D SEARCH Page 14 ACTION Page 13 STOP EJECT Page 14 ACTION Page 13 CHANNEL UP DOWN Page 16 TRACKING UP DOWN Page 41 SELECT UP DOWN Page 13 VOLUME UP DOWNPage 16 SET BACKSPACE Page 13 POWER Page 8 Audio Video In Jack Page 15 POWER Indicator Light when the unit is turned on Remote Control is functional only when this indicator is lit VIDEO IN VIDEO IN AUDIO IN AUDIO IN POWER POWER VOL VOL CH STOP STO...

Страница 8: ...language is set complete Reset all unit Memory Functions steps page 9 3 Press CH to select English OR Press CH to select Spanish Español OR Press VOL to select French Français CHANNEL CLOCK AUTO SET screen appears CHANNEL CLOCK AUTO SET CONNECT ANTENNA CABLE LOCAL PBS CH THEN AND IF YOU USE A CABLE BOX TUNE I T TO YOUR PLEASE PRESS CH UP KEY WARNING When using Nut type RF coaxial cables tighten wi...

Страница 9: ...P KEY If AUTO CLOCK SET IS INCOMPLETE screen appears set the clock using MANUAL CLOCK SET procedures as below PLEASE SET CLOCK BY PRESSING ACTION KEY AUTO CLOCK SET I S I NCOMPLETE Manual Clock Set If AUTO CLOCK SET was incomplete manually set the clock as follows SET SELECT END ACT I ON SET CLOCK DST ON SELECT MONTH 1 1 2 Press ACTION on the Remote to display SET CLOCK Menu screen Press to select...

Страница 10: ...VOL to select French Français CHANNEL CLOCK AUTO SET screen appears CHANNEL CLOCK AUTO SET CONNECT ANTENNA CABLE LOCAL PBS CH THEN AND IF YOU USE A CABLE BOX TUNE I T TO YOUR PLEASE PRESS CH UP KEY WARNING When using Nut type RF coaxial cables tighten with fingers only Overtightening may damage terminals Connect the OUT Jack on your cable box to the VHF UHF terminal on unit with an RF cable Turn o...

Страница 11: ...lock using MANUAL CLOCK SET procedures shown page 9 PLEASE SET CLOCK BY PRESSING ACTION KEY AUTO CLOCK SET I S I NCOMPLETE Note to CABLE System Installer This reminder is provided to call the CABLE Cable TV System Installers attention to Article 820 40 of the NEC that provides guidelines for proper grounding and in particular specifies that the cable ground shall be connected to the grounding syst...

Страница 12: ...eatedly For English MAIN MENU TV VCR HELLO LANGUAGE SET ACT I ON SELECT TV EX I T CLOCK CH For Spanish For French Language MAIN MENU TV VCR EX I T CLOCK CH LANGUAGE SET ACT I ON SELECT Channels Clock Press ACTION to display MAIN MENU 3 Press to select EXIT Press ACTION to exit 1 Press to select CH MAIN MENU CLOCK CH SET ACT I ON SELECT VCR TV EX I T LANGUAGE ANTENN ENNA CABLE AUTO SET CHANNEL CAPT...

Страница 13: ...ADJUST 1 SELECT SET END ACT I ON SET CLOCK CHANNEL 08 ADDED CHANNEL 08 DELETED Using keys CH UP CH DOWN VOLUME UP VOLUME DOWN Whenever the menu or program screen is displayed CHANNEL UP DOWN function as and VOLUME UP DOWN function as only On Remote On Unit VOL VOL CH CH Model PV C921 PV C931W remote is shown here ACTION key on the unit On Unit You can operate the menu screen using unit buttons To ...

Страница 14: ...e will cancel Recording in progress One Touch Recording OTR Press REC repeatedly to set the recording length 30 min 4 hours The unit stops recording at a preset time PROG TIMER indicator lights on the unit Normal Rec 0 30 1 00 1 30 2 00 3 00 4 00 1 The unit power comes on automatically Notes CH REC Press to stop and or eject tape PLAY Model PV C921 PV C931W remote is shown here To prevent tape jam...

Страница 15: ...dubbing Select LINE mode See Selecting Input Mode below Press REC then PAUSE SLOW immediately to put in Standby mode Press PAUSE SLOW to start dubbing Press STOP to stop dubbing Selecting Input Mode Method 1 Press CH The display will change as follows Method 2 a Press ACTION for MAIN MENU b Press to select TV then press ACTION for SET UP TV screen c Press to select INPUT SELECT and then press to s...

Страница 16: ... NITE Mode Color and picture intensity levels are adjusted so the screen is easier on your eyes during night time use Press NITE to set NIGHT mode NIGHT mode may be selected when watching TV playing a tape or while in FM mode Press NITE to cancel Previous settings are restored NIGHT mode is canceled when power is turned off or power failure occurs NIGHT Ready Check List All connections are made Yo...

Страница 17: ...ntrols Press and to select and set NORMAL All controls return to their factory settings 5Press ACTION three times to exit Picture Adjustment COLOR Control Adjust color intensity TINT Control Adjust for natural flesh tones BRIGHTNESS Control Adjust picture brightness PICTURE Control Adjust picture intensity by adjusting both contrast and color level in the proper balance SHARPNESS Control Adjust pi...

Страница 18: ...931W only Press to select ALARM ON or OFF Press PROG to set ON TIMER ON TIMER SET is displayed ON TIMER Indicator lights on the unit When ON is selected an alarm will gradually increase in volume for one minute or until canceled by pressing any button including VOL To Make Corrections use and to move back and correct To Cancel ON TIMER set Repeat steps 1 and 2 Then press ADD DLT to clear the time ...

Страница 19: ... 15 countdown will restart from 15 00 If current time remaining is 9 15 countdown will restart from 10 00 Press CH on the unit with CANCEL SET screen displayed to set alarm Time changes in the order shown left Alarm will sound at 0 00 Press any button to stop The volume of the alarm gradually increases for one minute and then continues to beep until any button is pressed Pressing Press TIMER FM PV...

Страница 20: ...TION CAPT I ON MODE CAP C1 CC ON MUTE CAP C1 SET SELECT END ACT I ON Closed Caption Mode Selections Caption Mode CAP C1 or C2 A narration of selected TV programs is displayed Check TV program listings for CC Closed Caption broadcasts Caption Mode TEXT C1 or C2 The lower half of the screen will be blocked out When the TV station broadcasts information such as program listings it will appear in this...

Страница 21: ...MAIN MENU 1 Press to select TV 2 Press ACTION to display SET UP TV screen 1 Press to select CAPTION 2 Press to display CAPTION screen Press MUTE to mute the sound and display closed captioning To cancel press MUTE again CAPTION CAPT I ON MODE OFF CC ON MUTE CAP C1 SET SELECT END ACT I ON Model PV C921 PV C931W screen shown Model PV C921 PV C931W remote is shown here 1 Press to select CAPTION MODE ...

Страница 22: ...rectly see FM Radio Setup MAIN MENU TV VCR EX I T CLOCK CH LANGUAGE SET ACT I ON SELECT Press ACTION to display MAIN MENU 1 Press to select TV 2 Press ACTION to display SET UP TV screen Press FM TV on the remote or press TIMER FM twice on the unit to display FM radio mode VIDEO IN VIDEO IN AUDIO IN AUDIO IN POWER POWER VOL VOL CH CH STOP STOP EJECT EJECT REW REW PLAY PLAY REPEAT REPEAT FF FF REC R...

Страница 23: ...smit sound when unit power is on and FM TRANSMITTER ON is selected When unit power is turned off FM TRANSMITTER returns to OFF setting The FM transmitter signal range varies depending on installation and operating requirements of your equipment Interference occurs when you select CATV channels 95 96 or 97 while FM Transmitter is operating FM Transmitter will not work in FM Radio Mode Please note t...

Страница 24: ... PROGRAM ON TIMER ON TIMER T I MER PR T I MER PROGRAMMING OGRAMMING PROG TIMER Indicator VIDEO IN AUDIO IN AUDIO IN POWER POWER VOL VOL CH CH STOP STOP EJECT REW REW PLAY PLAY REPEAT FF REC TIMER TIMER FM FM ACTION ACTION REC REC ON TIMER ON TIMER PROG TIMER PROG TIMER POWER POWER Press PROG to display SET PROGRAM screen If a program is already in memory press and to select an unused program numbe...

Страница 25: ...s to cancel the Timer Recording Any future daily or weekly recordings will be performed as programmed Press ADD DLT Review Replace or Clear Program Contents Recording is not in progress Model PV C921 PV C931W remote is shown here 2 minutes before Timer recording is performed PLEASE PREPARE FOR TIMER REC appears and or the PROG TIMER Indicator flashes Be sure a cassette with record tab is loaded an...

Страница 26: ...P INDEX SEARCH INDEX SEARCH FORWARD SEARCH FF REVERSE SEARCH REW INDEX SEARCH Search System is Each time a recording is made an invisible index mark is placed on the tape When timer recordings are made program index and information are also included Only AC POWER These index marks can be used to access or scan recordings Tape Operation Model PV C921 PV C931W remote is shown here Press SEARCH in Pl...

Страница 27: ...eds few seconds in BLANK area PLAYBACK DIRECTION Program 1 Program 2 or BLANK INDEX Program 2 BLANK INDEX BLANK Program 1 Program 2 BLANK Program 1 INDEX Press SEARCH button Press SEARCH button FF FF Press SEARCH button FF End Point 2 End Point Press SEARCH button End Point Notes 21 PV C931W wn here Press SEARCH twice in Playback or Stop mode to display PROGRAM END SEARCH screen Press FF to start ...

Страница 28: ...uto Operation Functions Tape Position Display Press TAPE POSITION to detect current tape position 1 Note This function cannot display exact amount of tape remaining for tapes 30 minutes or less or for tapes over 120 minutes in length DETECTING TAPE POSITION BEGIN END SLP R 120 MIN 2 Model PV C921 PV C931W remote is shown here To find out present tape position and amount of tape remaining Tape posi...

Страница 29: ... and stops at the last point the Counter was set to 0 00 00 Press DISPLAY during playback to display the Counter Press CM ZERO repeatedly to select skip time in Play mode Commercial Skip 1 Playback repeats when tape end is reached or unrecorded portion over 30 seconds is detected During playback you may also press PLAY REPEAT repeatedly on the unit to select REPEAT ON or OFF Repeat Play Notes Pres...

Страница 30: ...ect channel number 4 Press to set preset captions Repeat step 5 until the Caption List is complete 42 35 PRESET CAPT I ON CLEAR ADD DLT KEY SELECT SET END ACT I ON TNT UPN WB DSC CBC CTV TSN GLOB 62 21 52 123 To Make Corrections Press then to select channel number Press to change or ADD DLT to delete Channel Caption is Station names e g ABC TNN etc are set so they will appear when a channel is sel...

Страница 31: ...s with up to four characters each 4 1Do Preset Caption steps 1 3 page 30 Press repeatedly to move the cursor to CH NUMBER Repeat steps 3 and 4 as desired To Make Corrections Press then to select channel number Press to change or ADD DLT to delete A B C Z BLANK 9 2 1 0 PRESET CAPT I ON MANUAL CAPT PT I ON CHANNEL CAPT I ON SELECT SET END ACT I ON 5Press ACTION four times to end setup Model PV C921 ...

Страница 32: ...rations are prohibited except Timer recording and tape eject Useful for families with small children VCR LOCK ACT IVATED VCR LOCK OFF 4 Press ACTION to display MAIN MENU 1 Press to select CH 2 Press ACTION to display SET UP CHANNEL screen Press ACTION twice to return to the normal screen Notes VCR Lock is canceled automatically after about 24 hours if clock is set This feature cannot be activated ...

Страница 33: ...G TI ME STAMP ON SELECT SET END ACT I ON SET UP VCR 4Press ACTION twice to return to normal screen MAIN MENU TV VCR EX I T CLOCK CH LANGUAGE SET ACT I ON SELECT Press ACTION to display MAIN MENU 1 Press to select VCR 2 Press ACTION to display SET UP VCR screen Model PV C921 PV C931W remote is shown here This unit writes program data see example below for about the first 10 seconds of every recordi...

Страница 34: ...ke Corrections Press repeatedly to move the cursor Press number keys to make the correction DO NOT forget your secret code Once ratings are set restricted tapes or programs cannot be accessed unless the secret code is entered Changing your secret code You will need your current code Do steps 1 4 In step 5 press ADD DLT to clear current code Repeat steps 4 and 5 to enter new code Notes Process of V...

Страница 35: ...7 X GENERAL AUDIENCE All ages admitted PARENTAL GUIDANCE Some material may not be suitable for children PARENTS CAUTIONED Some material may be inappropriate for children under 13 RESTRICTED Children under 17 must be accompanied by a parent or adult OVER AGE 17 ONLY No one 17 and under admitted ADULTS ONLY US MOVIES RATINGS Process of V Chip Control Feature Blocking Enter Code Setup Model PV C921 P...

Страница 36: ... 34 TV Y TV Y7 TV G TV PG TV 14 TV MA FOR ALL CHILDREN Content specifically geared to young viewers ages 2 6 FOR AGE 7 AND OLDER May contain mild physical or comedic violence which may frighten children under 7 GENERAL AUDIENCE Contains little or no violence strong language or sexual dialogue or situations PARENTAL GUIDANCE May contain infrequent coarse language limited violence some suggestive se...

Страница 37: ...ip Control is reactivated when power is turned off or power failure occurs Deactivate V Chip Control Enter your secret code steps 1 4 page 34 Then set US MOVIES and or US TV PROGRAMS to OFF using and keys Ratings set on pages 35 36 are retained and will be in effect when V Chip Control is activated again ABC RATING PG 13 ACCESS CODE PROGRAM RATING EXCEEDED ENTER 0 9 If DISPLAY is pressed even when...

Страница 38: ... function button is pressed PLAY FF etc or you change channels the unit mode or channel number will be displayed Some station names may also appear if Channel Caption is set See pages 30 31 Channel Caption See pages 30 31 Time Stamp Data See page 33 08 ABC Channel Function Display PLAY To prevent damage to your tapes this unit is equipped with a dew detection system When moisture condensation is d...

Страница 39: ...ANING CASSETTE OR REFER TO MANUAL END PLAY KEY VCR LOCK ACTIVATED Caution If no active channels are found for CHANNEL MEMORY Page 5 8 11 8 13 4 14 25 14 38 41 32 If you attempt to set or review a Timer Recording or set the On Timer and the Clock is not set If you press REC and a cassette is inserted with no record tab If you press STOP during a Timer Recording If you press PLAY FF REW or REC witho...

Страница 40: ...ER on the unit is pressed OFF Timer Recording will be performed If POWER on the unit is pressed OFF during rewind the power will shut off but the rewind will continue Memory Rewind If POWER on the remote control is pressed OFF during rewind the rewind is terminated and the unit shuts off If it is pressed while recording the recording isterminated and the unit shuts off When STOP is pressed the cyl...

Страница 41: ... 9 1 Kg 20 1 lbs Dimensions 302 W X 327 H X 335 D mm 11 7 8 W X 12 7 8 H X 13 3 16 D Note Designs and specifications are subject to change without notice Unit Information Build inHeadCleaner ForModelPV C911only A clean video head helps produce a clear picture So we have equipped your unit with a built in non chemical head cleaning system that helps prevent clogging of the video heads Cleaning is p...

Страница 42: ...ion Make sure your antenna system TV or CABLE is correctly set P 8 11 Make sure cassette record tab is intact P 4 Check that clock is set to current time and date Make sure DSS CABLE box if used is left on and tuned to channel to be recorded Set recording Start Stop times correctly P 24 25 Timer recording may not be performed or continued if a power interruption of more than 1 minute occurs before...

Страница 43: ...100 Atlanta GA 30350 ILLINOIS 1709 North Randall Road Elgin IL 60123 MASSACHUSETTS 60 Glacier Drive Suite G Westwood MA 02090 CALIFORNIA 6550 Katella Avenue Cypress CA 90630 800 Dubuque Avenue S San Francisco CA 94080 3878 Ruffin Road Suite A San Diego CA 92123 FLORIDA 3700 North 29th Avenue Suite 102 Hollywood FL 33020 MINNESOTA 7850 12th Avenue South Airport Business Center Bloomington MN 55425 ...

Страница 44: ...in service in Puerto Rico can be obtained during the warranty period by calling the Panasonic Sales Company telephone number listed in the Servicenter Directory This warranty is extended only to the original purchaser A purchase receipt or other proof of the date of the original purchase is requires before warranty service is rendered This warranty only covers failures due to defects in materials ...

Страница 45: ...e para batería NOTAS IMPORTANTES Este cable sólo se puede usar en vehículos con batería de 12V o 24V toma a tierra negativo Verifique en su manual de instrucciones de su vehículo Use solamente el cable para batería de coche incorporado con su combinación de VCR TV Para evitar la disminución del voltage no extienda el cable para batería de coche desde usando otro cable de extensión Cuando no está u...

Страница 46: ...one ACTION para exhiba el menú Ajuste Manual del Reloj Si ajusta el idioma incorrecto realice los pasos de la página 9 Reajuste de todas las Funciones de Memoria de la unidad Active la caja de cables y ajústela al canal PBS en su huso horario Si usted utiliza receptor DSS este debe estar apagado 4 6 7 2000 MIE 12 00PM HORA VERANIEGA ACT F I JACION AUTOMATICA COMPLETO CANAL FI JADO CA 10 TERMINAR O...

Страница 47: ...bador combinado se enciende automáticamente Seleccione el canal Presione CH o las teclas numéricas correspondiente Seleccione la velocidad de grabación Presione SPEED SP reproducción normal LP reproducción larga SLP reproducción super larga La velocidad seleccionada debe aparecer en la pantalla Grabación normal 0 30 1 00 1 30 2 00 3 00 4 00 Grabación con temporizador 1Exhiba FIJAR PROGRAMACION Pre...

Страница 48: ...Index Search 26 Indoor Antenna Connections 5 Initial Setup for ANT Cable Connection 8 Initial Setup for DSS Cable box Connection 10 Input Mode 15 INSTANT ALARM 19 L Language 8 13 Limited Warranty 44 Location of Controls 6 7 N NIGHT Mode 16 O 100 Key 16 One Touch Recording 14 ON TIMER with Alarm 18 OperationDifferencesUsingACorDCPower 40 P Phones 16 Playback 14 Picture Adjustment 17 Program End Sea...

Отзывы: