


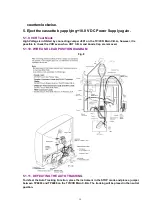


1. Installation of VCR Unit
CAUTION:
Opener Lever may be damaged when VCR Unit is installed, with
Cassette Door-Lid and Opener Lever of Cassette Up Ass'y set
incorrectly.
A. When installing the VCR Unit, swing the Cassette Door-Lid all
the way open until the Cassette Door tab clears the Opener
Lever.
B. Make sure that all guide tabs are aligned properly.
Then, press the VCR Unit straight in.
Fig. D6
2. Removal of CRT Unit
Place the Unit face down on a soft cloth before removing the CRT
Unit.
3. Installation of VCR Chassis Unit
When installing 2 Screws (S-6), slide the Holder Unit of the
Cassette Up Ass'y (Refer to "
METHOD FOR LOADING/
UNLOADING OF MECHANISM
" in SERVICE NOTES) totighten
screws. Then, slide it back to the EJECT Position.
Make sure that Mechanism and Cassette Up Ass'y are in the EJECT
Position. (Refer to "
EJECT Position Confirmation
" in
DISASSEMBLY/ASSEMBLYPROCEDURES.)
4. Removal of TV/VCR Main C.B.A.
26
Содержание Omnivision PV-C2540-K
Страница 8: ...Fig 1 3 Fig 1 4 8 ...
Страница 25: ...Fig D5 6 1 2 1 Notes in chart 25 ...
Страница 28: ...6 2 2 Inner Parts Location Fig J1 1 28 ...
Страница 29: ...6 2 3 EJECT Position Confirmation Fig J1 2 29 ...
Страница 30: ...6 2 4 Grounding Plate Unit Full Erase Head and Cylinder Unit Fig J2 1 30 ...
Страница 32: ...6 2 5 Capstan Belt Support Angle Intermediate Gear B and Main Cam Gear Fig J3 1 6 2 5 1 Reassembly Notes 32 ...
Страница 43: ...6 3 CASSETTE UP ASS Y SECTION 6 3 1 Top Plate Wiper Arm Unit and Holder Unit Fig K1 1 43 ...
Страница 74: ...74 ...
Страница 78: ...11 2 MECHANISM BOTTOM SECTION 78 ...
Страница 79: ...11 3 CASSETTE UP COMPARTMENT SECTION 79 ...
Страница 80: ...11 4 CHASSIS FRAME SECTION 1 80 ...
Страница 81: ...11 5 CHASSIS FRAME SECTION 2 81 ...
Страница 82: ...11 6 PACKING PARTS AND ACCESSORIES SECTION 82 ...