background image

Using the Menus

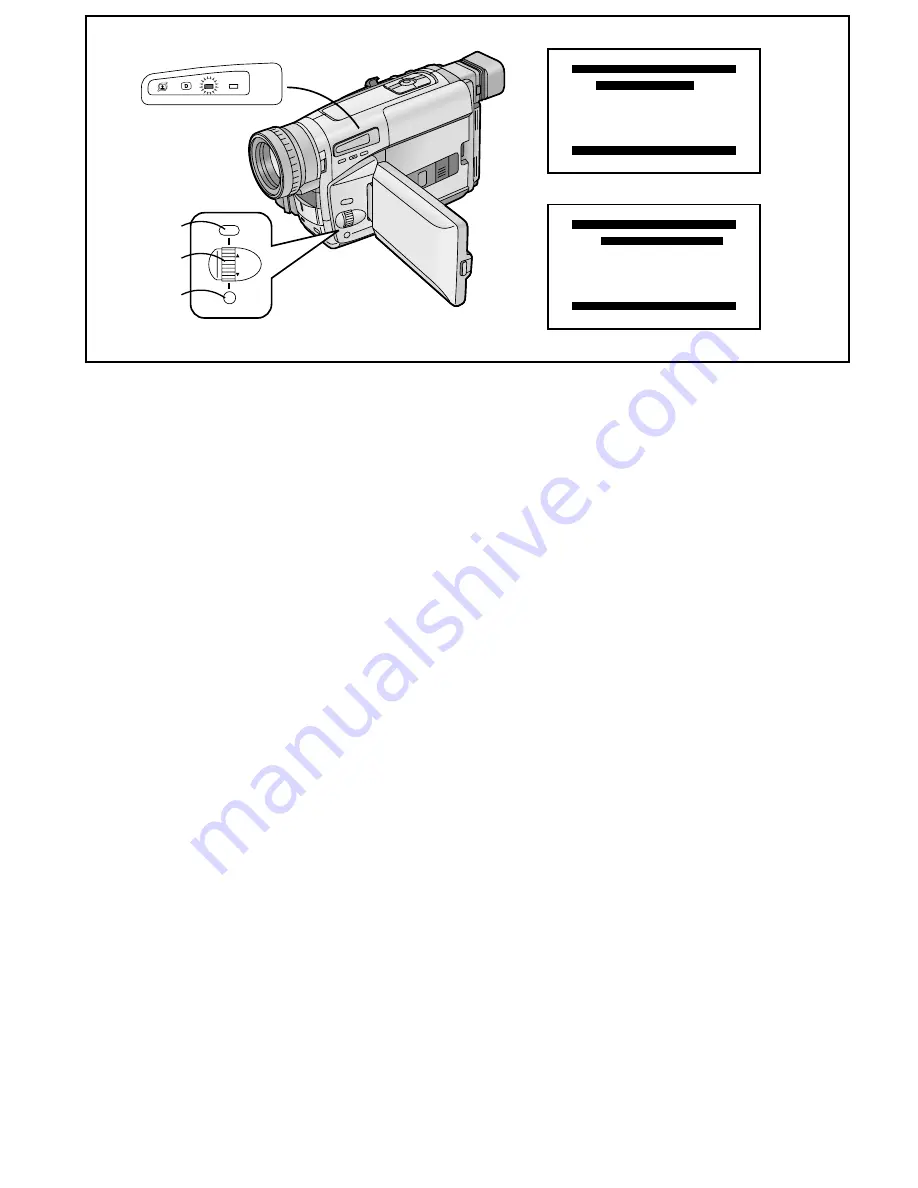
This Movie Camera displays the settings of various functions
in menus to make it easy to select the desired functions and
settings.

1

Press the [MENU] Button.

When you press this button while the [CAMERA] Lamp is
lit in red, the Camera Mode Menu 

1

 appears. When you

press this button while the [VCR] Lamp is lit in green, the
VCR Mode Menu 

2

 appears.

2

Turn the [

34

34

34

34

34

] Dial to select the desired

sub-menu.

Turning the [

34

] Dial changes the highlighted item.

3

Press the [SET] Button to display the selected
sub-menu.

4

Turn the [

34

34

34

34

34

] Dial to select the item to be set.

5

Press the [SET] Button to set the selected item
to the desired mode.

Exiting the Menu

Press the [MENU] Button again.

The method for making settings on the [DATE/TIME SETUP]
Sub-Menu (

l

 28) and [LCD/EVF SETUP] Sub-Menu (

l

 21)

differs slightly from that of other Sub-Menus.

You can display the menu during playback, but not during
recording. Also, it is possible to start playback while the
menu is displayed, but if you start recording, the displayed
menu disappears.

The settings that you have selected on the menus are
maintained when you turn the Movie Camera off. However, if
you disconnect the power supply unit (Battery or AC
Adaptor) from the Movie Camera before turning it off, the
selected settings may not be maintained.

1

2

MENU

FOCUS / SET

MF/
TRACKING

3,5

2,4

1

CAMERA FUNCTIONS

PRESS MENU TO EXIT

1.

CAMERA SETUP

2.DIGITAL EFFECT
3.TITLE SETUP
4.DATE/TIME SETUP
5.OTHER FUNCTIONS
6.LCD/EVF SETUP

VCR FUNCTIONS

PRESS MENU TO EXIT

1.

OTHER FUNCTIONS

2.LCD/EVF SETUP

INFO-

WINDOW

CAMERA

V C R

Содержание NV-VZ1PNA

Страница 1: ...Model No NV VZ1PN PNA NV RZ3PN PNA NV VZ1PN PNA NV RZ3PN PNA VQT8947 Before use please read these instructions completely VHS C Movie Camera Operating Instructions...

Страница 2: ...red Beam Emitters m 51 8 Microphone 9 Tally Lamp m 31 10 Fade Button FADE m 42 11 Focus Button FOCUS m 56 Item Set Button SET m 16 Tracking Button m 39 12 Multi Function Dial 34 34 34 34 34 MF TRACKI...

Страница 3: ...on 1 1 1 1 1 m 35 Backlight Button BLC m 59 23 LCD Monitor Open Lever LOPEN m 15 NV VZ1 only 24 LCD Monitor m 15 21 41 NV VZ1 only Due to limitations in LCD production technology there may be some tin...

Страница 4: ...N l 10 33 Battery Eject Lever BATTERY EJECT l 13 34 Recording Start Stop Buttons l 29 30 Use either of these buttons depending on the recording angle 35 Off On Mode Selector Switch CAMERA OFF VCR l 13...

Страница 5: ...ging Lit The Battery can already be used to operate the Movie Camera but it is not yet fully charged Approx 30 minute battery charge Off The Battery is fully charged Removing the Battery Slide it in t...

Страница 6: ...nuous Recording Time means the duration of continuous recording performed at an ambient temperature of 25xC and 60 relative humidity In actual recording however the use of the zoom and other functions...

Страница 7: ...MENU Button again The method for making settings on the DATE TIME SETUP Sub Menu l 28 and LCD EVF SETUP Sub Menu l 21 differs slightly from that of other Sub Menus You can display the menu during play...

Страница 8: ...battery The life of the battery is about 3 year To make it easier to remove the button type battery use a pointed object When you remove the button type battery be careful not to drop it Keep the but...

Страница 9: ...on to select HOUR 7 Turn the 34 34 34 34 34 Dial to set to 2PM 8 Press the SET Button to select MIN 9 Turn the 34 34 34 34 34 Dial to set to 30 10 Press the MENU Button to finish the date and time set...

Страница 10: ...g the Date Time Title Indication 5 During recording or when the Movie Camera is in the Recording Pause Mode press the DATE TITLE Button to make the Date Time Title Indication disappear After turning t...

Страница 11: ...icture Distortions ManualTracking Adjustment This Movie Camera adjusts the tracking automatically With certain cassettes however the tracking adjustment may not be precise In this case adjust the trac...

Страница 12: ...nction will be in black and white If you change the setting of the 0 LUX OFF ON Switch during recording a switching noise is also recorded When recording with the 0 Lux Night View Function it is not p...

Страница 13: ...flashing and remains lit When the Sepia Black White Yellow Red Blue Green Mode or 0 Lux Night View Function is used it is not possible to manually adjust the white balance or to cancel the manually ad...

Страница 14: ...rovide precise white balance adjustment and therefore natural colors in the recorded pictures when using the Full Auto Mode For light sources outside this range adjust the white balance manually l 54...

Страница 15: ...57 TSurf Snow Mode l 57 UManual Focus Mode l 56 VTracking Adjustment Mode l 39 WFade Effect Mode l 43 XColor Indication for Fade l 42 43 YSuper Image Stabilizer Mode l 47 ZDigital Zoom Mode l 48 Stre...

Страница 16: ...the Demonstration Mode by setting DEMO MODE on the OTHER FUNCTIONS Sub Menu of the CAMERA FUNCTIONS Main Menu to ON and then exiting the menu Pressing a button or displaying a menu temporarily suspend...

Страница 17: ...ion Lens 8 Tripod 9 Cassette Adaptor 10 IR Video DC Light Halogen Infra red It requires the Shoe Adaptor for attaching to the Movie Camera 11 Shoe Adaptor for attaching the IR Video DC Light Some acce...

Отзывы: