Panasonic NV-HV61GL Скачать руководство пользователя страница 2

2

Warning and Important Information

Important

Your attention is drawn to the fact that the recording of 
pre-recorded tapes or discs or other published or broadcast 
material may infringe copyright laws.

For your safety

Do not remove outer cover.
Touching internal parts of the VCR is dangerous, and may 
seriously damage it. 
To prevent electric shock, do not remove cover. There are no 
user serviceable parts inside. Refer all servicing to qualified 
service personnel.

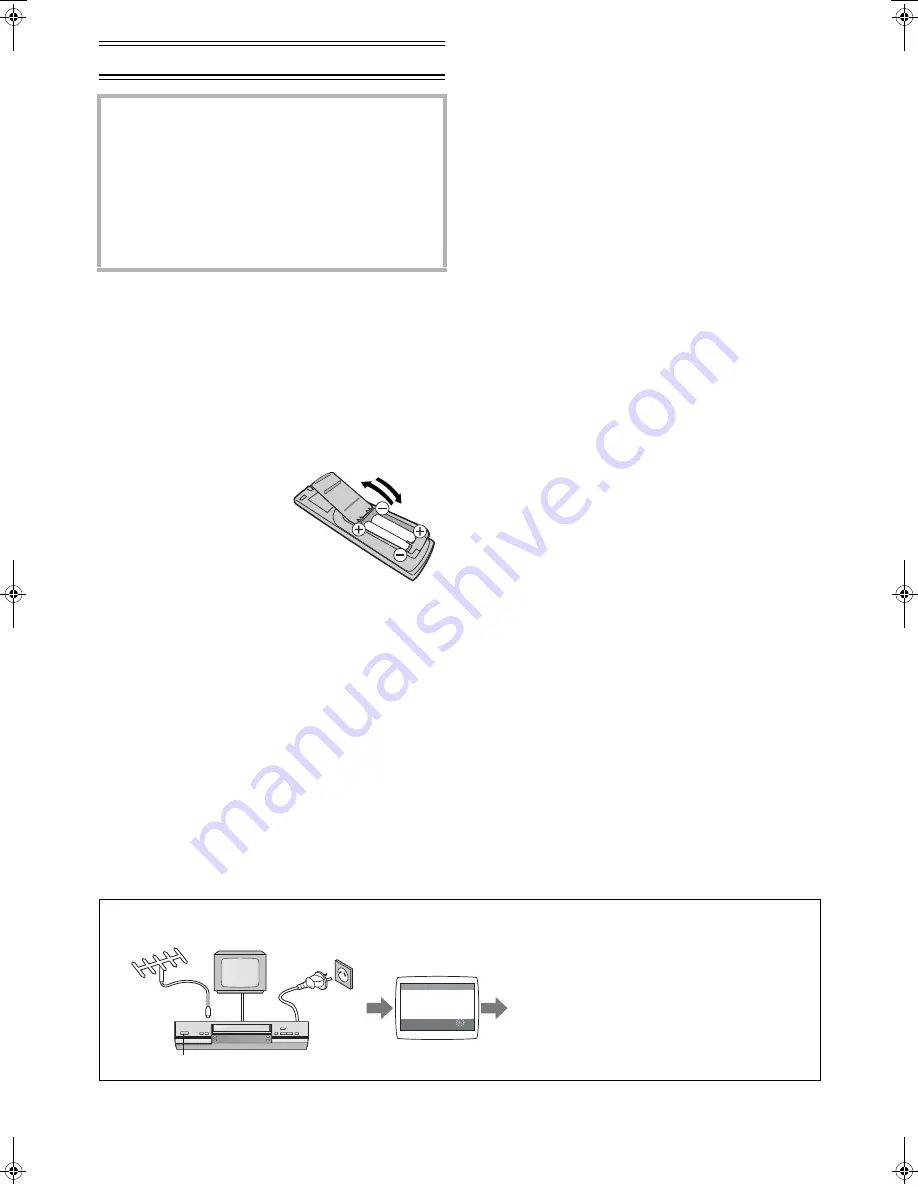
Inserting Remote Control 
Batteries

Insert the batteries with the 
polarity (

+

and

-

) correctly 

aligned.

Notes:

The service life of the batteries is approximately 1 year. 
However, it varies considerably depending on the frequency 
of use.
• When they are exhausted, replace them with two AA, UM3, 

or R6 size batteries.

• When the batteries are exhausted, remove them 

immediately and dispose them correctly.

• Do not mix old battery with new battery.
• Do not mix different battery types, i.e. Alkaline and 

Manganese.

• Do not use rechargeable (Ni-Cd) batteries.
• Do not heat or short-circuit the batteries.
• When you do not use the remote control for a long time, take 

out the batteries and store them in a cool, dry place.

Cautions before you operate this VCR

Avoid:
• Humidity and dust.
• Extreme heat such as direct sunlight.
• Magnets or electromagnetic objects.
• Touching internal parts of the VCR.
• Water or some other liquid.
• Lightning. (Disconnect the aerial plug from the VCR during 

lightning storms.)

• Anything heavy on the VCR.
• Connecting or handling the equipment with wet hands.
• Using a cell phone near the VCR because doing so may 

cause noise to adversely affect the picture and sound.

Do:
• Wipe the VCR with a clean and dry cloth.
• Install the VCR in a horizontal position.
• Keep the VCR, TV and other equipment switched off until 

you have finished all connections.

Condensation may form in the following cases:

• The VCR is brought from cold surroundings into a 

well-heated room.

• The VCR is suddenly brought from cool surroundings, such 

as an air-conditioned room or car, to a place which is hot 
and humid.

Note:

• In any of the above-mentioned conditions, do not operate 

the VCR for at least 1 hour. This VCR is not equipped with a 
dew sensor.

Press [VCR-ON/OFF] 

(1)

 to switch the VCR from ON to 

standby mode or vice versa. In the standby mode, the VCR is 
still connected to the mains.

NV-HV61GL: Australian model
NV-HV61GN: New Zealand model

As this equipment gets hot during use, operate it in a 
well ventilated place;
Do not install this equipment in a confined space 
such as a book case or similar unit.

WARNING:
To reduce the risk of fire, electric shock or product 
damage, do not expose this equipment to rain, 
moisture, dripping or splashing and ensure that no 
objects filled with liquids, such as vases, shall be 
placed on the equipment.

Plug in Auto Tuning (NV-HV61GN only)

(Setting image illustration)

(1) Connect the aerial cable.
(2) Connect the mains lead.
(3) Press [VCR-ON/OFF] 

(1)

.

(4) Plug in Auto Tuning is completed.

¢

On Screen Display

All broadcasting stations that can be received in the 
area are automatically tuned and stored in memory.

• Do not turn off the VCR halfway. (See page 5.)

CH 22

SEARCH    

                                     END: MENU

  21

AUTO TUNING
IN PROGRESS,
PLEASE WAIT.

(1)

(2)

(4)

(3)

¢

NV-HV61GL_GN.book  2 ページ  2004年2月19日 木曜日 午後1時26分

Содержание NV-HV61GL

Страница 1: ...VCR 7 Settings Using the On Screen Display 7 Option Setting 8 Playback 9 Recording 10 Timer Recording 13 Search Functions 15 Before Requesting Service 17 Specifications 19 Video Cassette Recorder RQTV0007 Operating Instructions Before attempting to connect operate or adjust this product please read these instructions completely Contents Page Model No NV HV61 Series ...

Страница 2: ...he equipment with wet hands Using a cell phone near the VCR because doing so may cause noise to adversely affect the picture and sound Do Wipe the VCR with a clean and dry cloth Install the VCR in a horizontal position Keep the VCR TV and other equipment switched off until you have finished all connections Condensation may form in the following cases The VCR is brought from cold surroundings into ...

Страница 3: ...PEAT 31 RESET To reset the tape counter elapsed time to 0 00 00 The tape counter is automatically reset to 0 00 00 when a video cassette is inserted 32 STATUS NAVI CHECK 33 REC MODE 34 Cassette compartment 35 EJECT 36 VIDEO IN socket AV 2 37 AUDIO IN sockets AV 2 38 REC OTR 39 Infra red Remote Control Receiver window 40 VCR display 41 TIMER CHECK 42 AC Input socket 43 VIDEO IN socket AV 1 44 VIDEO...

Страница 4: ...ntrol Connections This section shows you how to connect the VCR to an aerial TV etc When the VCR is turned on after unpacking and connecting the aerial cable and the mains lead Plug in Auto Tuning starts automatically NV HV61GN only Basic Connections The following connections are required to record and play back the video cassette through the TV Connection to a TV using the Audio Video Input Socke...

Страница 5: ...to Tuning Storing TV Broadcasts in Your VCR The VCR is fitted with its own tuner just like a normal TV and can be preset to receive up to 99 TV broadcast stations Pre programmed TV Channels NV HV61GL Australia The local TV broadcast channels 2 7 9 10 and 28 are factory preset in this VCR That is if you can receive television broadcasts on VHF channels 2 7 9 10 and UHF channel 28 these are already ...

Страница 6: ...Tuning If the desired TV station has not been tuned press 2 1 28 again Press MENU 9 and repeat steps 3 5 for each programme position you want to tune to a station 6 Press MENU 9 three times to exit the On Screen Display Direct Tuning Follow steps 1 to 4 of Manual Tuning Procedure 5 Press 43 28 to select SEARCH 6 Press Numeric 3 to enter the number of the desired programme position For the 5A and 9...

Страница 7: ...white set to B W 4 Press MENU 9 twice to exit the On Screen Display To Make Various Indicators Appear On Screen Display At a press of STATUS NAVI CHECK 32 the following indications appear on the TV screen Set OSD to AUTO See page 9 The display is released automatically after 5 seconds 1 Audio Output Mode Indicators At each press of AUDIO 21 the selected sound mode is indicated with Left L and Righ...

Страница 8: ... TV system used to record NTSC signals Press 2 1 28 to select AUTO Allows NTSC 4 43 or 3 58 signals to be distinguished automatically If the tape has not recorded correctly select 4 43 or 3 58 4 43 When recording NTSC 4 43 signals 3 58 When recording NTSC 3 58 signals Some programmes on NTSC 3 58 system cannot be recorded correctly by selecting 3 58 NTSC PB SELECT To select the colour TV system of...

Страница 9: ...leased For High speed Cue or Review Playback JET SEARCH During playback tap Fast Forward 27 or Rewind 10 twice For Still Playback During playback press PAUSE SLOW 29 To return to normal playback press PLAY 8 or PAUSE SLOW 29 For Slow Playback During playback keep PAUSE SLOW 29 pressed for 2 seconds or more To return to normal playback press PLAY 8 Fast forwarding or Rewinding the Tape Press Fast F...

Страница 10: ...n be played back by pressing PLAY 8 Auto Rewind When the tape reaches the end the VCR automatically rewinds it to the beginning This function does not work during timer recording OTR recording and fast forwarding Automatic Switching Off and Ejection When the VCR is switched off the inserted cassette can be ejected simply by pressing EJECT 35 The VCR will eject the cassette and automatically turn i...

Страница 11: ...ar sound ordinary normal sound on the FM audio tracks when a NICAM programme is received set MONAURAL to ON See page 9 To hear stereo performance connect as shown on page 4 to a TV or Stereo Amplifier with left and right audio inputs Important Note for the NICAM System When NV HV61GN is switched on the tuner will automatically switch to a NICAM broadcast if NICAM is being transmitted At this time ...

Страница 12: ...ote If you leave the VCR in the recording pause mode for more than 5 minutes in step 3 or 6 the VCR automatically switches over to stop mode to protect the video heads To Delete all of a Cassette s Contents Tape Refresh Function You can delete a cassette contents the picture the sound and the Jet Navigator data all at once Operations 1 Be sure to set JET NAVIGATOR to ON when you want to delete all...

Страница 13: ...IGATOR is set to OFF see page 8 the PROGRAMME IS COMPLETE message appears These messages will not appear if timer recording is started immediately after TIMER REC 14 is pressed To Suspend the Timer Recording Standby Mode When you want to use the VCR for playback normal recording or some other operation before the programmed timer recording perform you can temporarily suspend the timer recording st...

Страница 14: ... for Intelligent Timer on the TV screen The list of the timer programmes which are recorded before appears 2 Press 43 28 to select the timer programme which you want to record on the next week 3 Press ENTER 26 The Timer Programme List screen appears 4 Press TIMER REC 14 to switch the VCR over to the timer recording standby mode Notes Up to 16 I Timer Programmes can be memorized When I Timer Progra...

Страница 15: ...will allow signal checking to be performed more reliably When a signal is still not found CAN NOT FIND JET NAVIGATOR DATA is displayed on the TV and you cannot find the beginning of the programme PROGRAMME IS COMPLETE REMAINING PROGRAMME 0 DELETE JET NAVIGATOR DATA appears when you try to store more than 50 programmes The new item is added and the oldest item is deleted When programmes equivalent ...

Страница 16: ...e current tape position in which the desired programme is located on the tape to start the index search For example if you want to search for the 2nd recorded programme in forward direction press INDEX 13 L twice The VCR fast forwards or rewinds the tape and searches for the specified index signal the beginning of the desired recorded programme When it is found playback starts automatically To Can...

Страница 17: ...using an E300 type video cassette that was recorded in the LP or EP mode We recommend that you use video cassettes other than type E300 Recording will not operate correctly The symptom description is indicated in brackets The indication flashes whenever recording is attempted The erasure prevention tab on the video cassette has been broken off Use a tape with an intact erasure prevention tab or co...

Страница 18: ... If the Still Picture shaking V Lock Adjustment If the still picture shakes perform the following operation During still playback keep TRACKING V LOCK 20 _ or pressed until the picture stops shaking Precautions With certain TV models and tapes it may not be possible to adjust the tracking If you play back a cassette that was recorded on another VCR the picture quality may be inferior and it may be...

Страница 19: ...muth recording Colour signal converted subcarrier phase shift recording Input Level VIDEO IN PHONO 1 0 Vp p 75 ohm terminated Output Level VIDEO OUT PHONO 1 0 Vp p 75 ohm terminated RF Modulate UHF Channel AU28 69 NV HV61GL 75 ohm NZ21 69 NV HV61GN 75 ohm AUDIO Input Level AUDIO IN PHONO j6 dBV more than 47 kohm Output Level AUDIO OUT PHONO j6 dBV less than 1 kohm Audio Track 1 track Normal mono o...

Страница 20: ...Matsushita Electric Industrial Co Ltd Web Site http www panasonic co jp global ...

Отзывы: