background image


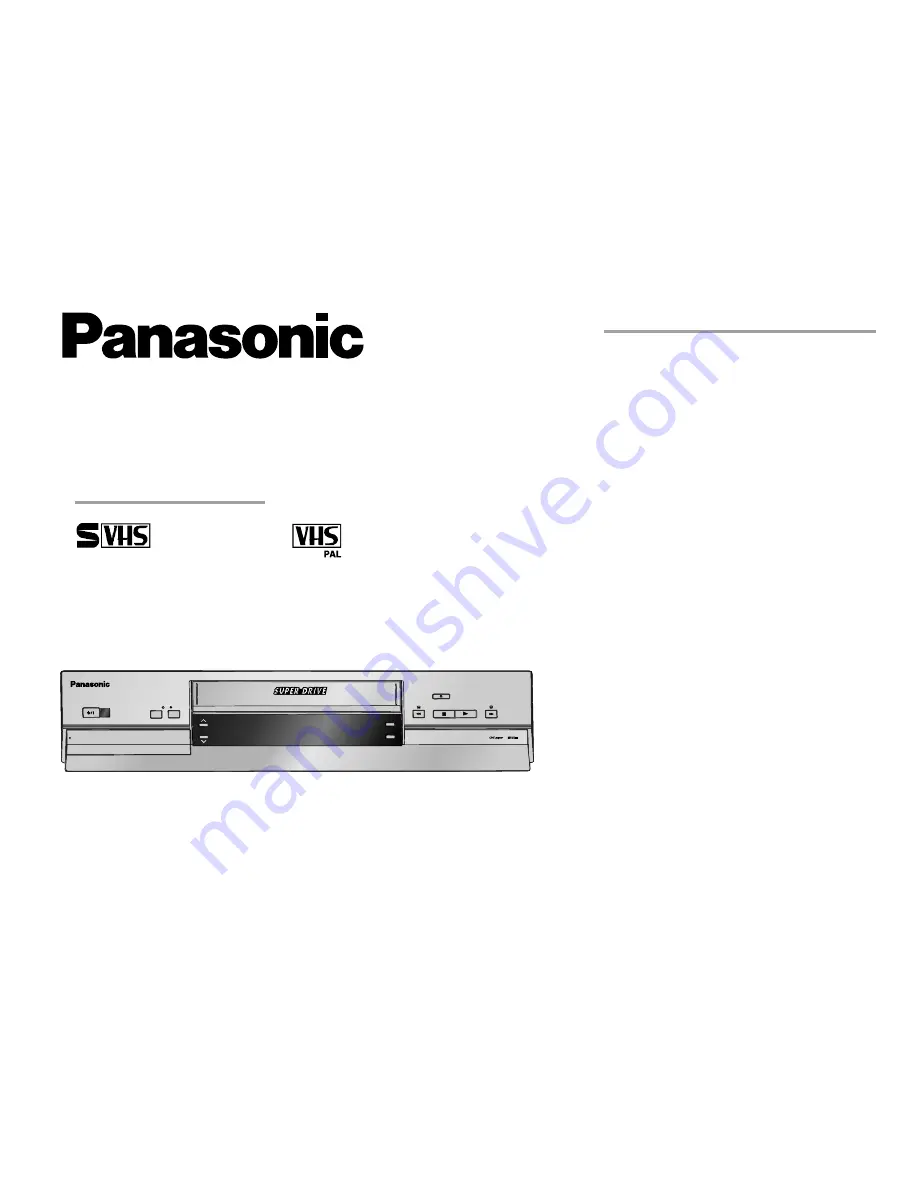
NV-HV61 

Series (Hi-Fi)

NV-HV51 

Series (Hi-Fi)

NV-MV21 

Series (Mono)

NV-MV16

 Series (Mono) 

NV-SV121

 Series (S-VHS, Hi-Fi)

PAL

VHS

625

Operating Instructions

.

SUPER LP   35x JET SEARCH

PULL OPEN

EJECT

TIMER REC

REC

CH

3D DNR

TBC

Super VHS

ET

Video Cassette Recorder 

Contents    

Page

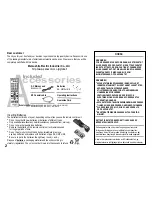
Included Accessories

2

Inserting Batteries

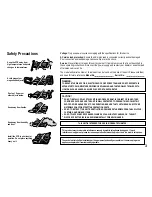
Safety Precautions 

3

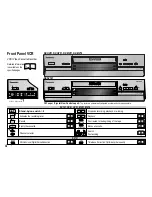
Front Panel VCR 

4

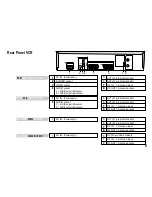
Rear Panel VCR

5

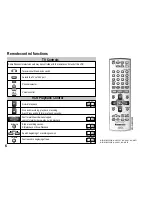
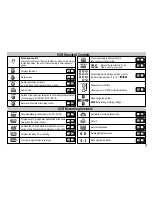
Remote control functions

6- 7

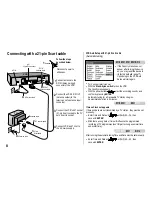
Connecting with a 21-pin Scart cable

8

VCR Auto Setup with 21-pin Scart cable

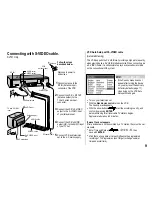
Connecting with S-VIDEO cable

9

VCR Auto Setup with S-VIDEO cable

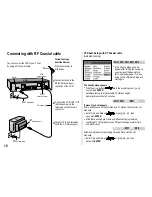
Connecting with RF Coaxial cable

10

VCR Auto Setup with RF Coaxial cable

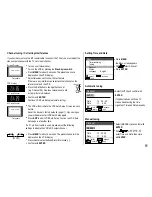
Channel tuning / Correcting interferences

11

Setting Time and Date

External Devices


Connecting a Set Top Box, satellite receiver, 

12

decoder or a second recorder
Connecting an amplifier, 

13

Menu

 14

Manual Setup

Creating a new station table

 15

Changing the name and order of TV stations

 16

Creating a new station table

17

Shipping condition/factory defaults

Menu Others

18-19

Recording

20

Timer recording 

21-22

Recording with INTELLIGENT TIMER 

23

Recording with ShowView

24

Recording with external recording controls

25

Playback

26

General convenient functions

27-28

NICAM sound system, NTSC playback

29

Before requesting service

30

Specifications

31

Index

last page

Connecting to the AV3 input

Before connecting the device, operating it or adjusting settings please read these operating 
instructions completely; especially the safety precautions on pages 2-3.

Содержание NV-HV51 Series

Страница 1: ...rrecting interferences 11 Setting Time and Date External Devices Connecting a Set Top Box satellite receiver 12 decoder or a second recorder Connectinganamplifier 13 Menu 14 Manual Setup Creating a new station table 15 Changing the name and order of TV stations 16 Creating a new station table 17 Shipping condition factory defaults Menu Others 18 19 Recording 20 Timer recording 21 22 Recording with...

Страница 2: ...ing manufacturers of entertainment electronics devices We are sure that you will be completely satisfied with this device AC Mains Lead RJA0043 1C RF Coaxial cable Batteries AA UM3 or R6 Operating Instructions Guarantee Card A ccessories Included Remote control N2QAJB000088 NV SV121 NV HV61 NV MV21 N2QAJB000090 NV HV51 NV MV16 2 Dispose of batteries packaging material and the unit according to sta...

Страница 3: ...REDUCE THE RISK OF FIRE ELECTRIC SHOCK OR PRODUCT DAMAGE DO NOT EXPOSE THIS APPARATUS TO RAIN MOISTURE DRIPPING OR SPLASHING AND THAT NO OBJECTS FILLED WITH LIQUIDS SUCH AS VASES SHALL BE PLACED ON THE APPARATUS THIS UNIT IS INTENDED FOR USE IN MODERATE CLIMATES This product may receive radio interference caused by mobile telephones during use If such interference is apparent please increase separ...

Страница 4: ...ing Fast rewind to the beginning of the tape Time Base Correction Optimises picture quality Stand by on switch I VCR Video Cassette Recorder Activates the recording timer Channel selector Page Detailed information is available on the specified pages NV SV121 NV HV61 NV HV51 NV MV21 NV MV16 SUPER LP 35x JET SEARCH PULL OPEN EJECT TIMER REC REC CH 3D DNR TBC Super VHS ET CH PULL OPEN TIMER REC REC Q...

Страница 5: ...55 HV50 MV20 SV121 HV61 HV51 MV21 MV16 SV120 HV60 HV65 HV55 HV50 MV20 SV120 HV60 HV65 HV55 HV50 MV20 6 AC IN Power supply 1 4 AUDIO output R AUDIO output right channel L AUDIO output left channel 1 4 AV2 21 pin Scart socket AV1 21 pin Scart socket RF IN Antenna input RF OUT Antenna output 5 7 8 7 8 6 AV2 21 pin Scart socket AV1 21 pin Scart socket RF IN Antenna input RF OUT Antenna output 5 7 8 7 ...

Страница 6: ...ding Eject Press and hold for more than 3 seconds Stop a recording session Still playback or Slow Playback Volume control VCR Playback Control TV Controls Television set Stand by on switch 6 Fast rewind to beginning of tape Channel selector Selects the TV set s AV port N2QAJB000088 VOL PAUSE SLOW AV ENTER TV CH VCR INPUT SEL ShowView AUDIO RESET CANCEL REC MODE OFF TIMER PROG PLAY I TIMER MENU EXI...

Страница 7: ...r stop mode Press repeatedly to display the time tape counter or tape remain ShowView Menu does not apply to HV51 MV16 Menu navigation buttons ENTER Selecting or storing settings VCR Standard Controls Select programme storage position or enter the ShowView number E g 18 Channel select buttons Tracking control of VCR picture disturbance 7 Records with external recording control Switches from televi...

Страница 8: ...n your television set With the Stand by on switch turn on the VCR The Country menu appears With the arrow buttons select the according country and confirm by pressing ENTER Automatic tuning for all receivable TV stations begins Approximate duration is 5 minutes If menu Clock set appears If time and date are not transmitted by a TV station they must be set manually Enter Time and Date with or then ...

Страница 9: ...With the arrow buttons select the according country and confirm by pressing ENTER Automatic tuning for all receivable TV stations begins Approximate duration is 5 minutes If menu Clock set appears If time and date are not transmitted by a TV station they must be set manually Enter Time and Date with or then save with ENTER 1 2 3 0 D Mind that a wrong date or time will influence the programmed reco...

Страница 10: ...l cable D Mind that a wrong date or time will influence the programmed recording of TV programmes don t forget to change summer time and winter time D If the Country menu does not appear after turning the device on you may reset the device to its factory defaults page 17 Upon doing so the VCR Auto Setup will start again The Country menu appears With the arrow buttons select the according country a...

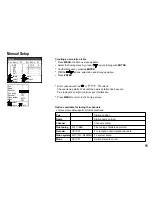
Страница 11: ... will not initiate the VCR Auto Setup if it was run once before Reset the device to factory defaults page 17 Upon doing so you will be able to start VCR Auto Setup again D Press EXIT to abort VCR Auto Setup You can run VCR Auto Setup again at another time Press MENU the Menu screen appears With select Clock set Press ENTER Setting Time and Date select access return exit ENTER MENU EXIT Select AUTO...

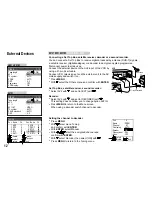
Страница 12: ...der Select AV2 with and set to DECODER with This setting does not allow you to change option AV2 IN Press MENU to return to the Menu screen When using a decoder switch channel to decoder Set Top Box satellite receiver second recorder Select AV2 with and set to EXT with Tape length AUTO E 240 AV2 EXT TV system AUTO SQPB AUTO OSD 4 3 Power save OFF VCR display ON Others 1 2 Tape length AUTO E 240 AV...

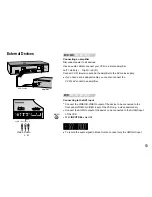
Страница 13: ...ite L Right red R Connect VCR television set and the Amplifier to the AC mains supply D If you have a scart adapter cable you can also connect the VCR s AV socket to an amplifier Connecting to the AV3 input Connect the VIDEO S VIDEO output of the device to be connected to the front panel VIDEO S VIDEO input of the VCR e g a video camcorder Connect the AUDIO output of the device to be connected to ...

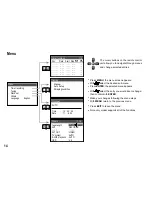
Страница 14: ... VIDEO Others 1 2 9 11 21 22 15 18 19 ENTER The cursor buttons on the remote control unit allow you to navigate through menus and change selected entries With select the entry you would like to change then confirm with ENTER Make your changes following the menu steps With MENU return to the previous menu Press EXIT to leave the menu Menu Press MENU the menu screen appears With select the desired s...

Страница 15: ...a new station table Press MENU the Menu screen appears Select the Tuning menu by pressing and confirming with ENTER Confirm Manual by pressing ENTER With the buttons select an open storage position Press ENTER 15 Pos Name Ch Pos Name Ch 1 ARD 7 2 ZDF 4 3 N3 2 4 RTL 12 5 SAT1 13 Pos Name Channel Fine tuning Decoder Video system Mono 7 AUTO OFF AUTO OFF Tuning select return exit MENU MENU MENU MENU ...

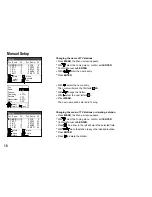
Страница 16: ...D R Manual Setup 16 Tuning Pos Name Ch Pos Name Ch 6 VOX 8 7 PRO7 95 8 RTL2 85 9 KABE 97 10 S RTL 98 Pos Name Channel Fine tuning Decoder Video system Mono 1 7 AUTO OFF AUTO OFF ARD access select return exit ENTER ENTER ENTER ENTER ENTER ENTER ENTER ENTER MENU MENU MENU MENU MENU MENU MENU MENU EXIT EXIT EXIT EXIT EXIT EXIT EXIT EXIT delete move A A A A A A A A A A A A A A A A A A A A A A A A A A ...

Страница 17: ...ore factory defaults briefly unplug the AC mains lead Afterwards you will have to run VCR Auto Setup again The Country menu appears Select country with and confirm with ENTER The Auto Setup menu will be displayed The Automatic Tuning will start Manual Setup 17 Tuning Manual Auto Setup Shipping condition yes no ENTER ENTER ENTER ENTER ENTER ENTER ENTER ENTER EXIT EXIT EXIT EXIT EXIT EXIT EXIT EXIT ...

Страница 18: ...ormat cassettes in the S VHS format only OFF Plays back cassettes recorded in VHS format only AUTO Automatically detects PAL or MESECAM PAL If you are using the PAL system MESECAM If you are using the MESECAM system 4 3 Displays appear at the edge of the screen displays not visible on 16 9 format screens WIDE Displays appear at the edge of the screen displays appear in the middle on 4 3 format scr...

Страница 19: ...ding control by satellite receivers or digital receivers video signal 1 For digital receivers transmitting a special recording control signal e g the F U N receiver TU DSF41 ON For S VHS format recordings on a S VHS type cassette OFF For VHS format recordings on a S VHS type cassette Available only if the unit is not in Power save mode ON Takes recordings at a higher picture quality on VHS HG cass...

Страница 20: ...from Scart inputs AV1 AV2 or the front panel input AV3 Press REC to start recording Press STOP to stop recording Press PAUSE SLOW to pause recording To protect the video heads this function will be terminated after approx 5 minutes Press PAUSE SLOW again to resume recording Recording D Recordings in the S VHS or S VHS ET REC mode are supported by the PAL TV system only SV121 only page 19 Tape Rema...

Страница 21: ...gs may be changed with does not apply to HV51 MV16 Press ENTER to save timer programme Repeat these steps for further recordings you may wish to programme Press TIMER to activate the VCR s timer mode Make sure the VCR symbol is displayed D Do not forget to verify that there is enough tape left The length of the recording must not exceed the tape left on the video cassette 21 Timer recording 1 3 Po...

Страница 22: ... not possible to automatically activate the EP mode VPS PDC function If a TV programme begins or ends earlier or later than planned this function synchronises the beginning and end of the recording session with the actual beginning and end of the TV programme through a VPS signal transmitted by the TV station ON The station transmits VPS PDC signals You must set the timer to the time specified in ...

Страница 23: ...in the Timer recording menu page 21 This information will be copied into the INTELLIGENT TIMER menu Upon completing the programmed recording session such session information will be deleted from the Timer recording menu but remain available in the INTELLIGENT TIMER menu From there such information may be copied back to the Timer recording menu thus allowing you to easily programme the recording se...

Страница 24: ...tered manually with The VCR will store this information so it will not have to be entered again Modifying programmed data Press PROG CHECK the Timer recording menu appears With select the entry to be modified confirm with ENTER Select station and use to set date week or weekday Then enter start and stop time Select tape speed A Automatic SP LP EP and confirm with ENTER Press TIMER to activate the ...

Страница 25: ...ecording controls 25 Quitting recording stand by mode Press EXT LINK to quit recording stand by mode The EL1 or EL2 display disappears You can now play back a cassette or make a manual recording You must press EXT LINK again to reactivate the recording stand by mode Press EXT LINK to activate the VCR s recording stand by mode Make sure the VCR s EL1 or EL2 display appears As long as the satellite ...

Страница 26: ...te with removed protection tab playback will start automatically Playback from power stand by mode When inserting a cassette and pressing PLAY the device will turn itself on and start playing back Normally the VCR automatically adjusts the playback picture to the highest possible quality Sometimes it may be necessary though to adjust the picture manually Picture noise or unclear picture during pla...

Страница 27: ...ape winds forward INDEX tape rewinds Every time you press the button max 20 times the VCR will find the start of the next recording Playback will start automatically Press STOP to exit the Search function Search forward or backwards While playing back press or the search begins When pressing the button twice JET SEARCH the search speed increases When holding the button down the search will run for...

Страница 28: ...rdings with the QUICK ERASE function Press and hold the QUICK ERASE button for a few seconds It takes approx 30 minutes to erase an E 180 cassette TBC TIME BASE CORRECTION TBC offers undistorted and stable playback picture quality Press the TBC button to deactivate this function The status will be displayed on the TV screen Device only operation Cassette erasure protection Break out the erasure pr...

Страница 29: ...MENU the Menu screen appears With select the Tuning menu and confirm with ENTER Confirm Manual with ENTER With select the desired channel and confirm with ENTER With select Mono and switch to ON or OFF with Press MENU to return to Tuning 29 select return exit MENU EXIT Pos Name Channel Fine tuning Decoder Video system Mono 1 ARD 7 AUTO OFF PAL OFF Tuning Pos Name Ch Pos Name Ch 6 VOX 8 7 PRO7 95 8...

Страница 30: ...tor noises These are not malfunctions Device is set to recording stand by or timer mode Quit with EXT LINK button or TIMER button The VCR display is not lit The VCR display is lit the device does not respond to controls Raised motor noise level Automatic Clock set doesn t work properly The use of E 300 cassettes may cause problems if the recordings were taken at low tape speeds LP or EP Check PAL ...

Страница 31: ...ion colour More than 240 lines VHS SP 400 lines S VHS S VHS ET SP Audio output level 6 dBV less than 1 kOhm Audio input level 6 dBV more than 10 kOhm RF modulated UHF channel 21 69 75 Ohm Video input and output level 1 0 V peak to peak 75 Ohm terminated Video TV colour system Tape speed Video andAudio heads helical scanning system 220 240 V AC 50 60 Hz Signal to noise ratio audio More than 90 dB H...

Страница 32: ...AV2 18 PAL 15 18 30 AV2 IN 18 Tape counter 7 28 Playback 6 26 Tape length 18 Power consumption 31 Cassette erasure protection 28 Tape remain display 7 20 Power save 19 30 Channel 11 15 Tape speed 20 Power supply 31 Country 8 9 10 TBC TIME BASE CORRECTION 4 28 Precautions 3 CVC super 4 Time 11 Time limited recording playback 26 QUICK ERASE 4 28 Date 11 TRACKING V LOCK 7 26 Decoder 12 15 18 TV syste...

Отзывы: