background image

Record mode

24

VQT0N57

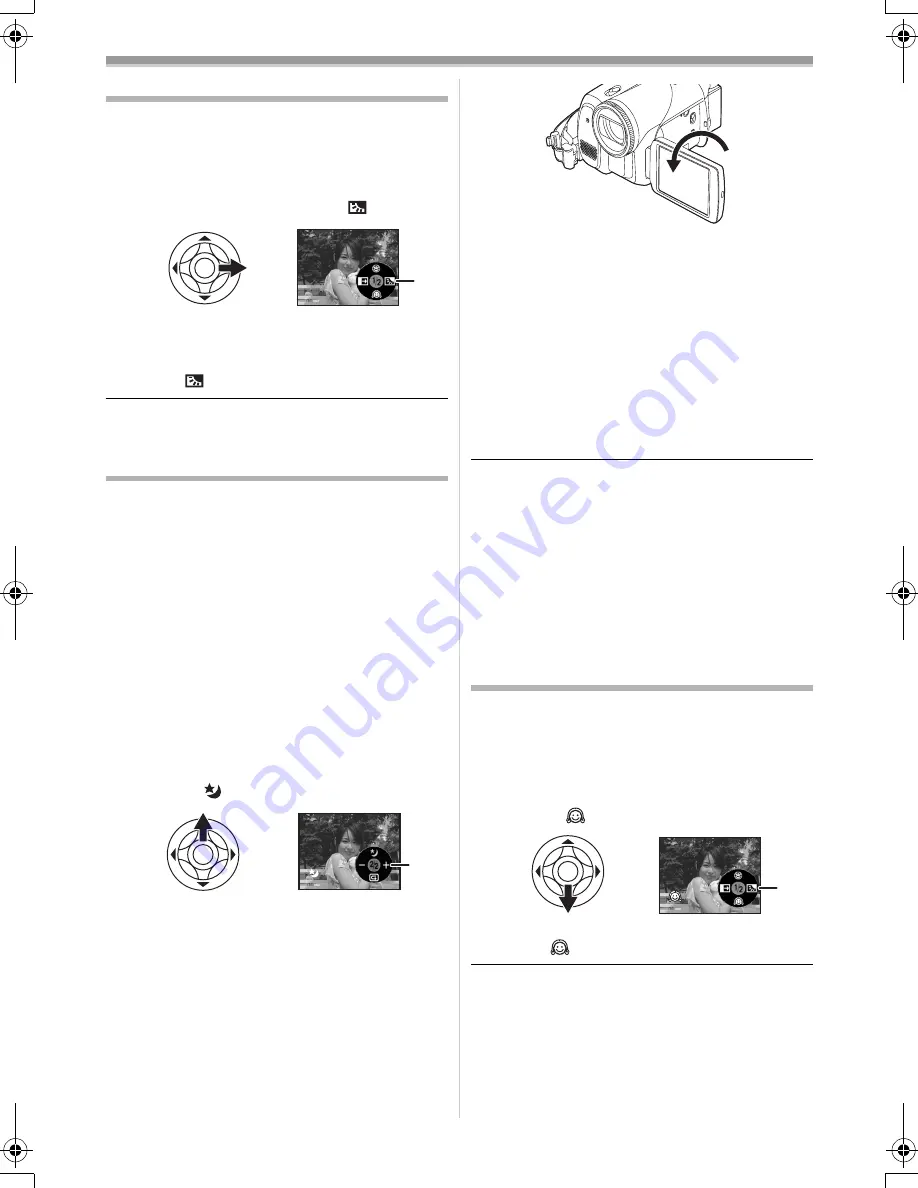
Backlight compensation function

This protects a backlit subject from being 
darkened.

Set to Tape/Card Recording Mode.

1

Press the joystick until the icon 

appears.

2

Move the joystick right to select the 
backlight compensation icon [

].

The image on the screen will become 
brighter.

ª

To return to normal recording

Select the [

] icon again.

If you operate the [OFF/ON] switch or the mode 
dial, the backlight compensation is cancelled.

Night view functions

This function allows you to record colour subjects 
in dark locations to stand out against the 
background.
Attach the camera to a tripod, and you can record 
images free from vibration.

Only manual focusing can be used.

Recorded scene is seen as if frames were 
missed.

Colour night view function

You can record dark locations brightly in colour.

0 Lux night view function

You can record completely dark locations with the 
light of the LCD monitor.

Set to Tape Recording Mode.

1

Press the joystick until the icon 

appears.

2

Move the joystick up to select the night 
view icon [

].

Each upward press switches the modes.
OFF

 # 

Colour night view function

 # 

0 Lux 

night view function

 # 

OFF

3

(In the case of 0 lux night view function) 
Rotate the LCD monitor towards the lens 
side.

When the LCD monitor is reversed, the 
Power LCD Lamp turns on and the screen is 
lit in white.

Record the subject while viewing it on the 
viewfinder.

The light of the LCD monitor reaches approx. 
1.2 m or less.

ª

To cancel the colour night view 
function

Select the night view icon until the night view 
indication disappear. 

If set in a bright place, the screen may become 
whitish for a while.

The night view function makes the signal 
charging time of CCD up to approximately 25

k


longer than usual, so that dark scenes invisible 
to the naked eye can be recorded brightly. For 
this reason, bright dots that are usually invisible 
may be seen, but this is not a malfunction.

The night view function is canceled when you 
operate the power switch or the mode dial.

Soft skin mode

This allows the skin colour to be recorded in a 
softer tone. This is more effective if you record the 
bust image of a person. 

Set to Tape/Card Recording Mode.

1

Press the joystick until the icon 

appears.

2

Move the joystick down to select the soft 
skin icon [

].

ª

To cancel the soft skin mode

Select the [

] icon again.

If the background or anything else in the scene 
has colours similar to the skin colour, they will 
also be smoothed.

If the brightness is insufficient, the effect may 
not be clear.

ª

1

1

1

GS75EB.book  24 ページ  2004年12月20日 月曜日 午後2時56分

Содержание NV-GS75EB

Страница 1: ...Operating Instructions Digital Video Camera Model No NV GS75EB Before use please read these instructions completely VQT0N57 R ...

Страница 2: ... not be used until a replacement cover is obtained A replacement fuse cover can be purchased from your local Panasonic Dealer IF THE FITTED MOULDED PLUG IS UNSUITABLE FOR THE SOCKET OUTLET IN YOUR HOME THEN THE FUSE SHOULD BE REMOVED AND THE PLUG CUT OFF AND DISPOSED OF SAFELY THERE IS A DANGER OF SEVERE ELECTRICAL SHOCK IF THE CUT OFF PLUG IS INSERTED INTO ANY 13 AMPERE SOCKET If a new plug is to...

Страница 3: ...ccessories Do not use any other AV cables and USB cables except the supplied one When you use the cable which are sold separately please make sure to use the one whose length is less than 3 meters ª WARNING Do not remove the cover or back there are no user serviceable parts inside Refer servicing to qualified service personnel ª Carefully observe copyright laws Recording of pre recorded tapes or d...

Страница 4: ...n fade out function 25 Wind noise reduction function 25 Self timer recording 26 Recording images for wide screen TVs 26 Image stabilizer function 26 Continuous Photoshot 27 Recording in various situations Scene mode 27 Recording in natural colours White balance 28 Manual focus adjustment 29 Manual shutter speed aperture adjustment 29 Playback mode Playing back tape 31 Slow motion playback frame by...

Страница 5: ... the accessories supplied with this product 1 AC adaptor DC input lead AC mains lead 9 2 Battery pack 9 3 Remote control button type battery 16 4 Free style remote control 17 5 Lens cap 7 6 AV cable 36 7 Shoulder strap 7 8 USB cable and CD ROM 38 Optional 1 AC adaptor VW AD11EB 2 Battery pack lithium CGR DU06 640mAh 3 Battery pack lithium CGA DU07 680mAh 4 Battery pack lithium CGA DU12 1150mAh 5 B...

Страница 6: ...o output terminal S VIDEO 32 23 LCD monitor 8 53 24 LCD monitor open part OPEN 8 25 Reset button RESET 45 26 Power LCD button POWER LCD 15 Power LCD lamp 15 27 Mode select switch AUTO MANUAL FOCUS 19 27 29 28 Card access lamp 11 29 DV terminal DV 37 30 Card slot cover 11 31 Card slot 11 32 Cassette holder 10 33 Cassette eject lever OPEN EJECT 10 34 Cassette cover 10 35 Zoom lever W T 22 Volume lev...

Страница 7: ...r the ND filter of the Filter Kit VW LF37WE optional in front of the lens hood Do not fit the other accessories on the hood Except for the lens cap When fitting the tele conversion lens VW LT3714M2E optional or the wide conversion lens VW LW3707M3E optional first remove the lens hood When 2 lens accessories such as the ND filter and tele conversion lens are fitted and the W T lever is pressed towa...

Страница 8: ...elt attachment part press the lock cover 1 and check if the grip belt is securely locked ª To use as a grip belt Adjust the belt length so it fits your hand 1 Adjust the belt length and the pad position 1 Flip the belt 2 Adjust the length 3 Fix the belt Using the LCD monitor You can record the image while viewing it on the LCD monitor opened 1 Put a finger on the LCD monitor open part and pull the...

Страница 9: ...gning the mark and then securely plug it in ª Charging lamp Lights up Charging Goes off Charging completed Flashing The battery is over discharged discharged excessively In a while the lamp will light up and normal charging will start When the battery temperature is excessively high or low the CHARGE lamp flashes and the charging time will be longer than normal ª Connecting to the AC outlet 1 Conn...

Страница 10: ...in the following cases When you use both the viewfinder and the LCD monitor simultaneously while rotating the LCD monitor frontward to record yourself using the 0 lux night view function etc When you use this camera with the LCD monitor lit up by pressing the POWER LCD button The batteries heat up after use or charging The main unit of the movie camera being used will also heat up This is normal A...

Страница 11: ... slider 1 of a cassette is opened slide in the direction of the SAVE arrow the cassette cannot be recorded When recording close the accidental erasure prevention slider of the cassette slide in the direction of the REC arrow Inserting removing a card Before inserting removing a card be sure to turn the power OFF If the card is inserted or removed with the power turned on this camera may malfunctio...

Страница 12: ...p ª How to turn off the power 1 While pressing the button 1 set the OFF ON switch to OFF The power lamp goes off Selecting a mode Rotate the mode dial to select the desired mode 1 Rotate the mode dial Set your desired mode to 1 Tape recording mode Use this when you record the image on a tape Also you can simultaneously record still pictures on a card while recording images on a tape Tape playback ...

Страница 13: ...OCUS switch is set to AUTO 5 Card recording mode AUTO MANUAL FOCUS switch is set to MANUAL 6 Picture playback mode 3 Tele macro 25 4 Soft skin mode 24 2 Fade 25 1 Backlight compensation 24 3 Night view 0 Lux night view 24 4 Recording check 21 4 White balance Shutter speed Iris or gain value 28 1 Select Adjust 28 2 Select Adjust 28 3 Playback pause 31 4 Stop 31 2 Rewind review playback 31 1 Fast fo...

Страница 14: ... or down in order to select the sub menu 5 Move the joystick right or press it to set the selection 6 Move the joystick up or down in order to select the item to be set 7 Press the joystick to determine the setting ª To exit the menu screen Press the MENU button ª To get back to the previous screen Move the joystick left ª About the menu setting The menu screen does not appear during recording And...

Страница 15: ... hours and the battery will drive the date and time for approx 6 months Even if the OFF ON switch is set to OFF the battery is still being recharged Adjusting LCD monitor viewfinder ª Adjusting the brightness and colour level 1 Set SETUP LCD SET or EVF SET YES 2 Move the joystick up or down in order to select the item to be adjusted LCD SET Brightness of the LCD monitor Colour level of the LCD mon...

Страница 16: ...CH 32 9 Menu button MENU 14 10 Photoshot button PHOTO SHOT 11 Rewind review button 6 12 Pause button 13 Stop button 14 Recording start stop button START STOP 15 Playback button 1 16 Fast forward cue button 5 17 Enter button ENTER 14 means that these buttons function in the same manner as the corresponding buttons on the movie camera ª Install a button type battery Install the button type battery s...

Страница 17: ...ame remote control mode The remote control is intended for indoor operation Outdoors or under strong light the movie camera may not operate properly even within the usable ranges Within a 1 metre range you can operate the remote control from beside the remote control sensor LCD monitor side of the movie camera Free style remote control This controller can be used from different high and low angles...

Страница 18: ...ere beware of knocking over the tripod and causing the camera to fall off the table If the pin plug of the control is not inserted securely into the REMOTE terminal as far as it will go normal operation may not be ensured Before using make sure that the plug is inserted securely into the terminal as far as it will go ...

Страница 19: ... AUTO MANUAL FOCUS switch to AUTO and colour balance white balance and focusing will be adjusted automatically Auto white balance 54 Auto focusing 54 Colour balance and focus may not be adjusted depending on light sources or scenes If so manually adjust the white balance and focus Scene mode setting 27 White balance setting 28 Shutter speed setting 29 Iris gain value setting 29 Focus setting 29 ª ...

Страница 20: ...ng the remaining tape time indication on the screen The remaining tape time is indicated in minutes When it reaches less than 3 minutes the indication starts flashing During a 15 second or shorter recording the remaining tape time indication may not be displayed or the remaining tape time may not be displayed correctly In some cases the remaining tape time indication may display remaining tape tim...

Страница 21: ...l pictures clearly When zooming in on the subject with a magnification of 4k to 10k or higher it is difficult to reduce the slight shaking from holding the movie camera by hand We recommend decreasing the zoom magnification and approaching the subject when recording When recording still pictures hold the movie camera firmly with your hands and keep your arms stationary at your side so as not to sh...

Страница 22: ...ANCE SHTR EFFECT ON Zoom in out function You can zoom in up to 10k optically Set to Tape Card Recording Mode 1 Wide angle recording zoom out Push the W T lever towards W Close up recording zoom in Push the W T lever towards T When zooming in and taking a picture while holding the movie camera by hand we recommend using the image stabilizer function When you are zooming on a faraway subject a sharp...

Страница 23: ...a card is inserted while the Tape Recording Mode is set A card is inserted while the Card Recording Mode is set 1 Press the QUICK START button The quick start recording lamp lights up Press the button again to cancel it 2 Set the OFF ON switch to OFF The quick start is now ready 3 Set the OFF ON switch to ON This camera will be put into a recording pause in approx 1 7 seconds after it is turned on...

Страница 24: ...the case of 0 lux night view function Rotate the LCD monitor towards the lens side When the LCD monitor is reversed the Power LCD Lamp turns on and the screen is lit in white Record the subject while viewing it on the viewfinder The light of the LCD monitor reaches approx 1 2 m or less ª To cancel the colour night view function Select the night view icon until the night view indication disappear I...

Страница 25: ...ft to select the fade icon 3 Press the recording start stop button Start recording fade in When you start recording the image audio disappeared completely and the image audio gradually appears Pause recording fade out The image audio gradually disappears After the image audio completely disappears recording stops ª To cancel fading Select the icon again ª To select the colour for fade in out The c...

Страница 26: ...d Please refer to the operating instructions for your TV This function does not widen the recording range When images are played back on a TV screen the date time indication may be erased in some cases Depending on the TV the picture quality may deteriorate When a cinema picture is imported into a personal computer the imported picture may not be displayed correctly depending on the software in us...

Страница 27: ...ortant data on a PC and format your card with this movie camera Recording in various situations Scene mode When you record images in different situations this mode automatically sets optimum shutter speeds and apertures Set to Tape Card Recording Mode 1 Set the AUTO MANUAL FOCUS switch to MANUAL 2 Set BASIC SCENE MODE select the desired mode 1 5 Sports mode To record sports scenes or scenes where ...

Страница 28: ...witch to AUTO When the camera is turned on with the lens cap fitted the automatic white balance adjustment may not function properly Please turn the camera on after removing the lens cap When setting both the white balance and the iris gain set the white balance first Whenever recording conditions change re set the white balance for correct adjustment ª To set the white balance manually Select in ...

Страница 29: ...shutter speed indication or aperture value indication appears 1 Shutter speed 2 Aperture Iris gain value 3 Move the joystick left or right in order to adjust the shutter speed or aperture ª To restore to automatic adjustment Set the AUTO MANUAL FOCUS switch to AUTO Manual shutter speed adjustment Avoid recording under fluorescent light mercury light or sodium light because the colour and brightnes...

Страница 30: ... on the zoom magnification there are iris values that are not displayed ª Shutter speed range 1 50 1 8000 seconds Tape Recording Mode 1 25 1 500 seconds Card Recording Mode The shutter speed closer to 1 8000 is faster ª Iris gain value range CLOSE Closed F16 F2 0 OPEN Opened 0dB 18dB Value closer to CLOSE darken the image Value closer to 18dB brighten the image Values with dB are gain values ...

Страница 31: ...rs In order to cancel the repeat playback mode set REPEAT PLAY OFF or set OFF ON switch to OFF When you set USB FUNCTION WEBCAM and then connect the USB connection cable the repeat playback mode is canceled ª Settings on the audio If you cannot listen to the desired audio when playing back a tape check the settings in SETUP 12bit AUDIO When you record or dub the audio in 12bit and set SETUP 12bit ...

Страница 32: ...ayback only 1 3k LP mode slow motion playback only 2k 5k 10k 20k ª To return to normal playback Press the VAR SEARCH button or 1 button on the remote control Images may be shown in a mosaic like pattern The sound is muted during search This function is canceled when the operation icon is displayed Playback on TV Images recorded by this camera can be played back on a TV Insert a recorded tape into ...

Страница 33: ...ARD indication may appear as warning When playing back a file recorded on other equipment the date and time display is different from when it was recorded When playing back a picture recorded on other equipment its size and that of this movie camera may appear differently ª To display multiple playback files Multiple files on the card 6 files on 1 screen are displayed 1 Move the s VOLr lever to sw...

Страница 34: ... files recorded on a card by other equipment A still picture file other than JPEG that cannot be played back on the movie camera may be erased Formatting a card Please be aware that if a card is formatted then all the data recorded on the card will be erased Store important data on a personal computer etc Set to Picture Playback Mode 1 Set ADVANCE CARD FORMAT YES 2 When the confirmation message ap...

Страница 35: ...and then press it You can select from 0 to 999 Selected number of pictures can be printed as you set the number of prints with the printer supporting DPOF 2 or more files can be set in succession ª To complete the settings Press the MENU button DPOF setting made on another camera may not be recognised by this camera Please perform the DPOF settings on your movie camera ª To set so that all picture...

Страница 36: ...a DVD RAM or other such media Refer to the instructions for the recorder Place a recorded cassette in the movie camera and an unrecorded DVD RAM or cassette in the DVD recorder or VCR 1 Connect the movie camera and the recorder Connecting with the AV cable Connect the movie camera and the recorder by using the AV cable 1 If the recorder has an S Video terminal then also connect an S Video cable 2 ...

Страница 37: ...rder 4 Stop playback Player Do not plug or unplug the DV cable during dubbing or the dubbing may not be completed properly Even if you use a device equipped with DV terminals such as IEEE1394 you may not be able to perform digital dubbing in some cases For more information see the instructions for equipment connected Regardless of the menu settings on the recorder digital dubbing is carried out in...

Страница 38: ...corded sound Printing pictures by directly connecting to the printer PictBridge To print pictures by directly connecting the movie camera to the printer use a printer compatible with PictBridge Read the operating instructions for the printer Insert a card and set to Picture Playback Mode 1 Connect the movie camera and the printer with the supplied USB cable 1 USB cable The PictBridge indication ap...

Страница 39: ...ed on the printer 7 Set PRINT YES to start printing ª When you stop printing halfway Move the joystick down Avoid the following operations during printing These operations disable proper printing Disconnecting the USB cable Removing the card Switching the mode dial Turning off the power Check the settings for the paper size quality of print etc on the printer You cannot print pictures that cannot ...

Страница 40: ...o the operating instructions for PC connection D ZOOM 22 ZOOM MIC 23 DATE TIME 42 INITIAL SET 43 3 SETUP FADE COLOUR 25 AUDIO REC 42 REC LAMP 42 DISPLAY 42 REMOTE 17 BEEP SOUND 42 LCD SET 15 EVF SET 15 DEMO MODE 43 AV JACK 42 POWER SAVE 42 4 LANGUAGE 14 ª TAPE PLAYBACK MENU 1 BASIC DATE TIME 42 AV JACK 42 USB FUNCTION Refer to the operating instructions for PC connection 2 ADVANCE REC DATA 42 PICT...

Страница 41: ...MODE 27 SHTR EFFECT 22 DATE TIME 42 INITIAL SET 43 3 SETUP REC LAMP 42 DISPLAY 42 REMOTE 17 BEEP SOUND 42 LCD SET 15 EVF SET 15 POWER SAVE 42 4 LANGUAGE 14 ª PICTURE PLAYBACK MENU 1 BASIC DATE TIME 42 PROTECT 34 2 ADVANCE DPOF SET 35 CARD FORMAT 34 3 SETUP DISPLAY 42 REMOTE 17 LCD SET 15 EVF SET 15 POWER SAVE 42 4 LANGUAGE 14 1520 1520 ...

Страница 42: ...operation the standby mode automatically will be set In the standby mode blinks and it takes time more than usual to start recording after you press the recording start stop button 5 MINUTES When about 5 minutes passed without any operation the movie camera automatically turns off to protect the tape or to prevent the battery from running down When you use the movie camera turn it on again In the ...

Страница 43: ...ion ª DEMO MODE If you set to DEMO MODE ON without inserting a cassette and a card the movie camera is automatically set to the demonstration mode for introducing its functions If any button is pressed or operated the demonstration mode is cancelled If no operations take place for approx 10 minutes the demonstration mode automatically starts To terminate the demonstration mode insert a cassette or...

Страница 44: ...er incandescent lamp 28 Outdoor mode 28 White balance adjustment mode 28 WEB CAMERA mode recording 39 Playback indications Recording underway 1 Playback 31 Pause 31 5 Fast forward Cue playback 31 6 Rewind Review playback 31 D E Slow motion playback 31 1 2 Frame by frame playback 31 2k5 Variable speed search 33 Repeat playback 31 WEB CAMERA mode playback 39 A DUB Audio dubbing 37 A DUB Audio dubbin...

Страница 45: ...eration of the remote control after powering on 17 WRONG TAPE FORMAT You are attempting to play back a tape section that has been recorded with a different TV system This cassette is incompatible UNPLAYABLE CARD You are attempting to play back data not compatible with this movie camera UNABLE TO A DUB LP RECORDED Audio dubbing cannot be performed because the original recording was in LP mode UNABL...

Страница 46: ...bled or cannot be selected due to its specifications The table below shows examples of functions restricted by conditions Functions Conditions which disable the functions Progressive When recording onto a tape and a card simultaneously When digital zoom 10k or higher is used When the shutter speed is 1 750 or faster in Tape Recording Mode When the gain value is increased in Tape Recording Mode Whe...

Страница 47: ...uns down quickly Is the battery fully charged Charge it with the AC adaptor 9 Are you using the battery in an extremely cold place The battery is affected by ambient temperature In cold places the operating time of the battery becomes shorter Has the battery worn out The battery has a limited life If the operating time is still too short even after the battery is fully charged depending on the usa...

Страница 48: ...occurred Wait until the condensation indication disappears 4 Auto focus function does not work Is manual focus mode selected If auto focus mode is selected focus is automatically adjusted There are some recording subjects and surroundings for which the auto focus does not operate correctly 54 If so use the manual focus mode to adjust the focus 29 Is the colour night view function set When the colo...

Страница 49: ...ut terminals used for the connection 4 Playback picture is not clear Are the heads of the movie camera dirty If the heads are dirty playback image cannot be clear Clean the heads by using the head cleaner for digital video optional 51 If the terminal for the AV cable is soiled noises may appear on the screen Wipe the soil off the terminal with a soft cloth and then connect the cable to the AV term...

Страница 50: ...isplayed on the PC The audio of the tape can be played Is the video stream driver installed For details refer to the operating instructions for PC connection Cautions for Use ª About condensation If you turn the movie camera on when condensation occurs on the head or the tape condensation Indication 3 yellow or red is displayed on the viewfinder or the LCD monitor and the messages 3DEW DETECT or 3...

Страница 51: ...igital circuits including microprocessor may adversely affect the movie camera causing the disturbance of images and sounds If the movie camera is affected by such equipment and does not function properly turn off the movie camera power and detach the battery or AC adaptor Then connect the battery or AC adaptor again and turn on the movie camera power Do not use your movie camera near radio transm...

Страница 52: ...ar and store it again after you have completely used up the charged capacity Dust and other matter attached to the battery terminals should be removed Do not throw old battery into fire Heating a battery or throwing it into a fire may result in an explosion If the operating time is very short even after the battery has been recharged the battery has worn out Please purchase a new battery ª About t...

Страница 53: ...C as the illustration below Up to 999 pictures can be recorded on 100CDPFP folder etc Files with the DPOF settings can be recorded on MISC folder ª LCD monitor viewfinder LCD monitor When the LCD monitor gets dirty wipe it with a dry soft cloth In a place with drastic temperature changes condensation may form on the LCD monitor Wipe it with soft dry cloth If your movie camera is extremely cold the...

Страница 54: ...mera can adjust the balance among the other colours Since white colour is the reference of all colours light the movie camera can record pictures in a natural hue if it can recognize the reference white colour ª Auto focus Auto focus automatically moves the focusing lens forward and backward inside the movie camera to bring the subject into focus Auto focus has the following characteristics Adjust...

Страница 55: ...deo output level 1 0 Vp p 75 ohm S Video output level Y Output 1 0 Vp p 75 ohm C Output 0 3 Vp p 75 ohm Audio output level Line 316 mV 600 ohm Mic input Mic sensitivity 50 dB 0 dB 1 V Pa 1 kHz Stereo mini jack USB Card reader writer function USB 2 0 compliant Hi Speed No copyright protection support PictBridge compliant Digital interface DV output terminal IEEE1394 4 pin Dimensions Approx 76 mm W ...

Страница 56: ...ations These figures vary depending on the subject being photographed Power source AC 110 240 V 50 60 Hz Power consumption 19 W DC output DC 7 9 V 1 4 A Movie camera operation DC 8 4 V 0 65 A Battery charging Maximum number of still pictures recordable on an SD Memory Card optional PICTURE SIZE 640 1520 PICT QUALITY 32 MB 220 440 32 53 64 MB 440 880 68 110 128 MB 880 1760 130 210 256 MB 1760 3520 ...

Страница 57: ...57 VQT0N57 ...

Страница 58: ...58 VQT0N57 ...

Страница 59: ...atting 34 Frame by frame playback 31 Free Style Remote Control 17 ª L LCD Monitor 8 53 Low Light Mode 27 ª M Manual Focus 29 Mode Dial 12 ª P Photoshot 21 Portrait Mode 27 ª Q Quick Start 23 ª R Recording Check 21 Recording Speed 19 Remaining Tape Time 44 Remote Control 16 Repeat Playback 31 ª S Scene mode 27 Self Recording 23 Self timer Recording 26 Shutter Speed 29 Slow Motion Playback 31 Soft S...

Страница 60: ...B VQT0N57 F1204Ke0 10000 A C Matsushita Electric Industrial Co Ltd Web site http www panasonic co jp global ...

Отзывы: