background image

Record mode

22

VQT1D15

You can record stable pictures without shaking 
by using a tripod and the remote control.

For the number of still pictures to be recorded 
on a card, refer to


-60-

.

The sound cannot be recorded.

While data are recorded on a card, do not 
operate the mode dial.

When the access lamp is lit, do not insert or 
remove a card.

Another product may degrade or not play back 
data recorded on this camera.

If set [PICT. QUALITY] >> [

], mosaic-pattern 

noise may appear on a playback image 
depending on the picture content.

When the [PICTURE SIZE] is set to other than 
[640], the mega pixel recording mode is set.

When the picture size setting is other than [640], 
the scene around the subject can be recorded 
wider than that in [640].

ª

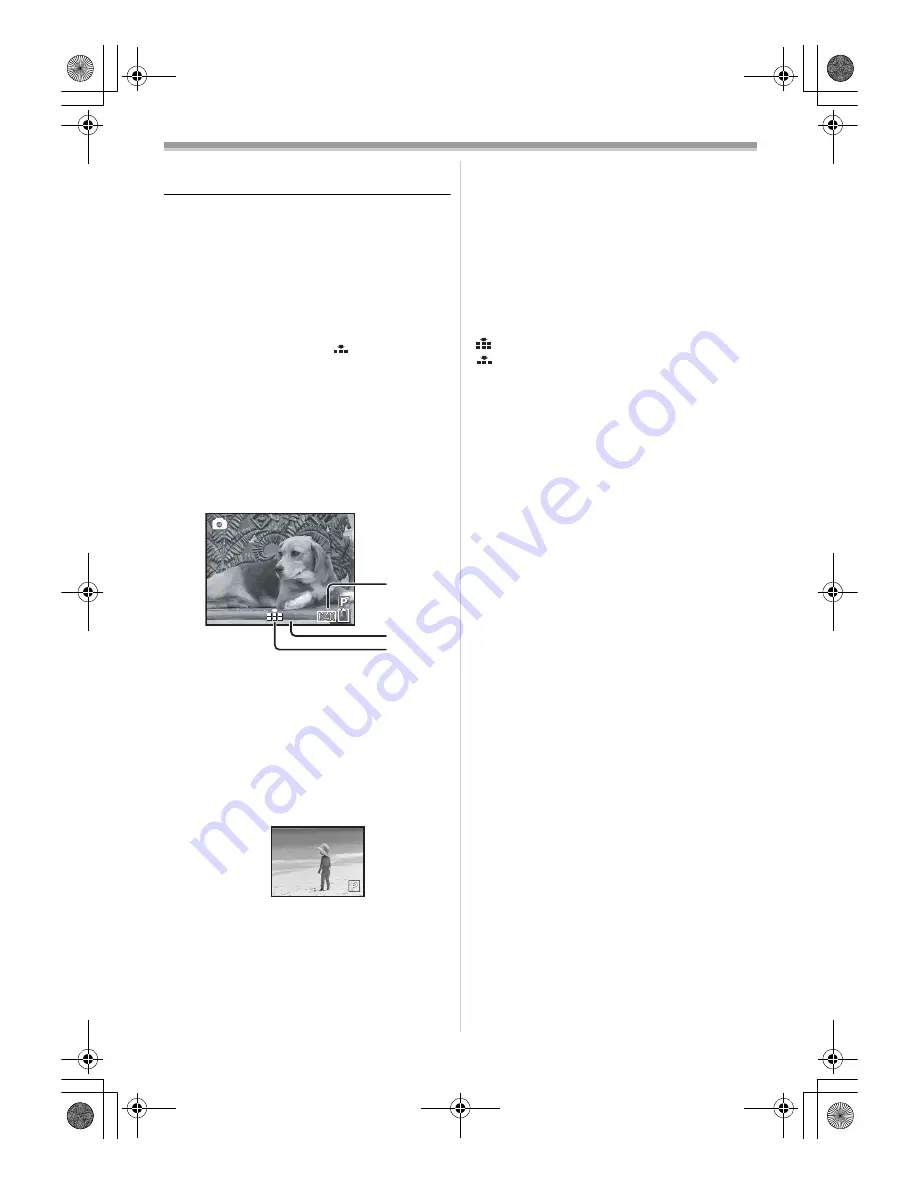
On-screen display in the card 
recording mode

1) Still picture size
2) Number of recordable still pictures

(When no pictures can be recorded, the red 
light will flash.) 

3) Quality of still pictures

ª

Progressive Photoshot

You can record still pictures with higher picture 
quality and frames. (You cannot switch the 
progressive function off/on.) 

In the tape recording mode, the progressive 
function may be disabled depending on the 
other functions used. (

-49-

ª

Select the size of still pictures to be 
recorded on a card

1

Set [BASIC] >> [PICTURE SIZE] >> select 
the desired picture size. 

[1760]: 1760

k

1320

[1280]: 1280

k

960

[640]:

640

k

480

ª

Select the picture quality for 
photoshot images

1

Set [BASIC] >> [PICT. QUALITY] >> select 
the desired picture quality.

[

]:

High picture quality

[

]:

Normal picture quality

You can also change the picture quality on 
[ADVANCE] >> [PICT. QUALITY] in the tape 
recording mode.

ª

Recording with a shutter operation 
effect

You can add a shutter operation simulating 
sound.

1

Set [ADVANCE] >> [SHTR EFFECT] >> [ON].

ª

About the shutter chance mark

The shutter chance mark does not appear in 
manual focus mode.

When the subject is not easily focused, focus on 
the subject manually.

You can record still pictures on the card even if 
the shutter chance mark does not appear, but 
pictures may be recorded without being 
focused.

The shutter chance mark does not appear or 
becomes difficult to be displayed in the following
cases.

When the zoom magnification is high.

When the movie camera is shaken.

When the subject is moving.

When the subject stands against the light 
source.

When close subjects and far subjects are 
included in the same scene.

When the scene is dark.

When there is a bright part in the scene.

When the scene is filled with only horizontal 
lines.

When the scene lacks contrast.

ª

Concerning the focusing area

When there is a contrasting object ahead or 
behind the subject in the focus area, the subject 
may not be focused. If so, move the contrasting 
object out of the focus area.

100

100

100

1)

2)
3)

VQT1D15ENG.book  22 ページ  2006年10月30日 月曜日 午後8時23分

Содержание NV-GS230

Страница 1: ...Operating Instructions Digital Video Camera Model No NV GS230GN Before use please read these instructions completely VQT1D15 VQT1D15ENG book 1 ページ 2006年10月30日 月曜日 午後8時23分 ...

Страница 2: ...product names in the operating instructions are trademarks or registered trademarks of their respective corporations Files recorded on SD Memory Card It may not be possible to play back the files on this Movie Camera recorded on and created by other equipment or vice versa For this reason check the compatibility of the equipment in advance WARNING TO REDUCE THE RISK OF FIRE ELECTRIC SHOCK OR PRODU...

Страница 3: ...ories Do not use any other AV cables and USB cables except the supplied one When you use the cable which are sold separately please make sure to use the one whose length is less than 3 meters If you see this symbol Information on Disposal in other Countries outside the European Union This symbol is only valid in the European Union If you wish to discard this product please contact your local autho...

Страница 4: ...tion 27 Self timer recording 27 Recording images for wide screen TVs 27 Image stabilizer function 28 Continuous Photoshot 28 Recording in various situations Scene mode 29 Recording in natural colours White balance 30 Manual focus adjustment 31 Manual shutter speed aperture adjustment 31 Playback mode Playing back tape 33 Slow motion playback frame by frame playback 33 Variable speed search functio...

Страница 5: ...ght VZ LL10E 12 Stereo microphone VW VMS2E 13 Tripod VW CT45E 14 DV cable VW CD1E 15 Jacket pouch VW SJ05E Some optional accessories may not be available in some countries Parts identification and handling ª Camera 1 Recording lamp 45 2 Grip belt 8 3 Microphone built in stereo 23 27 4 Lens 5 White balance sensor 30 Remote control sensor 18 6 Audio video output terminal AV 39 Use the supplied AV ca...

Страница 6: ...3 34 Photoshot button 20 35 Accessory shoe Accessories such as a stereo microphone VW VMS2E optional are attached here 36 Tripod receptacle This is a hole for attaching the camera to optional tripod VW CT45E Please carefully read the operating instructions for how to attach the tripod to the camera You cannot open the card slot cover when the tripod is used Insert the card first and then attach th...

Страница 7: ...move the lens hood When 2 lens accessories such as the ND filter and tele conversion lens are fitted and the W T lever is pressed toward the W side the 4 corners of an image will be darkened Vignetting Fitting the lens cap Fit the lens cap to protect the surface of the lens If you do not use the movie camera when the MC protector or the ND filter of the Filter Kit VW LF37WE optional is attached to...

Страница 8: ...rightness and colour level of the LCD monitor can be adjusted from the menu If it is forcibly opened or rotated the camera may be damaged or fail Check that the card slot cover is closed When the LCD monitor is rotated by 180o towards the lens when recording yourself the LCD monitor and the viewfinder will be simultaneously activated Using the viewfinder ª Extending the viewfinder 1 Pull out the v...

Страница 9: ... normal charging will start When the battery temperature is excessively high or low the CHARGE lamp flashes and the charging time will be longer than normal ª Connecting to the AC outlet 1 Connect the AC mains lead to the AC adaptor and the AC mains socket 2 Connect the DC input lead to the AC adaptor 3 Connect the DC input lead to this product The output plug of the AC mains lead is not completel...

Страница 10: ...ght view function etc When you use this camera with the LCD monitor lit up by pressing the POWER LCD button The batteries heat up after use or charging The main unit of the movie camera being used will also heat up This is normal Along with the reduction of the battery capacity the display will change r s t u v If the battery discharges then u v will flash Inserting removing a cassette 1 Slide the...

Страница 11: ...ion If the accidental erasure prevention slider 1 of a cassette is opened slide in the direction of the SAVE arrow the cassette cannot be recorded When recording close the accidental erasure prevention slider of the cassette slide in the direction of the REC arrow Inserting removing a card Before inserting removing a card be sure to set the OFF ON switch to OFF If the card is inserted or removed w...

Страница 12: ...ing the camera on When the camera is turned on with the lens cap fitted the automatic white balance adjustment may not function properly Please turn the camera on after removing the lens cap ª How to turn on the power 1 While pressing the button 1 set the OFF ON switch to ON The status indicator lights up ª How to turn off the power 1 While pressing the button 1 set the OFF ON switch to OFF The st...

Страница 13: ...rding mode AUTO MANUAL FOCUS switch is set to AUTO 2 Tape recording mode AUTO MANUAL FOCUS switch is set to MANUAL 3 Tape playback mode 4 Card recording mode AUTO MANUAL FOCUS switch is set to AUTO 1 Select by moving up 2 Select by moving down 3 Select by moving left 4 Select by moving right 5 Determine by pushing the centre 3 Tele macro 26 4 Soft skin mode 25 2 Fade 26 1 Backlight compensation 24...

Страница 14: ...yed Do not switch the mode dial when the menu is displayed 2 Move the joystick up or down in order to select the top menu 3 Move the joystick right or press it to set the selection 4 Move the joystick up or down in order to select the sub menu 5 Move the joystick right or press it to set the selection 6 Move the joystick up or down in order to select the item to be set 4 White balance Shutter spee...

Страница 15: ...n to set the desired value The year will change as follows 2000 2001 2089 2000 The 24 hour clock is used 3 Press the joystick to determine the setting The clock function starts at 00 seconds ª About date time The date and time function are driven by a built in lithium battery Make sure to check the time before recording because the built in clock is not very accurate ª Recharging the built in lith...

Страница 16: ...l Press this button again and the lamp will go off and the brightness will revert back to the original brightness This will not affect the images to be recorded If you turn on the camera when the AC adaptor is used the POWER LCD function will automatically be activated ª Changing the picture quality on the LCD monitor 1 Set SETUP LCD AI DYNAMIC or NORMAL DYNAMIC The image on the LCD monitor become...

Страница 17: ...6 Slow frame by frame forward buttons E D E reverse D forward 33 7 Zoom volume button ZOOM VOL 8 Search button VAR SEARCH 34 9 Menu button MENU 15 10 Photoshot button PHOTO SHOT 11 Rewind review button 6 12 Pause button 13 Stop button 14 Recording start stop button START STOP 15 Playback button PLAY 1 16 Fast forward cue button 5 17 Enter button ENTER 15 means that these buttons function in the sa...

Страница 18: ...umber CR2025 The battery is normally expected to last about 1 year but it depends on operation frequency Keep the button type battery out of the reach of children If the remote control mode of the camera and that of the remote control do not match with each other REMOTE will appear When the remote control is operated for the first time after the camera is turned on CHECK REMOTE MODE 48 will appear...

Страница 19: ... and colour balance white balance and focusing will be adjusted automatically Auto white balance 58 Auto focusing 58 Colour balance and focus may not be adjusted depending on light sources or scenes If so manually adjust the white balance and focus Scene mode setting 29 White balance setting 30 Shutter speed setting 31 Iris gain value setting 31 Focus setting 31 ª Recording mode You can switch the...

Страница 20: ... minutes When it reaches less than 3 minutes the indication starts flashing During a 15 seconds or shorter recording the remaining tape time indication may not be displayed or the remaining tape time may not be displayed correctly In some cases the remaining tape time indication may display remaining tape time that is 2 to 3 minutes shorter than the actual remaining tape time Recording still pictu...

Страница 21: ...Set to Card Recording Mode 1 Press the button halfway in order to adjust focusing For auto focusing only The iris gain value is fixed and this camera focuses on the subject automatically 1 Shutter chance mark The white lamp flashes Focusing The green lamp lights up When in focus No mark When focusing is unsuccessful The shutter chance mark is indicated as follows when the button is not pressed hal...

Страница 22: ...desired picture size 1760 1760k1320 1280 1280k960 640 640k480 ª Select the picture quality for photoshot images 1 Set BASIC PICT QUALITY select the desired picture quality High picture quality Normal picture quality You can also change the picture quality on ADVANCE PICT QUALITY in the tape recording mode ª Recording with a shutter operation effect You can add a shutter operation simulating sound ...

Страница 23: ... function cannot be used ª To use the zoom microphone function Interlocked with the zooming operation the microphone will collect sounds clearly far away with the tele shot or those in the vicinity with the wide angle shot Set to Tape Recording Mode 1 Set ADVANCE ZOOM MIC ON ª About the variable speed zoom function When pushing the W T lever as far as it will go you can zoom from 1k to 10k in 2 1 ...

Страница 24: ...ll be completely turned off When you rotate the mode dial or remove the battery the quick start recording lamp is turned off and the quick start mode is cancelled If the movie camera is turned on and the Tape Card Recording Mode is set though the lamp turns on and the quick start mode is restored When the camera is quick started with the white balance on automatic it may take some time until the w...

Страница 25: ... light of the LCD monitor reaches approx 1 2 m or less ª To cancel the colour night view function Select the night view icon until the night view indication disappear If set in a bright place the screen may become whitish for a while The night view function makes the signal charging time of CCD up to approximately 25k longer than usual so that dark scenes invisible to the naked eye can be recorded...

Страница 26: ...The image and audio gradually appear Fade out The image and audio gradually disappear Set to Tape Recording Mode 1 Press the joystick until the icon 1 appears 2 Move the joystick left to select the fade icon 3 Press the recording start stop button Start recording fade in When you start recording the image audio disappeared completely and the image audio gradually appears Pause recording fade out T...

Страница 27: ...ord images compatible with wide screen TVs Wide Function Images are recorded with a 16 9 aspect ratio Cinema Function Images are recorded with a black belt appearing along the top and bottom of the screen so that they look like theatre movies Set to Tape Recording Mode 1 Wide Function Set ADVANCE ASPECT 16 9 Cinema Function Set ADVANCE CINEMA ON ª To cancel the Wide Cinema function Wide Function S...

Страница 28: ...g subject while tracking it Continuous Photoshot Records still pictures continuously at a certain interval Set to Card Recording Mode 1 Set BASIC PICTURE SIZE 640 2 Set ADVANCE BURST MODE ON 3 Press and hold the button ª To stop continuous photoshot midway through Release the button The camera records up to 10 still pictures at intervals of 0 5 seconds If the shutter speed is manually set to 1 25 ...

Страница 29: ...ded pictures this mode presents free of camera shakes During normal playback the image movement may not look smooth Avoid recording under fluorescent light mercury light or sodium light because the colour and brightness of the playback image may change If you record a subject illuminated with strong light or a highly reflective subject vertical lines of light may appear If the brightness is insuff...

Страница 30: ...balance manually Select in Step 3 Then while viewing a white subject on the entire screen move the joystick up to select the indication ª About flashing of the indication When the manual adjustment mode is selected Flashing indicates that the white balance previously adjusted is stored This setting is stored until the white balance is adjusted again When white balance cannot be set in the manual a...

Страница 31: ... or aperture value indication appears 1 Shutter speed 2 Aperture Iris gain value 3 Move the joystick left or right in order to adjust the shutter speed or aperture ª To restore to automatic adjustment Set the AUTO MANUAL FOCUS switch to AUTO Manual shutter speed adjustment Avoid recording under fluorescent light mercury light or sodium light because the colour and brightness of the playback image ...

Страница 32: ...there are iris values that are not displayed ª Shutter speed range 1 50 to 1 8000 seconds Tape Recording Mode 1 25 to 1 500 seconds Card Recording Mode The shutter speed closer to 1 8000 is faster ª Iris gain value range CLOSE Closed F16 F2 0 OPEN Opened 0dB 18dB Value closer to CLOSE darken the image Value closer to 18dB brighten the image Values with dB are gain values VQT1D15ENG book 32 ページ 200...

Страница 33: ...ppears In order to cancel the repeat playback mode set REPEAT PLAY OFF or set OFF ON switch to OFF When you set USB FUNCTION WEBCAM and then connect the USB connection cable the repeat playback mode is cancelled ª Settings on the audio If you cannot listen to the desired audio when playing back a tape check the settings in SETUP 12bit AUDIO When you record or dub the audio in 12bit and set SETUP 1...

Страница 34: ...ress and hold the E or the D button in the playback pause and then the images will continuously be played back frame by frame Variable speed search function The speed of cue review playback can be varied This operation is only available when using the remote control Set to Tape Playback Mode and play back a tape 1 Press the VAR SEARCH button on the remote control 2 Press the 3 or 4 button to vary ...

Страница 35: ... read the operating instructions for the TV ª To display the on screen information on the TV The information displayed on the LCD monitor or the viewfinder operation icon time code and mode indication etc date and time can be displayed on the TV 1 Press the EXT DISPLAY button on the remote control Press the button again to erase the OSD information Playing back card Set to Picture Playback Mode 1 ...

Страница 36: ...d on a card The deleted files cannot be restored Set to Picture Playback Mode 1 Move the joystick left or right to select a file to delete You can select a file in the multi screen display After selecting the file press the joystick and display the operation icon 2 Move the joystick down to select 3 Move the joystick up or down in order to select DELETE 1 FILE and then press it 4 When the confirmi...

Страница 37: ...ger If the SD Memory Card is formatted on a PC it cannot be used on the Movie Camera Format the SD Memory Card on the Movie Camera in this case The Movie Camera supports SD Memory Cards formatted in FAT12 system and FAT16 system based on SD Memory Card Specifications Protecting files on a card Files recorded on a card can be locked so that they may not be deleted by mistake Even if the files are l...

Страница 38: ...n select from 0 to 999 Selected number of pictures can be printed as you set the number of prints with the printer supporting DPOF 2 or more files can be set in succession ª To complete the settings Press the MENU button DPOF setting made on another camera may not be recognised by this camera Please perform the DPOF settings on your movie camera ª To set so that all pictures are not printed Select...

Страница 39: ... Pictures recorded by the movie camera can be stored on a DVD RAM or other such media Refer to the instructions for the recorder Place a recorded cassette in the movie camera and an unrecorded DVD RAM or cassette in the DVD recorder or VCR 1 Connect the movie camera and the recorder Connecting with the AV cable Connect the movie camera and the recorder by using the AV cable 1 If the recorder has a...

Страница 40: ...utton on the remote control to stop recording Recorder 6 Stop playback Player ª To cancel the standby for recording When the camera is standby for recording move the joystick down and select the icon Do not plug or unplug the DV cable during dubbing or the dubbing may not be completed properly If a picture bilingual video etc containing main sound and sub sound has been dubbed select the desired s...

Страница 41: ... audio dubbing Set to Tape Recording Mode When you want to preserve the original sound taken during recording set SETUP AUDIO REC 12bit to take pictures When set 16bit the sounds taken during recording are erased after recording with audio dubbing Set BASIC REC SPEED SP to take pictures ª To play back the sound recorded with audio dubbing You can switch between the sound recorded with audio dubbin...

Страница 42: ...lect DPOF PRINT When you select DPOF PRINT for printing set the number of prints in DPOF setting When DPOF PRINT is selected print after you determine the paper size 3 Move the joystick left and right to select a desired picture and then press it 4 Select the desired number of prints You can set up to 9 prints 5 Select the setting for date printing If the printer is not capable of date printing th...

Страница 43: ...OOM 23 ZOOM MIC 23 DATE TIME 45 INITIAL SET 46 3 SETUP FADE COLOUR 26 AUDIO REC 45 REC LAMP 45 DISPLAY 45 REMOTE 18 BEEP SOUND 45 LCD AI 16 LCD SET 16 EVF SET 16 DEMO MODE 46 AV JACK 46 POWER SAVE 45 4 LANGUAGE 14 ª TAPE PLAYBACK MENU 1 BASIC DATE TIME 45 AV JACK 46 USB FUNCTION Refer to the operating instructions for PC connection 2 ADVANCE BLANK SEARCH 21 REC SPEED 19 REC STDBY 40 REC DATA 46 PI...

Страница 44: ...IME 45 INITIAL SET 46 3 SETUP REC LAMP 45 DISPLAY 45 REMOTE 18 BEEP SOUND 45 LCD AI 16 LCD SET 16 EVF SET 16 POWER SAVE 45 4 LANGUAGE 14 ª PICTURE PLAYBACK MENU 1 BASIC DATE TIME 45 PROTECT 37 2 ADVANCE DPOF SET 38 CARD FORMAT 37 3 SETUP DISPLAY 45 REMOTE 18 LCD SET 16 EVF SET 16 LCD AI 16 POWER SAVE 45 4 LANGUAGE 14 VQT1D15ENG book 44 ページ 2006年10月30日 月曜日 午後8時23分 ...

Страница 45: ... to OFF and it can be switched to minimum display ª BEEP SOUND Set to ON and confirmation alarm beeps are issued as follows 1 Beep When you start recording When you turn on the power 2 Beeps When you pause recording 2 Beeps for 4 times When a cassette with its erasure prevention tab set to SAVE is inserted condensation occurs and at other times Check the sentence displayed on the screen ª POWER SA...

Страница 46: ...etimes not displayed normally ª AUDIO OUT This switches the sound to be played back STEREO Stereo sound main sound and sub sound L Left channel sound main sound R Right channel sound sub sound Other menus ª INITIAL SET When there is a menu that cannot be selected depending on a combination of functions set to YES for changing the menu settings back to the initial shipping condition Language settin...

Страница 47: ...uto white balance 30 Indoor mode recording under incandescent lamp 30 Outdoor mode 30 White balance adjustment mode 30 WEB CAMERA mode recording 42 Playback indications Recording underway 1 Playback 33 Pause 33 5 Fast forward Cue playback 33 6 Rewind Review playback 33 D E Slow motion playback 33 1 2 Frame by frame playback 33 2k5 Variable speed search 34 Repeat playback 33 WEB CAMERA mode playbac...

Страница 48: ...gital dubbing on a tape with the accidental erasure prevention slider placed in the SAVE position CHECK REMOTE MODE An incorrect remote control mode has been selected This is only displayed at the first operation of the remote control after powering on 18 WRONG TAPE FORMAT You are attempting to play back a tape section that has been recorded with a different TV system This cassette is incompatible...

Страница 49: ...ds the lens the brightness of the LCD monitor cannot be adjusted Functions cannot be used simultaneously Some functions in the movie camera are disabled or cannot be selected due to its specifications The table below shows examples of functions restricted by conditions Functions Conditions which disable the functions Progressive When recording onto a tape and a card simultaneously When digital zoo...

Страница 50: ...all operations except for taking cassettes out Wait until the condensation indication disappears 54 4 Battery runs down quickly Is the battery fully charged Charge it with the AC adaptor 9 Are you using the battery in an extremely cold place The battery is affected by ambient temperature In cold places the operating time of the battery becomes shorter Has the battery worn out The battery has a lim...

Страница 51: ...en the movie camera may not operate normally Close the cassette cover 10 2 The screen has changed suddenly Has the demonstration started In the Tape Recording mode if you set DEMO MODE ON without inserting a cassette and a card the demonstration starts For normal use set this function to OFF 46 3 A cassette cannot be inserted Has condensation occurred Wait until the condensation indication disappe...

Страница 52: ...back Pictures 1 Mosaic pattern noise appears on images during cue or review playback This phenomenon is characteristic of digital video systems It is not a malfunction 2 Horizontal stripes appear on images during cue and review playback Horizontal stripes may appear depending on the scene but this is not a malfunction 3 Although the movie camera is correctly connected to a TV playback images canno...

Страница 53: ... yourself 3 Even if connected by the USB cable the movie camera is not recognized by the PC Is the USB driver installed For information refer to the operating instructions for PC connection separate volume 4 When the USB cable is disconnected an error message will appear on PC To disconnect the USB cable safely double click the icon in the task tray and follow the instructions on the screen 5 The ...

Страница 54: ... camera in this condition for about 1 hour When the lens temperature becomes close to the ambient temperature the fogging disappears naturally ª About dirty heads If video heads the parts that closely contact with the tape become dirty normal recording and playback are not properly performed Clean the heads with the digital video head cleaner Insert the head cleaner into the movie camera set it to...

Страница 55: ...pe the movie camera with it Afterwards wipe it with a dry cloth When you use a chemical dust cloth follow the instructions Do not use this movie camera for surveillance purposes or other business use If you use the movie camera for a long time the internal temperature increases and consequently this may cause malfunction This movie camera is not intended for business use ª About the battery The ba...

Страница 56: ... 6 months wind the tape to the end and then rewind it to the beginning If the cassette is left for 1 year or longer without winding or rewinding the tape may be deformed by expansion or shrinkage attributable to temperature and humidity The wound tape may stick to itself Dust direct sunlight ultraviolet rays and humidity may damage the tape Such usage may cause damage to the movie camera and the h...

Страница 57: ...he effective range of automatic white balance adjustment the image will become reddish or bluish Even within the effective range of automatic white balance adjustment the automatic white balance adjustment may not function properly if there is more than one light source For light outside the functional auto white balance adjustment range use the manual white balance adjustment mode 1 The effective...

Страница 58: ...the following situations Record pictures in the manual focus mode Recording a subject with one end located closer to the movie camera and the other end farther away from it As auto focus adjusts at the centre of an image it may be impossible to focus on a subject that is located in both the foreground and background Recording a subject behind dirty or dusty glass The subject behind the glass will ...

Страница 59: ...ant Hi Speed No copyright protection support PictBridge compliant Digital interface DV input output terminal IEEE1394 4 pin Dimensions Approx 71 mm W k73 mm H k123 mm D excluding the projection part Mass Approx 410 g without supplied battery and DV cassette Approx 480 g with supplied battery and DV cassette Operating temperature 0 oC to 40 oC Operating humidity 10 to 80 Card memory functions Recor...

Страница 60: ...n an SD Memory Card optional PICTURE SIZE 640 1280 1760 PICT QUALITY 8 MB 45 95 9 15 4 7 16 MB 100 200 21 35 11 18 32 MB 220 440 47 76 24 40 64 MB 440 880 98 158 52 84 128 MB 880 1760 187 302 100 161 256 MB 1760 3520 390 628 208 335 512 MB 3520 7040 774 1246 414 666 1 GB 7040 14080 1550 2495 831 1334 2 GB 14080 28160 3160 5030 1680 2700 VQT1D15ENG book 60 ページ 2006年10月30日 月曜日 午後8時23分 ...

Страница 61: ...61 VQT1D15 For_Anzen_memo fm 66 ページ 2006年10月30日 月曜日 午後4時8分 ...

Страница 62: ...A VQT1D15 F0000Nm0 0000 A C Matsushita Electric Industrial Co Ltd Web site http panasonic net VQT1D15ENG book 61 ページ 2006年10月30日 月曜日 午後8時23分 ...

Отзывы: