background image

Record mode

24

VQT0N43

While data are recorded on a card, do not 
operate the mode dial.

When the access lamp is lit, do not insert or 
remove a card.

Another product may degrade or not play back 
data recorded on this camera.

If set [PICT. QUALITY] >> [

], mosaic-pattern 

noise may appear on a playback image 
depending on the picture content.

When the [PICTURE SIZE] is set to other than 
[640], the mega pixel recording mode is set.

When the picture size setting is other than [640], 
the scene around the subject can be recorded 
wider than that in [640].

ª

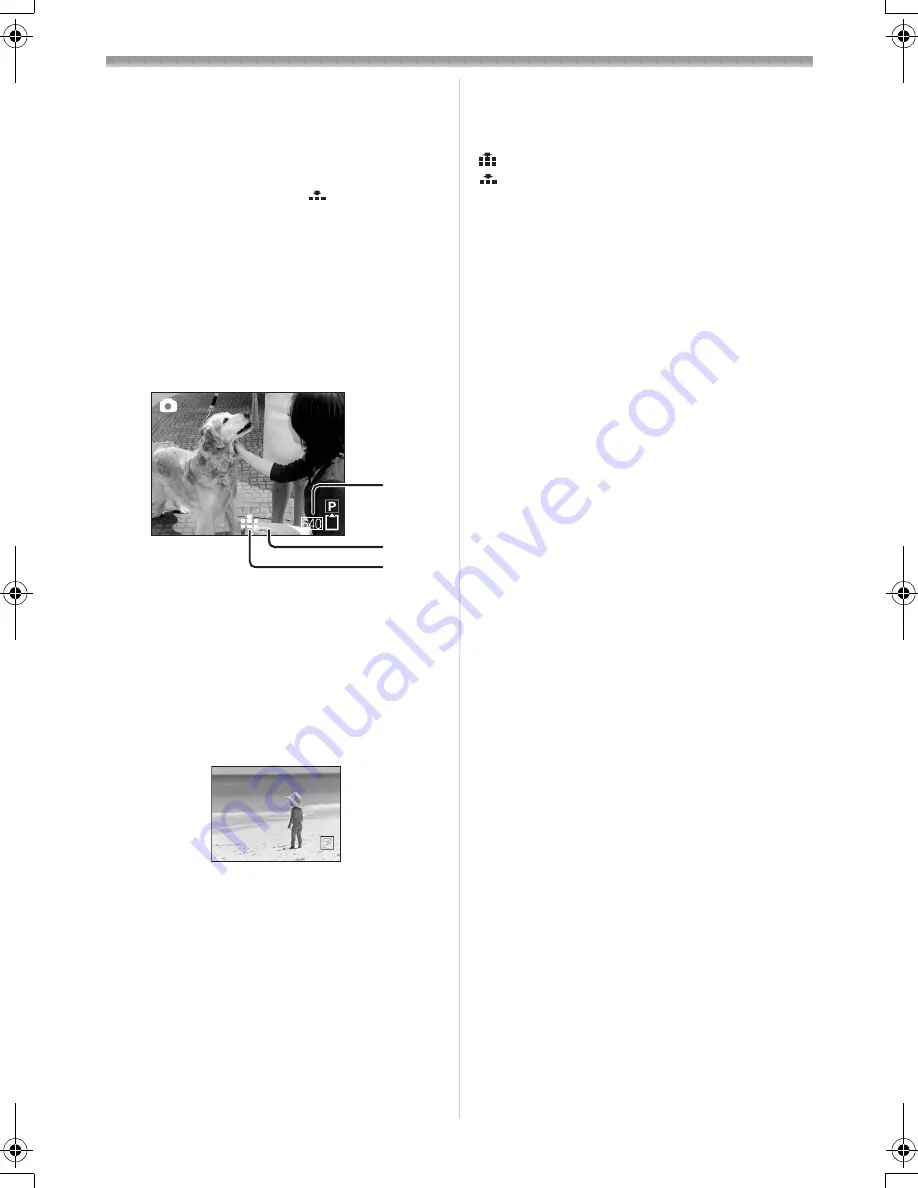
On-screen display in the card 
recording mode

1) Still picture size
2) Number of recordable still pictures

(When no pictures can be recorded, the red 
light will flash.) 

3) Quality of still pictures

ª

Progressive Photoshot

You can record still pictures with higher picture 
quality and frames. (You cannot switch the 
progressive function off/on.) 

In the tape recording mode, the progressive 
function may be disabled depending on the 
other functions used. (

-52-

ª

Select the size of still pictures to be 
recorded on a card

1

Set [BASIC] >> [PICTURE SIZE] >> select 
the desired picture size. 

[1760]: 1760

k

1320

[1280]: 1280

k

960

[640]:

640

k

480

ª

Select the picture quality for 
photoshot images

1

Set [BASIC] >> [PICT. QUALITY] >> select 
the desired picture quality.

[

]:

High picture quality

[

]:

Normal picture quality

You can also change the picture quality on 
[ADVANCE] >> [PICT. QUALITY] in the tape 
recording mode.

ª

Recording with a shutter operation 
effect

You can add a shutter operation simulating 
sound.

1

Set [ADVANCE] >> [SHTR EFFECT] >> [ON].

ª

About the shutter chance mark

The shutter chance mark does not appear in 
manual focus mode.

When the subject is not easily focused, focus on 
the subject manually.

You can record still pictures on the card even if 
the shutter chance mark does not appear, but 
pictures may be recorded without being 
focused.

The shutter chance mark does not appear or 
becomes difficult to be displayed in the following
cases.

When the zoom magnification is high.

When the movie camera is shaken.

When the subject is moving.

When the subject stands against the light 
source.

When close subjects and far subjects are 
included in the same scene.

When the scene is dark.

When there is a bright part in the scene.

When the scene is filled with only horizontal 
lines.

When the scene lacks contrast.

ª

Concerning the focusing area

When there is a contrasting object ahead or 
behind the subject in the focus area, the subject 
may not be focused. If so, move the contrasting 
object out of the focus area.

100

1)

2)

3)

GS150_140EB.book  24 ページ  2004年11月27日 土曜日 午後4時55分

Содержание NV-GS140EB

Страница 1: ...Operating Instructions Digital Video Camera Model No NV GS150EB NV GS140EB Before use please read these instructions completely VQT0N43 R ...

Страница 2: ... not be used until a replacement cover is obtained A replacement fuse cover can be purchased from your local Panasonic Dealer IF THE FITTED MOULDED PLUG IS UNSUITABLE FOR THE SOCKET OUTLET IN YOUR HOME THEN THE FUSE SHOULD BE REMOVED AND THE PLUG CUT OFF AND DISPOSED OF SAFELY THERE IS A DANGER OF SEVERE ELECTRICAL SHOCK IF THE CUT OFF PLUG IS INSERTED INTO ANY 13 AMPERE SOCKET If a new plug is to...

Страница 3: ...ges for reference Pages for reference are indicated by dashes either side of a number for example 00 The menu operation flow is indicated by in the description Use only the recommended accessories Do not use any other AV cables and USB cables except the supplied one When you use the cable which are sold separately please make sure to use the one whose length is less than 3 meters ª WARNING To prev...

Страница 4: ...ade in fade out function 28 Wind noise reduction function 28 Using the built in video flash 29 Self timer recording 30 Recording images for wide screen TVs 30 Image stabilizer function 31 Continuous Photoshot 31 Recording in various situations Scene mode 32 Recording in natural colours White balance 33 Manual focus adjustment 34 Manual shutter speed aperture adjustment 34 Playback mode Playing bac...

Страница 5: ...on our website for further details Accessories The followings are the accessories supplied with this product 1 AC adaptor DC input lead AC mains lead 10 2 Battery pack 10 3 Remote control button type battery 18 4 Free style remote control with mic 20 5 AV cable 41 6 Shoulder strap 7 7 USB cable and CD ROM 44 Optional 1 AC adaptor VW AD11EB 2 Battery pack lithium CGR DU06 640mAh 3 Battery pack lith...

Страница 6: ...for power supply and noise will stop 11 USB terminal 44 12 Speaker 36 13 Viewfinder 10 59 14 Battery holder 15 Battery release lever BATT 11 16 Power switch OFF ON 14 17 Power lamp 14 18 Quick start recording button QUICK START 26 Quick start recording lamp 26 19 Menu button MENU 15 20 Joystick 14 21 Mode dial 14 22 Recording start stop button 22 23 S Video output terminal S VIDEO 38 24 LCD monito...

Страница 7: ...ower is supplied from this product 40 Tripod receptacle This is a hole for attaching the camera to optional tripod VW CT45E Please carefully read the operating instructions for how to attach the tripod to the camera When the tripod is used operate the camera from the free style remote control with mic for convenience When not using the remote control attach the clip to the grip belt for convenienc...

Страница 8: ... W side the 4 corners of an image will be darkened Vignetting The lens hood has a built in lens cover Fitting the lens cap optional Fit the lens cap to protect the surface of the lens If you do not use the movie camera when the MC protector or the ND filter of the Filter Kit VW LF37WE optional is attached to the front of the lens hood attach the lens cap to protect the surface of the lens 1 Remove...

Страница 9: ... belt attachment part press the lock cover 1 and check if the grip belt is securely locked ª To use as a grip belt Adjust the belt length so it fits your hand 1 Adjust the belt length and the pad position 1 Flip the belt 2 Adjust the length 3 Fix the belt Using the LCD monitor You can record the image while viewing it on the LCD monitor opened 1 Put a finger on the LCD monitor open part and pull t...

Страница 10: ...then the battery will not get charged Remove the DC input lead from the AC adaptor 1 Connect the AC mains lead to the AC adaptor and the AC mains socket 2 Put the battery on the battery mount by aligning the mark and then securely plug it in ª Charging lamp Lights up Charging Goes off Charging completed Flashing The battery is over discharged discharged excessively In a while the lamp will light u...

Страница 11: ... The intermittent recordable time refers to recordable time when the recording and stopping operations are repeated 1h 10 min indicates 1 hour 10 minutes The battery CGA DU12 is supplied The times shown in the table are rough estimates The times indicate the recordable times when the viewfinder is used The times in parentheses indicate the recordable times when the LCD monitor is used We recommend...

Страница 12: ...n a case Store the case in an upright position 58 When condensation is formed on the lens or the main unit of the movie camera even if no condensation alarm is indicated condensation may have formed on the heads or the cassette tape Do not open the cassette cover 56 ª When the cassette holder does not come out Close the cassette cover completely and then open it again completely Check if the batte...

Страница 13: ...d We recommend saving important data on a personal computer by using a USB cable PC card adaptor and USB reader writer ª Card access lamp When the camera accesses the card reading recording playback erasing etc the access lamp lights up If the following operations are performed when the access lamp is lit then the card or the recorded data may be damaged or the camera may malfunction Opening the c...

Страница 14: ...still pictures recorded on a card PC mode You can view or edit the images recorded on a card on your personal computer Refer to the operating instructions for PC connection How to use the joystick ª Basic joystick operations Operations on the menu screen and selection of files to be played back on the multi image display Move the joystick up down left or right to select an item or file and then pu...

Страница 15: ...enu corresponding to the mode selected by the mode dial is displayed Do not switch the mode dial when the menu is displayed 2 Move the joystick up or down in order to select the top menu 3 Move the joystick right or press it to set the selection 4 White balance Shutter speed Iris or gain value 33 1 Select Adjust 33 2 Select Adjust 33 3 Playback pause 36 4 Stop 36 2 Rewind review playback 36 1 Fast...

Страница 16: ...he previous screen Move the joystick left ª About the menu setting The menu screen does not appear during recording And you cannot record when the menu screen appears ª Operating with remote control The menu screen transition is the same as when the buttons on the main unit are used 1 Press the MENU button 2 Select a menu item Use the direction buttons π and ENTER button in place of the joystick o...

Страница 17: ...ing recharged Adjusting LCD monitor viewfinder ª Adjusting the brightness and colour level 1 Set SETUP LCD SET or EVF SET YES 2 Move the joystick up or down in order to select the item to be adjusted LCD SET Brightness of the LCD monitor Colour level of the LCD monitor EVF SET Brightness of the viewfinder 3 Move the joystick left or right to move the bar indication representing the brightness 4 Pr...

Страница 18: ...e lens the picture quality of the LCD monitor is temporarily adjusted as if the LCD AI is set to NORMAL Using the remote control ª Remote control Using the remote control supplied will enable controlling almost all the functions of this camera to be controlled 1 Date time button DATE TIME 46 2 On screen display button OSD 38 3 Record button REC NV GS150 only 42 4 Audio dubbing button A DUB 43 5 Di...

Страница 19: ...ª Concerning the button type battery When the button type battery runs down replace it with a new battery part number CR2025 The battery is normally expected to last about 1 year but it depends on operation frequency Keep the button type battery out of the reach of children If the remote control mode of the camera and that of the remote control do not match with each other REMOTE will appear When ...

Страница 20: ...as it goes ª Switching the microphone Press the TALK button on the free style remote control with mic and the microphone on the remote control will be activated instead of that on the camera While this button is being pressed appears and the microphone on the remote control is activated We recommend you talk with the microphone approx 10 cm away from your mouth ª About the clip on the backside Whe...

Страница 21: ... AUTO and colour balance white balance and focusing will be adjusted automatically Auto white balance 60 Auto focusing 60 Colour balance and focus may not be adjusted depending on light sources or scenes If so manually adjust the white balance and focus Scene mode setting 32 White balance setting 33 Shutter speed setting 34 Iris gain value setting 34 Focus setting 34 ª Recording mode You can switc...

Страница 22: ...ning tape time is indicated in minutes When it reaches less than 3 minutes the indication starts flashing During a 15 second or shorter recording the remaining tape time indication may not be displayed or the remaining tape time may not be displayed correctly In some cases the remaining tape time indication may display remaining tape time that is 2 to 3 minutes shorter than the actual remaining ta...

Страница 23: ...djust focusing For auto focusing only The iris gain value is fixed and this camera focuses on the subject automatically 1 Shutter chance mark The white lamp flashes Focusing The green lamp lights up When in focus No mark When focusing is unsuccessful The shutter chance mark is indicated as follows when the PHOTO SHOT button is not pressed halfway Please use it as a guide for recording The green la...

Страница 24: ...lect the picture quality for photoshot images 1 Set BASIC PICT QUALITY select the desired picture quality High picture quality Normal picture quality You can also change the picture quality on ADVANCE PICT QUALITY in the tape recording mode ª Recording with a shutter operation effect You can add a shutter operation simulating sound 1 Set ADVANCE SHTR EFFECT ON ª About the shutter chance mark The s...

Страница 25: ...nction cannot be used ª To use the zoom microphone function Interlocked with the zooming operation the microphone will collect sounds clearly far away with the tele shot or those in the vicinity with the wide angle shot Set to Tape Recording Mode 1 Set ADVANCE ZOOM MIC ON ª About the variable speed zoom function When pushing the W T lever as far as it will go you can zoom from 1k to 10k in 2 1 sec...

Страница 26: ... the quick start mode is cancelled If the movie camera is turned on and the Tape Card Recording Mode is set though the lamp turns on and the quick start mode is restored When the camera is quick started with the white balance on automatic it may take some time until the white balance is adjusted if the scene being recorded has a light source different from the scene last recorded When the colour n...

Страница 27: ...proximately 25k longer than usual so that dark scenes invisible to the naked eye can be recorded brightly For this reason bright dots that are usually invisible may be seen but this is not a malfunction The night view function is cancelled when you operate the power switch or the mode dial Soft skin mode This allows the skin colour to be recorded in a softer tone This is more effective if you reco...

Страница 28: ...l fading Select the icon again ª To select the colour for fade in out The colour which appears in fading pictures can be selected 1 Set SETUP FADE COLOUR WHITE or BLACK While the fade in fade out function is selected it takes several seconds to display the image when you start recording images Besides it also takes several seconds to pause recording Wind noise reduction function This reduces the w...

Страница 29: ... flash is lit in front of a white background A conversion lens optional can block the flash and may cause a vignetting effect Do not use the flash with the ND filter optional attached Set the flash to where using a flash is prohibited Do not block the flash by hand or any other means ª When the video flash is not used Set ADVANCE FLASH ª To adjust the brightness of the video flash 1 Set ADVANCE FL...

Страница 30: ...n Images are recorded with a black belt appearing along the top and bottom of the screen so that they look like theatre movies Set to Tape Recording Mode 1 Wide Function Set ADVANCE ASPECT 16 9 Cinema Function Set ADVANCE CINEMA ON ª To cancel the Wide Cinema function Wide Function Set ADVANCE ASPECT 4 3 Cinema Function Set ADVANCE CINEMA OFF Images played back vary depending on the TV connected P...

Страница 31: ...while tracking it Continuous Photoshot Records still pictures continuously at a certain interval Set to Card Recording Mode 1 Set BASIC PICTURE SIZE 640 2 Set ADVANCE BURST MODE ON 3 Press and hold the PHOTO SHOT button ª To stop continuous photoshot midway through Release the PHOTO SHOT button The camera records up to 10 still pictures at intervals of 0 5 seconds If the shutter speed is manually ...

Страница 32: ... playback pause of recorded pictures this mode presents free of camera shakes During normal playback the image movement may not look smooth Avoid recording under fluorescent light mercury light or sodium light because the colour and brightness of the playback image may change If you record a subject illuminated with strong light or a highly reflective subject vertical lines of light may appear If ...

Страница 33: ...tment ª To set the white balance manually Select in Step 3 Then while viewing a white subject on the entire screen move the joystick up to select the indication ª About flashing of the indication When the manual adjustment mode is selected Flashing indicates that the white balance previously adjusted is stored This setting is stored until the white balance is adjusted again When white balance cann...

Страница 34: ...ation appears 1 Shutter speed 2 Aperture Iris gain value 3 Move the joystick left or right in order to adjust the shutter speed or aperture ª To restore to automatic adjustment Set the AUTO MANUAL FOCUS switch to AUTO Manual shutter speed adjustment Avoid recording under fluorescent light mercury light or sodium light because the colour and brightness of the playback image may change If you increa...

Страница 35: ... that are not displayed ª Shutter speed range 1 50 1 8000 seconds Tape Recording Mode 1 25 1 500 seconds Card Recording Mode The shutter speed closer to 1 8000 is faster ª Iris gain value range CLOSE Closed F16 F2 0 OPEN Opened 0dB 18dB Value closer to CLOSE darken the image Value closer to 18dB brighten the image Values with dB are gain values ...

Страница 36: ...trol press the T button to increase the volume or the W button to decrease it When the adjustment is completed the volume indication will disappear If you do not hear the sound check the settings of SETUP 12bit AUDIO ª Repeat playback When the tape end is reached the tape will be rewound and played back again 1 Set ADVANCE REPEAT PLAY ON The indication appears In order to cancel the repeat playbac...

Страница 37: ...ck If you keep pushing the lever then the images will continuously be played back frame by frame ª To return to normal playback Press the 1 button on the remote control Slow motion playback In the reversed slow motion playback the time code indication may be unstable Frame by frame playback Press and hold the E or the D button in the playback pause and then the images will continuously be played b...

Страница 38: ...tion please read the operating instructions for the TV ª To display the on screen information on the TV The information displayed on the LCD monitor or the viewfinder operation icon time code and mode indication etc date and time can be displayed on the TV 1 Press the OSD button on the remote control Press the button again to erase the OSD information Playing back card Set to Picture Playback Mode...

Страница 39: ...vie camera Deleting files recorded on a card The deleted files cannot be restored Set to Picture Playback Mode 1 Move the joystick left or right to select a file to delete You can select a file in the multi screen display After selecting the file press the joystick and display the operation icon 2 Move the joystick down to select 3 Move the joystick up or down in order to select DELETE 1 FILE and ...

Страница 40: ... the selected file is locked Press the joystick again and the lock will be cancelled 2 or more files can be locked in succession ª To complete the settings Press the MENU button Writing the printing data on a card DPOF setting You can write the data of pictures to be printed number of copies and other information DPOF data onto the card Set to Picture Playback Mode 1 Set ADVANCE DPOF SET SET 2 Mov...

Страница 41: ...ctures recorded by the movie camera can be stored on a DVD RAM or other such media Refer to the instructions for the recorder Place a recorded cassette in the movie camera and an unrecorded DVD RAM or cassette in the DVD recorder or VCR 1 Connect the movie camera and the recorder Connecting with the AV cable Connect the movie camera and the recorder by using the AV cable 1 If the recorder has an S...

Страница 42: ...onal 1 high image quality dubbing can be done in digital format Only the NV GS150 can be used as a Recorder Set to Tape Playback Mode Player recorder 1 Connect the movie camera and digital video equipment with the DV cable 2 Set ADVANCE REC STDBY YES Recorder You do not have to follow this step when the remote control is used in the digital dubbing 3 Start playback Player 4 Start recording Recorde...

Страница 43: ... dubbing You can add music or narration to the recorded cassette Set to Tape Playback Mode 1 Insert a free style remote control or an external microphone securely into the REMOTE MIC terminal as far as it will go 2 Find a scene that you want to add sound to and press the button on the remote control 3 Press the A DUB button on the remote control to make audio dubbing ready 4 Press the button on th...

Страница 44: ...nting pictures by directly connecting to the printer PictBridge To print pictures by directly connecting the movie camera to the printer use a printer compatible with PictBridge Read the operating instructions for the printer Insert a card and set to Picture Playback Mode 1 Connect the movie camera and the printer with the supplied USB cable 1 USB cable The PictBridge indication appears on the scr...

Страница 45: ...ed on the printer 7 Set PRINT YES to start printing ª When you stop printing halfway Move the joystick down Avoid the following operations during printing These operations disable proper printing Disconnecting the USB cable Removing the card Switching the mode dial Turning off the power Check the settings for the paper size quality of print etc on the printer You cannot print pictures that cannot ...

Страница 46: ...tions for PC connection D ZOOM 25 ZOOM MIC 25 DATE TIME 48 INITIAL SET 49 3 SETUP FADE COLOUR 28 AUDIO REC 48 REC LAMP 48 DISPLAY 48 REMOTE 19 BEEP SOUND 48 LCD AI 18 LCD SET 17 EVF SET 17 DEMO MODE 49 AV JACK 48 POWER SAVE 48 4 LANGUAGE 15 ª TAPE PLAYBACK MENU 1 BASIC DATE TIME 48 AV JACK 48 USB FUNCTION Refer to the operating instructions for PC connection 2 ADVANCE BLANK SEARCH NV GS150 only 23...

Страница 47: ...E 29 FLASH LEVEL 29 SHTR EFFECT 24 DATE TIME 48 INITIAL SET 49 3 SETUP REC LAMP 48 DISPLAY 48 REMOTE 19 BEEP SOUND 48 LCD AI 18 LCD SET 17 EVF SET 17 POWER SAVE 48 4 LANGUAGE 15 ª PICTURE PLAYBACK MENU 1 BASIC DATE TIME 48 PROTECT 40 2 ADVANCE DPOF SET 40 CARD FORMAT 40 3 SETUP DISPLAY 48 REMOTE 19 LCD SET 17 EVF SET 17 LCD AI 18 POWER SAVE 48 4 LANGUAGE 15 ...

Страница 48: ...and at other times Check the sentence displayed on the screen ª POWER SAVE OFF When about 5 minutes passed without any operation the standby mode automatically will be set In the standby mode blinks and it takes time more than usual to start recording after you press the recording start stop button 5 MINUTES When about 5 minutes passed without any operation the movie camera automatically turns off...

Страница 49: ...O MODE ON without inserting a cassette and a card the movie camera is automatically set to the demonstration mode for introducing its functions If any button is pressed or operated the demonstration mode is cancelled If no operations take place for approx 10 minutes the demonstration mode automatically starts To terminate the demonstration mode insert a cassette or a card or set to DEMO MODE OFF F...

Страница 50: ... used 20 External microphone supporting the smart accessory shoe 7 External microphone supporting the smart accessory shoe LOW CUT 7 5 Sports mode Scene mode 32 Portrait mode Scene mode 32 Low light mode Scene mode 32 Spotlight mode Scene mode 32 Surf snow mode Scene mode 32 Auto white balance 33 Indoor mode recording under incandescent lamp 33 Outdoor mode 33 White balance adjustment mode 33 WEB ...

Страница 51: ...empting to record pictures on a tape with the accidental erasure prevention slider placed in the SAVE position You are attempting audio dubbing or digital dubbing on a tape with the accidental erasure prevention slider placed in the SAVE position CHECK REMOTE MODE An incorrect remote control mode has been selected This is only displayed at the first operation of the remote control after powering o...

Страница 52: ... LCD MONITOR At the time of 0 Lux night view mode when LCD monitor is not reversed it displays Functions cannot be used simultaneously Some functions in the movie camera are disabled or cannot be selected due to its specifications The table below shows examples of functions restricted by conditions Functions Conditions which disable the functions Progressive When recording onto a tape and a card s...

Страница 53: ...ected by ambient temperature In cold places the operating time of the battery becomes shorter Has the battery worn out The battery has a limited life If the operating time is still too short even after the battery is fully charged depending on the usage the battery has worn out and can no longer be used 5 The movie camera cannot be operated though powered up The movie camera does not operate norma...

Страница 54: ... For normal use set this function to OFF 49 4 A cassette cannot be inserted Has condensation occurred Wait until the condensation indication disappears 5 Auto focus function does not work Is manual focus mode selected If auto focus mode is selected focus is automatically adjusted There are some recording subjects and surroundings for which the auto focus does not operate correctly 60 If so use the...

Страница 55: ...V and select the channel that matches the input terminals used for the connection 4 Playback picture is not clear Are the heads of the movie camera dirty If the heads are dirty playback image cannot be clear Clean the heads by using the head cleaner for digital video optional 56 If the terminal for the AV cable is soiled noises may appear on the screen Wipe the soil off the terminal with a soft cl...

Страница 56: ...Is the video stream driver installed For details refer to the operating instructions for PC connection Cautions for Use ª About condensation If you turn the movie camera on when condensation occurs on the head or the tape condensation Indication 3 yellow or red is displayed on the viewfinder or the LCD monitor and the messages 3DEW DETECT or 3EJECT TAPE only when the tape is inserted appear If so ...

Страница 57: ...mera is affected by such equipment and does not function properly turn off the movie camera power and detach the battery or AC adaptor Then connect the battery or AC adaptor again and turn on the movie camera power Do not use your movie camera near radio transmitters or high voltage cables If you record pictures near radio transmitters or high voltage cables recorded images or sounds may be advers...

Страница 58: ...atter attached to the battery terminals should be removed Do not throw old battery into fire Heating a battery or throwing it into a fire may result in an explosion If the operating time is very short even after the battery has been recharged the battery has worn out Please purchase a new battery ª About the AC adaptor If the battery is warm charging requires more time than normal If the temperatu...

Страница 59: ...00CDPFP folder etc Files with the DPOF settings can be recorded on MISC folder ª LCD monitor viewfinder LCD monitor When the LCD monitor gets dirty wipe it with a dry soft cloth In a place with drastic temperature changes condensation may form on the LCD monitor Wipe it with soft dry cloth If your movie camera is extremely cold the LCD monitor is slightly darker than usual immediately after you tu...

Страница 60: ...mera can adjust the balance among the other colours Since white colour is the reference of all colours light the movie camera can record pictures in a natural hue if it can recognize the reference white colour ª Auto focus Auto focus automatically moves the focusing lens forward and backward inside the movie camera to bring the subject into focus Auto focus has the following characteristics Adjust...

Страница 61: ... Video output level Y Output 1 0 Vp p 75 ohm C Output 0 3 Vp p 75 ohm Audio output level Line 316 mV 600 ohm Mic input Mic sensitivity 50 dB 0 dB 1 V Pa 1 kHz Stereo mini jack USB Card reader writer function USB 2 0 compliant Hi Speed No copyright protection support PictBridge compliant Digital interface NV GS140 DV output terminal IEEE1394 4 pin NV GS150 DV input output terminal IEEE1394 4 pin Vi...

Страница 62: ... depending on the subject being photographed Power source AC 110 240 V 50 60 Hz Power consumption 19 W DC output DC 7 9 V 1 4 A Movie camera operation DC 8 4 V 0 65 A Battery charging Maximum number of still pictures recordable on an SD Memory Card optional PICTURE SIZE 640 1280 1760 PICT QUALITY 32 MB 220 440 47 76 24 40 64 MB 440 880 98 158 52 84 128 MB 880 1760 187 302 100 161 256 MB 1760 3520 ...

Страница 63: ...izer function 31 ª L LCD Monitor 9 59 Low Light Mode 32 ª M Manual Focus 34 Mode Dial 14 ª P Photoshot 23 PictBridge 44 Portrait Mode 32 ª Q Quick Start 26 ª R Recording Check 23 Recording Speed 21 Red eye reduction function 29 Remaining Tape Time 50 Remote Control 18 Repeat Playback 36 ª S Scene mode 32 Self Recording 25 Self timer Recording 30 Shutter chance mark 23 Shutter Speed 34 Slow Motion ...

Страница 64: ...B VQT0N43 F1104Ke0 3500 A C Matsushita Electric Industrial Co Ltd Web site http www panasonic co jp global ...

Отзывы: