background image

Before Use

-7-

When connecting the Free Style Remote 

Controller with Mic to this socket and the 
[TALK] Button is pressed, the built-in 
microphone does not operate. 

-22-

When connecting the pin plug of the Free 

Style Remote Controller with Mic to this 
socket, plug it in as far as it goes.

A compatible plug-in powered microphone 

can be used.

The microphone may make noises 

depending on the type of it. In this case, we 
recommend using the battery for the Movie 
Camera.

(34)

Audio-Video Input/Output Socket 
[AV IN/OUT] (Input function on NV-GS200 
Model only) 

-44-

Headphone Socket [PHONES]

Connecting an AV Cable to this socket 

activates the Movie Camera’s built-in 
speaker, but connecting a headphone, etc. 
deactivates it.

When connecting the pin plug of the AV 

Cable to this socket, plug it in as far as it 
goes.

When using headphones, set [AV JACK] of 

the [AV IN/OUT] (NV-GS200 only) or 
[INITIAL] Sub-Menu to [OUT/PHONES]. If 
you set [AV JACK] to [OUT], you may hear 
noises on the right.

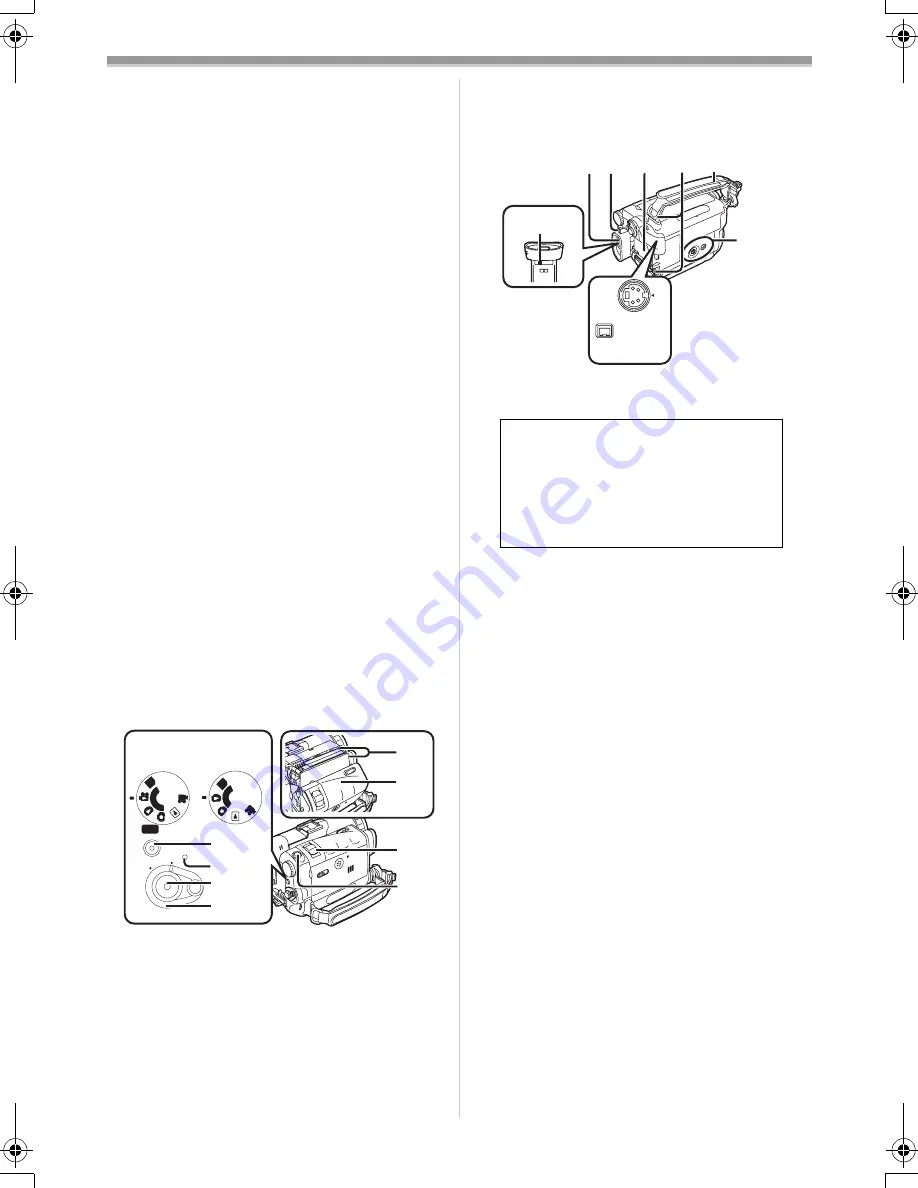
(35)

Mode Selector Switch 
[AUTO/MANUAL/FOCUS] 

-21-

,

-29-

,

-32-

(36)

Reset Button [RESET] 

-55-

(37)

Speaker 

-36-

(38)

Cassette Eject Lever [OPEN/EJECT] 

-13-

(39)

Mode Dial 

-14-

(40)

Quick Start Recording Button 
[QUICK START] 

-25-

Quick Start Recording Lamp 

-25-

(41)

Power Lamp 

-14-

,

-21-

,

-36-

(42)

Recording Start/Stop Button 

-21-

,

-24-

(43)

Power Switch [OFF/ON] 

-14-

,

-21-

,

-36-

,

-63-

(44)

Cassette Holder

(45)

Cassette Compartment Cover 

-13-

PC

S

D

START

QUICK

ON

OFF

PC

S

D

NV-GS200

NV-GS120

(40)
(41)
(42)
(43)

(46)

(47)

(44)

(45)

(39)

(46)

Zoom Lever [W/T] 

-25-

Volume/Jog Lever [

`

VOL/JOG

_

-36-

,

-37-

(47)

Photoshot Button [PHOTO SHOT] 

-22-

,

-46-

(48)

Eyepiece Corrector Knob 

-14-

(49)

Viewfinder 

-14-

,

-66-

(50)

Battery Eject Button [PUSH BATT] 

-10-

(51)

Battery Holder

(52)

Shoulder Strap Holders 

-12-

(53)

Grip Belt (One-touch Free Style Grip Belt) 

-11-

(54)

Tripod Receptacle

Used for mounting the Movie Camera on an 

optional tripod.

(55)

DV Terminal [DV] 

-48-

Connect this to the digital video equipment.

(56)

S-Video Input/Output Socket 
[S-VIDEO IN/OUT] (Input function on 
NV-GS200 Model only) 

-44-

Due to limitations in LCD production 
technology, there may be some tiny 
bright or dark spots on the Viewfinder 
screen. However, this is not a 
malfunction and does not affect the 
recorded picture.

S-VIDEO

IN/OUT

DV

(48)

(49)


(50)


(51)


(52)


(53)

(54)

(55)


(56)

120.200B.book  7 ページ  2004年2月25日 水曜日 午後4時0分

Содержание NV-GS120EB

Страница 1: ...Operating Instructions Digital Video Camera Model No NV GS120EB NV GS200EB Before use please read these instructions completely VQT0H94 R ...

Страница 2: ...able fuse cover you must ensure that it is refitted when the fuse is replaced If you lose the fuse cover the plug must not be used until a replacement cover is obtained A replacement fuse cover can be purchased from your local Panasonic Dealer IF THE FITTED MOULDED PLUG IS UNSUITABLE FOR THE SOCKET OUTLET IN YOUR HOME THEN THE FUSE SHOULD BE REMOVED AND THE PLUG CUT OFF AND DISPOSED OF SAFELY THER...

Страница 3: ...en to prevent swallowing MPEG4 moving pictures recorded in SUPERFINE cannot be recorded in the MultiMediaCard NV GS200 only Pages for reference Pages for reference are indicated by dashes either side of a number for example 00 Use only the recommended accessories ª WARNING To prevent electric shock do not remove the cover or back there are no user serviceable parts inside NV GS200 only Do not remo...

Страница 4: ... Speed Adjustment 31 Manual Iris Adjustment 32 Manual Focus Adjustment 32 Using the Built in Video Flash 33 Red Eye Reduction Function 33 Digital Effect Functions 33 Playback Mode Playing Back a Tape 36 Finding a Scene You Want to Play Back 36 Slow Motion Playback 37 Still Playback Still Advance Playback 37 Index Search Functions 38 Playback Zoom Function 38 Playback Digital Effect Functions 39 Pl...

Страница 5: ...0017 N2QCBD000030 1 2 5 4 7 8 9 6 VFC3506 3 3 Remote Controller and Button Type Battery 9 4 Free Style Remote Controller with Mic 8 5 Lens Cap and Lens Cap Cord 12 6 AV Cable 44 7 Shoulder Strap 12 8 SD Memory Card 13 9 USB Connection Kit USB Cable and CD ROM 51 Optional Accessories 1 AC Adaptor VW AD10B 2 Battery Pack Lithium CGA DU07 680mAh 3 Battery Pack Lithium CGA DU14 1360mAh 4 Battery Pack ...

Страница 6: ... FADE COLOUR NIGHT VIEW SOFT SKIN TELE MACRO SD CARD MENU PUSH CLOSE REC BACK LIGHT ACCESS i s 10 11 12 13 14 15 16 17 18 19 7 8 9 11 Colour Night View Button COLOUR NIGHT VIEW 28 12 Soft Skin Button SOFT SKIN 28 13 Tele Macro Button TELE MACRO 26 14 Menu Button MENU 15 15 Pause Button 39 Still Button STILL 22 16 Fast Forward Cue Button 5 36 39 17 Play Button 1 36 39 Enter Button ENTER 16 18 Stop ...

Страница 7: ...tch AUTO MANUAL FOCUS 21 29 32 36 Reset Button RESET 55 37 Speaker 36 38 Cassette Eject Lever OPEN EJECT 13 39 Mode Dial 14 40 Quick Start Recording Button QUICK START 25 Quick Start Recording Lamp 25 41 Power Lamp 14 21 36 42 Recording Start Stop Button 21 24 43 Power Switch OFF ON 14 21 36 63 44 Cassette Holder 45 Cassette Compartment Cover 13 P C S D START QUICK ON OFF PC S D NV GS200 NV GS120 ...

Страница 8: ...H MENU P B ZOOM 64 65 66 67 68 69 70 71 72 Photoshot Button PHOTO SHOT 22 46 73 Title Button TITLE 42 74 Multi Picture Picture in Picture Button MULTI P IN P 34 40 75 Rewind Review Button 6 36 39 76 Pause Button 37 39 77 Stop Button 36 39 78 Recording Start Stop Button START STOP 21 24 79 Play Button 1 36 39 80 Fast forward Cue Button 5 36 39 81 Playback Zoom Button P B ZOOM 38 82 Enter Button ENT...

Страница 9: ...SE IT SHOULD BE DISPOSED OF IN WASTE PRODUCTS DESTINED FOR BURIAL RATHER THAN INCINERATION 1 ª Using the Remote Controller 1 Direct the Remote Controller at the Remote Control Sensor 29 of the Movie Camera and press an appropriate button Distance from the Movie Camera Within approximately 5 metres Angle Within approximately 10o in the upward and 15o in the downward and horizontal directions from t...

Страница 10: ...ies of other companies are used 1 Attach the Battery to the AC Adaptor and charge it Since the Battery will not be charged when the DC Input Lead is connected to the AC Adaptor disconnect it from the AC Adaptor The CHARGE Lamp lights up and charging starts When the CHARGE Lamp goes off charging is completed When charging the overdischarged battery the CHARGE Lamp blinks at first but the battery is...

Страница 11: ... A 2h45min B 2h30min 2h10min C 1h15min 1h5min CGA DU21 A 3h55min B 3h45min 3h15min C 1h55min 1h40min CGA DU07 A 1h30min B 1h15min 1h5min C 40min 35min VSB0471 A 2h10min B 2h25min 2h5min C 1h15min 1h5min CGA DU14 A 2h45min B 3h 2h40min C 1h30min 1h20min CGA DU21 A 3h55min B 4h30min 4h C 2h15min 2h CGA DU07 A 1h30min B 1h30min 1h20min C 45min 40min In the following cases the available recording time...

Страница 12: ...the hole in the Grip Belt Attachment part and the Lens Cap through the Lens Cap Cord The removed Lens Cap can be hooked onto the Grip Belt It is not possible when using as a hand strap When you are not recording be sure to cover the Lens with the Lens Cap for protection Attaching the Shoulder Strap We recommend that you attach the Shoulder Strap before going out of doors to record so as to avoid d...

Страница 13: ...Card can be used to record pictures ª Caution before inserting removing a Card Be sure to turn off the Movie Camera Otherwise the Movie Camera may not function properly or it may cause the loss of recorded data in a Card ª Inserting a Card 1 Slide the OPEN Lever 6 to open the Card Slot Cover 4 2 While holding the Memory Card with its cut corner on top 1 insert it into the Card Slot 3 Close the Car...

Страница 14: ...s mode when playing back the recorded moving picture on a card ON OFF 1 43 41 ON OFF 43 1 PC SD 39 PC Mode Use this mode when you want to connect the Movie Camera to your Personal Computer Using the Viewfinder LCD Monitor ª Using the Viewfinder Before using the Viewfinder adjust the field of view so that the displays inside the Viewfinder become clear and easy to read 1 Tilt up the Viewfinder The ...

Страница 15: ...tion A larger number of vertical bars indicates stronger brightness or colour saturation 290o 1180o 1LCD BRIGHTNESS LCD COLOUR LEVEL EVF BRIGHTNESS SELECT SETUP MENU EXIT LCD EVF SETUP To Increase the Brightness of the Entire LCD Monitor Press the POWER LCD Button When you press the POWER LCD Button the LCD monitor becomes bright about twice as much as usual The POWER LCD Lamp 26 lights up When tu...

Страница 16: ... NV GS200 Model only A File Selection Operation may be necessary during Menu Operations In this case carry out the following procedure 1 Press the 6 5 Button and select a file The selected file is marked by a frame PC SD 39 PICTURE No 25 100 0012 2 Press the ENTER Button 17 to confirm the selection of the file After the above File Selection Procedure carry out the various Menu Operations The above...

Страница 17: ... Camera is automatically set to Demonstration Mode for introducing its functions If any button is pressed or operated the Demonstration Mode is cancelled The Demonstration Mode can be started by setting DEMO MODE to ON and by exiting the Menu To terminate the Demonstration Mode insert a Cassette or set the DEMO MODE to OFF AV JACK AV Socket 68 REMOTE Remote Controller Mode 9 REC LAMP Recording Lam...

Страница 18: ...0 only Intelligent LCD Monitor 15 LCD EVF SET LCD and Viewfinder Adjustment 15 EVF ON AUTO Using the Viewfinder 14 8 INITIAL Initial Setup Sub Menu BLANK SEARCH Blank Search 22 AV JACK NV GS120 only AV Socket 68 REMOTE Remote Controller Mode 9 BEEP SOUND Beep Sound 56 ª CARD RECORDING MENU Card Recording Mode 1 CAMERA Camera Setup Sub Menu PROG AE Auto Exposure Mode 29 SHTR EFFECT Shutter Effect Y...

Страница 19: ...E PLAYBACK MENU DELETE 5 DISPLAY Display Setup Sub Menu All of the items on the DISPLAY Sub Menu are the same as those on the DISPLAY Sub Menu of the TAPE RECORDING MENU 6 LCD EVF Adjusting Brightness and Colour Level All of the items on the LCD EVF Sub Menu are the same as those on the LCD EVF Sub Menu of the TAPE PLAYBACK MENU 7 INITIAL Initial Setup Sub Menu AV JACK AV Socket 68 REMOTE Remote C...

Страница 20: ... Movie Camera with the power turned off and then connect to the AC Mains socket After charging for 4 hours the built in lithium battery can power the clock for approximately 3 months LP Mode A desired recording speed can be selected with REC SPEED on the RECORDING Sub Menu If LP Mode is selected the recording time becomes 1 5 times longer than that of SP Mode Although the image quality does not de...

Страница 21: ...nutes the power is turned off automatically To resume recording from this condition turn off then turn on the power again ª Recording Lamp The Recording Lamp 27 lights up during recording and alerts those being recorded that recording is in progress The Recording Lamp does not light up if the REC LAMP on the INITIAL Sub Menu is set to OFF AUTO MANUAL FOCUS 35 27 Recording on a Tape 1 Set the OFF O...

Страница 22: ... Still Picture Mode and then press the PHOTO SHOT Button STILL ENTER FADE MENU i s 14 REC 83 87 ENTER FADE STILL i s 15 ª Progressive Photoshot When the æ Indication is displayed Progressive Photoshot Function works You can record still pictures as frame still pictures with higher quality by this function The Progressive Photoshot Function may not be activated depending on the function you use 54 ...

Страница 23: ...the Shutter Chance Mark does not appear in Manual Focus Mode P C SD 39 PHOTO SHOT 47 1 2 PHOTO SHOT 47 PICTURE NV GS120 1 Set the Mode Dial 39 to Card Recording Mode 2 Press the PHOTO SHOT Button 47 The Indication lights up in red Selecting the Size of Photoshot Images 2 sizes are available for Photoshot 1 Set CARD RECORDING MENU CARD PICTURE SIZE 1760k1320 NV GS200 1520k1152 NV GS120 or 640k480 S...

Страница 24: ...ures on a Card The recorded data can also be played back on Windows Media Player ver 6 4 and later STILL ENTER FADE MENU i s 14 PHOTO SHOT 47 When the Mode Dial 39 is set to Card Recording Mode you cannot record to the Tape 1 Set the Mode Dial 39 to Card Recording Mode 2 Press the Recording Start Stop Button 42 It takes 1 to 2 seconds to start recording During recording the Indication is lit in re...

Страница 25: ...he Quick Start Recording Lamp lights up 2 Set the OFF ON Switch 43 to OFF The Quick Start Recording Lamp remains lit START QUICK 40 ON OFF 43 3 Set the OFF ON Switch 43 to ON The Movie Camera will be ready for recording in approximately 1 7 seconds To Cancel the Quick Start Keep the QUICK START Button pressed for approximately 2 seconds and make sure the Quick Start Recording Lamp is not lit For o...

Страница 26: ...ophone Function Along with the zooming operation the microphone s directional angle and sensitivity are varied for recording sounds 1tW 5tW 10tW T T T TELE MACRO 13 T MACRO T MACRO T MACRO PHOTO SHOT 47 42 Set TAPE RECORDING MENU RECORDING ZOOM MIC ON The Z MIC Indication is displayed For other notes concerning this item see 58 Digital Zoom Function This function is useful when you want to record ...

Страница 27: ...ge is completely gone press the Recording Start Stop Button 42 to start recording 3 Release the FADE Button 18 about 3 seconds after starting recording The image reappears gradually Fade Out Fade Out causes images and sounds to disappear gradually leaving a black screen at the end of a scene 1 Keep pressing the FADE Button 18 while recording The image fades out gradually 2 When the image is comple...

Страница 28: ...ge of the LCD Monitor light is within approximately 1 2 metre To Cancel the Night View Functions Press the COLOUR NIGHT VIEW Button repeatedly until neither the C NIGHT VIEW Indication nor the 0LUX NIGHT VIEW Indication appears For other notes concerning this item see 58 Soft Skin Function This enables you to record skin colours in a softer tone In order to get the best result avoid background col...

Страница 29: ...appears 1 5 Sports Mode For recording scenes involving quick movements such as sports scenes 2 7 Portrait Mode For bringing up people clearly from the background 3 4 Low Light Mode For recording a dark scene brighter 4 Ω Spotlight Mode For recording a subject under a spotlight in a party theatre etc 5 º Surf Snow Mode For recording in a glaring surrounding such as ski slopes beaches etc To Cancel ...

Страница 30: ...lance Sensor thereby judging the recording condition and selects the closest hue setting This function is called Automatic White Balance Adjustment For light outside the functional Auto White Balance Adjustment range use the Manual White Balance Adjustment Mode FADE STILL ENTER i s 17 1 1 1 1AWB 1 3 2 4 1 2 3 1 Set the AUTO MANUAL FOCUS Switch 35 to MANUAL The MNL Indication appears 2 Press the EN...

Страница 31: ...NUAL FOCUS 35 2 Press the ENTER Button 17 until the Shutter Speed Indication appears 3 Press the 5 Button 16 or 6 Button 19 to adjust the shutter speed Range of Shutter Speed Adjustment 1 50 1 8000 s in Tape Recording Mode 1 4 1 500 s in Card Recording Mode NV GS200 1 25 1 500 s in Card Recording Mode NV GS120 The standard shutter speed is 1 50 s Selecting a speed closer to 1 8000 causes the shutt...

Страница 32: ...UTO MANUAL FOCUS Switch to AUTO For other notes concerning this item see 59 Manual Focus Adjustment Focus can be adjusted manually for recording in a situation where auto focus may not function well 1 Set the AUTO MANUAL FOCUS Switch 35 to MANUAL The MNL Indication appears AUTO MANUAL FOCUS 35 FADE STILL ENTER i s 17 MNL 1 50 F2 0 0dB AUTO MANUAL FOCUS 35 2 Slide the AUTO MANUAL FOCUS Switch 35 to...

Страница 33: ...NORMAL setting set it to i the ßi Indication appears if it is too much set it to j the ßj Indication appears STILL ENTER FADE MENU i s 14 21 15 ENTER FADE STILL i s PHOTO SHOT 47 42 For other notes concerning this item see 59 Red Eye Reduction Function This function reduces a phenomenon which causes the subject s eyes to turn red when you record pictures with a flash such as built in Video Flash o...

Страница 34: ...or other notes concerning this item see 60 ª Multi Picture Mode Strobe Multi Picture Mode You can capture and record 9 consecutive small still pictures 11 NEGA 12 SEPIA 13 B W 14 SOLARI Manual Multi Picture Mode You can manually capture and record 9 small still pictures 1 Set TAPE RECORDING MENU DIGITAL EFFECT1 MULTI 2 Set TAPE RECORDING MENU DIGITAL MULTI MODE STROBE or MANUAL 3 Press the MULTI B...

Страница 35: ...scene Mix Mode While the moving image of a new scene fades in the still image of the last recorded scene gradually fades out 1 Set TAPE RECORDING MENU DIGITAL EFFECT1 WIPE or MIX The WIPE or MIX Indication appears STILL ENTER FADE MENU i s 14 MULTI P IN P 10 WIPE WIPE WIPE MIX MIX MIX STILL ENTER FADE MENU i s 14 2 Press the Recording Start Stop Button 42 to start recording 3 Press the Recording S...

Страница 36: ...ation Push the VOL JOG_ Lever towards T to increase the volume or push the VOL JOG_ Lever towards W to decrease the volume The VOLUME Indication goes off after the adjustment is finished To adjust the volume with the Remote Controller press the T or W Button to display the VOLUME Indication Press the T Button to increase the volume or press the W Button to decrease the volume The VOLUME Indication...

Отзывы: