background image

40

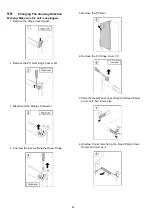
9.9.

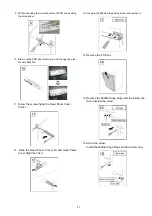
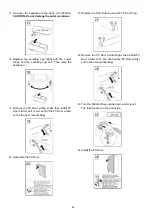
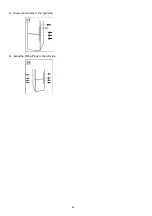
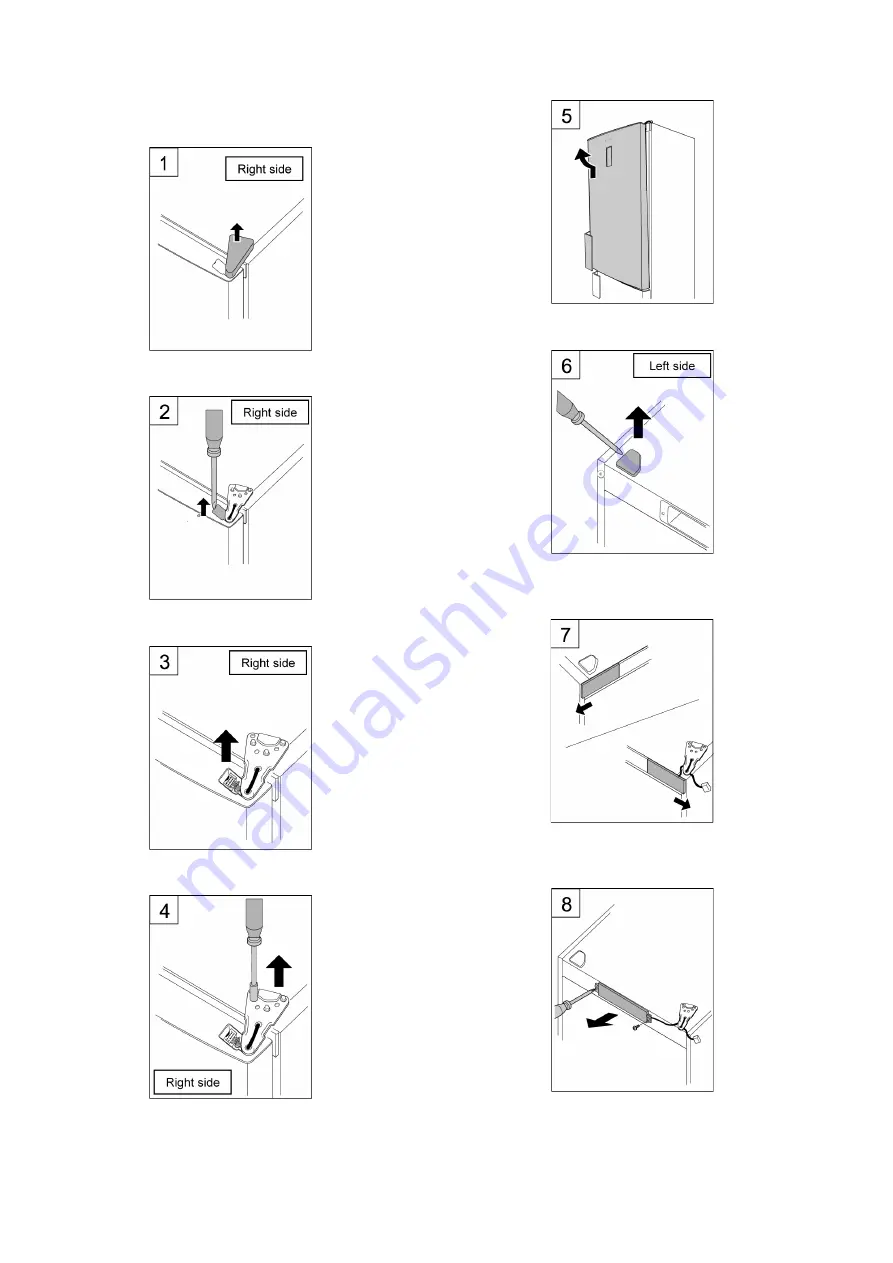
Changing The doorway Direction 

Warning: Make sure the unit is unplugged

1.

Remove the Hinge Cover Upper.

2.

Remove the PC Door Edge Cover Left.

3.

Disconnect the Display Connector.

4.

Unscrew the screws fixing the Upper Hinge.

5.

Remove the PC Door.

6.

Remove the PC Hinge Cover VC.

7.

Slide the Head Panel Cover Right and Head Panel
Cover Left then remove its.

8.

Unscrew the screws fixing the Head Panel Cover
Center and remove it.


Содержание NR-BN34AX1

Страница 1: ...nless S Inox look W White Destination E Europe Continental B U K TABLE OF CONTENTS PAGE PAGE 1 Safety Precautions 2 2 Specifications 5 3 Technical Descriptions 7 4 Location of Controls and Components 9 5 Installation Instructions 11 6 Operating Instructions 13 7 Service Mode 16 8 Troubleshooting Guide 26 9 Disassembly and Assembly Instructions 32 10 Schematic Diagram 45 11 Exploded View and Replac...

Страница 2: ...2 1 Safety Precautions ...

Страница 3: ...3 ...

Страница 4: ...4 ...

Страница 5: ...nt sensor FCC ESCOP B57020 M2502 Ambient temperature sensor ATC Not used Defrost temperature sensor DFC ESCOP B57020 M2502 Compressor Model Jiaxipera NB1114Y Rotation speed 2930 rpm Curled resistance cord at 25 C Main wiring 20 3 Ohm Aux wiring 18 8 Ohm Overlord relay Model B50 120 Operating temperature without power 120 C Return temperature 61 C Operating current A 5A Fan motor Model Rating BG151...

Страница 6: ...6 Name Plate ...

Страница 7: ...g of fridge compartment first the PC Damper opens and after 30 seconds the Fan Motor switches on Fan Motor switches on with time delay after the compressor start up depending on the last cycle If the last cycle was a normal cycle the Fan Motor switches on immediately After defrosting of the evaporator the Fan Motor starts to function after 4 minutes Fan Motor operation is suspended if the freezer ...

Страница 8: ...itch off Based on request for cooling of freezer compartment the compressor and Fan Motor of freezer compartment are controlled Defrosting Unconditional start of defrosting is installed in the following cases 1 At switch on of Fast Freeze function if the compressor of freezer compartment does not function 2 At switch on of Super Cool function if the compressor of freezer compartment does not funct...

Страница 9: ...9 4 Location of Controls and Components 4 1 Display and Control Panel ...

Страница 10: ...10 4 2 Components ...

Страница 11: ...11 5 Installation Instructions ...

Страница 12: ...12 ...

Страница 13: ...13 6 Operating Instructions 6 1 Setting the temperature 6 1 1 Fridge compartment PC 6 1 2 Freezer compartment FC 6 1 3 Fresh Zone Crisper 6 2 Functions 6 2 1 Super Cool Mode ...

Страница 14: ...14 6 2 2 Super Freeze Mode 6 2 3 Flash Freeze Mode 6 2 4 ECO Mode ...

Страница 15: ...15 6 2 5 Holiday Mode 6 2 6 Alarm Mode 6 2 7 Child safety lock ...

Страница 16: ...n General Service mode is intended for service interventions In service mode it is possible to select optionally among the outputs From service mode we always enter normal mode of operation Display Panel A ssy Display Panel A ssy on appliance door ...

Страница 17: ...17 7 1 1 How to start 7 1 2 How to stop 7 1 3 Summary of Service Mode ...

Страница 18: ...18 7 1 4 Service Mode 00 Main PCB 7 1 5 Service Mode 01 Display Panel PCB ...

Страница 19: ...19 7 1 6 Service Mode 02 Compressor 7 1 7 Service Mode 03 Fan Motor ...

Страница 20: ...20 7 1 8 Service Mode 04 Defrost Heater 7 1 9 Service Mode 05 PC Damper ...

Страница 21: ...21 7 1 10 Service Mode 06 LED Lamp 7 1 11 Service Mode 07 PC Temp Sensor ...

Страница 22: ...22 7 1 12 Service Mode 08 FC Temp Sensor 7 1 13 Service Mode 09 Defrost Sensor ...

Страница 23: ...23 7 2 Measuring Points on Main PCB Box Note For more detail refer to the Schematic Diagram on page 44 7 3 Value of Temperature sensors ...

Страница 24: ...play of temperature in freezer compartment shows E3 On models with one digit temperature display in fridge compartment E and 1 are shown alternately with 1 second interval while the regulations function each one in accordance with their time regime Alarms Alarms of too high temperature in fridge freezer compartment In case the temperature in fridge compartment exceeds 13 C and in freezer compartme...

Страница 25: ... the key is released the display shows set temperature Child lock is cancelled by long press on the key 1 In case the alarm is activated it can be cancelled with alarm cancellation key without having to leave the Child lock mode Error display Error E1 is shown on temperature display in fridge compartment For models with single digit display the display alternately shows the errors 1 second E 1 sec...

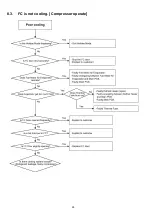
Страница 26: ...26 8 Troubleshooting Guide 8 1 Not cooling at all Both PC FC compressor does not operate ...

Страница 27: ...27 8 2 PC is not cooling or poor cooling FC cooling condition is normal ...

Страница 28: ...28 8 3 FC is not cooling Compressor operate ...

Страница 29: ...29 8 4 Cooling system trouble ...

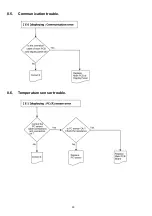
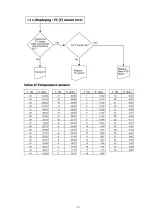
Страница 30: ...30 8 5 Communication trouble 8 6 Temperature sensor trouble ...

Страница 31: ...31 ...

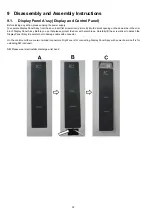
Страница 32: ...mall opening on the down side in the mid dle of Display Panel A ssy Before you do that please protect the door with scotch tape Carefully lift the screw driver to detach the Display Panel A ssy Be careful not to damage cable with connector On the control unit there are two terminal connectors Right one is for connecting Display Panel A ssy with power board Left is for uploading SW optional NB Plea...

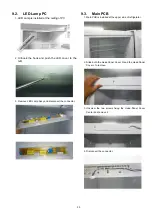
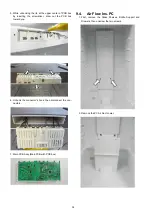
Страница 33: ...o the left 3 Remove LED Lamp Assy and disconnect the connector 9 3 Main PCB 1 Main PCB is installed at the upper side of refrigerator 2 Slide both the Head Panel Cover R and the Head Panel Cover L to remove 3 Unscrew the two screws fixing the Head Panel Cover Center and remove it 4 Disconnect the connector ...

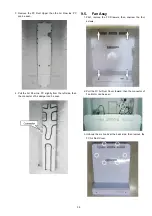
Страница 34: ...rewdriver draw out the PCB box toward you 6 Unhook the connector s hook then disconnect the con nectors 7 Main PCB Assy Main PCB with PCB box 9 4 Air Flow Ins PC 1 First remove the Glass Shelves Bottle Support and Drawers then unscrew the two screws 2 Remove the PC Air Duct Lower ...

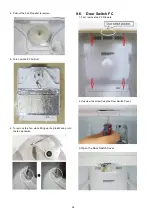
Страница 35: ...lightly from the left side then the connector of Air damper can be seen 9 5 Fan Assy 1 First remove the FC Drawers then unscrew the four screws 2 Pull the FC Air Duct Cover toward then the connector of Fan Motor can be seen 3 Unhook the six hooks at the back side then remove the FC Air Duct Cover ...

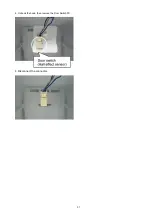
Страница 36: ...emove 5 Turn over the FC Air Duct 6 To remove the fan while lifting up the plastic snap turn the fan clockwise 9 6 Door Switch FC 1 First remove the FC Drawers 2 Unscrew the screw fixing the Door Switch Cover 3 Open the Door Switch Cover ...

Страница 37: ...37 4 Unhook the hook then remove the Door Switch FC 5 Disconnect the connector ...

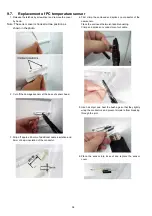
Страница 38: ...off approx 25mm of additional cable insulation and 5mm of basic insulation of the conductor 4 First crimp the enclosed end splices on conductor of the new sensor Place the enclosed thermo shrinkable bushing Crimp end splices on conductors of cut cable 5 Use hair dryer and heat the bushings so that they tightly wrap the conductors and prevent moisture from breaking through the joint 6 Place the sen...

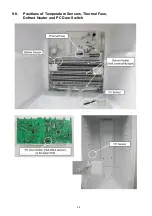
Страница 39: ...39 9 8 Positions of Temperature Sensors Thermal Fuse Defrost Heater and PC Door Switch ...

Страница 40: ...Remove the PC Door Edge Cover Left 3 Disconnect the Display Connector 4 Unscrew the screws fixing the Upper Hinge 5 Remove the PC Door 6 Remove the PC Hinge Cover VC 7 Slide the Head Panel Cover Right and Head Panel Cover Left then remove its 8 Unscrew the screws fixing the Head Panel Cover Center and remove it ...

Страница 41: ...ion 11 Screw the screws fixing the Head Panel Cover Center 12 Slide the Head Panel Cover Left and Head Panel Cover Right then fix it 13 Unscrew the Middle Hinge fixing screw and remove it 14 Remove the FC Door 15 Remove the Middle Hinge Plugs and the Screw cap then unscrew the screw 16 Screw the screw Install the Middle Hinge Plugs and the Screw cap ...

Страница 42: ...or Limiter Right then install FC Door Limiter Left You can find the FC Door Limiter Left in the user manual bag 20 Assemble the FC Door 21 Replace the Door Bushing and the FC Door Plug 22 Remove the PC Door Limiter Right then install PC Door Limiter Left You can find the PC Door Limiter Left in the user manual bag 23 Turn the Middle Hinge upside down and screw it The thick washer on the downside 2...

Страница 43: ...r Hinge 27 Connect the Display Connector 28 Screw the Upper Hinge fixing screws 29 Install the Hinge Cover 30 Fix the Hinge Cover VC and the PC Door Edge Cover Right 31 Remove the Filling Plugs 32 Unscrew the Handles fixing Torx screws using the Torx screwdriver ...

Страница 44: ...44 33 Screw the Handles to the right side 34 Install the Filling Plugs to the left side ...

Отзывы: