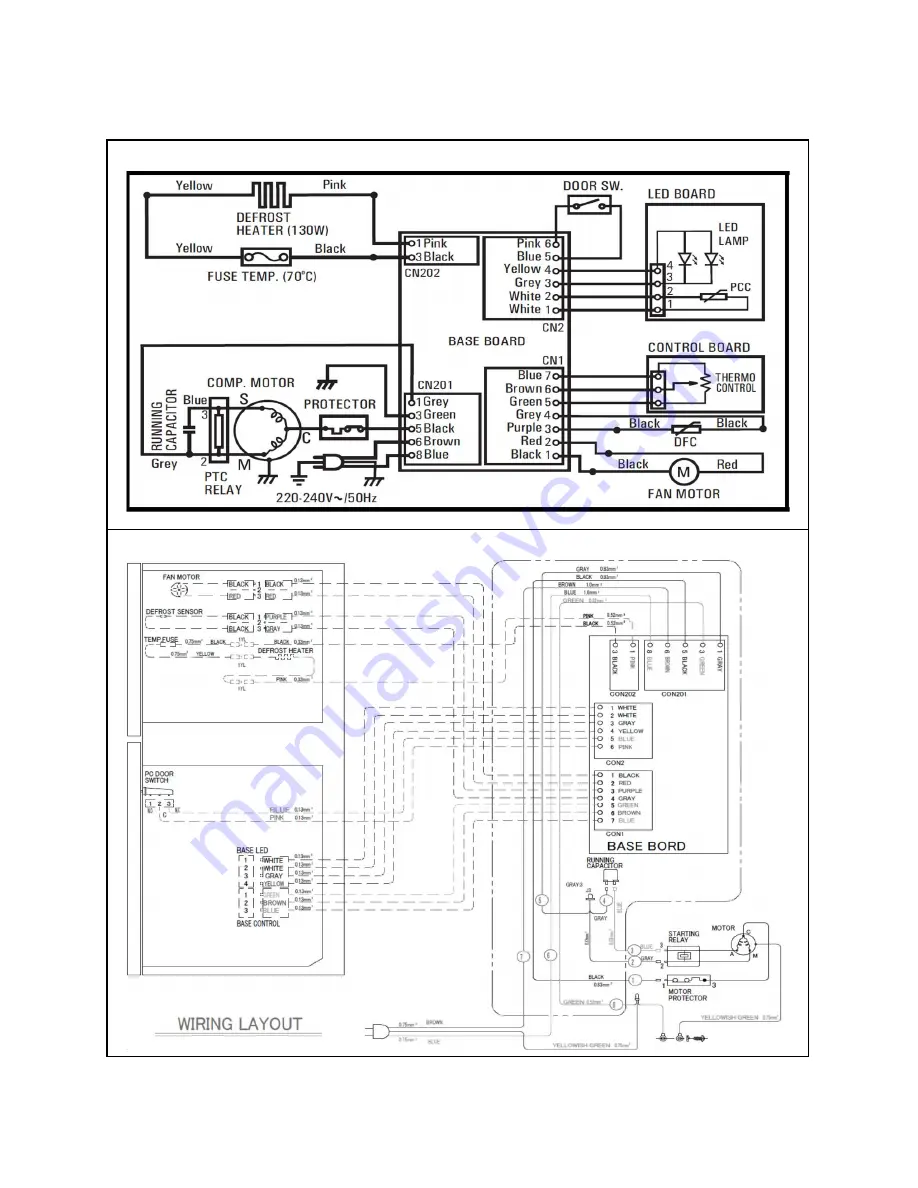
3. Wiring Diagram dan Wiring Connection
NR-BN211GKMY, NR-BN211GAMY, NR-BN211GRMY
a) Wiring Diagram
b) Wiring Connection
-5-
Страница 1: ...r many years But it is now known that these compounds which once seemed so ideal for use as cleaning agents and in refrigeration systems destroy the earth s ozone layer as a result an international bo...
Страница 2: ...6 6 Reparation Standard 7 6 1 Repairing Devices Which are Exclusive Use for HFC 134a Refrigerant 7 6 2 Repairing Standard of Refrigerating Unit HFC 134a 7 6 3 Tool for Repairing Refrigerating Unit HF...
Страница 3: ...charging capacitor Check safety after repairing Check the screws parts lead wires to take in place And check the repairing portion whether circumferential parts are damaged or not Check insulation res...
Страница 4: ...nthane Cooling System Evaporator 195 5 cc Freol Alpha 22 SF51C91RAW5 S0YS Cylinder cap A 5 10 cc rev Capacity 148W Power Input 110W 100 5 gram HFC 134a Coil Evaporator Main Parts For Cooling System Co...
Страница 5: ...3 Wiring Diagram dan Wiring Connection NR BN211GKMY NR BN211GAMY NR BN211GRMY a Wiring Diagram b Wiring Connection 5...
Страница 6: ...elf 2 1 Medium Refrige Max 6 0 2 5 5 5 2 5 18 0 2 5 3 0 2 5 12 0 2 5 The function is to pass the low pressure gas to compressor Evaporator Suction Pipe The function is to prevent from sweating Dryer C...
Страница 7: ...form From the time just after pipe cleaning is completed until the process of setting compressor and dryer just before vacuum pumping process Since refrigerant HFC 134a has higher degree of swelling...
Страница 8: ...Since the inside of manifold gauge and charge hoses are vacuum state after vacuum pumping the oil of vacuum pumping may flow into HFC 134a refrigerant unit The adaptor prevents the oil flowing into th...
Страница 9: ...l of charge pipes Finish Refer to the TROUBLESHOOTING For purging the pipe use HFC 134a as liquid state Never use HCFC 141b HCFC 22 for purging Do not keep the pipes open to air more than 30 minutes T...
Страница 10: ...essor Change compressor Compressor noise but not compress Cooling unit broken Compressor less compression Gas leakage Be found residual gas No gas Repair gas leakage and recharge Sprayed with gas Chec...
Страница 11: ...ozen Little frosting or just on inlet tube eva only Gas leakage Cut capillary tube at outlet of dryer Check the smell Check compressor oil Can not be repaired Bad smell Occasionally frosting Frosting...
Страница 12: ...the hook of LED cover with mark as Picture 1 2 Change LED Lamp by releasing wire joint behind it as Picture 2 Picture 3 3 After replacing LED Lamp assembly LED Cover on inner liner from up side to bo...
Страница 13: ...ssor running If compressor stop start compressor again about 5 minutes until stable pressure then check pressure Before measuring make sure the pressure gauge at 0 position If not at 0 position adjust...
Страница 14: ...e from the compressor with brazing Disconnect the discharge pipe from the compressor with brazing Remove the compressor According to Diagnosing Standard of the degree of the case of discoloration of t...
Страница 15: ...pipe firmly Close the valve of charge cylinder when liquid come out Collect the liquid in the container and see how stained the discharged liquid the inside In case that the pressure at the charge cy...
Страница 16: ...package Joint capillary tube Mullion dryer pipe and Charge pipe Dia 4 mm to Draye with brazing From the process of removing compressor until the process of setting compressor and dryer just before va...
Страница 17: ...vacuum pump oil Check the vacuum level by read the Vacuum Gauge periodicly if gauge indication over from 0 5 torr change the oil vacuum pump and check the packing rubber Inert the coupler plug to drye...
Страница 18: ...f the glass tube Confirm the set amount of glass to be charged in the refrigerator be refering to the wiring diagram or the name plate of the unit And put a mark at the division indicating the amount...
Страница 19: ...Plier Seal up the end of charge pipe by melting and complete the sealing by brazing Confirm that no gas leakage from the sealed part Do not make the compressor run when to do leakage test While compre...
Страница 20: ...inute Connect the high voltage cord s pin to the cabinet and switch on puncture test Connect the Power Supply Cord pin positive and negative except grounding Connect the grounding pin and insulation t...
Страница 21: ...age C urrent Frequency D efros t Input D efros t H eater C lim aticC lass G ros sVolum e Total StorageVolum e FreshFoodS torageV olum e Freezer StorageVolum e 3 Star C om partm ent 2 Star D oorC om pa...
Страница 22: ...7 Instruction to Assembly Parts NR BN211GKMY NR BN211GAMY NR BN211GRMY INDICATED SAFETY PART PS 74 76 75 77 78 72 73 71 69 70 41 40 79 80 42 44 79 81 82 83 22...
Страница 23: ...SELF NET 08 231581 For Stopper Chilled Case 24 TRUSS 4 TS 14 AT MC 38 1144101 A For Fix Button Shelf Net 25 CASE AIR GUIDE AH 330090 26 AG BIO FILTER AH 278441 27 INS AIR GUIDE AH 283222 AH 283222 28...
Страница 24: ...171810 For fix Power Supply Cord 59 TORX 4 TS 14 38 1967710 For fix Power Supply Cord 60 COMPRESSOR GROUNDING BG 153420 61 PAN 4TS 10 BB BTS D4X10LA For fix 2 Wire As Grounding at Reinforce Side 62 E...
Страница 25: ...BN211GRMY PREVIOUS CURRENT PREVIOUS CURRENT 79 EGG SHELF FROZEN SHELF AD 348841 80 EGG TRAY 10 AD 181170 81 UTILITY SHELF AD 348851 82 BOTTLE SHELF AD 348862 83 SMALL BOTTLE SHELF AD 348871 84 ENERGY...
Страница 26: ...176334 AK 176331 AK 176330 NR BN211G SERIES AK 176321 INSTRUCTION BOOK TOP CUSHION R L AK 174340 CARTON PROTECTOR FRONT AK 174781 FRONT CUSHION AK 170910 BOTTOM TRAY AS BK 144100 STRAPPING BAND SB15X...