background image

– 4 –

Installation and General Instructions


(continued)

Placement of Oven

1. The oven must be placed on a 

fl

 at, stable 

surface. For correct operation, the oven must 
have suf

fi

 cient air 

fl

 ow. 

Allow 15 cm of space 

on the top of the oven, 10 cm at the back, and 
5 cm on both sides. If one side of the oven 
is placed 

fl

 ush to wall, the other side or top 

must not be blocked. Do not remove feet.

a.  Do not block air vents. If they are blocked 

during operation, the oven may be overheated 
and damaged. When using any cloth over the 
oven, the air intake and exhaust should not be 
blocked. Also allow suf

fi

 cient space on back 

and both sides of the oven.

b.  Do not place oven near a hot or damp surface 

such as a gas stove, electric range or sink etc.

c.  Do not operate oven when room humidity is 

too high.

2. This appliance is intended to be used in 

household and similar applications such as: staff 
kitchen areas in shops, of

fi

 ces and other working 

environments; farm house; by clients in hotels, 
motels and other residential environments; bed 
and breakfast type environments.

Building-in your oven

1. This oven is intended for counter-top and built-

in use only. It is not intended for use inside a 
cupboard. This oven may be built into a wall 
cabinet by using the proper trim kit, 
(NN-TK510FSQP/NN-TK510FWQP) which may 
be purchased from you local Panasonic dealer.

2. In case of 

fi

 tting into an oven housing, please use 

Panasonic's Trim Kit, NN-TK510FSQP/
NN-TK510FWQP.

3. Microwave ovens should not be built into a unit 

directly above a top front venting conventional 
cooker. This may be a safety hazard and could 
result in damage to your oven. This will invalidate 
your one year guarantee.

4. A microwave which is built in must be more 

than 850 mm above 

fl

 oor level. Read Trim-Kit 

instructions carefully before installation. It is 
recommended that the microwave oven is placed 
below a conventional oven to avoid heat damage 
to the facia of the microwave.

Circuits

Your microwave oven should be operated on a 
separate 10 A circuit from other appliances. Failure 
to do this may cause the power board fuse to blow, 
and/or food to cook slower. Do not insert higher 
value fuse in the power board.

Food

1. Do not use your oven for home canning or the 

heating of any closed jar. Pressure will build 
up and the jar may explode. In addition, the 
microwave oven cannot maintain the food at the 
correct canning temperature. Improperly canned 
food may spoil and be dangerous to consume.

2. Do not attempt to deep fat fry in your microwave 

oven.

3. Do not boil eggs in their shell and whole hard-

boiled eggs (unless otherwise stated in Cooking 
Guide section). Pressure will build up and the 
eggs will explode.

4. Potatoes, apples, egg yolks, chicken wings, 

whole squash and sausages are examples of 
foods with nonporous skins. This type of food 
must be pierced before cooking, to prevent 
bursting.

5. When heating liquids, e.g. soup, sauces and 

beverages, in your microwave oven, overheating 
the liquid beyond boiling point can occur without 
evidence of bubbling. This could result in a 
sudden boil over of hot liquid. To prevent this 
possibility the following steps should be taken:

a) Avoid using straight-sided containers with 

narrow necks.

b) Do not overheat.
c) Stir the liquid before placing the container in 

the oven and halfway through cooking time.

d) After heating, allow to stand in the oven for 

a short time, stirring again before carefully 
removing the container.

6. 

DO NOT USE A CONVENTIONAL MEAT 
THERMOMETER IN THE MICROWAVE OVEN. 
To check the degree of cooking of roasts and 
poultry use a MICROWAVE THERMOMETER. 

Alternatively, a conventional meat thermometer 
may be used after the food is removed from the 
oven. If undercooked, return meat or poultry to 
the oven and cook for a few more minutes at 
the recommended power level. It is important 
to ensure that meat and poultry are thoroughly 
cooked.

7. 

COOKING TIMES given in the Cooking Guide 
section are APPROXIMATE. 

Factors that may 

affect cooking time are preferred degree of 
moisture content, starting temperature, altitude, 
volume, size, shape of food and utensils used. 
As you become familiar with the oven, you will be 
able to adjust for these factors.

8. 

It is better to UNDERCOOK RATHER THAN 
OVERCOOK foods.

 If food is undercooked, it 

can always be returned to the oven for further 
cooking. If food is overcooked, nothing can be 
done. Always start with minimum cooking times 
recommended.

F0003BN60QP.indb   4

F0003BN60QP.indb   4

2014/8/15   15:23:13

2014/8/15   15:23:13

Содержание NN-SF574S

Страница 1: ...rating Instruction and Cook Book Microwave Oven Household Use Only Please read these instructions carefully before using this product and save this manual for future use Model Number NN SF574S NN SF56...

Страница 2: ...sure you will be able to master the basic techniques and thereby develop a firm understanding of your new oven This book includes recipes from starters to desserts After trying our recipes be sure to...

Страница 3: ...Defrost using Turbo Defros 12 Defrosting Tips and Techniques 13 3 Stage Setting 14 To Reheat Food Using Reheat Meal Frozen Reheat 15 To Cook Food Using Auto Cook 16 19 To Use Timer 20 Quick Guide to...

Страница 4: ...ce by a person responsible for their safety 11 Young children should be supervised to ensure that they do not play with the appliance 12 It is hazardous for anyone other than a competent person to car...

Страница 5: ...Use 1 In order to maintain high quality do not operate the oven when empty The microwave energy will reflect continuously throughout the oven if no food or water is present to absorb energy This can...

Страница 6: ...d to cook slower Do not insert higher value fuse in the power board Food 1 Do not use your oven for home canning or the heating of any closed jar Pressure will build up and the jar may explode In addi...

Страница 7: ...ide of the food and travel through the food losing half of their power every two to three centimetres Continued cooking to the centre occurs by conduction Although pacemakers used to be affected by mi...

Страница 8: ...5 minutes on High power These dishes although not suitable for extended cooking may be used successfully for defrosting or for use on lower power levels Cooking Bags designed to withstand boiling fre...

Страница 9: ...e to an exposed corner and pull gently to remove Door Release Button Press to open the door Opening the door during cooking will stop the cooking process without cancelling the program Cooking resumes...

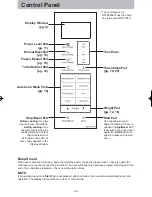
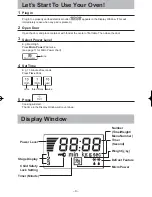
Страница 10: ...mode Start Pad One tap allows oven to begin functioning If door is opened or Stop Reset Pad is pressed once during oven operation Start Pad must again be pressed to restart oven Display Window pg 9 Po...

Страница 11: ...the center of flat table Then close the door 3 Select Power Level E g Med High Press Micro Power Pad twice see page 11 for Micro Power chart twice 4 Set Time E g 13 minute 20 seconds Press Time Pads o...

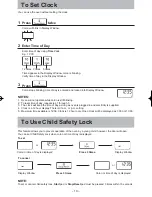
Страница 12: ...through 3 3 The clock will keep the time of day as long as oven is plugged in and electricity is supplied 4 Clock is a 12 hour display There isn t a m or p m setting 5 Maximum time available is 12 59...

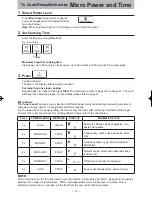
Страница 13: ...representing decreasing amounts of microwave energy used for cooking foods at different speeds E g The lower the micro power setting the more evenly the food cooks although it will take a little longe...

Страница 14: ...t the Turbo Defrost feature you can also press Weight pad to select weight before pressing Start 2 The oven will beep once or twice during the total defrosting time This indicates that food should be...

Страница 15: ...efrosting Chart by setting Micro Power at Defrost Power FOOD APPROX TIME minutes per 500 g INSTRUCTION MEAT Beef Minced Beef Roast Topside Beef Tenderloin Chuck or Rump Sirloin rolled Steak Miscellane...

Страница 16: ...When operating two beeps will sound between each stage 3 This feature is not available for Turbo Defrost Auto Cook and Reheat function 1 Press twice to select MED High 5 Press 6 times to select Low 3...

Страница 17: ...ry products raw uncooked or frozen foods or beverages Foods should be reheated from room temperature or refrigerator temperature Do not reheat frozen foods on this setting Foods should be covered loos...

Страница 18: ...se 50 g 100 g 150 g 200 g 250 g 300 g 4 Ice Cream 200 g 500 g 1000 g 2000 g 5 Reheat Bread 100 g 200 g 300 g 500 g 6 Vegetables 100 g 200 g 300 g 400 g 7 Frozen Vegetables 120 g 250 g 500 g 700 g 8 Ja...

Страница 19: ...enter of the flat table Select the program and weight then press Start Open the door to TURN OVER AND ARRANGE WHEN TWO BEEPS HEARD during cooking press Start Pad to continue DO NOT USE PLASTIC WRAP OR...

Страница 20: ...parmesan 2 cups 1 onions 2 cloves garlic 2 tablsp Oil 2 cups 650 ml 650 ml cup parmesan 3 cups 2 onions 3 cloves garlic 3 tablsp Oil 3 cups 850 ml 850 ml cup parmesan 14 Pasta It is suitable for cooki...

Страница 21: ...serv self raising flour 1 cup cocoa powder 1 tablespoon caster sugar cup milk cup vanilla essence 1 teaspoon chocolate 50 g butter 100 g brown sugar cup cocoa extra 2 tablespoons water cup Sift flour...

Страница 22: ...ing or cooking begins A change in the starting temperature could cause inaccurate results and or food may deteriorate 3 When using Standing time or Delay Start it s up to 2 Power stages Press Start De...

Страница 23: ...lem with the oven contact an authorized Service Centre Oven will not turn on The oven is not plugged in securely Remove plug from outlet wait 10 seconds and re insert Circuit breaker or fuse is trippe...

Страница 24: ...Turn the oven off and remove the power plug from the wall socket before cleaning The outside oven surfaces should be cleaned with a damp cloth To prevent damage to the operating parts inside the oven...

Страница 25: ...23 Panasonic Warranty For Australia...

Страница 26: ...24 Panasonic Warranty For New Zealand...

Страница 27: ...can also press Weight pad to select weight before pressing Start To Reheat using Auto Reheat Pads page 15 or Press to select the desired weight Press once After you select the reheat menu you can also...

Страница 28: ...Auto Menu Techniques for Preparation Timing A range of cooking times is given in each recipe for two reasons First to allow for the uncontrollable differences in food shapes starting temperatures and...

Страница 29: ...always be kept covered while standing in order to retain the heat If a longer standing time is required while you cook another food to serve with the first for instance cover with aluminum foil Conve...

Страница 30: ...s can be mixed on a vegetable platter but remember frozen vegetables are not as dense as fresh vegetables as they have been blanched before freezing If vegetables are cut to a similar size they can be...

Страница 31: ...y feel warm Ensure you allow it to stand for several minutes before eating IMPORTANT POINTS TO CONSIDER WHEN REHEATING COLD FOODS STARTING TEMPERATURE Foods taken from the refrigerator will take longe...

Страница 32: ...ed High 4 5 Place onto paper towel lined plate Pizza 350 g High 3 4 Remove from package and place onto paper towel or follow manufacturer s instructions FROZEN MEAL Fish in Sauce 200 g Medium 5 6 Pier...

Страница 33: ...1 medium onion chopped 1 tablespoon fresh thyme leaves 1 bay leaf 6 cups chicken stock cup frozen peas Method Wash split peas and place in a 2 litre capacity bowl with 1 litre of water Cover and allo...

Страница 34: ...High for 1 to 2 minutes Add remaining ingredients mix well and cook on High for 4 to 5 minutes Stir twice through cooking Allow to cool Place in a bowl and serve with drinks Store in an airtight conta...

Страница 35: ...cook on High for 1 minute Add parsley pepper mustard and gradually blend in milk Cook on High for 2 to 3 minutes stir halfway through cooking Lightly mix through salmon and liquid into sauce Pour int...

Страница 36: ...Cook on Medium for 8 to 10 minutes stirring halfway through cooking Serve in individual ramekins GARLIC CHILLI PRAWNS Serves 4 Ingredients 1 kg medium uncooked king prawns 1 small red onion thinly sl...

Страница 37: ...leaves chopped pepper Method Place marinara mix into a 2 litre casserole dish Set aside Place butter and garlic in 1 litre casserole dish Cook on Med High for 1 minute Add remaining ingredients excep...

Страница 38: ...string or a strip cut from the open end of the bag Make six 2 cm slits on top of bag Multiply the weight of the poultry by the minimum recommended minutes per 500 g See chart below Programme Micro Pow...

Страница 39: ...oking To Cook by Auto Cook Prepare as above Select Steam Chicken Pieces press to select weight 400 g then press Start CHICKEN BURRITOS Serves 4 Ingredients 1 clove garlic crushed 2 large onions choppe...

Страница 40: ...Med High for 12 to 14 minutes CHICKEN SAN CHOY BAU Serves 4 Ingredients 10 dried shiitake mushrooms 2 teaspoons sesame oil 1 clove garlic chopped 500 g minced chicken 10 water chestnuts finely chopped...

Страница 41: ...for 1 minute before serving Note The size of the eggs will alter cooking time CRUSTLESS CHEESE AND SPINACH PIE Serves 4 Ingredients 1 bunch spinach 6 green onions thinly sliced 500 g ricotta 2 eggs 1...

Страница 42: ...foil around ham and secure to body of ham with wooden toothpicks Fold 2 cm over cut surface After heating check temperature using a meat thermometer The thermometer should not touch bone or fat If it...

Страница 43: ...ilk and cook on High for 6 to 8 minutes Mix in the soy sauce lemon juice and basil and serve sprinkled with peanuts LASAGNE Serves 4 to 6 Ingredients Meat Sauce 500 g minced beef 2 small onions choppe...

Страница 44: ...s in a 3 litre dish Mix well Cook on Med High for 15 to 17 minutes Stir halfway through cooking Serve in taco shells with chopped tomatoes and shredded lettuce or with a salad and crusty bread HINT It...

Страница 45: ...k on Medium for 30 to 35 minutes turn halfway through cooking Stand covered for 15 minutes before slicing GOULASH Serves 4 Ingredients 1 onion chopped 1 clove garlic crushed 1 tablespoon butter 2 tabl...

Страница 46: ...ussels Sprouts 250 g Covered dish with cup water 4 to 6 Cabbage 500 g Shredded with cup water in covered dish 5 to 7 Carrots 4 sliced finely 250 g With cup water in covered dish 5 to 6 Cauliflower 500...

Страница 47: ...7 Cauliflower 500 g Cook in covered 2 litre dish 5 to 6 Corn cob Corn cobs 125 g 250 g Cook in covered 2 litre dish Cook in covered 2 litre dish 3 to 4 5 to 6 Mixed Vegetables 250 g Cook in covered 2...

Страница 48: ...stirring halfway through cooking Serve CHICKPEA SALAD WITH CORIANDER DRESSING Serves 4 to 6 Ingredients 1 cup dried chick peas water for soaking 3 cups boiling water 1 red capsicum diced 1 lebanese c...

Страница 49: ...s 4 Ingredients 250 g brussels sprouts 2 tablespoons butter 150 g bacon finely chopped 1 onion finely chopped 1 teaspoon dill or basil 1 teaspoon sugar Method Wash and drain brussels sprouts Cook in a...

Страница 50: ...heese over asparagus Serve ARDENNIS STYLE POTATOES Serves 4 Ingredients 4 medium sized potatoes 100 g ham finely diced 3 tablespoons snipped chives 50 g butter cup grated Cheddar cheese ground black p...

Страница 51: ...14 to 16 5 Jasmine 1 cup 3 litre dish 2 cups 14 to 16 5 Cooking Pasta by Micor power Follow directions in chart for recommended dish size amount of water and cooking time Boil water with 1 teaspoon s...

Страница 52: ...parmesan cheese Method Place asparagus into a 2 litre dish and cook on High for 1 minute Set aside Place oil rice and garlic in a large microwave safe bowl Cook covered on High for 1 minute Add 2 cup...

Страница 53: ...ok uncovered on High for 12 to 14 minutes Rotate halfway through cooking Sprinkle each capsicum with Parmesan and cook on High for a further 2 minutes Tip substitute any thin sausages Freeze leftover...

Страница 54: ...300 g stir fry vegetables 1 tablespoon hoisin sauce 1 tablespoon teriyaki sauce 85 g 2 minute noodles 2 cups boiling water Method Place oil tofu and onion in a 3 litre dish and cook on High for 2 to...

Страница 55: ...k successfully in the microwave oven PACKET CAKE Ingredients 1 packet cake mix 340 g Ingredients as recommended by manufacturer Method Mix cake and other ingredients with a metal spoon DO NOT OVERBEAT...

Страница 56: ...sed 20 cm square pan Refrigerate until set Cut or break into pieces to serve CHERRY KUECHEN Serves 4 to 6 Ingredients Base 1 340 g pkt buttercake mix cup toasted coconut 125 g melted butter 1 egg Fill...

Страница 57: ...of a 2 litre casserole dish Cook on High for 4 to 6 minutes Do not use plastic wrap or lid STEAMED JAM PUDDING Serves 4 Ingredients 2 tablespoons jam 100 g butter cup caster sugar 2 eggs cup self rai...

Страница 58: ...peaches into a 2 litre casserole dish Place crumble mixture on top of peaches and cook on High for 10 to 12 minutes Serve with cream or ice cream BANANA LOAF Serves 4 to 6 Ingredients 90 g butter cup...

Страница 59: ...ins 50 g craisins 100 g dates chopped 100 g dried figs chopped 50 g glace ginger chopped cup brandy 125 g butter cup firmly packed brown sugar 2 eggs teaspoon cinnamon teaspoon mixed spice teaspoon nu...

Страница 60: ...h Add sugar stir well and cook on Med High for 35 to 40 minutes Stirring occasionally Pour into sterilised jars and seal LEMON BUTTER Makes 1 cups 250 ml Ingredients cup lemon juice 1 tablespoon lemon...

Страница 61: ...thod Combine all ingredients in 1 cup jug Cook on High for 30 to 60 seconds Stir well and serve with Roast Lamb HOLLANDAISE SAUCE Makes cups Ingredients 60 g butter 2 tablespoons lemon juice 2 egg yol...

Страница 62: ...in the base of a mug add milk Cook on Med High for 2 minutes stirring half way through cooking Stir and serve PEPPERMINT COOLER Serve 4 Ingredients 3 peppermint tea bags 4 cups cold water juice of le...

Страница 63: ...Panasonic Appliances Microwave Oven Shanghai Co Ltd 2014 F0003BN60QP PA0814 0 Printed in China...

Отзывы: