background image

Read Before Using - 3

Contents

Read Before Using

Consider the Environment. . . . . . . . 2

Checking before use . . . . . . . . . . . . . . .2

SAFETY PRECAUTIONS . . . . . . . . 4

Checking Your Tumble Dryer. . . . . . 7

Your tumble dryer . . . . . . . . . . . . . . . . .7

Accessories. . . . . . . . . . . . . . . . . . . . . .7

Using the Buttons  . . . . . . . . . . . . . . 8

Child Lock . . . . . . . . . . . . . . . . . . . . . . .9

Additional functions. . . . . . . . . . . . . . . .9

Drying Instructions

Drying  . . . . . . . . . . . . . . . . . . . . . . 10

Setting drying  . . . . . . . . . . . . . . . . . . .10

Required time . . . . . . . . . . . . . . . . . . .11

Changing settings while drying . . . . . .11

Preset timer. . . . . . . . . . . . . . . . . . . . .11

Selecting the Programme . . . . . . . 12

Sub-programme description . . . . . . . .13

Details of Programmes . . . . . . . . . 14

Drying Outdoor/Sport Wears  

and Delicates. . . . . . . . . . . . . . . . . 16

Preparing the laundry . . . . . . . . . . . . .16

Outdoor/Sports programme  . . . . . . . .16

Delicate laundry loads. . . . . . . . . . . . .16

Tips for drying delicates  . . . . . . . . . . .16

Maintenance

Maintenance . . . . . . . . . . . . . . . . . 17

Emptying water . . . . . . . . . . . . . . . . . .17

Cleaning the outside of the  

appliance. . . . . . . . . . . . . . . . . . . . . . .17

Cleaning the drum. . . . . . . . . . . . . . . .17

Cleaning the door . . . . . . . . . . . . . . . .17

Cleaning the moisture sensors . . . . . .18

Filter locations. . . . . . . . . . . . . . . . . . .18

Cleaning the fluff filter . . . . . . . . . . . . .19

Cleaning the filter frame . . . . . . . . . . .19

Cleaning the fine filter . . . . . . . . . . . . .20

Troubleshooting

Fault Checklist. . . . . . . . . . . . . . . . 21

Error Display . . . . . . . . . . . . . . . . . 23

Installation Instructions

Choosing the Right Location . . . . . 24

Transporting the appliance . . . . . . . . .24

The right place for the appliance. . . . .24

Installing the set-in appliance . . . . . . .25

Levelling the appliance . . . . . . . . . . . .26

Connecting Power Supply  

and Hose . . . . . . . . . . . . . . . . . . . . 27

Hose and mains lead lengths . . . . . . .27

Connecting to the power supply . . . . .27

Connecting the extended  

water-drain hose . . . . . . . . . . . . . . . . .27

Checking After Installation. . . . . . . 29

Installation checklist  . . . . . . . . . . . . . .29

Test run after installation . . . . . . . . . . .29

Power Consumption  . . . . . . . . . . . 30

Specifications  . . . . . . . . . . . . . . . . 31

NH-P70G2_AUS_NZ.indb   3

2013/07/04   11:44:10

Содержание NH-P70G2

Страница 1: ...nstructions Heat Pump Tumble Dryer Domestic use Model No NH P70G2 Thank you for purchasing this appliance For optimum performance and safety please read these instructions carefully Before connecting operating or adjusting this appliance please read the instructions completely Please keep this manual for future reference NH P70G2_AUS_NZ indb 1 2013 07 04 11 44 10 ...

Страница 2: ... the room temperature is not excessively high If the tumble dryer and other heat producing appliances share the same area make sure that the room is well ventilated and switch the other appliances off when operating the tumble dryer if possible Checking before use Before the appliances initial operation or after a prolonged period of non operation perform the following procedures if you are using ...

Страница 3: ...enance 17 Emptying water 17 Cleaning the outside of the appliance 17 Cleaning the drum 17 Cleaning the door 17 Cleaning the moisture sensors 18 Filter locations 18 Cleaning the fluff filter 19 Cleaning the filter frame 19 Cleaning the fine filter 20 Troubleshooting Fault Checklist 21 Error Display 23 Installation Instructions Choosing the Right Location 24 Transporting the appliance 24 The right p...

Страница 4: ...exposed to heat sources such as in a tumble dryer The items become warm causing an oxidation reaction in the oil Oxidation creates heat If the heat cannot escape the items can become hot enough to catch fire Piling stacking or storing oil affected items can prevent heat from escaping and so create a fire hazard If it is unavoidable that fabrics that contain vegetable or cooking oil or have been co...

Страница 5: ...way from the appliance for example gasoline thinner alcohol or clothing soaked with these materials They may cause an explosion or a fire Power source and mains lead Unplug the mains lead when cleaning the appliance Check the mains lead and mains plug for any damage If the mains lead is damaged it must be replaced by the manufacturer its service agent or similarly qualified person to avoid a hazar...

Страница 6: ...eneral Use This appliance is only suitable for textiles which are suitable for tumble drying Do NOT apply pesticide hair spray or deodorant to the appliance Do NOT put any electrical equipment for example TVs radios or battery chargers on or near the appliance Do NOT put too much laundry into the appliance This may cause damage to the appliance Fabric softeners or similar products should be used a...

Страница 7: ...e 17 Door Adjustable feet see page 26 Water drain hose see pages 27 28 Mains lead Mains plug Drum Heat exchanger unit Extended water drain hose see pages 27 28 Using the optional drying basket can dry sports shoes etc with Timed Prog Warm Optional accessory Drying basket N DB1 Accessories Make sure that all the accessories are supplied with the appliance NH P70G2_AUS_NZ indb 7 2013 07 04 11 44 11 ...

Страница 8: ... the washing machine programme Use this button only if the anticipated drying time needs to be displayed more accurately 8 Drying Level button Child Lock button Press this button to choose from 5 different Drying Level settings 1 2 3 4 5 for Cottons Easy care Mixed Rapid 40 and Outdoor Sports programmes 3 is the default setting level Press and hold this button to set the Child Lock The controls wi...

Страница 9: ... beeps heard keep Drying Level button pressed until it unlocks The symbol disappears Warning Do NOT leave children unsupervised near the appliance Keep pets away from the appliance Additional functions Depending on the programme you can combine different additional functions Note Some additional functions cannot be used with certain programmes See pages 14 15 If you select an unavailable function ...

Страница 10: ...pliance has started the laundry is weighed After about 3 minutes a new drying time will be displayed If you select the Wool Silk Lingerie Shirts or Timed programme the laundry is not weighed The buzzer will sound when the programme has finished For details on setting the buzzer see page 9 Remove the laundry and rearrange where necessary Do not leave it in the drum too long after the programme ends...

Страница 11: ... drying might finish before or after preset times depending on the kind of laundry the temperature and the moisture content in the laundry Setting a preset time Continuously press the Time button until the desired preset time is displayed The preset time increases by 1 hour each time it is pressed Press and hold the button to change the preset time rapidly Programme Applicable preset times Cotton ...

Страница 12: ...pes of fabrics composition and moisture content of the loads 1 5 kg Outdoor Sports For membrane coated fabrics water repellent fabrics functional clothing fleece fabrics dry jackets trousers with removable internal lining separately 2 5 kg Wool For woollen fabrics suitable for tumble drying Fabrics become fluffier but not dry Remove the laundry once the programme ends and allow them to dry 2 kg Si...

Страница 13: ... fabrics which dry more slowly than general fabrics Example terrycloth towels and table linen Cupboard Dry For general fabrics Example trousers skirts and dresses Iron Dry For cotton or linen fabrics which you would like to iron Example table linen and bed linen Note To prevent laundry from drying out it should be rolled up until it is ironed Post drying ironing Sub programme Applicable drying met...

Страница 14: ...rd Dry 1 10 Iron Dry 0 50 Mixed Cupboard Dry 3 1000 1 30 1 Iron Dry 1 10 Rapid 40 3 1000 0 40 1 Outdoor Sports 3 1000 2 00 1 Wool 0 15 Silk Lingerie 1 00 Shirts 1 00 Timed Prog Warm 0 10 Timed Prog Cold 1 If the appliance has been operated even once the Drying Level and Spin speed set in the previous operation have been memorized 2 When the Speed function is set the approximate time will be 50 min...

Страница 15: ...2 2 2 0 1 5 500 1600 0 0 0 1 5 500 1600 0 0 1 5 500 1600 0 1 5 500 1600 4 5 4 0 4 0 0 the 3 The Gentle Dry function and Speed function cannot be used together Only one of these functions can be set at a single time 4 The Gentle Dry function is automatically set Although the function cannot be selected its indicator will light up NH P70G2_AUS_NZ indb 15 2013 07 04 11 44 12 ...

Страница 16: ...lothes or the appliance Tie up any loose strings on the clothing and close zippers Turn clothing with raised fabrics and zippers inside out Otherwise the clothes may be damaged Outdoor Sports programme Make sure that the item to be dried can be dried with this programme Delicate laundry loads Wool programme 2 kg or less Silk Lingerie programme 1 kg or less Approximate weights Wool sweater 400 g Si...

Страница 17: ...appliance Clean the outside of the appliance with a soft cloth and mild detergent for example kitchen detergent and soapy water Remove lint and dust that accumulate around the appliance Warning Do NOT splash water over the appliance Do NOT use cream cleansers thinners nor products containing alcohol or paraffin oil Cleaning the drum The drum and other stainless steel parts can be cleaned with a su...

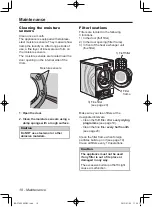
Страница 18: ...all filters every 10 operations Caution The appliance must not be used if any filter is out of its place or damaged in any way The excessive build up of fluff might cause a malfunction Cleaning the moisture sensors Clean once a month The appliance is equipped with stainless steel moisture sensors They measure how damp the laundry is After long periods of use a fine layer of limescale can form on t...

Страница 19: ...reful not to tear the net 4 Replace the fluff filter to its original position Extra cleaning Remove any fluff from the hollow part of the door with a bottle brush or a vacuum cleaner Cleaning the filter frame Clean the filter frame when foreign particles build up on it 1 Open the door and then remove the filter frame from the bottom of the door opening 2 Turn the filter frame upside down to remove...

Страница 20: ...te the fine filter from the inner cover Fine filter Inner cover 5 Clean the fine filter using a vacuum cleaner or with water 6 Replace every part to its original position Fit the projections of the inner cover into the holes of the fine filter while joining both parts together Note To open or close the levers on the inner cover refer to the following figure CLOSE OPEN NH P70G2_AUS_NZ indb 20 2013 ...

Страница 21: ...nd on again Then set the settings again Child Lock may be activated See page 9 Drying repeatedly starts and stops This is not a malfunction the drum slowly rotates and stops repeatedly when the Anti crease function has been set Laundry is not sufficiently dried Some portions are damp The laundry might have been added to the drum during drying The laundry may have become tangled The laundry may be ...

Страница 22: ...or may flash even if the filters have been cleaned The displayed remaining time changes The remaining time is estimated and corrected continually Thus the time displayed may change The operating sound changes This is normal the change is caused by the on off conditions of the compressor and draining pump 0 display remains after the programme has finished This is not a malfunction without the Anti ...

Страница 23: ...ee page 17 Set the water drain hose properly See pages 27 28 After the above procedures turn the power on again and press the Start button Aberrant ambient temperature Operate the appliance within an operating ambient temperature range 5 ºC 35 ºC Inspection is required Pull out the power plug Then contact Customer Care Centre and explain the displayed content 2 digit number after H NH P70G2_AUS_NZ...

Страница 24: ...ppliance has not been transported as described then it must be left to stand for at least 1 hour before it is connected to an electricity supply Otherwise the heat pump could be damaged The right place for the appliance Make sure that there is enough space for the appliance and that openings on the base are not obstructed by a carpet Dimension in millimetres 536 596 561 491 593 625 51 845 You need...

Страница 25: ...ad of the standard cover panel have a technician install a metal cover Warning The appliance must not be installed behind a lockable door a sliding door or a door with a hinge on the opposite side to that of the appliance in such a way that a full opening of the appliance door is restricted This will prevent children from being locked in the drum Caution Do NOT install the appliance in direct sunl...

Страница 26: ...make sure that the appliance is properly levelled 4 Tighten each lock nut by turning it anticlockwise Caution Make sure that all lock nuts are tightened securely and the feet are still bolted to the appliance If they are unbolted the appliance will move around The dryer can be stacked on top of a Panasonic washing machine using the Washer dryer stacking kit N SKT100 Panasonic accessory available t...

Страница 27: ...rs 1 2 Drain off any water inside of the water drain hose Follow the instructions in this section to prevent water leaks If you are unsure ask a service agent to connect the hoses Hose and mains lead lengths Left side connections Right side connections 90 cm 135 cm 150 cm 140 cm Connecting to the power supply Name plate Caution The name plate indicates the rated power that the appliance needs Make...

Страница 28: ...er can be drained at the height of appliance approx 85 cm by the drain pump contained in this appliance 85 cm Do not roll the drain hose when using Also do not arrange the drain hose in the twisted or bent state Water may not be drained properly Caution Do NOT let the tip of the water drain hose dip into the drained water This can cause water to flow back into the appliance Left side connection Fo...

Страница 29: ... appliance on a flat stable surface Does it run without vibrating 2 Adjustable feet Are they bolted securely to the appliance Installation checklist Test run after installation Check for abnormal noise WITHOUT laundry in the drum 1 Close the door 2 Press the On button 3 Press the Start button Check whether there is any abnormal noise If so make sure that the appliance is level After resolving any ...

Страница 30: ... Iron Dry Eco 4 kg 1000 r min 0 60 kWh 0 50 1 The results shown here comply with IEC 61121 Each result indicates the value required until the end of each programme with the Drying Level 3 and Anti crease process ON set Power consumption and time during Anti crease process are not included 2 The power consumption and times indicated in the table may vary depending on variations in room temperatures...

Страница 31: ...e 220 240 V Rated frequency 50 Hz Maximum energy rated power input 870 910 W Power consumption Off mode 0 18 W Left on mode 1 36 W Product weight 55 kg Maximum mass of dry cloth 7 kg Product dimensions 596 mm W x 625 mm D x 845 mm H NH P70G2_AUS_NZ indb 31 2013 07 04 11 44 15 ...

Страница 32: ...Web Site http panasonic net Panasonic Corporation 2013 Printed in China July 2013 H0813 0 H9901 50800 H9901 508 NH P70G2_AUS_NZ indb 32 2013 07 04 11 44 15 ...

Отзывы: