background image

C1

C7

C32

C15

C26

C28

C24

C15

C18

C31

C8

C21

C23

C29

C6

C27

C25

C19

C20

C15

BLACK

BLACK

GREEN

GRAY

C22

C15

C16

C3

C2

C5

C4

(For X1)

(For A1)

C12

C13

C17

C30-1

C30-2

C30-3

C30-4

C30-5

C30-6

C30-7

C30

C14

C9

C11

C10

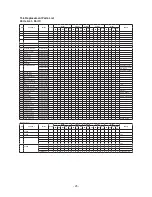
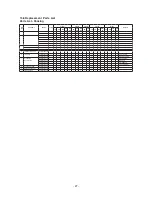
15.5 Parts Exploded View : Part C

- 24 -

Содержание NA-F135X1

Страница 1: ...ired only by experienced professional technicians Any attempt to service or repair the product or products dealt within this service information by anyone else could result in serious injury or death...

Страница 2: ...erations Panel 9 7 Washing 10 8 Washing Options 11 9 Maintenance 12 10 Test Mode 13 14 11 Troubleshooting 15 12 Table of Errors 12 1 U Error indication 16 12 2 H Error indication 17 13 Wiring Diagram...

Страница 3: ...be careful enough about receiving an electric shock at electric charging parts and cable terminal parts The level of the arised damages or dangers when indicated contents are ignored are classified b...

Страница 4: ...drain water hose Bottom cover Screw For the bottom cover Water supply valve Accessories External drain water hose Pulsator Lint filter Lid Tub Operation Panel Leveller Softener case Power cord and pl...

Страница 5: ...Spin 13 5 Kg 11 5 Kg 13 5 Kg 12 5 Kg 11 5 Kg Standard Consumption Water 93 Liter 86 Liter 93 Liter 90 Liter 86 Liter Product Weight Accessories 43 Kg 43 Kg 42 Kg 42 Kg 42 Kg Packing 49 Kg 49 Kg 48 Kg...

Страница 6: ...ty of this washing machine Note Total time is approximate When the standard water supply rate is 15 L min Total time may increase depending on low water pressure bad draining conditions and the amount...

Страница 7: ...id the following locations for installation Locations with a possibility of freezing Damp locations or locations where it may be exposed to rain etc To prevent electric shock or fire Locations exposed...

Страница 8: ...4 Turn part A to the right and tighten securely To prevent water leakage Connect the water supply hose to the water tap adaptor Insert the hose into the adaptor while pushing down the lever and hook...

Страница 9: ...Auto Restart The power turns off automatically if you do not press Start Pause within 10 minutes after power on Change water amount During the wash process press Water Level to change the water amoun...

Страница 10: ...eeps Set how many hours later to finish operation P 9 2 minutes after start up all indications except turn off To confirm after the timer has been set press To cancel or change press The hours that ca...

Страница 11: ...as conducted based on IEC60456 except for water temperature Delicate Blanket ECONAVI lamp NA F135X1 NA F115X1 Air Dry Delicate Use this program to gently wash delicate clothes and stylish garments Loa...

Страница 12: ...d for 5 seconds 2 short beeps To cancel do the same procedure 4 short beeps Turning the tub by hand If it is difficult to reach the detergent inlet Turn the power on When a clicking sound is heard Tur...

Страница 13: ...n H05 will display 1 B Spinning operation Lid SF switch The spinning operation Check lid SF switch operation Light up lid switch working 2 C Adjust the water amount against amount detection Press the...

Страница 14: ...ssage of the last time Digit lights shall be indicate E initially press Wash button to show the last error and press the wash button again to return to initial mode If any error message occurred in th...

Страница 15: ...unt of laundry water is added several times automatically The water level is too high for the amount of laundry If laundry is wet or there is water in the tub before operation the water level may be h...

Страница 16: ...g the extension hose Resume operation by opening and closing the lid Clear and clean drain hose U12 The lid is open Did you try to run the washing machine with the lid open Close the lid U13 Spin or A...

Страница 17: ...In water drain action check both side of Disconnect the power plug plug in capacitor that voltage not equal to 0 V Replace PCB board H04 Load relay short error After turn on the Motor for 2 seconds ca...

Страница 18: ...13 WIRING DIAGRAM 13 1 NA F135X1 NA F115X1 13 2 NA F135A1 NA F125A1 NA F115A1 18...

Страница 19: ...it as Fig 2 Use Screw driver take off screws at Controller Unit with Panel Face B as Fig 3 Change new part of Controller Unit as Fig 4 14 2 Panel Face B Fig 5 Fig 6 Fig 7 Use Screw driver push lock lo...

Страница 20: ...A3 A4 A17 A18 A19 A11 A14 A12 A13 A10 A10 A16 A15 A20 A21 A26 A22 A25 A5 A6 A7 A8 A9 A2 A1 15 1 Parts Exploded View Part A 15 PARTS EXPLODED VIEW AND REPLACEMENT PARTS LIST 20...

Страница 21: ...0W 1 1 1 1 1 1 1 1 1 WHITE AXW21518XT0S 1 1 1 1 SILVER A13 ANTIFREEZE INSTRUCTION B AXW99598XV0L 1 THAI AXW99598XT0L 1 1 1 ENGLISH AXW99598XU0L 1 VIETNAMESE AXW99598XV0W 1 1 1 THAI AXW99598XT0W 1 1 1...

Страница 22: ...B21 1 Accessories B17 B16 B2 B21 B12 B2 B10 B9 B15 B18 B20 B23 B22 B19 B18 1 B1 B21 1 B13 B11 B14 B3 B8 B6 B4 B4 B5 B5 B4 15 3 Parts Exploded View Part B 22...

Страница 23: ...LISH AXW01538XW00 S 1 THAI AXW01538XW10 S 1 1 ENGLISH AXW01538XV00 S 1 THAI AXW01538XV10 S 1 ENGLISH AXW01538XV20 S 1 VIETNAMESE AXW01538XV30 S 1 ENGLISH AXW01538XX00 S 1 THAI AXW01538XX10 S 1 ENGLISH...

Страница 24: ...C24 C15 C18 C31 C8 C21 C23 C29 C6 C27 C25 C19 C20 C15 BLACK BLACK GREEN GRAY C22 C15 C16 C3 C2 C5 C4 For X1 For A1 C12 C13 C17 C30 1 C30 2 C30 3 C30 4 C30 5 C30 6 C30 7 C30 C14 C9 C11 C10 15 5 Parts E...

Страница 25: ...1 1 M 19 8 C23 SPINNER PLATE B AXW32328XT00 1 1 1 1 1 1 1 1 1 1 1 1 1 1 1 1 1 1 C24 OVER FLOW HOSE B UNIT AXW018P8XT00 1 1 1 1 1 1 1 1 1 1 1 1 1 1 1 1 1 1 C25 EARTH WIRE UNIT AXW003F8XT00 S 1 1 1 1 1...

Страница 26: ...Accessories 7 9 8 4 2 5 Fully Automatic Washing Machine Fully Automatic Washing Machine THIS PART USE FOR PACKING NOT PART OF PRODUCT 1 10 6 3 15 7 Parts Exploded View Packing 26...

Страница 27: ...ION B AXW90158XT50 1 1 1 1 1 1 1 1 1 1 1 1 1 1 1 1 1 1 BACK SIDE 4 CORNER PAD AXW90168XT00 2 2 2 2 2 2 2 2 2 2 2 2 2 2 2 2 2 2 FRONT SIDE 5 PROTECTION CASE B UNIT AXW090B8XT00 1 1 1 1 1 1 1 1 1 1 1 1...

Отзывы: