Panasonic LUMIX DMC-ZX1 Скачать руководство пользователя страница 13

13

(ENG) VQT2F42

Preparation

Note

After charging is completed, be sure to disconnect the power supply device from the electrical outlet.

The battery becomes warm after using it and during and after charging. The camera also 

becomes warm during use. This is not a malfunction.

The battery will be exhausted if left for a long period of time after being charged.

The battery can be recharged even when it still has some charge left, but it is not 

recommended that the battery charge be frequently topped up while the battery is fully 

charged. 

(Since characteristic swelling may occur.)

When the operating time of the camera becomes extremely short even after properly charging 

the battery, the life of the battery may have expired. Buy a new battery. 

Do not leave any metal items (such as clips) near the contact areas of the power plug. Otherwise, a 

fire and/or electric shocks may be caused by short-circuiting or the resulting heat generated.

The battery life

Recording conditions by CIPA standard

CIPA is an abbreviation of [Camera & Imaging Products Association].

Temperature: 23

o

C (73.4

o

F)/Humidity: 50% when LCD monitor is on.

¢

Using a Panasonic SD Memory Card (32 MB).

Using the supplied battery.

Starting recording 30 seconds after the camera is turned on. (When the Optical Image 

Stabilizer function is set to [AUTO].)

Recording once every 30 seconds

 with full flash every second recording.

Rotating the zoom lever from Tele to Wide or vice versa in every recording.

Turning the camera off every 10 recordings and leaving it until the temperature of the battery 

decreases.

¢

The number of recordable pictures decreases in Auto Power LCD Mode and Power LCD Mode.

The number of recordable pictures varies depending on the recording interval time. 
If the recording interval time becomes longer, the number of recordable pictures 
decreases. [e.g. When recording once every 2 minutes, the number of recordable 
pictures decreases to about 82.]

The number of recordable pictures and playback time

 will vary depending on the 

operating conditions and storing condition of the battery.

Charging

The indicated charging time is for when the battery has been discharged completely. 

The charging time may vary depending on how the battery has been used. The charging 

time for the battery in hot/cold environments or a battery that has not been used for long 

time may be longer than normal.

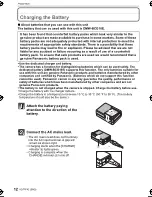
Detach the battery after 
charging is completed.

Number of recordable 

pictures

Approx. 330 pictures

By CIPA standard in Normal Picture 

Mode

Recording time

Approx. 165 min

Playback time

Approx. 300 min

Charging time

Approx. 130 min

DMC-ZX1EB-VQT2F42_eng.book  13 ページ  2009年7月14日 火曜日 午後1時43分

Содержание LUMIX DMC-ZX1

Страница 1: ...these instructions completely Please also refer to Operating Instructions PDF format recorded on the CD ROM containing the Operating Instructions supplied You can learn about advanced operation metho...

Страница 2: ...not leave the battery ies in an automobile exposed to direct sunlight for a long period of time with doors and windows closed WARNING TO REDUCE THE RISK OF FIRE ELECTRIC SHOCK OR PRODUCT DAMAGE DO NOT...

Страница 3: ...se observe the wiring code as stated below If in any doubt please consult a qualified electrician IMPORTANT The wires in this mains lead are coloured in accordance with the following code Blue Neutral...

Страница 4: ...d or pictures may be distorted by strong magnetic fields created by speakers or large motors Electromagnetic wave radiation generated by microprocessors may adversely affect the camera disturbing the...

Страница 5: ...trousers pocket when you sit down or forcefully insert it into a full or tight bag etc Damage to the LCD monitor or personal injury may result Do not attach any other items to the hand strap that s in...

Страница 6: ...GB More specific information about memory cards that can be used with this unit You can only use an SDHC Memory Card if using cards with 4 GB or more capacity A 4 GB or more Memory Card without an SDH...

Страница 7: ...ing For more information about collection and recycling of old products and batteries please contact your local municipality your waste disposal service or the point of sale where you purchased the it...

Страница 8: ...r customers within the Republic of Ireland 01 289 8333 Visit our website for product information E mail customer care panasonic co uk Technical Support for AV Software For customers within the UK 0844...

Страница 9: ...ctures on the built in memory when you are not using a card Consult the dealer or your nearest Service Centre if you lose the supplied accessories You can purchase the accessories separately Optional...

Страница 10: ...EC PLAYBACK selector switch 10 E ZOOM button 11 Cursor buttons A 3 Exposure compensation Auto Bracket White balance fine adjustment B 4 Macro Mode AF Tracking C 2 Self timer button D 1 Flash setting b...

Страница 11: ...le when the camera is attached to it 23 Card Battery door 24 Release lever 25 DC coupler cover When using an AC adaptor ensure that the Panasonic DC coupler DMW DCC5 optional and AC adaptor DMW AC5E o...

Страница 12: ...charger indoors Charge the battery in a temperature between 10 oC to 35 oC 50 oF to 95 oF The battery temperature should also be the same It has been found that counterfeit battery packs which look ve...

Страница 13: ...g recording 30 seconds after the camera is turned on When the Optical Image Stabilizer function is set to AUTO Recording once every 30 seconds with full flash every second recording Rotating the zoom...

Страница 14: ...the lever A being careful about the direction you insert it Pull the lever A in the direction of the arrow to remove the battery Card Push it fully until it clicks being careful about the direction y...

Страница 15: ...hat were performed When MENU SET has been pressed to complete the settings without the clock having been set set the clock correctly by following the Changing the clock setting procedure below Select...

Страница 16: ...e camera Here the method for making settings in the normal picture mode is described but settings can be made in a similar way on the playback menu the setup menu etc Example Setting AF MODE from to i...

Страница 17: ...Press 4 to select the SETUP menu icon Press 1 Select a menu item next and set it Press 3 4 to select AF MODE Select the item at the very bottom and press 4 to move to the second screen Press 1 Dependi...

Страница 18: ...Slide the REC PLAYBACK selector switch to Switching the mode by rotating the mode dial Align a desired mode with part C Rotate the mode dial slowly and surely to adjust to each mode Intelligent Auto M...

Страница 19: ...to The status indicator 3 lights when you turn this unit on 2 It turns off after about 1 second 1 Shutter button Hold this unit gently with both hands keep your arms still at your side and stand with...

Страница 20: ...od is used for instance and the camera has judged that camera shake is minimal when the Scene Mode has been identified as the shutter speed will be set to a maximum of 8 seconds Take care not to move...

Страница 21: ...Slide the REC PLAYBACK selector switch to A Mode dial B REC PLAYBACK selector switch Set the mode dial to Aim the AF area at the point you want to focus on Press the shutter button halfway to focus Th...

Страница 22: ...to play back the picture If you keep pressing 2 1 the number of pictures forwarded rewound increases Slide the REC PLAYBACK selector switch A to Normal playback is set automatically in the following...

Страница 23: ...DISPLAY button B button Press 2 to select YES and then press MENU SET To delete multiple pictures up to 50 or all the pictures Press Press 3 4 to select DELETE MULTI or DELETE ALL and then press MENU...

Страница 24: ...later or Adobe Reader 7 0 or later to browse or print the Operating Instructions PDF format Download and install a version of Adobe Reader that you can use with your OS from the following Web Site ht...

Страница 25: ...m 3 28 feet Tele to Scene mode There may be differences in the above settings Shutter system Electronic shutteriMechanical shutter Motion picture recording 1280k720 pixels 30 frames second only when...

Страница 26: ...Built in Memory Approx 40 MB SD Memory Card SDHC Memory Card Picture size Still picture When the aspect ratio setting is X 4000k3000 pixels 3264k2448 pixels 2560k1920 pixels 2048k1536 pixels 1600k1200...

Страница 27: ...Dimensions Approx 97 8 mm W k54 6 mm H k26 0 mm D 3 3 4q W k2 1 4q H k1q D excluding the projecting parts Mass Approx 138 g 4 868 oz excluding card and battery Approx 160 g 5 644 oz with card and bat...

Страница 28: ...oft Corporation Other names company names and product names printed in these instructions are trademarks or registered trademarks of the companies concerned B VQT2F42 F0709NK0 6500 EU Pursuant to at t...

Отзывы: