background image

47

 (ENG) VQT4H04

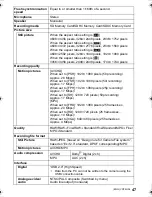
Flash synchronisation 
speed

Equal to or smaller than 1/160th of a second

Microphone

Stereo

Speaker

Monaural

Recording media

SD Memory Card/SDHC Memory Card/SDXC Memory Card

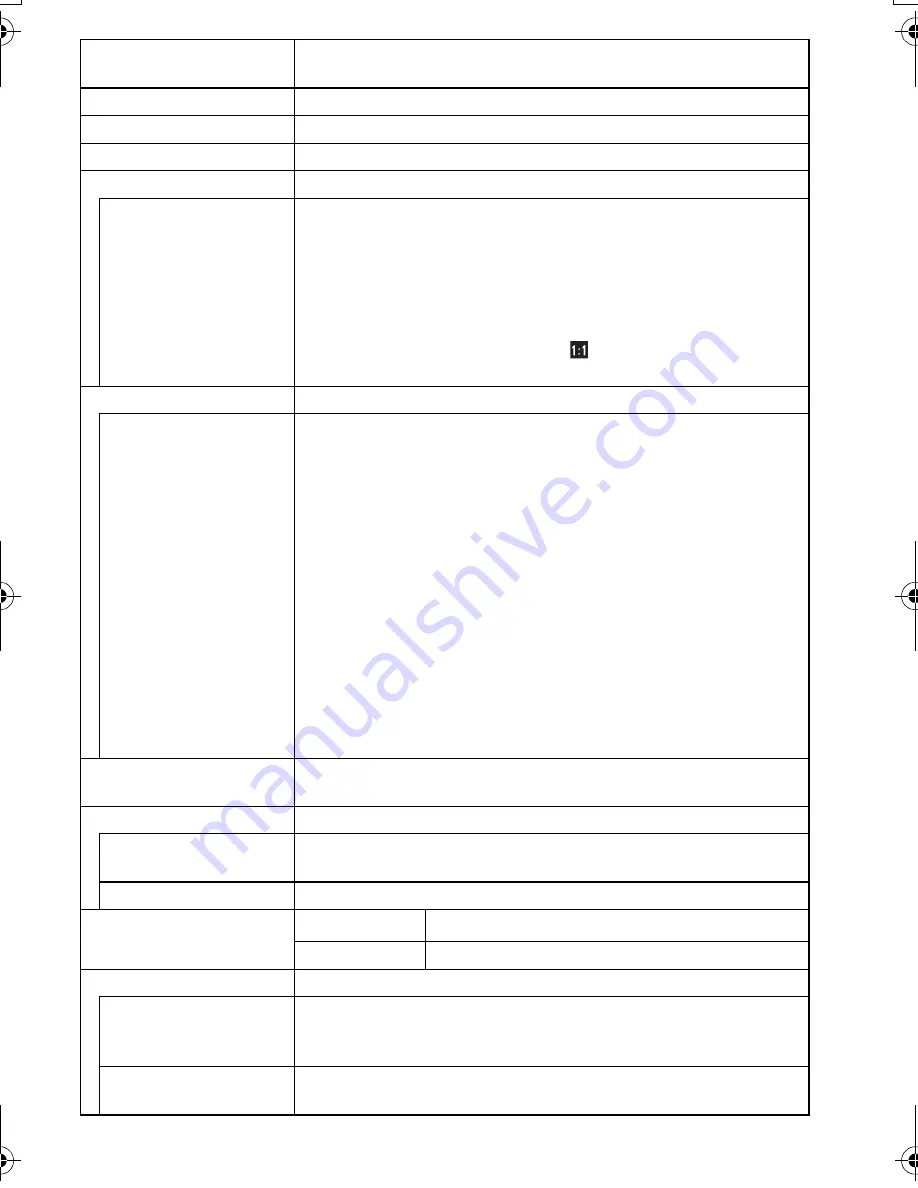
Picture size

Still picture

When the aspect ratio setting is [

X

]

4608

k

3456 pixels, 3264

k

2448 pixels, 2336

k

1752 pixels

When the aspect ratio setting is [

Y

]

4608

k

3072 pixels, 3264

k

2176 pixels, 2336

k

1560 pixels

When the aspect ratio setting is [

W

]

4608

k

2592 pixels, 3264

k

1840 pixels, 1920

k

1080 pixels

When the aspect ratio setting is [

]

3456

k

3456 pixels, 2448

k

2448 pixels, 1744

k

1744 pixels

Recording quality

Motion pictures

[AVCHD]
When set to [PSH]: 1920

k

1080 pixels (50p recording/

Approx. 28 Mbps)/
When set to [FSH]: 1920

k

1080 pixels (50i recording/

Approx. 17 Mbps)/
When set to [FPH]: 1920

k

1080 pixels (25p recording/

Approx. 17 Mbps)/
When set to [SH]: 1280

k

720 pixels (50p recording/

Approx. 17 Mbps)
[MP4]
When set to [FHD]: 1920

k

1080 pixels (25 frames/sec., 

Approx. 20 Mbps)/
When set to [HD]: 1280

k

720 pixels (25 frames/sec., 

Approx. 10 Mbps)/
When set to [VGA]: 640

k

480 pixels (25 frames/sec., 

Approx. 4 Mbps)

Quality

RAW/RAW

i

Fine/RAW

i

Standard/Fine/Standard/MPO

i

Fine/

MPO

i

Standard

Recording file format

Still Picture

RAW/JPEG (based on “Design rule for Camera File system”, 
based on “Exif 2.3” standard, DPOF corresponding)/MPO

Motion pictures

AVCHD/MP4

Audio compression

AVCHD

Dolby

R

 Digital (2 ch)

MP4

AAC (2 ch)

Interface

Digital

“USB 2.0” (High Speed)

¢

Data from the PC can not be written to the camera using the 
USB connection cable.

Analogue video/
audio

NTSC/PAL Composite (Switched by menu)
Audio line output (monaural)

DMC-G5X&G5K&G5W&G5EB_VQT4H04_eng.book  47 ページ  2012年6月22日 金曜日 午前8時57分

Содержание Lumix DMC-G5K

Страница 1: ...ns Kit Double Zoom Lens Kit Body Model No DMC G5X DMC G5K DMC G5W DMC G5 Before use please read these instructions completely More detailed instructions on the operation of this camera are contained in Operating Instructions for advanced features PDF format in the supplied CD ROM Install it on your PC to read it VQT4H04 F0612SM0 ...

Страница 2: ...king About the battery pack Do not heat or expose to flame Do not leave the battery ies in a car exposed to direct sunlight for a long period of time with doors and windows closed WARNING To reduce the risk of fire electric shock or product damage Do not expose this unit to rain moisture dripping or splashing Use only the recommended accessories Do not remove covers Do not repair this unit by your...

Страница 3: ...3 ENG VQT4H04 ...

Страница 4: ...ones because doing so may result in noise adversely affecting the pictures and or sound Recorded data may be damaged or pictures may be distorted by strong magnetic fields created by speakers or large motors Electromagnetic wave radiation generated by microprocessors may adversely affect this unit disturbing the pictures and or sound If this unit is adversely affected by electromagnetic equipment ...

Страница 5: ...ling For more information about collection and recycling of old products and batteries please contact your local municipality your waste disposal service or the point of sale where you purchased the items Penalties may be applicable for incorrect disposal of this waste in accordance with national legislation For business users in the European Union If you wish to discard electrical and electronic ...

Страница 6: ...igent Auto Mode 23 Recording using Intelligent Auto Plus Mode 24 Taking Pictures with Defocus Control Function 25 Recording Motion Picture 26 Recording still pictures while recording motion pictures 26 Compensating the Exposure 27 Using the function button 28 Taking Pictures that match the Scene being recorded Scene Guide Mode 29 Taking Pictures with different image effects Creative Control Mode 3...

Страница 7: ... but it may also become irreparable Places with a lot of sand or dust Places where water can come into contact with this unit such as when using it on a rainy day or at the beach Do not place your hands inside the mount of the digital camera body Since the sensor unit is a precision apparatus it may cause a malfunction or damage About Condensation When the lens the viewfinder or LCD Monitor is fog...

Страница 8: ...ions for advanced features Use it to install to your PC 12 Shoulder Strap 1 This is referred to as lens in these operating instructions 2 This is attached to the interchangeable lens at the time of purchase 3 This is attached to the camera body at the time of purchase SD Memory Card SDHC Memory Card and SDXC Memory Card are indicated as card in the text The card is optional Description in these op...

Страница 9: ...VFC4315 VFC4315 H FS014042 H FS014042 VYF3443 H PS14042 VYF3201 VFC4605 VFC4605 H FS45150 VYC1090 DMC G5X DMC G5K DMC G5 DMC G5W 1 2 3 4 5 K2CT3YY00034 VFF1027 VFC4765 DE A80A K1HY08YY0025 DMW BLC12E 6 7 8 9 10 11 12 VKF4971 VKF4971 VKF4971 VKF4971 ...

Страница 10: ...enquiries transactions and distribution facilities are provided directly by Panasonic UK It couldn t be simpler Also available through our Internet is direct shopping for a wide range of finished products Take a browse on our website for further details Optional Accessories Lithum Ion Battery DMW BLC12 AC Adaptor 1 DMW AC8 DC Coupler 1 DMW DCC8 Flash DMW FL220 DMW FL360 DMW FL500 Remote Shutter DM...

Страница 11: ...H PS45175 H PS14042 H VS014140 H HS12035 H FS100300 H FS045200 H FS014042 H FS014045 H F007014 H F008 H ES045 H X025 H H020 H H014 The 3D Interchangeable Lens H FT012 Mount Adaptor DMW MA1 DMW MA2M DMW MA3R Class 10 64 GB SDXC Memory Card Class 10 32 GB SDHC Memory Card Class 10 16 GB SDHC Memory Card Class 10 8 GB SDHC Memory Card Class 10 4 GB SDHC Memory Card Class 4 16 GB SDHC Memory Card Clas...

Страница 12: ...r eye or an object is brought close to the viewfinder the display automatically switches to the viewfinder display 13 Q MENU button 14 AF AE LOCK button Fn1 button 15 Rear dial 16 Touch screen LCD monitor 17 Playback button 18 button Fn2 button 19 MENU SET button 20 Cursor buttons 3 ISO button 1 WB White Balance 2 AF Mode button 4 Drive Mode button This button in picture record mode will allow the...

Страница 13: ...r 37 Shoulder strap eyelet Be sure to attach the shoulder strap when using the camera to ensure that you will not drop it 38 REMOTE socket 39 HDMI socket 40 AV OUT DIGITAL socket 41 DC coupler cover When using an AC adaptor ensure that the Panasonic DC coupler DMW DCC8 optional and AC adaptor DMW AC8E optional are used Always use a genuine Panasonic AC adaptor DMW AC8E optional When using an AC ad...

Страница 14: ...en To touch and release the touch screen Drag A movement without releasing the touch screen Use this to perform tasks such as selecting icons or images displayed on the touch screen When selecting features using the touch screen be sure to touch the centre of the desired icon This is used to move the AF area operate the slide bar etc This can also be used to move to the next image during playback ...

Страница 15: ...of the arrow until it clicks Do not press the lens release button B when you attach a lens While pressing on the lens release button B rotate the lens toward the arrow until it stops and then remove Attaching the lens Preparations Remove the lens rear cap from the lens and the body cap from the camera Detaching the lens Preparations Attach the lens cap ...

Страница 16: ... camera body A Shoulder strap eyelet 2 Pass the end of the shoulder strap through the ring in the direction of the arrow and then pass it through the stopper 3 Pass the end of the shoulder strap through the hole on the other side of the stopper 4 Pull the other side of the shoulder strap and then check that it will not come out Perform steps 1 to 4 and then attach the other side of the shoulder st...

Страница 17: ...once the charging has completed without any problem Disconnect the charger from the electrical socket and detach the battery after charging is completed Charging time The indicated charging time is for when the battery has been discharged completely The charging time may vary depending on how the battery has been used The charging time for the battery in hot cold environments or a battery that has...

Страница 18: ...Battery Being careful about the battery orientation insert all the way until you hear a locking sound and then check that it is locked by lever A Pull the lever A in the direction of the arrow to remove the battery Card Push it securely all the way until you hear a click while being careful about the direction in which you insert it To remove the card push the card until it clicks then pull the ca...

Страница 19: ...owing About cards that can be used with this unit Remarks SD Memory Card 8 MB to 2 GB Use a card with SD Speed Class with Class 4 or higher when recording motion pictures SDHC Memory Card can be used with SDHC Memory Card or SDXC Memory Card compatible equipment SDXC Memory Card can only be used with SDXC Memory Card compatible equipment Check that the PC and other equipment are compatible when us...

Страница 20: ...e settings without setting a date and time To set the display order and the time display format Touch Style to display the settings screen for setting display order time display format 4 Touch Set to set 5 Touch Set in the confirmation screen When the clock setting is complete the confirmation screen for the function lever setting is displayed Select Change or Exit You can check uncheck the check ...

Страница 21: ... Mode Easily match settings selected by the camera to your preferences and record Programme AE Mode The subjects are recorded using your own settings Aperture Priority AE Mode The shutter speed is automatically determined by the aperture value you set Shutter Priority AE Mode The aperture value is automatically determined by the shutter speed you set Manual Exposure Mode The exposure is adjusted b...

Страница 22: ...ved except when set to flash When the image is correctly focused the picture will be taken since the Focus Priority is set initially to ON 3 Press the shutter button fully push it in further and take the picture Taking pictures using the Touch Shutter function 1 Touch 2 Touch Icon will change to and taking a picture with the Touch Shutter function becomes possible 3 Touch the subject you wish to f...

Страница 23: ...ring recording button is turned off when it is pressed again and it will be set to the Rec Modes selected by the mode dial When the subject is touched AF Tracking function works It is also possible by pressing the cursor button towards 2 and then pressing the shutter button halfway Scene Detection When the camera identifies the optimum scene the icon of the scene concerned is displayed in blue for...

Страница 24: ...nt Auto Mode 2 Touch iA MODE 3 Select and then touch Set Setting brightness 1 Touch 2 Touch to display the setting screen The setting screen can also be displayed from the recording screen by pressing rear dial Each press of the rear dial switches among brightness setting Defocus Control and end operation 3 Drag the slide bar to set This will adjust the brightness of the image Setting can also be ...

Страница 25: ...e recording screen by pressing the cursor button 1 Taking Pictures with Defocus Control Function Applicable modes You can easily set the blurriness of the background while checking the screen 1 Touch 2 Touch to display the setting screen Defocus Control setting screen can also be displayed by pressing the rear dial 3 Drag the slide bar to set Setting can also be performed by rotating the rear dial...

Страница 26: ...minutes 59 seconds Maximum time to record motion pictures continuously with MP4 is 29 minutes 59 seconds or up to 4 GB For FHD in MP4 format the file size is large and so the recordable time will drop below 29 minutes 59 seconds Still pictures can be recorded even while recording a motion picture Simultaneous recording Recording still pictures while recording motion pictures During motion picture ...

Страница 27: ... Select 0 to return to the original exposure Rotate the rear dial to display the Expo Meter 1 Press the rear dial to switch to Exposure Compensation operation 2 Rotate the rear dial to compensate the exposure A Exposure Compensation value B Expo Meter Underexposed Properly exposed Overexposed Compensate the exposure towards positive Compensate the exposure towards negative 160 SS SS F 250 15 4 0 5...

Страница 28: ...Fn4 or Fn5 To use Fn1 set the AF AE LOCK Fn1 of the Custom menu to Fn1 To use Fn3 set the LVF LCD Fn3 of the Custom menu to Fn3 1 Touch Fn1 Fn2 Fn3 Fn4 or Fn5 from the Fn Button Set in the Custom menu 2 Touch the function you want to assign Assign your favourite functions to each of the function buttons Exit the menu after it is set ロヷョバロヤュ ョㄏピ モョバモユチロヰヤレ ョㄏヒ ョㄏビ ...

Страница 29: ...n a manner appropriate to the scene 1 Set the mode dial to 2 Drag the example images to select a screen You can also select the scene by dragging the slide bar A 3 Touch Set To enjoy a variety of picture effects Touch on the scene selection screen to display explanations etc for picture effects to suit the scene To take full advantage of the picture effects we recommend that you read the explanati...

Страница 30: ...le images and checking them on the screen 1 Set the mode dial to 2 Touch the example image to select image effects filters The image effect of the selected example image will be applied in a preview display A The image effect can be switched by touching Touch to display the explanation for the selected image effect The explanation can also be displayed by pressing cursor button 1 3 Touch Set A ...

Страница 31: ...and QuickTime Motion JPEG formats In Playback Mode select a picture with the motion picture icon and touch in the middle of the screen A Motion picture icon B The motion picture recording time Operations performed during Motion Picture Playback Playing Back Pictures Playing Back Motion Pictures Play Pause Stop Fast rewind Fast forward Frame by frame rewind while pausing Frame by frame forward whil...

Страница 32: ...h Delete Multi or Delete All Delete All Confirmation screen is displayed Pictures are deleted by selecting Yes It is possible to delete all pictures except the ones set as favourite when All Delete Except Favorite is selected with the Delete All set 3 When Delete Multi is selected Touch the picture to be deleted repeat this step appears on the selected pictures Touching again cancels the setting 4...

Страница 33: ... Mode Screen will switch as follows Example of LCD monitor display A With information B Detailed information display C Histogram display D Without information If approximately 1 minute elapses without an operation being performed part of the display will disappear Press DISP or touch the LCD monitor to make the display reappear ュリヴヱハ 98 98 98 0 AFS AFS 98 98 98 AFS AFS 0 100 0001 F3 5 60 P s RGB A...

Страница 34: ...played in a different way A brief description appears when you touch a menu item option in steps 3 and 4 It will be set when you release your finger You can avoid selecting an item by dragging your finger to a vacant area and releasing the finger there Close the menu Touch or press the shutter button halfway Switching to other menus e g Switching to the Setup menu from Rec menu Touch or another of...

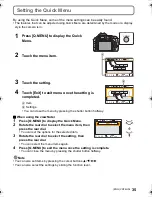
Страница 35: ...y When using the viewfinder 1 Press Q MENU to display the Quick Menu 2 Rotate the rear dial to select the menu item then press the rear dial You can set the options for the selected item 3 Rotate the rear dial to select the setting then press the rear dial You can select the menu items again 4 Press Q MENU to exit the menu once the setting is complete You can close the menu by pressing the shutter...

Страница 36: ...measuring brightness HDR You can combine 3 pictures with different levels of exposure into a single picture with rich gradation i Dynamic Intelligent dynamic range control Automatically corrects contrast and exposure Flash Sets the manner in which the flash works Red Eye Removal Automatically detects red eye caused by the flash and corrects the image data accordingly Flash Synchro Sets the flash s...

Страница 37: ...u want to correct the colour reproduction of the recorded pictures on a PC printer etc Stabilizer When camera shake is sensed during recording the camera corrects it automatically Face Recog Sets the focus and exposure automatically prioritising registered faces Profile Setup If you set the name and birthday of your baby or pet in advance you can record their name and age in months and years in th...

Страница 38: ...he histogram Guide Line This will set the pattern of guide lines displayed when taking a picture Auto Review Set the length of time that the picture is displayed after taking the still picture Highlight When the Auto Review function is activated or when playing back white saturated areas appear blinking in black and white Expo Meter Set whether or not to display the exposure meter AF AE Lock Sets ...

Страница 39: ...e display style of the Live Viewfinder LCD Disp Style This will set the display style of the LCD monitor Eye Sensor Enable or disable the eye sensor You can also set the sensitivity of the eye sensor iA Button Switch It is possible to set how the button to toggle to Intelligent Auto Mode will operate Video Button Enables disables the motion picture button Rec Area This changes the angle of view du...

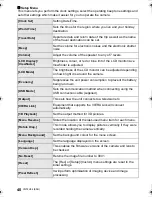
Страница 40: ...a Economy Suppresses the unit power consumption to prevent the battery being run down USB Mode Sets the communication method when connecting using the USB connection cable supplied Output This sets how the unit connects to a television etc VIERA Link Equipment that supports the VIERA Link will connect automatically 3D Playback Set the output method for 3D pictures Menu Resume Stores the location o...

Страница 41: ... and plays back only particular images Title Edit Input texts comments on the recorded pictures Text Stamp Stamps the recorded pictures with recording date and time names travel destination travel date etc Video Divide Splits the recorded motion picture in two Resize Reduces the image size number of pixels Cropping Crops the recorded image Rotate Rotate pictures manually in 90o steps Favorite Mark...

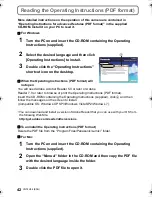
Страница 42: ...0 or later or Adobe Reader 7 0 or later to browse or print the Operating Instructions PDF format Insert the CD ROM containing the Operating Instructions supplied click A and then follow the messages on the screen to install Compatible OS Windows XP SP3 Windows Vista SP2 Windows 7 You can download and install a version of Adobe Reader that you can use with your OS from the following Web Site http g...

Страница 43: ...4 v10 5 v10 6 v10 7 This is software to edit RAW format images Using RAW files recorded on this camera allows images to be edited with a higher quality Edited images can be saved in a format JPEG TIFF etc that can be displayed on a personal computer LoiLoScope 30 day full trial version Windows XP Vista 7 LoiLoScope is a video editing software where that draws out the full power of your PC Creating...

Страница 44: ...0 MB or more for installing software Refer to the operating instructions of PHOTOfunSTUDIO PDF for further operating environment For details on SILKYPIX Developer Studio 3 1 SE please read the support site given on P43 2 Insert the CD ROM with the supplied software When you insert the supplied CD ROM the install menu will start 3 Click on the Recommended Installation Proceed with installation acco...

Страница 45: ...erchangeable lens H FS45150 is used Camera effective pixels 16 050 000 pixels Image sensor 4 3q Live MOS sensor total pixel number 18 310 000 pixels Primary colour filter Digital Zoom Max 4k Extra Tele Conversion When taking still pictures Max 2k When a picture size of S 4 M aspect ratio of 4 3 is selected When recording motion pictures ON OFF simple enlargement compatible with lenses from other m...

Страница 46: ... Auto White Balance Daylight Cloudy Shade Incandescent lights Flash White set1 White set2 White Balance K set Exposure AE Programme AE P Aperture priority AE A Shutter priority AE S Manual exposure M AUTO Exposure Compensation 1 3 EV Step j5 EV to i5 EV Metering Mode Multiple Centre weighted Spot LCD monitor 3 0q TFT LCD 3 2 Approx 920 000 dots field of view ratio about 100 Touch screen Viewfinder...

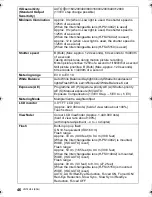
Страница 47: ...hen set to FSH 1920k1080 pixels 50i recording Approx 17 Mbps When set to FPH 1920k1080 pixels 25p recording Approx 17 Mbps When set to SH 1280k720 pixels 50p recording Approx 17 Mbps MP4 When set to FHD 1920k1080 pixels 25 frames sec Approx 20 Mbps When set to HD 1280k720 pixels 25 frames sec Approx 10 Mbps When set to VGA 640k480 pixels 25 frames sec Approx 4 Mbps Quality RAW RAWiFine RAWiStandar...

Страница 48: ...ng the projecting parts Mass Approx 396 g 0 87 lb with the card and battery Approx 346 g 0 76 lb camera body Approx 491 g 1 08 lb with the Interchangeable lens H PS14042 card and battery Approx 561 g 1 24 lb with the Interchangeable lens H FS014042 card and battery Approx 596 g 1 31 lb with the Interchangeable lens H FS45150 card and battery Operating temperature 0 oC to 40 oC 32 oF to 104 oF Oper...

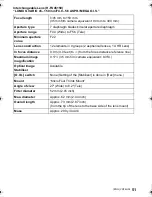
Страница 49: ...0 66 feet Wide to focal length 20 mm to from the focus distance reference line 0 3 m 0 99 feet focal length 21 mm to Tele to from the focus distance reference line Maximum image magnification 0 17k 35 mm film camera equivalent 0 34k Optical Image Stabiliser Available O I S switch None Setting of the Stabilizer is done in Rec menu Mount Micro Four Thirds Mount Angle of view 75x Wide to 29x Tele Fil...

Страница 50: ... groups 1 aspherical lens In focus distance 0 3 m 0 99 feet to from the focus distance reference line Maximum image magnification 0 16k 35 mm film camera equivalent 0 32k Optical Image Stabiliser Available O I S switch None Setting of the Stabilizer is done in Rec menu Mount Micro Four Thirds Mount Angle of view 75x Wide to 29x Tele Filter diameter 52 mm 2 05 inch Max diameter Approx 60 6 mm 2 39 ...

Страница 51: ...oups 2 aspherical lenses 1 UHR Lens In focus distance 0 9 m 3 0 feet to from the focus distance reference line Maximum image magnification 0 17k 35 mm film camera equivalent 0 35k Optical Image Stabiliser Available O I S switch None Setting of the Stabilizer is done in Rec menu Mount Micro Four Thirds Mount Angle of view 27x Wide to 8 2x Tele Filter diameter 52 mm 2 05 inch Max diameter Approx 62 ...

Страница 52: ... Adobe Systems Incorporated in the United States and or other countries Mac and Mac OS are trademarks of Apple Inc registered in the U S and other countries Windows and Windows Vista are either registered trademarks or trademarks of Microsoft Corporation in the United States and or other countries This product uses DynaFont from DynaComware Corporation DynaFont is a registered trademark of DynaCom...

Отзывы: