background image

Preparation

14

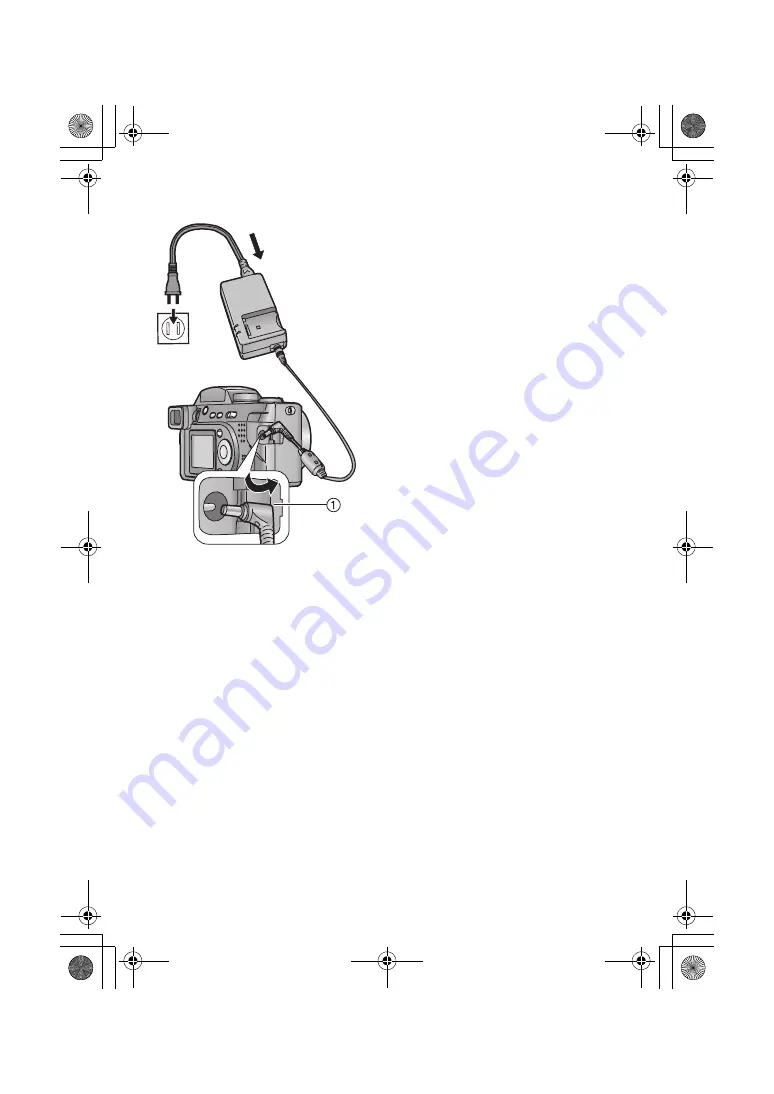
Connecting to an Electrical Outlet

If you use an AC adaptor as indicated in 3, 
you can use the camera without worrying 
about battery discharge.

[Preparation]
• Check that the power switch is set to [OFF] 

and the lens is stored.

1

Connect the AC cable.

2

Open the DC IN terminal door 

1

.

3

Connect the DC cable (supplied) to 
the camera.

• The camera becomes warm during use. 

However, this is not a malfunction.

• Disconnect the AC adaptor and DC cable 

when the camera is not in use.

• The battery cannot be charged in the 

camera with the AC adaptor connected.

• Use the supplied DC cable.

2

3

DC IN

1

KC72‑PP.book  14 ページ  2002年12月12日 木曜日 午後7時38分

Содержание Lumix DMC-FZ1

Страница 1: ...gital Camera Operating Instructions Model No DMC FZ1PP VQT0A99 For USA assistance please call 1 800 272 7033 or send e mail to consumerproducts panasonic com For Canadian assistance please call 1 800...

Страница 2: ...names and product names printed in these instructions are trademarks or registered trademarks of the companies concerned WARNING TO REDUCE THE RISK OF FIRE OR SHOCK HAZARD AND ANNOYING INTERFERENCE US...

Страница 3: ...t and receiver Connect the equipment into an outlet on a circuit different from that to which the receiver is connected Consult the dealer or an experienced radio TV technician for help FCC Caution To...

Страница 4: ...sing Portrait Mode 45 Taking Pictures using Sports Mode 46 Taking Pictures using Panning Mode 47 Taking Pictures using Night Portrait Mode 48 Taking Pictures using Spot Mode 49 Compensating the Exposu...

Страница 5: ...Guide Gu a espa ola para el uso r pido 106 Standard Accessories Before using your camera check the contents 1 SD Memory Card 8 MB RP SD008B In the text it is indicated as Card 2 Battery Pack CGA S002A...

Страница 6: ...iew 13 Viewfinder P18 P23 14 Diopter Adjustment Dial P18 15 Flash Open Button P35 16 DISPLAY Button P23 17 FOCUS Button P38 18 Power Indicator P17 19 Power Switch P17 20 LCD Monitor P8 21 MENU Button...

Страница 7: ...C IN Terminal Door P14 Bottom View 33 Memory Card Battery Door P12 P15 34 Memory Card Battery Door Open Lever P12 P15 35 Tripod Receptacle Battery Charger AC Adaptor 1 AC Input Terminal 2 POWER Indica...

Страница 8: ...l zoom ON 13 Self timer mode P40 14 Card access indication P16 15 AF area P28 16 AF Trigger P38 17 Aperture indication Shutter speed indication P28 18 Exposure Compensation P50 19 Auto Bracket P51 20...

Страница 9: ...ack 1 Playback mode 2 DPOF P67 White DPOF setting for printing Green DPOF setting for Slide Show Green with DPOF number DPOF setting for printing and Slide Show 3 Protected image P70 4 Image with audi...

Страница 10: ...oor 3 Insert the battery into the camera P12 4 Insert the Card into the camera P15 5 Close the Memory Card battery door Recording 6 Remove the lens cap 7 Set the power switch to ON P17 8 Set date time...

Страница 11: ...the AC adaptor The battery cannot be charged when the DC cable is connected to the AC adaptor After use be sure to disconnect the AC cable The battery becomes warm after use charge or during the char...

Страница 12: ...e the battery When the fully charged battery is inserted in the camera for more than 1 hour the clock setting is memorized by the camera for about 24 hours even after the battery is removed The time m...

Страница 13: ...error Charge the battery in a place with a temperature of 50 F 95 F 10 C 35 C The battery should also be the same temperature When charging starts the CHARGE indicator lights If after charging starts...

Страница 14: ...et to OFF and the lens is stored 1 Connect the AC cable 2 Open the DC IN terminal door 1 3 Connect the DC cable supplied to the camera The camera becomes warm during use However this is not a malfunct...

Страница 15: ...attention when inserting cards Do not touch the connection terminals on the back side of the card 3 Close the Memory Card battery door Removing the card 1 Open the Memory Card battery door 2 Press the...

Страница 16: ...MultiMediaCard are small lightweight removable external cards The SD Memory Card is equipped with a write protection switch that can inhibit writing and formatting When the switch is moved towards th...

Страница 17: ...ith the lens cap attached When the remaining battery power is low blinking slowly When turning on the power in the recording mode do not put any obstacle in front of the lens Please be sure to remove...

Страница 18: ...adjustment It allows the user to make adjustments related to each user s individual vision characteristics Please adjust this feature before using the camera Preparation Press DISPLAY button to make...

Страница 19: ...hood 2 supplied Adjust the mark of the lens hood to the mark of the lens hood adaptor Then rotate the lens hood to the mark and fix it Be careful not to rotate the lens hood adaptor 4 Rotate the lens...

Страница 20: ...ove the lens hood 2 Reverse the lens hood and attach it Attach the lens hood adjusting the mark of the lens hood adaptor to the mark of the lens hood and rotate the lens hood to the right 3 Attach the...

Страница 21: ...art to the metal fitting again if it is detached 3 Pass the metal fitting through the eyelet of the camera 4 Rotate the plastic part of the metal fitting to the opposite direction until it is locked 5...

Страница 22: ...s cap 2 Pass the opposite side of the string through the circular part of the string 3 Pull in the direction of the arrow 4 Pass the top of the lens cap string through the strap eyelet as shown in the...

Страница 23: ...ecording In playback When the LCD monitor is displayed the Viewfinder turns off and vice versa DISPLAY 1600 REC1 3 SETUP W BALANCE PICT SIZE QUALITY SPOT MODE SELECT SET EXIT REC1 3 SETUP W BALANCE PI...

Страница 24: ...halfway 1 Focus and exposure are locked Pressing fully 2 The picture is captured In motion image mode the recording starts You can adjust volume of the operational sound in the menu P79 If you press...

Страница 25: ...ortrait mode P45 This mode allows you to easily achieve the depth of focus effect The subject stands out in front of an unfocused background Sports mode P46 When taking pictures of outdoor sports this...

Страница 26: ...e the REC menu is displayed if you set it to the playback mode the playback menu is displayed 2 Press 1 3 Press 3 4 to choose the item 4 Press 2 1 to set the item 5 Press the MENU button The menu will...

Страница 27: ...then press 1 5 Press 3 4 to select M D Y D M Y or Y M D 6 Press the MENU button twice The menu will disappear 7 Check if the date time setting is displayed correctly after turning the camera OFF and...

Страница 28: ...utton halfway When the focus is adjusted the focus indication 2 appears When the focus indication flashes the focus is not adjusted Press the shutter button halfway to adjust the focus again The shutt...

Страница 29: ...right If the exposure is not properly set the color of the aperture value and the shutter speed on the LCD monitor Viewfinder becomes red In the following cases the focus may not be adjusted properly...

Страница 30: ...an easy way to produce small general purpose prints INTERNET selection favors smaller file size optimized for home page and e mail use 5 Press the MENU button 6 Take a picture The recording method is...

Страница 31: ...oom lever towards the captured picture is zoomed 4 times A and 8 times if you rotate it once again You can also change the position with 3 4 2 1 You can check the previous or following picture with 2...

Страница 32: ...e recording is stopped automatically The picture size is fixed to 320 a 240 pixels The remaining time displayed on the LCD monitor Viewfinder is an approximation You cannot record motion images withou...

Страница 33: ...er To make subjects appear closer Tele Rotate towards T To make subjects appear further away Wide angle Rotate towards W 2 Take a picture The recording method is the same as in Taking Pictures P28 The...

Страница 34: ...ON 4 Press the MENU button The menu will disappear The zoom adjustment and recording method are the same as in Using the Optical Zoom P33 When the digital zoom is set to ON the digital zoom indicatio...

Страница 35: ...eduction The flash fires automatically according to the recording situation It reduces the red eye phenomenon when a subject s eyes appear red in flash light Use it when you take pictures of people or...

Страница 36: ...or auto bracket only 1 picture is taken for every flash firing In night portrait mode setting is fixed to Slow sync Red eye reduction When you take a picture using the flash with the lens hood attache...

Страница 37: ...ng a moving subject it may not be stabilized The stabilizer function may be less effective in the digital zoom zone When taking pictures with a low shutter speed such as night portrait the stabilizer...

Страница 38: ...is displayed on the LCD monitor Viewfinder Using the FOCUS button to prefocus the camera The prefocus technique is effective when you want to take a picture of a fast moving subject a situation where...

Страница 39: ...will disappear The indication 1 will appear When setting CONT AF to ON AF TRIGGER is fixed to In simple mode CONT AF is fixed to ON The battery is depleted more quickly using continuous AF It may take...

Страница 40: ...ess the shutter button fully The self timer indicator 1 blinks and the shutter is activated after 10 seconds or 2 seconds When setting the self timer the focus and exposure are not adjusted by pressin...

Страница 41: ...fully and take a picture It is not necessary to continue pressing the shutter button Audio is recorded from the built in microphone 1 of the camera 5 seconds later the audio recording is stopped autom...

Страница 42: ...he menu will disappear In motion image mode the picture size is fixed to 320 a 240 pixels The smaller the picture size you select the more pictures you can store on the Memory Card In addition a small...

Страница 43: ...will disappear Picture size Quality and number of recordable pictures 8 MB 64 MB SD Memory Card The numbers shown in the table are approximate numbers If you mix fine quality and standard quality the...

Страница 44: ...method is the same as in Taking Pictures P28 Select the flash setting depending on the situation P35 The available flash range is about 0 98 feet 30 cm 6 86 feet 2 1 m when setting to ISO100 When the...

Страница 45: ...e subject close by and allowing for proper distance between subject and background Please note that this mode is suitable for outdoor situations under sunlight 1 Set the mode dial to Portrait mode 2 T...

Страница 46: ...lease note that this mode is suitable to take photos of the subject from distances of more than 16 4 feet 5 m and in daylight situations 1 Set the mode dial to Sports mode 2 Take a picture The recordi...

Страница 47: ...et the mode dial to Panning mode 2 Take a picture The recording method is the same as in Taking Pictures P28 1 Move the camera smoothly while tracking a subject in motion 2 Press the shutter button wh...

Страница 48: ...to Night portrait mode 3 Take a picture The recording method is the same as in Taking Pictures P28 Be sure to close the flash when you do not use the flash Flash setting is fixed to Slow sync Red eye...

Страница 49: ...4 Press the MENU button The menu will disappear The spot AF area 1 and spot metering target 2 appear 5 Center the subject in the spot AF area 6 Take a picture The recording method is the same as in Ta...

Страница 50: ...EV to i2 EV with 1 3 EV step EV is an abbreviation of Exposure Value and it is the amount of light given to the CCD by the aperture value and the shutter speed The compensation state is not reflected...

Страница 51: ...EV 1 3 EV step 3 Press the 4 REVIEW SET button The compensation window will close The auto bracket indication 1 appears 4 Take a picture The recording method is the same as in Taking Pictures P28 Once...

Страница 52: ...aration Set the mode dial except for P25 1 Aim the camera at the subject on which you want to adjust the focus to enter the AF area 2 on the LCD monitor Viewfinder and then keep pressing the shutter b...

Страница 53: ...ress 3 4 to select COL EFFECT 3 Press 2 1 to select OFF COOL WARM or B W COOL The picture becomes bluish WARM The picture becomes reddish B W The picture becomes black and white 4 Press the MENU butto...

Страница 54: ...ANDARD or VIVID NATURAL The picture becomes softer VIVID The picture becomes sharper 4 Press the MENU button The menu will disappear When taking a picture in a dark place noise may appear To avoid noi...

Страница 55: ...ors on a bright day Cloudy for recording under a cloudy and shady sky Halogen for recording under halogen lighting White set for manual setting Read the following page where the manual setting is expl...

Страница 56: ...e paper 1 or similar object so that it completely fills the frame to white on the screen and press the shutter button all the way White balance is set 6 Press the MENU button The menu will disappear W...

Страница 57: ...NSITIVITY 3 Press 2 1 to select the sensitivity AUTO The ISO sensitivity is automatically adjusted up to ISO400 If your picture is still too dark please use the flash ISO50 ISO100 ISO200 ISO400 4 Pres...

Страница 58: ...1 second in burst mode at a shutter speed higher than 1 60 but the flash does not fire simultaneously If the flash fires it is possible to record only 1 frame In simple mode the shutter speed is fixed...

Страница 59: ...colour balance Preparation Check that the power switch is set to OFF and the lens barrel is stored Close the flash P36 1 Remove the lens ring 2 Attach the lens hood adaptor 1 3 Install the MC protect...

Страница 60: ...ure corresponding to the current file number is displayed This camera is based on the DCF standards Design rule for Camera File system which were established by the Japan Electronics and Information T...

Страница 61: ...r audio from the speaker 1 To adjust the sound volume A 1 Set the mode dial to playback 2 Press the MENU button 3 Press 1 to select the setup menu 4 Press 3 4 to select VOLUME 5 Press 2 1 to adjust th...

Страница 62: ...1 During playback rotate the zoom lever towards Multi playback 9 frames starts 2 Press 3 4 2 1 to select images To return to the normal indication rotate the zoom lever towards The image with the fil...

Страница 63: ...re the zoom lever rotates towards the more the zoom magnification ratio decreases Use 3 4 2 1 to change the area to be enlarged To delete a picture during the playback zoom Press the button When this...

Страница 64: ...se Press 3 during motion image playback Press 3 again to cancel pause To adjust the sound volume P61 The play back zoom cannot be used while playing back motion images The file format that can be play...

Страница 65: ...l to playback P25 When an image is protected it cannot be deleted Cancel the protect setting P70 Delete single image 1 Press 2 1 to select the image to be deleted 2 Press 3 Press 2 1 to select YES 4 P...

Страница 66: ...D press 2 1 to select YES 7 Press the 4 REVIEW SET button The selected multi images are deleted all at once Delete all images Once deleted images cannot be recovered 1 Press twice 2 Press 3 4 to selec...

Страница 67: ...then press 1 3 Select SINGLE and then press 1 4 Press 2 1 to select 1 image 5 Press 3 4 to select the number of sheets The number of sheets can be set from 1 to 999 6 Press the MENU button twice The m...

Страница 68: ...to 0 in step 5 of the Multi copy setting If the file is not based on the DCF standard the DPOF setting cannot be set DCF is abbreviation of Design rule for Camera File system stipulated by JEITA Japan...

Страница 69: ...4 to select INDEX and then press 1 4 When this message is displayed SET INDEX PRINT press 2 1 to select YES When the index is already set the message SET CANCEL INDEX PRINT is displayed Press 2 1 to...

Страница 70: ...ess the MENU button twice The menu will disappear Multi setting to cancel To cancel all settings 1 The method is the same as in Writing the Print Information to the Card DPOF Setting P67 P69 When tryi...

Страница 71: ...mong 1 2 3 and 5 seconds AUDIO It can be set to ON or OFF By setting it to ON it is possible to play back the still pictures with audio in slide show DPOF SET Only when setting to DPOF You can select...

Страница 72: ...io dubbing When editing with the supplied software SD Viewer for DSC recorded on the CD ROM you can play back in SD slide show with this camera P94 Images that are set with DPOF with the supplied soft...

Страница 73: ...ayed OVERWRITE AUDIO DATA Press 2 1 to select YES and press the 4 REVIEW SET button to start audio recording 5 Press the 4 REVIEW SET button to stop audio recording Even if you do not press the 4 REVI...

Страница 74: ...is displayed DELETE ORIGINAL PICTURE press 2 1 to select YES or NO 7 Press the 4 REVIEW SET button 8 Press the MENU button The menu will disappear Resizing images will use additional memory if the or...

Страница 75: ...7 When this message is displayed DELETE ORIGINAL PICTURE press 2 1 to select YES or NO 8 Press the 4 REVIEW SET button 9 Press the MENU button The menu will disappear Trimming images will use additio...

Страница 76: ...yed DELETE ALL DATA ON THE MEMORY CARD press 2 1 to select YES 4 Press the 4 REVIEW SET button The card is formatted After formatting recorded images and any other data cannot be recovered During form...

Страница 77: ...brightness 5 Press the MENU button The menu will disappear Adjusting the LCD Monitor Viewfinder will not lighten or darken the actual photograph Adjusting the LCD Monitor Viewfinder to brighten the im...

Страница 78: ...to select AUTO REVIEW 4 Press 2 1 to select 1 SEC or 3 SEC 5 Press the MENU button The menu will disappear Even when setting the auto review to 1 SEC 3 SEC it is not available in motion image mode Wh...

Страница 79: ...utton 2 Press 1 to open the setup menu In simple mode skip this step 3 Press 3 4 to select BEEP 4 Press 2 1 to adjust the operational sound volume 5 Press the MENU button The menu will disappear In si...

Страница 80: ...is not turned off automatically 5 Press the MENU button The menu will disappear If you want to cancel the power save mode turn the power switch to ON again after turning it to OFF or press the shutte...

Страница 81: ...start recording from the file number 0001 Preparation Set the mode dial except for P25 1 Press the MENU button 2 Press 1 to open the setup menu 3 Press 3 4 to select NO RESET and then press 1 4 When t...

Страница 82: ...YES 5 Press the 4 REVIEW SET button The message REC SETTING RESET COMPLETED is displayed for about 2 seconds 6 When this message is displayed RESET SETUP PARAMETERS press 2 1 to select YES 7 Press the...

Страница 83: ...and then set the mode dial to playback The image is displayed on the television Viewing images in other countries When setting VIDEO OUT on the menu you can view images on a TV in other countries reg...

Страница 84: ...amera to a PC via the supplied USB connection cable 1 Windows The drive is shown on the My computer folder If it is the first time you are connecting the camera to a PC the required driver is installe...

Страница 85: ...rt the Memory Card into the camera and turn the power switch to ON 2 Turn on a printer 3 Connect the camera to a printer via the supplied USB connection cable 1 When connecting to a printer we recomme...

Страница 86: ...URE TO PRINT is displayed for 2 seconds 3 Press 3 and press 2 1 to set the number of sheets and then press the 4 REVIEW SET button 4 Press 2 1 to select YES The message PLS CHECK THE PRINTER START PRI...

Страница 87: ...The message PLS CHECK THE PRINTER START PRINTING is displayed 3 Press 2 1 to select YES and then press the 4 REVIEW SET button Printing starts Press the MENU button and you can stop printing When the...

Страница 88: ...power switch to OFF P17 Close the flash P36 2 Eject the card P15 3 Remove the battery P12 4 Remove the lens hood 5 Remove the lens hood adaptor 6 Attach the lens ring 7 Attach the lens cap If you wil...

Страница 89: ...T P81 18 RESET P82 19 CLOCK SET P27 20 LANGUAGE 5 6 7 8 1 2 3 4 SELECT SET EXIT MENU SELECT SET EXIT MENU 1600 PICT SIZE QUALITY SPOT MODE REC1 3 W BALANCE SETUP 13 14 15 16 17 18 19 20 SELECT SET EXI...

Страница 90: ...26 RESIZE P74 27 TRIMMING P75 28 FORMAT P76 29 VOLUME P61 30 VIDEO OUT P83 21 OFF BEEP ON AUTO REVIEW PICT MODE CLOCK SET ENLARGE 4 k6 10k15cm SELECT SET EXIT MENU 22 23 24 25 26 27 28 29 30 SETUP PL...

Страница 91: ...ish may peel off Do not keep rubber or plastic products in contact with the digital camera for a long period of time When you use the digital camera on a beach or similar place do not let sand or fine...

Страница 92: ...ounding temperature and humidity and if the temperature is too high or too low the operating time of the battery will be shorter Always keep the terminals of the battery clean Prevent the terminals fr...

Страница 93: ...gh temperature or direct sunlight or where electromagnetic waves or static electricity are easily generated Do not bend or drop the card The card or the recorded content may be damaged After use be su...

Страница 94: ...HOW is displayed Select YES and press the 4 REVIEW SET button to start the SD slide show Select NO and press the 4 REVIEW SET button to start normal playback Folder Composition When a Memory Card with...

Страница 95: ...OCK This message is displayed when you use the camera for the first time or you do not use the camera for a long time Set the clock again THIS PICTURE IS PROTECTED After cancelling the protect setting...

Страница 96: ...tch to LCD monitor display 5 The LCD monitor Viewfinder is too bright or dark 5 Adjust the brightness of the LCD monitor Viewfinder 6 Flash does not fire 6 Is the flash closed Press the OPEN button to...

Страница 97: ...Shutter speed 8 1 2 000 Motion image mode 1 30 1 2 000 White balance AUTO Daylight Cloudy Halogen White set Exposure AE AUTO Exposure compensation 1 3 EV Step j2 i2 EV Metering mode Multi Spot Spot mo...

Страница 98: ...rminal USB 5 pin Mini USB Analog video audio 2 5 mm jack DC IN EIAJ type 3 jack Dimensions W a H a D 41 2q a 23 4q a 31 4q 114 a 70 3 a 83 3 mm excluding the projection part Weight Approx 11 2 oz 318...

Страница 99: ...ption Figure RP SD064B RP SD032B RP SD016B BN SDCAPU 1B BN SDABPU 1B 512 MB SD Memory Card 256 MB SD Memory Card 128 MB SD Memory Card 64 MB SD Memory Card 32 MB SD Memory Card 16 MB SD Memory Card 8...

Страница 100: ...21 84th Avenue South Kent WA 98032 Ship To Mr Mrs Ms First Last Street Address City State Zip Phone Day Night 4 Shipping information UPS delivery requires complete street address Please photocopy this...

Страница 101: ...Service Notice USA Only Please photocopy this form when making a request for service notice In the unlikely event this product needs service Please include your proof of purchase Failure to due so wi...

Страница 102: ...or b replace it with a new or refurbished product The decision to repair or replace will be made by the warrantor During the Labor warranty period there will be no charge for labor During the Parts wa...

Страница 103: ...ISTED UNDER LIMITED WARRANTY COVERAGE THE WARRANTOR IS NOT LIABLE FOR INCIDENTAL OR CONSEQUENTIAL DAMAGES RESULTING FROM THE USE OF THIS PRODUCT OR ARISING OUT OF ANY BREACH OF THIS WARRANTY As exampl...

Страница 104: ...Customer Service inquiries please contact 1 800 272 7033 Monday Friday 8 30am 8pm EST As of January 2002 Service in Puerto Rico Matsushita Electric of Puerto Rico Inc Panasonic Sales Company Factory...

Страница 105: ...nitor Viewfinder Brightness 77 M Macro Mode 44 MC Protector 59 Motion Image 32 Multi Playback 62 MultiMediaCard 16 N ND Filter 59 Night Portrait Mode 48 O Operational Sound 79 Optical Zoom 33 P Pannin...

Страница 106: ...tapa tarjeta de memoria bater a 3 Introduzca la bater a en la c mara 4 Introduzca la tarjeta en la c mara 5 Cierre la tapa tarjeta de memoria bater a Grabaci n 6 Quite la tapa del objetivo 7 Ponga el...

Страница 107: ...107 Memo KC72 PP book 107...

Страница 108: ...ation of America One Panasonic Way Secaucus NJ 07094 Panasonic Sales Company PSC Division of Matsushita Electric of Puerto Rico Inc Ave 65 de Infanteria Km 9 5 San Gabriel Industrial Park Carolina Pue...

Отзывы: