background image

Basic

- 40 -

[REC] mode: 

·

Taking pictures with your favourite settings 

(Normal picture mode)

Many more menu items can be set and you can take pictures with greater freedom than when 
you take pictures in the Intelligent auto mode 

(P36)

.

To adjust the exposure and take pictures at times when the image appears too dark 

(P59)

To adjust the colours and take pictures at times when the image appears too red 

(P83)

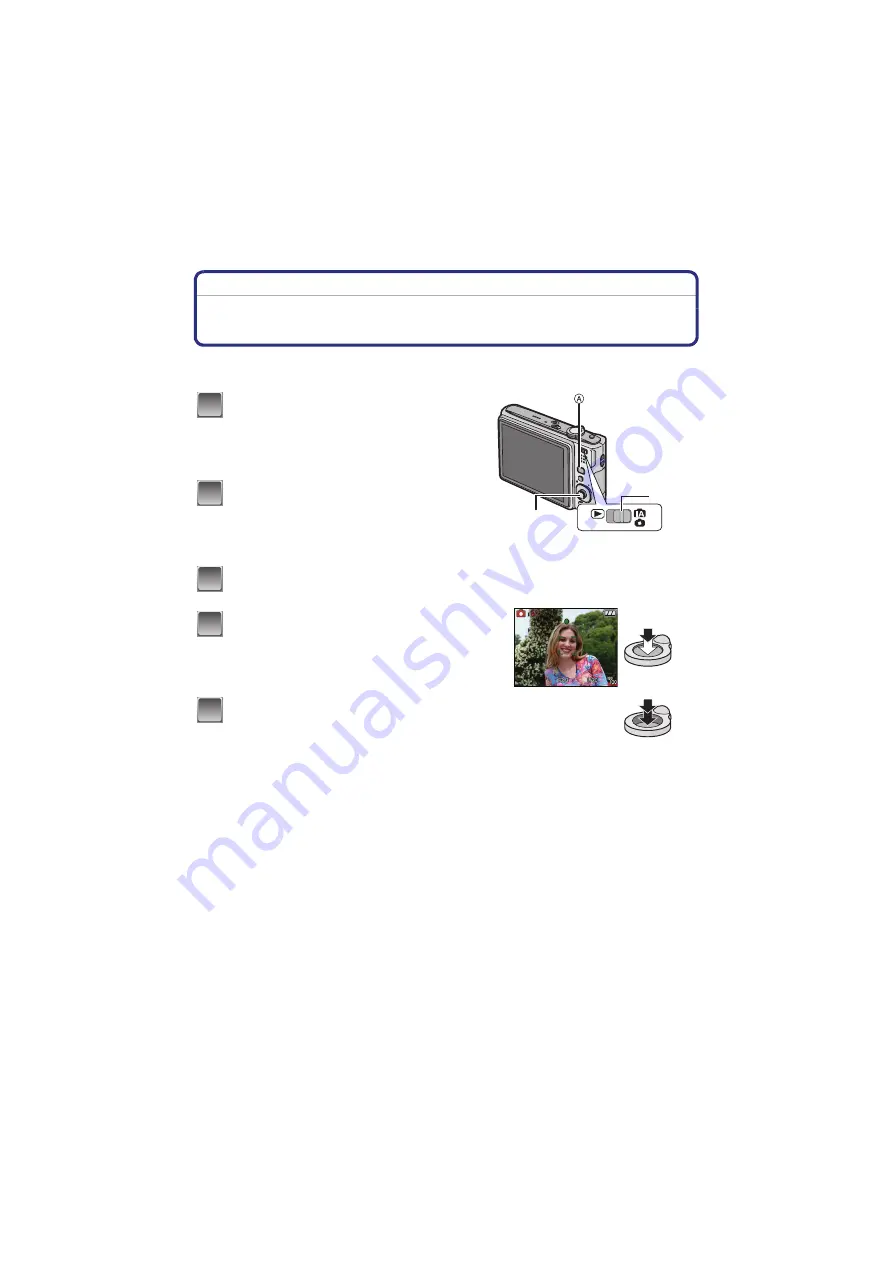
Slide the [REC]/[PLAYBACK] selector 
switch to [

¦

/

!

], and then press 

[MODE].

A

[MODE] button

B

[REC]/[PLAYBACK] selector switch

Move 

3

/

4

 to select [NORMAL 

PICTURE], and then press [MENU/SET].

To change the setting while taking pictures, refer 
to 

Using the [REC] Mode Menu


(P79)

.

C

[MENU/SET] button

Aim the AF area at the point you want to 
focus on.

Press the shutter button halfway to 
focus.

The focus range is 50 cm to 

.

If pictures are to be taken at an even closer range, 
refer to 

Taking Close-up Pictures


(P57)

.

Press the halfway pressed shutter 
button fully to take a picture.

The access indication light

(P20)

 red when 

pictures are being recorded on the built-in 
memory (or the card).

1

2

3

C

B

4

5

Содержание Lumix DMC-FS20

Страница 1: ...uctions Digital Camera Model No DMC FS20 VQT1M95 Before use please read these instructions completely QuickTime and the QuickTime logo are trademarks or registered trademarks of Apple Inc used under license therefrom ...

Страница 2: ...om Microsoft Corporation Other names company names and product names printed in these instructions are trademarks or registered trademarks of the companies concerned WARNING TO REDUCE THE RISK OF FIRE ELECTRIC SHOCK OR PRODUCT DAMAGE DO NOT EXPOSE THIS APPARATUS TO RAIN MOISTURE DRIPPING OR SPLASHING AND THAT NO OBJECTS FILLED WITH LIQUIDS SUCH AS VASES SHALL BE PLACED ON THE APPARATUS USE ONLY TH...

Страница 3: ...any potential negative effects on human health and the environment which could otherwise arise from inappropriate waste handling Please contact your local authority for further details of your nearest designated collection point Penalties may be applicable for incorrect disposal of this waste in accordance with national legislation For business users in the European Union If you wish to discard el...

Страница 4: ...ere water can come into contact with this unit such as when using it on a rainy day or on a beach Do not touch the lens or the sockets with dirty hands Also be careful not to allow liquids sand and other foreign matter to get into the space around the lens buttons etc If water or seawater splashes on the camera use a dry cloth to wipe the camera body carefully How to replace the Fuse The location ...

Страница 5: ... changes Be careful of condensation since it causes lens stains fungus and camera malfunction If condensation occurs turn the camera off and leave it for about 2 hours The fog will disappear naturally when the temperature of the camera becomes close to the ambient temperature Read together with the Cautions for Use P126 ...

Страница 6: ...cture you want to take 41 Preventing jitter camera shake 42 Taking Pictures with the Zoom 43 Using the Optical Zoom Using the Extra Optical Zoom EZ Using the Digital Zoom 43 Using the Easy zoom 44 Playing back Pictures NORMAL PLAY 46 Displaying Multiple Screens Multi Playback 46 Using the Playback Zoom 47 Switching the PLAYBACK mode 47 Deleting Pictures 48 To delete a single picture 48 To delete m...

Страница 7: ...TE PLAY 96 Playing Back Motion Pictures 97 Using the PLAYBACK mode menu 98 CALENDAR 98 TITLE EDIT 99 TEXT STAMP 101 RESIZE 103 TRIMMING 104 ASPECT CONV 105 ROTATE ROTATE DISP 106 FAVORITE 107 DPOF PRINT 108 PROTECT 110 COPY 111 Connecting to other equipment Connecting to a PC 112 Printing the Pictures 115 Selecting a single picture and printing it 116 Selecting multiple pictures and printing them ...

Страница 8: ...ttery is not charged when the camera is shipped Charge the battery before use plug in type inlet type Insert the battery and the card P18 When you do not use the card you can record or play back pictures on the built in memory P20 Refer to P20 when you use a card Turn the camera on to take pictures 1 Slide the REC PLAYBACK selector switch to 2 Press the shutter button to take pictures P36 1 9 0 2 ...

Страница 9: ... 9 Before Use Play back the pictures 1 Slide the REC PLAYBACK selector switch to 2 Select the picture you want to view P46 4 ...

Страница 10: ... differ depending on the country or area where the camera was purchased SD Memory Card SDHC Memory Card and MultiMediaCard are indicated as card in the text The card is optional You can record or play back pictures on the built in memory when you are not using a card Consult the dealer or your nearest Service Centre if you lose the supplied accessories You can purchase the accessories separately F...

Страница 11: ... 11 Before Use Names of the Components 1 Flash P52 2 Lens P5 127 3 Self timer indicator P58 AF assist lamp P90 1 2 3 ...

Страница 12: ...ting P52 The joystick is operated in two different ways it can be moved in the up down left and right directions to perform an operation or it can be pressed to select In these operating instructions it is pictured as shown in the figure below or described with 3 4 2 1 Example When the joystick is moved toward 2 left Place your finger on the right side of the joystick and move the joystick toward ...

Страница 13: ...ill not drop it 19 Lens barrel 20 AV OUT DIGITAL socket P112 115 121 21 DC IN socket P112 115 Always use a genuine Panasonic AC adaptor optional This camera cannot charge the battery even when the AC adaptor optional is connected to it 22 Tripod receptacle When you use a tripod make sure the tripod is stable when the camera is attached to it 23 Card Battery door P18 24 Release lever P18 12 14 13 1...

Страница 14: ...e battery temperature should also be the same Attach the battery with attention to the direction of the battery Connect the charger to the electrical outlet The AC cable does not fit entirely into the AC input terminal A gap will remain as shown below Charging starts when the CHARGE indicator A lights green Charging is complete when the CHARGE indicator A turns off after approx 120 min maximum plu...

Страница 15: ...The battery will be exhausted if left for a long period of time after being charged The battery can be recharged even when it still has some charge left but it is not recommended that the battery charge be frequently topped up while the battery is fully charged The battery has characteristics that will reduce its operating duration and cause the battery to swell up When the operating time of the c...

Страница 16: ...ging Products Association Temperature 23 oC Humidity 50 when LCD monitor is on Using a Panasonic SD Memory Card 16 MB Using the supplied battery Starting recording 30 seconds after the camera is turned on When the optical image stabilizer function is set to MODE2 Recording once every 30 seconds with full flash every second recording Rotating the zoom lever from Tele to Wide or vice versa in every ...

Страница 17: ... optional battery pack are the same as above The charging time will vary slightly depending on the status of the battery and the conditions in the charging environment When the charging has been completed successfully the CHARGE indicator turns off Note The battery may swell and its operating time may become shorter as the number of times it is charged increases For long term battery use we recomm...

Страница 18: ...bout the direction you insert it Pull the lever A in the direction of the arrow to remove the battery Card Push it fully until it clicks being careful about the direction you insert it To remove the card push the card until it clicks then pull the card out upright B Do not touch the connection terminals of the card The card may be damaged if it is not fully inserted 1 Close the card battery door 2...

Страница 19: ...urn off as the settings on the camera may not be stored properly The supplied battery is designed only for the camera Do not use it with any other equipment Before removing the card or battery turn the camera off and wait until the status indicator has gone off completely Otherwise this unit may no longer operate normally and the card itself may be damaged or the recorded pictures may be lost ...

Страница 20: ...has been inserted Pictures can be recorded on the card and played back When using the built in memory k ð access indication When using the card access indication The access indication lights red when pictures are being recorded on the built in memory or the card Built in Memory Card Type of card Characteristics SD Memory Card 8 MB to 2 GB Formatted using the FAT12 or FAT16 format in compliance wit...

Страница 21: ...jp pavc global cs This Site is English only Note Do not turn this unit off remove its battery or card or disconnect the AC adaptor optional when the access indication is lit when pictures are being read or deleted or the built in memory or the card is being formatted P33 Furthermore do not subject the camera to vibration or impact The card or the data on the card may be damaged and this unit may n...

Страница 22: ...without setting the clock Press MENU SET to set After completing the clock settings turn the camera off Then turn the camera back on switch to recording mode and check that the display reflects the settings that were performed When MENU SET has been pressed to complete the settings without the clock having been set set the clock correctly by following the Changing the clock setting In normal pictu...

Страница 23: ... the clock setting will be stored in the camera for at least 3 months even if the battery is removed If you insert a battery that is not sufficiently charged the length of time that the clock setting is stored may become less You can set the year from 2000 to 2099 The 24 hour system is used If the clock is not set the correct date cannot be printed when you stamp the date on the pictures with TEXT...

Страница 24: ...ing to use the camera A REC PLAYBACK selector switch PLAYBACK mode menu P98 to 111 REC mode menu P79 to 90 This menu lets you make the rotation protection trimming or DPOF settings etc of recorded pictures This menu lets you set the colouring sensitivity aspect ratio number of pixels and other aspects of the pictures you are recording SETUP menu P28 to 33 This menu lets you perform the clock setti...

Страница 25: ...an be used for the PLAYBACK menu and SETUP menu as well Example Setting AF MODE from Ø to š in the normal picture mode Setting menu items Turn the camera on A MENU SET button B REC PLAYBACK selector switch C MODE button Slide the REC PLAYBACK selector switch to and then press MODE When selecting the PLAYBACK mode menu settings set the REC PLAYBACK selector switch to and proceed to step 4 Move 3 4 ...

Страница 26: ... menu icon Move 1 Select a menu item next and set it Move 3 4 to select AF MODE Select the item at the very bottom and move 4 to move to the second screen Move 1 Depending on the item its setting may not appear or it may be displayed in a different way Move 3 4 to select š Press MENU SET to set 1 2 3 5 6 7 8 9 ...

Страница 27: ...y the modes When DISPLAY is pressed while STABILIZER P89 is selected JITTER SUBJ MOVE DEMO can be displayed Using the quick menu Press and hold Q MENU when recording Move 3 4 2 1 to select the menu item and the setting and then press MENU SET to close the menu A The items to be set and the settings are displayed 1 2 Q MENU A ...

Страница 28: ...e only CLOCK SET WORLD TIME TRAVEL DATE BEEP and LANGUAGE can be set For details on how to select the SETUP menu settings refer to P25 Refer to P22 for details Refer to P77 for details U CLOCK SET Setting Date Time WORLD TIME Set the time in your home area and travel destination DESTINATION Travel destination area HOME Your home area MONITOR Adjust the brightness of the LCD monitor in 7 steps ...

Страница 29: ...decreases in Auto Power LCD mode Power LCD mode and High angle mode When you connect the camera to a TV the volume of the TV speakers does not change LCD MODE These menu settings make it easier to see the LCD monitor when you are in bright places or when you are holding the camera high above your head OFF AUTO POWER LCD The brightness is adjusted automatically depending on how bright it is around ...

Страница 30: ...pattern of the guide lines displayed when taking pictures You can also set whether or not to have the recording information displayed when the guide lines are displayed P50 REC INFO OFF ON PATTERN TRAVEL DATE Set the departure date and the return date of the vacation OFF SET q ECONOMY You can conserve the battery life by setting these menus p POWER SAVE The camera is automatically turned off if th...

Страница 31: ... the operation that resets the lens is also performed at the same time You will hear the sound of the lens operating but this is normal and not indicative of malfunctioning When SETUP menu settings are reset the following settings are also reset In addition FAVORITE P107 in PLAYBACK mode menu is set to OFF and ROTATE DISP P106 is set to ON The birthday and name settings for BABY1 BABY2 P66 and PET...

Страница 32: ...ore connecting to a printer supporting PictBridge z PC Set after or before connecting to a PC VIDEO OUT Set to match the colour television system in each country Playback mode only NTSC Video output is set to NTSC system PAL Video output is set to PAL system TV ASPECT Set to match the type of TV Playback mode only W When connecting to a 16 9 screen TV X When connecting to a 4 3 screen TV m ft Chan...

Страница 33: ... set the desired language A Jitter detection demonstration B Movement detection demonstration In playback mode JITTER SUBJ MOVE DEMO cannot be displayed Press DISPLAY to close JITTER SUBJ MOVE DEMO Press MENU SET to close AUTO DEMO JITTER SUBJ MOVE DEMO is an approximation AUTO DEMO has no TV output capability FORMAT The built in memory or card is formatted Formatting irretrievably deletes all the...

Страница 34: ...tablished in line with the subject to be recorded and the recording conditions or to the scene mode which enables you to take pictures that match the scene being recorded Turn the camera on A MENU SET button B REC PLAYBACK selector switch C MODE button Slide the REC PLAYBACK selector switch to Press MODE Move 3 4 to select the mode Press MENU SET 1 2 3 ON OFF A B C 4 5 ...

Страница 35: ...de P36 The subjects are recorded using the settings which are left to the camera to automatically select them Normal picture mode P40 The subjects are recorded using your own settings Scene mode1 Scene mode2 P61 This allows you to take pictures that match the scene being recorded Motion picture mode P72 This mode allows you to record motion pictures with audio ...

Страница 36: ...mend this mode for beginners or those who want to leave the settings to the camera and take pictures easily The following functions are activated automatically Scene detection STABILIZER INTELLIGENT ISO Face detection QUICK AF Slide the REC PLAYBACK selector switch to and then press MODE The status indicator 3 lights when you turn this unit on 2 It turns off after about 1 second 1 Shutter button 3...

Страница 37: ...rms still at your side and stand with your feet slightly apart A Flash B AF assist lamp Press the shutter button halfway to focus The focus indication 1 green lights when the subject is focused The AF area 2 is displayed around the subject s face by the face detection function In other cases it is displayed at the point on the subject which is in focus The focus range is 5 cm Wide 50 cm Tele to Pr...

Страница 38: ... optimal Note Due to conditions such as the ones below a different scene may be identified for the same subject Subject conditions When the face is bright or dark The size of the subject The distance to the subject The contrast of the subject When the subject is moving When zoom is used Recording conditions Sunset Sunrise Under low brightness conditions When the camera is shaken To take pictures i...

Страница 39: ...L ZOOM The other items on the SETUP menu can be set in a mode such as the normal picture mode What is set will be reflected in the intelligent auto mode About the flash Settings in Intelligent auto mode Item Settings GUIDE LINE P30 REC INFO OFF ECONOMY POWER SAVE P30 5MIN AUTO REVIEW P31 2SEC Focus range The focus range becomes the same as macro mode 5 cm Wide 50 cm Tele to P57 The maximum close u...

Страница 40: ... switch to and then press MODE A MODE button B REC PLAYBACK selector switch Move 3 4 to select NORMAL PICTURE and then press MENU SET To change the setting while taking pictures refer to Using the REC Mode Menu P79 C MENU SET button Aim the AF area at the point you want to focus on Press the shutter button halfway to focus The focus range is 50 cm to If pictures are to be taken at an even closer r...

Страница 41: ...le P85 Subject and recording conditions which are difficult to focus in Fast moving subjects extremely bright subjects or subjects without contrast When the recordable range display has appeared in red When recording subjects through windows or near shiny objects When it is dark or when jitter occurs When the camera is too close to the subject or when taking a picture of both distant and near subj...

Страница 42: ...end using a tripod In NIGHT PORTRAIT NIGHT SCENERY PARTY CANDLE LIGHT STARRY SKY or FIREWORKS in scene mode P61 Direction detection function Pictures recorded with the camera held vertically are played back vertically rotated Only when ROTATE DISP P106 is set to ON Pictures may not be displayed vertically if they were taken with the camera aimed up or down Motion pictures taken with the camera hel...

Страница 43: ...ppear closer use Tele Rotate the zoom lever towards Tele To make subjects appear further away use Wide Rotate the zoom lever towards Wide Feature Optical zoom Extra optical zoom EZ Digital zoom Maximum magnification 4k 7 1k 1 16k including optical zoom 4k 28 5k including extra optical zoom 7 1k Picture quality No deterioration No deterioration The higher the magnification level the greater the det...

Страница 44: ...he camera is turned on If you use the zoom function after focusing on the subject focus on the subject again The lens barrel extends or retracts according to the zoom position Take care not to interrupt the motion of the lens barrel while the zoom lever is rotated When using the digital zoom STABILIZER may not be effective When using the digital zoom we recommend using a tripod and the self timer ...

Страница 45: ...set the picture size which was changed in the extra optical zoom range now returns to what it was originally Also the picture size returns to what it was originally when the zoom position has been returned to the optical zoom range using the zoom lever Note Press E ZOOM firmly until the zoom function is activated Aspect ratio Picture size X Y W Press E ZOOM at Tele T W ...

Страница 46: ...es Rotate the zoom lever towards Z T to return to the previous screen Pictures are not rotated for display To return to normal playback 1 Move 3 4 2 1 to select a picture An icon will be displayed depending on the recorded picture and the settings 2 Press MENU SET The picture that was selected will appear Slide the REC PLAYBACK selector switch A to Normal playback is set automatically in the follo...

Страница 47: ...W after enlarging the picture the magnification becomes lower When you change the magnification the zoom position indication A appears for about 1 second and the position of the enlarged section can be moved by moving 3 4 2 1 The more a picture is enlarged the more its quality deteriorates When you move the position to be displayed the zoom position indication appears for about 1 second Switching ...

Страница 48: ...pictures cannot be recovered Delete the pictures on the card while the card is inserted in the camera To delete a single picture Select the picture to be deleted and then press A DISPLAY button B button Move 2 to select YES and then press MENU SET 1 B A 2 ...

Страница 49: ... ALL DELETE EXCEPT Ü the deleting will stop halfway Depending on the number of pictures to be deleted it may take some time to delete them If pictures do not conform to the DCF standard or are protected P110 they will not be deleted even if DELETE ALL or ALL DELETE EXCEPTÜ is selected To delete multiple pictures up to 50 or all the pictures Press Move 3 4 to select DELETE MULTI or DELETE ALL and t...

Страница 50: ...GUIDE LINE in SETUP menu You can also set whether or not to have the recording information displayed when the guide lines are displayed In playback mode C Normal display D No display E No display Recording guide line F Normal display G Display with recording information H No display A B 9 9 C D E 1 6 1 6 1 6 100_0001 100_0001 100_0001 ISO ISO 100 100 AWB AWB ISO 100 AWB 1 6 1 6 1 6 100_0001 100_00...

Страница 51: ...n the horizontal and vertical guide lines or the cross point of these lines you can take pictures with well designed composition by viewing the size the slope and the balance of the subject A This is used when dividing the entire screen into 3k3 for taking pictures with a well balanced composition B This is used when you want to position the subject at the exact centre of the screen ...

Страница 52: ...rmation about flash settings that can be selected refer to Available flash settings by recording mode P54 Press MENU SET You can also press the shutter button halfway to finish The menu screen disappears after about 5 seconds At this time the selected item is automatically set A Photo flash Do not cover it with your fingers or other objects Switching to the appropriate flash setting A 1 2 3 ...

Страница 53: ...nditions Forced flash ON Š Forced ON Red eye reduction The flash is activated every time regardless of the recording conditions Use this when your subject is back lit or under fluorescent light The flash setting is set to Š only when you set PARTY or CANDLE LIGHT in scene mode P61 Slow sync Red eye reduction If you take a picture with a dark background landscape this feature will slow the shutter ...

Страница 54: ... When is selected or is set depending on the type of subject and brightness The flash setting may change if the recording mode is changed Set the flash setting again if necessary The flash setting is memorised even if the camera is turned off However the scene mode flash setting is reset to the initial setting when the scene mode is changed ˆ Š Œ ˆ Š Œ ñ í ï 0 9 ô 5 4 6 1 8 2 7 3 n ...

Страница 55: ...in the above shutter speeds in the scene modes NIGHT PORTRAIT 1 or 1 8th of a second to 1 2000th of a second 4 NIGHT SCENERY 8 or 1 8th of a second to 1 2000th of a second 4 CANDLE LIGHT 1 or 1 8th of a second to 1 2000th of a second 4 STARRY SKY 15 seconds 30 seconds 60 seconds FIREWORKS 1 4th of a second 2 seconds 4 All other scene modes 1 8th of a second to 1 2000th of a second 4 The maximum sh...

Страница 56: ...ure even when you press the shutter button fully When AUTO LCD OFF is set the LCD monitor turns off and the status indicator lights The white balance may not be properly adjusted if the flash level is insufficient for the subject When the shutter speed is fast the flash effect may not be sufficient It may take time to charge the flash if you repeat taking a picture Take a picture after the access ...

Страница 57: ...en the camera and the subject is beyond the focus range of the camera the picture may not be properly focused even if the focus indication lights When a subject is close to the camera the effective focus range is significantly narrowed Therefore if the distance between the camera and the subject is changed after focusing on the subject it may become difficult to focus on it again Macro mode gives ...

Страница 58: ...o focus on the subject We recommend using a tripod when recording with the self timer The number of pictures which can be taken in BURST is fixed to 3 Move 2 ë Move 3 4 to select a mode You can also move 2 ë to select Press MENU SET You can also press the shutter button halfway to finish The menu screen disappears after about 5 seconds At this time the selected item is automatically set Press the ...

Страница 59: ...er speed The exposure compensation value appears on the lower left of the screen The set exposure value is memorised even if the camera is turned off The compensation range of the exposure will be limited depending on the brightness of the subject Under exposed Properly exposed Overexposed Compensate the exposure towards positive Compensate the exposure towards negative Move 3 È until EXPOSURE app...

Страница 60: ...ensation value appears on the lower left of the screen The auto bracket setting is cancelled if you turn the camera off or POWER SAVE is activated When auto bracket is set the auto review function is activated regardless of the auto review setting The picture is not enlarged You cannot set the auto review function in the SETUP menu The exposure may not be compensated with auto bracket depending on...

Страница 61: ...er Press MENU SET to set The menu screen is switched to the recording screen in the selected scene mode About the information If you press DISPLAY when selecting a scene mode in step 3 explanations about each scene mode are displayed If you press DISPLAY again the screen returns to the scene mode menu Note To change the scene mode press MENU SET and then move 1 and return to step 3 above Refer to ...

Страница 62: ...DE is š When taking pictures of people outdoors during the daytime this mode enables the texture of their skin to appear even softer than with PORTRAIT It is effective when taking pictures of people from the chest up Technique for Soft skin mode To make this mode more effective 1 Rotate the zoom lever as far as possible to Tele 2 Move close to the subject to make this mode more effective Note If a...

Страница 63: ...sing the 2 second self timer Note The focus range is about 30 cm to 70 cm The zoom magnification is automatically moved to Wide 1k The self timer can only be set to off or 2 seconds If it is set to 2 seconds this setting will remain until the camera is turned off the scene mode is changed or REC mode or PLAYBACK mode is selected The stabilizer function mode is fixed to MODE2 P89 The initial settin...

Страница 64: ...ing This is not a malfunction Noise may become visible when you take pictures in dark places The initial setting for AF MODE is š This allows you to take vivid pictures of the nightscape Technique for Night scenery mode Since the shutter speed becomes slower up to about 8 sec use a tripod We also recommend using the self timer for taking pictures Note The focus range is 5 m to The shutter may rema...

Страница 65: ...ng pictures We recommend rotating the zoom lever to Wide 1k and being about 1 5 m from the subject when taking pictures Note The initial setting for AF MODE is š This mode allows you to take pictures with a candle lit atmosphere Technique for Candle light mode This is more effective when taking pictures without using the flash We recommend using a tripod and the self timer for taking pictures Note...

Страница 66: ...e has not been registered the setting screen appears automatically 4 Press MENU SET to finish To cancel AGE and NAME Select the OFF setting in step 2 of the Birthday Name setting procedure Note The age and name can be printed out using the PHOTOfunSTUDIO viewer bundled software on the CD ROM supplied If AGE or NAME is set to OFF even when the birthday or name has been set the age or name will not ...

Страница 67: ...de Select this when you want to take pictures of sunset view This allows you to take vivid pictures of the red colour of the sun Note ISO sensitivity is fixed to ISO100 This mode minimises the jitter of the subjects and enables you to take pictures of these subjects in dimly lit rooms Select this for high sensitivity processing The sensitivity automatically switches to between ISO1600 and ISO6400 ...

Страница 68: ... card used The number of burst recording pictures increase immediately after formatting Note QUALITY is automatically fixed to You can take pictures suitable for 4qk6q 10k15 cm printing The shutter speed becomes 1 8th of a second to 1 2000th of a second The focus zoom exposure white balance shutter speed and ISO sensitivity are fixed to the settings for the first picture The ISO sensitivity automa...

Страница 69: ...button fully to display the countdown screen Do not move the camera after this screen is displayed When countdown finishes PLEASE WAIT is displayed for the same length of time as the set shutter speed for signal processing Press MENU SET to stop taking the picture while the countdown screen is displayed Technique for Starry sky mode The shutter opens for 15 30 or 60 seconds Be sure to use a tripod...

Страница 70: ...on 1 4th of a second or 2 seconds The shutter speed becomes 2 seconds only when the camera has determined that there is little jitter such as when using a tripod etc You can change the shutter speed by compensating the exposure The AF area is not displayed ISO sensitivity is fixed to ISO100 This allows you to take even more vivid pictures of the blue colour of the sea sky etc It also prevents unde...

Страница 71: ...echnique if it is difficult to focus when taking pictures of clouds etc Aim the camera at something with high contrast press the shutter button halfway to fix the focus and then aim the camera at the subject and press the shutter button fully to take the picture Note The focus range is 5 m to Turn the camera off when taking off or landing When using the camera follow all instructions from the cabi...

Страница 72: ... screen After pressing the shutter button fully release it straight away If the button is held down the sound will not be recorded for a few seconds when recording starts When the subject is focused the focus indication lights The focus and zoom are fixed to the setting when recording starts the first frame The audio is also recorded simultaneously from the built in microphone on this unit Motion ...

Страница 73: ...re quality is lower The file size with ø is small so it is suitable for e mails Cannot be recorded in the built in memory Press MENU SET to close the menu You can also press the shutter button halfway to close the menu Changing the settings for the aspect ratio and the picture quality Press MENU SET Move 3 4 to select ASPECT RATIO and then move 1 Move 3 4 to select the item and then press MENU SET...

Страница 74: ...time for up to 2 GB only is displayed on the screen DMC FS20GC DMC FS20SG DMC FS20GJ DMC FS20PL Motion pictures can be recorded continuously for up to 15 minutes The maximum continuous recording time up to 15 minutes is displayed on the screen DMC FS20EG DMC FS20E DMC FS20PR When motion pictures recorded with the camera are played back on other equipment the quality of the picture and sound may de...

Страница 75: ...STUDIO viewer bundled software on the CD ROM supplied Recording which Day of the Vacation You Take the Picture Select TRAVEL DATE from the SETUP menu and then move 1 Move 4 to select SET and then press MENU SET Move 3 4 2 1 to set the departure date year month day and then press MENU SET Move 3 4 2 1 to set the return date year month day and then press MENU SET If you do not want to set the return...

Страница 76: ...en if the camera is turned off If you set a departure date and then take a picture on a date before this departure date minus is displayed in orange and the day of the vacation that you took the picture is not recorded If you set a departure date and then change the clock setting to the date and time at the travel destination minus is displayed in white and the day of the vacation that you took th...

Страница 77: ...n move 1 When first using the camera after purchasing it the PLEASE SET THE HOME AREA message appears Press MENU SET and set the home area on the screen in step 3 Move 4 to select HOME and then press MENU SET Move 2 1 to select the home area and then press MENU SET A Current time B Time difference from GMT Greenwich Mean Time If daylight saving time is used at the home area move 3 Move 3 again to ...

Страница 78: ...ars when playing back pictures taken at the travel destination Move 3 to select DESTINATION and then press MENU SET to set C Depending on the setting the time at the travel destination area or the home area is displayed Move 2 1 to select the area the travel destination is in and then press MENU SET to set D Current time of the destination area E Time difference If daylight saving time is used at ...

Страница 79: ...s Applicable modes ñ When the aspect ratio is X This item cannot be set in the intelligent auto mode When the aspect ratio is Y When the aspect ratio is W PICTURE SIZE 10M 3648k2736 pixels 7M 3072k2304 pixels 5M 2560k1920 pixels 3M 2048k1536 pixels 2M 1600k1200 pixels 0 3M 640k480 pixels 9M 3648k2432 pixels 6M 3072k2048 pixels 4 5M 2560k1712 pixels 2 5M 2048k1360 pixels 7 5M 3648k2056 pixels 5 5M ...

Страница 80: ...t work in HIGH SENS or HI SPEED BURST in scene mode so the picture size for is not displayed Pictures may appear mosaic depending on the subject and the recording conditions Refer to P144 for information about the number of recordable pictures For details on REC mode menu settings refer to P25 Set the compression rate at which the pictures are to be stored Applicable modes Note Refer to P144 for i...

Страница 81: ...of the ISO sensitivity can be set The higher the value set for the ISO sensitivity the more the jitter is reduced but the greater the amount of picture noise Note Depending on the brightness and how fast the subject is moving jitter may not be avoided Movements may not be detected when a moving subject is small when a moving subject is at the edge of the screen or when a subject has moved at the v...

Страница 82: ... maximum of ISO400 according to the brightness It can be adjusted to a maximum of ISO1000 when using the flash The sensitivity automatically switches to between ISO1600 and ISO6400 in HIGH SENS in scene mode The setting is not available when INTELLIGENT ISO is being used is displayed To avoid picture noise we recommend that you either reduce the maximum ISO sensitivity level or set COLOR MODE to N...

Страница 83: ...n a reddish or bluish tinge Furthermore when a multiple number of light sources are being used or there is nothing with a colour close to white auto white balance may not function properly In a case like this set the white balance to a mode other than AWB 1 Auto white balance will work within this range 2 Blue sky 3 Cloudy sky Rain 4 Shade 5 TV screen 6 Sunlight 7 White fluorescent light 8 Incande...

Страница 84: ...at a sheet of white paper etc so that the frame in the centre is filled by the white object only and then press MENU SET 3 After setting select Ò Note The white balance setting is memorised even if the camera is turned off However the white balance setting for a scene mode returns to AWB when the scene mode is changed ...

Страница 85: ...he person s face The focus and exposure can then be adjusted to fit that face no matter what portion of the picture it is in 9 area focusing The camera focuses on any of 9 focus areas This is effective when the subject is not in the centre of the screen ƒ 1 area focusing High speed The camera quickly focuses on the subject in the AF area on the centre of the screen Ø 1 area focusing The camera foc...

Страница 86: ...ovement When the subject is other than a human being When the camera is shaking When digital zoom is used About ƒ You can focus on the subject more quickly than other AF modes The picture may stop moving for a moment before being brought into focus when you press the shutter button halfway This is not a malfunction Note The camera is focusing on all the AF areas when multiple AF areas max 9 areas ...

Страница 87: ...ayed on the screen For details on REC mode menu settings refer to P25 Pictures are taken continuously while the shutter button is pressed Select the ones you really like from among the pictures you have taken Applicable modes ñ The burst speed is constant regardless of the transfer speed of the card The burst speed values given above apply when the shutter speed is 1 60 or faster and when the flas...

Страница 88: ...ctures in a place landscape indoors outdoors etc where there is a large difference between the light and shade it may take time until the exposure is stable If burst is used at this time the exposure may not become optimal The burst speed pictures second may become slower depending on the recording environment such as in dark places if the ISO sensitivity is high etc Burst mode is not cancelled wh...

Страница 89: ...licable modes ñ n Note The stabilizer function may not be effective in the following cases When there is a lot of jitter When the zoom magnification is high In digital zoom range When taking pictures while following a moving subject When the shutter speed becomes slower to take pictures indoors or in dark places Be careful of camera jitter when you press the shutter button The setting is fixed to ...

Страница 90: ...unctions in exactly the same way as CLOCK SET in the SETUP menu AF ASSIST LAMP OFF The AF assist lamp does not turn on ON When taking pictures in dark places the AF assist lamp lights while the shutter button is pressed halfway Larger AF areas are now displayed Note The effective range of the AF assist lamp is 1 5 m When you do not want to use the AF assist lamp A e g when taking pictures of anima...

Страница 91: ... of the enlarged part by moving 3 4 2 1 You cannot display the same picture on the dual display at the same time During dual play the selected picture can be deleted by pressing Press MENU SET to end dual play The selected picture is now played back filling the screen normal playback Note When ROTATE DISP is set to ON pictures which were recorded with the camera held vertically or pictures which w...

Страница 92: ... playback method is recommended when you have connected the camera to a TV set to view the pictures you have taken Slide the REC PLAYBACK selector switch to and then press MODE Move 3 4 to select SLIDE SHOW and then press MENU SET When ALL or FAVORITE has been selected in step 3 Move 3 4 to select the item and then press MENU SET FAVORITE can be selected only when FAVORITE on the PLAYBACK menu P10...

Страница 93: ... to select the category to play back and then press MENU SET to set For details on categories refer to P95 Move 3 to select START and then press MENU SET Move 4 to finish the slide show Normal playback resumes after the slide show finishes A Play Pause B Stop C Back to previous picture D Ahead to next picture These operations can be performed only in the pause mode E Reduce volume level F Increase...

Страница 94: ...ture may appear in black and white as a screen effect AUTO can be used only when CATEGORY SELECTION has been selected The pictures are played back with the recommended effects in each category SETUP DURATION or REPEAT can be set DURATION can be set only when OFF has been selected as the EFFECT setting MUSIC cannot be selected when OFF has been selected as the EFFECT setting Note Motion pictures ca...

Страница 95: ...t If a picture is found in a category the category icon turns blue It may take time to search the picture files if there are a lot on the card or the built in memory If you press while searching the searching will stop halfway Pictures are sorted into the categories shown below CATEGORY PLAY CATEGORY Recording information e g scene modes CATEGORY Recording information e g scene modes PORTRAIT i PO...

Страница 96: ...VORITE is set to ON and there are pictures which have been set to FAVORITE Slide the REC PLAYBACK selector switch to and then press MODE Move 3 4 to select FAVORITE PLAY and then press MENU SET Note You can use only ROTATE ROTATE DISP DPOF PRINT or PROTECT in the PLAYBACK menu FAVORITE PLAY 1 2 ...

Страница 97: ... rewind Frame by frame rewind D Fast forward Frame by frame forward These operations can be performed only in the pause mode E Reduce volume level F Increase volume level Note The file format that can be played back with this camera is QuickTime Motion JPEG Please note that the bundled software includes QuickTime to play back motion picture files created with the camera on the PC Some QuickTime Mo...

Страница 98: ...on that day is displayed You can display the calendar between January 2000 and December 2099 If the date is not set in the camera the recording date is set as the 1st January 2008 If you take pictures after setting the travel destination in WORLD TIME the pictures are displayed by the dates at the travel destination in calendar playback CALENDAR Select CALENDAR on the PLAYBACK mode menu P25 You ca...

Страница 99: ...e left with L and to the right with Z To enter a blank move the cursor to SPACE or to delete an entered character move the cursor to DELETE and press MENU SET To stop editing at any time during text entry press A maximum of 30 characters can be entered TITLE EDIT Select the picture and then press MENU SET to set A is displayed for pictures that have already been recorded with text in BABY1 BABY2 P...

Страница 100: ...Press MENU SET to close the menu Note Text can be scrolled if all of the registered text does not fit on the screen The name setting of BABY1 BABY2 or PET in scene mode can also be registered by using the operation in steps 4 and following The name setting of BABY1 BABY2 or PET in scene mode and TITLE EDIT cannot be registered at the same time You can print out texts comments using the PHOTOfunSTU...

Страница 101: ...o ON AGE is stamped on the pictures TRAVEL DATE If this is set to ON TRAVEL DATE is stamped on the pictures TITLE Text is printed together with the image for pictures that have already been recorded with text in BABY1 BABY2 or PET name settings in scene mode or TITLE EDIT TEXT STAMP Select the picture and then press MENU SET to set A appears on screen if the picture is stamped with text MULTI sett...

Страница 102: ... is automatically restored when MULTI is selected Press MENU SET to close the menu Note When you print pictures stamped with text the date will be printed over the stamped text if you specify printing of the date at the photo shop or on the printer You can set up to 50 pictures at one time in MULTI Depending on the printer being used some characters may be cut at printing Check before printing Whe...

Страница 103: ...f the resized picture will deteriorate It may not be possible to resize pictures recorded with other equipment RESIZE Reducing the picture size number of pixels Move 3 4 to select SINGLE or MULTI and then press MENU SET Select the picture and size SINGLE setting 1 Move 2 1 to select the picture and then press MENU SET 2 Move 2 1 to select the size and then press MENU SET Only the sizes to which th...

Страница 104: ...on the cut size the picture size of the trimmed picture may become smaller than that of the original picture The picture quality of the trimmed picture will deteriorate It may not be possible to trim pictures recorded with other equipment TRIMMING Move 2 1 to select the picture and then press MENU SET Use the zoom lever and move 3 4 2 1 to select the parts to be trimmed Zoom lever T Enlargement Zo...

Страница 105: ...picture size may become larger than that of the original picture You may not be able to convert pictures taken on other equipment ASPECT CONV Move 3 4 to select Y or X and then press MENU SET Move 2 1 to select a picture taken with W aspect ratio and then press MENU SET Move 2 1 to determine the horizontal position and press MENU SET to set Use 3 4 to set the frame position for pictures rotated ve...

Страница 106: ...res on a PC they cannot be displayed in the rotated direction unless the OS or software is compatible with Exif Exif is a file format for still pictures which allows recording information etc to be added It was established by JEITA Japan Electronics and Information Technology Industries Association It may not be possible to rotate pictures that have been recorded with other equipment ROTATE ROTATE...

Страница 107: ...t as a favourite Note You can set up to 999 pictures as favourites When printing pictures at a photo printing store ALL DELETE EXCEPTÜ P49 is useful so only the pictures you want to be printed remain on the card You may not be able to set pictures taken with other equipment as favourites You can perform check and cancel the settings of images as favourites using the PHOTOfunSTUDIO viewer bundled s...

Страница 108: ... on the built in memory copy them to a card P111 and then set the DPOF setting Select DPOF PRINT on the PLAYBACK mode menu P25 Move 3 4 to set the number of prints and then press MENU SET to set When MULTI has been selected repeat steps 3 and 4 for each picture It is not possible to use the same setting for a multiple number of pictures Press to return to the menu screen Press MENU SET to close th...

Страница 109: ...rinting store or the printer the date may not be printed even if you set to print the date For further information ask at your photo printing store or refer to the operating instructions for the printer The date cannot be printed on pictures stamped with text If you set TEXT STAMP for pictures that have been set for date printing the date printing setting is cancelled Note The number of prints can...

Страница 110: ...alfway Note The protect setting may not be effective on other equipment Even if you protect pictures in the built in memory or a card they will be deleted if the built in memory or the card is formatted Even if you do not protect pictures on an SD Memory Card or an SDHC Memory Card they cannot be deleted when the card s Write Protect switch is set to LOCK PROTECT Move 3 4 to select SINGLE or MULTI...

Страница 111: ... free space the picture data will only be copied halfway We recommend using a card which has more free space than the built in memory about 50 MB If a picture exists with the same name folder number file number as the picture to be copied in the copy destination when is selected a new folder is created and the picture is copied If a picture exists with the same name folder number file number as th...

Страница 112: ...Use a battery with sufficient battery power or the AC adaptor optional If the remaining battery power becomes low while the camera and the PC are communicating the status indicator blinks and the alarm beeps Refer to Disconnecting the USB connection cable safely P114 before disconnecting the USB connection cable Otherwise data may be destroyed Move 3 4 to select PC and then press MENU SET If USB M...

Страница 113: ... pictures you want to acquire or the folder storing those pictures to any different folder on the PC Double click on Removable Disk in My Computer When using a Macintosh the drive is displayed on the desktop LUMIX NO_NAME or Untitled is displayed Double click DCIM folder 3 4 5 ...

Страница 114: ...n importing pictures from an SDHC memory card Viewing the contents of the built in memory or card using the PC folder composition A new folder is created when pictures are taken in the following situations After NO RESET P31 in the SETUP menu has been executed When a card containing a folder with the same folder number has been inserted Such as when pictures were taken using another make of camera...

Страница 115: ...them straight in or unplug them straight out Otherwise the connectors may be bent out of shape which will cause trouble B Align the marks and insert C AC adaptor optional Use a battery with a sufficient battery power or the AC adaptor optional If the remaining battery power becomes low while the camera and the printer are connected the status indicator blinks and the alarm beeps If this happens du...

Страница 116: ...nnect the USB connection cable to the printer again Selecting a single picture and printing it Move 2 1 to select the picture and then press MENU SET The message disappears in about 2 seconds Move 3 to select PRINT START and then press MENU SET Refer to P118 for the items which can be set before starting to print the pictures Press MENU SET to cancel printing halfway Disconnect the USB connection ...

Страница 117: ...When DISPLAY is pressed again the setting is cancelled After the pictures have been selected press MENU SET SELECT ALL Prints all the stored pictures DPOF PICTURE Prints the pictures set in DPOF PRINT only P108 FAVORITE Prints the pictures set as favourites only P107 Move 3 to select PRINT START and then press MENU SET Refer to P118 for the items which can be set before starting to print the pictu...

Страница 118: ...s are not displayed If the printer does not support date printing the date cannot be printed on the picture Since the printer s settings may take precedence over the print with date setting check the printer s print with date setting as well Note When asking the photo shop to print the pictures By stamping the date using TEXT STAMP P101 or setting date printing at the time of the DPOF PRINT P108 s...

Страница 119: ...Item Description of settings Settings on the printer are prioritised L 3 5qk5q 89 mmk127 mm 2L 5qk7q 127 mmk178 mm POSTCARD 100 mmk148 mm 16 9 101 6 mmk180 6 mm A4 210 mmk297 mm A3 297 mmk420 mm 10k15cm 100 mmk150 mm 4qk6q 101 6 mmk152 4 mm 8qk10q 203 2 mmk254 mm LETTER 216 mmk279 4 mm CARD SIZE 54 mmk85 6 mm ...

Страница 120: ...er set PAGE LAYOUT to ä and then set NUM OF PRINTS to 1 for each of the 4 pictures Note The camera is receiving an error message from the printer when the indication lights orange during printing After finishing printing make sure there are no problems with the printer If the number of prints is high the pictures may be printed several times In this case the remaining number of prints indicated ma...

Страница 121: ...ed to the video input and the audio input sockets on the TV Connect the AV cable to the AV OUT socket on the camera Turn the TV on and select external input Turn the camera on Note Depending on the ASPECT RATIO black bands may be displayed on the top and bottom or the left and right of the pictures Do not use any other AV cables except the supplied one Read the operating instructions for the TV Wh...

Страница 122: ...el pictures may not be displayed on the full screen Motion pictures cannot be played back To play back motion pictures connect the camera to the TV with the AV cable supplied You cannot play back pictures on SDHC cards if the TV does not support these cards You may not be able to play back MultiMediaCards Playing back pictures on a TV with an SD Memory Card slot ...

Страница 123: ... P79 6 Quality P80 7 Battery indication P16 8 Number of recordable pictures P144 9 Built in memory P20 Card P20 displayed only during recording 10 Recording state 11 ISO sensitivity P82 12 Shutter speed P41 13 Aperture value P41 14 Optical image stabilizer P89 Jitter alert P42 6 6 1 30 1 30 1 30 F3 3 F3 3 F3 3 9 10 12 14 10 4 5 6 7 8 3 1 2 ISO ISO 100 100 ISO 100 11 13 ...

Страница 124: ...nsation P59 Backlight compensation P38 27 High angle mode P29 Power LCD P29 Auto Power LCD P29 28 Self timer mode P58 29 Burst P87 Auto bracket P60 B Audio recording P72 30 Quick AF P87 AF assist lamp P90 31 Number of days that have passed since the travel date P75 1 This is displayed for about 5 seconds when this unit is turned on in BABY1 BABY2 or PET in scene mode 2 This is displayed for about ...

Страница 125: ...ng information 13 Favourites settings P107 14 Recorded date and time Travel destination setting P77 Name P66 Title P99 15 Age P66 16 Number of days that have passed since the travel date P75 17 Power LCD P29 18 Number of DPOF prints P108 19 Motion picture playback P97 Cable disconnection warning icon P115 1ST DAY 1ST DAY 1ST DAY 10 00 1 DEC 2008 10 00 1 DEC 2008 10 00 1 DEC 2008 10 00 1 DEC 2008 8...

Страница 126: ...nd sound Recorded data may be damaged or pictures may be distorted by strong magnetic fields created by speakers or large motors Electromagnetic wave radiation generated by microprocessors may adversely affect the camera disturbing the pictures and sound If the camera is adversely affected by electromagnetic equipment and stops functioning properly turn the camera off and remove the battery or dis...

Страница 127: ...old when you turn it on the picture on the LCD monitor will be slightly darker than usual at first However the picture will return to normal brightness when the internal temperature of the camera increases Do not press the lens with excessive force Do not leave the camera with the lens facing the sun as rays of light from the sun may cause it to malfunction Also be careful when placing the camera ...

Страница 128: ...battery into fire because it may cause an explosion Do not allow battery terminals to come into contact with metal objects such as necklaces hairpins etc This can cause short circuiting or heat generation and you may be badly burned if you touch a battery If you use the battery charger near a radio the radio reception may be disturbed Keep the charger 1 m or more away from radio The charger may ge...

Страница 129: ... a desiccant silica gel when you keep it in a closet or a cabinet Recorded data may be damaged or lost if the camera breaks down due to inappropriate handling Panasonic will not be liable for any damage suffered due to loss of recorded data When you use a tripod make sure the tripod is stable when this unit is attached to it You may not be able to remove the card or the battery when using a tripod...

Страница 130: ...the protect setting P110 THIS PICTURE CANNOT BE DELETED SOME PICTURES CANNOT BE DELETED Pictures not based on the DCF standard cannot be deleted If you want to delete some pictures format the card after saving necessary data on a PC etc P33 NO ADDITIONAL SELECTIONS CAN BE MADE The number of pictures which can be set at one time when MULTI has been selected for DELETE MULTI P49 FAVORITE P107 TITLE ...

Страница 131: ...ill be displayed when you formatted the built in memory on a PC Format the built in memory on the camera again P33 The data on the built in memory will be deleted MEMORY CARD ERROR FORMAT THIS CARD This card has a format which is not recognised by the camera Format the card again with the camera after saving necessary data on a PC etc P33 PLEASE TURN CAMERA OFF AND THEN ON AGAIN This message appea...

Страница 132: ... A FOLDER CANNOT BE CREATED A folder cannot be created because there are no remaining folder numbers that can be used P114 Format the card after saving necessary data on a PC etc P33 If you execute NO RESET in the SETUP menu after formatting the folder number is reset to 100 P31 PICTURE IS DISPLAYED FOR 4 3 TV PICTURE IS DISPLAYED FOR 16 9 TV The AV cable is connected to the camera Press MENU SET ...

Страница 133: ...30 When using the AC adaptor When connecting to a PC or a printer When recording or playing back motion pictures During a slide show AUTO DEMO AUTO LCD OFF P30 When using the AC adaptor While the menu screen is displayed While the self timer is set While recording motion pictures When connecting to a PC or a printer AUTO REVIEW P31 mode Extra Optical Zoom P43 9 and ô in SCENE MODE1 SCENE MODE2 mod...

Страница 134: ...nd 7 in SCENE MODE1 SCENE MODE2 Playback Zoom P47 When playing back motion pictures TITLE EDIT P99 Motion pictures Protected pictures TEXT STAMP P101 Motion pictures Pictures recorded without setting the clock Pictures that were previously stamped with TEXT STAMP RESIZE P103 Motion pictures Pictures stamped with TEXT STAMP TRIMMING P104 Motion pictures Pictures stamped with TEXT STAMP ASPECT CONV ...

Страница 135: ... the ECONOMY mode etc P30 Is the temperature of the battery excessively high or low If it is it will take longer than usual to charge the battery or charging may remain incomplete Are the terminals of the charger or battery dirty Wipe off the dirt using a dry cloth If the problem is not resolved it may be improved by selecting RESET P31 on the SETUP menu when taking pictures Battery and power sour...

Страница 136: ...e menu to OFF The focus range varies depending on the recording mode Set to the proper mode for the distance to the subject The subject is beyond the focus range of the camera P40 There is camera shake jitter or the subject is moving slightly P42 The shutter speed becomes slower when pictures are taken in dark places so hold the camera firmly with both hands to take the pictures P37 When taking pi...

Страница 137: ... MultiMediaCard This unit does not support MultiMediaCards When you set the picture quality to or û we recommend using a high speed card with 10MB s or greater displayed on the package Depending on the type of the card recording may stop in the middle The recorded picture looks rough Noise appears on the picture The brightness or the hue of the recorded picture is different from the actual scene A...

Страница 138: ...the screen P28 POWER LCD or HIGH ANGLE is activated P29 This is not a malfunction These pixels do not affect the recorded pictures In dark places noise may appear to maintain the brightness of the LCD monitor This does not affect the pictures you are recording Is the flash setting set to Œ Change the flash setting P52 Flash mode is not available when auto bracket P60 or BURST P87 in REC mode menu ...

Страница 139: ...attery immediately after picture taking or did you take the picture using a battery with a low remaining charge Format the data to delete the pictures mentioned above P33 Other pictures will be deleted as well and it will not be possible to restore them Therefore check well before formatting Is the clock in the camera set properly P22 When pictures edited using a PC or pictures taken by other equi...

Страница 140: ...he motion pictures This is not a malfunction White round spots like soap bubbles appear on the recorded picture If you take a picture with the flash in a dark place or indoors white round spots may appear on the picture caused by the flash reflecting of particles of dust in the air This is not a malfunction A characteristic of this is that the number of round spots and their position differ in eve...

Страница 141: ...s cannot be printed using a printer which does not support PictBridge Set to PictBridge PTP in USB MODE P32 115 When using a printer with a trimming or borderless printing function cancel this function before printing For details refer to the operating instructions for the printer When you order photo studios to print pictures ask the photo studio if the pictures can be printed with both ends TV P...

Страница 142: ...f you do not use the camera for a long time the clock may be reset When the message PLEASE SET THE CLOCK appears set the clock again When you take a picture before setting the clock 0 00 0 0 0 is recorded P23 At some magnification levels the pictures taken are slightly distorted or the outlines and other areas in the pictures taken are coloured but this is not a malfunction When using the extra op...

Страница 143: ...r the pictures taken will not be stored in the memory When the power is then turned back on and pictures are taken they may be stored under file numbers which should have been assigned to previous pictures Check the clock P22 and birthday settings P66 The lens barrel retracts about 15 seconds after switching from REC mode to PLAYBACK mode The file numbers are not recorded consecutively The file nu...

Страница 144: ...ures Aspect ratio X Picture size 10M 3648k2736 7M 3072k2304 5M 2560k1920 3M 2048k1536 Quality A A A A Built in Memory Approx 50 MB 9 20 14 28 20 40 32 62 Card 16 MB 2 5 3 7 5 10 8 16 32 MB 5 11 7 16 11 23 18 36 64 MB 11 24 16 34 24 48 38 75 128 MB 24 49 35 69 50 99 78 150 256 MB 48 97 68 135 98 190 150 290 512 MB 97 190 135 270 195 380 300 590 1 GB 195 380 270 540 390 770 600 1180 2 GB 390 770 550...

Страница 145: ...prox 50 MB 51 97 240 400 Card 16 MB 13 26 68 110 32 MB 29 56 145 230 64 MB 61 115 290 480 128 MB 125 230 600 970 256 MB 240 460 1170 1900 512 MB 480 910 2320 3770 1 GB 970 1830 4640 7550 2 GB 1920 3610 8780 12290 4 GB 3770 7090 17240 24130 8 GB 7670 14440 35080 49120 16 GB 15440 29070 70590 98840 ...

Страница 146: ... 5020 8 GB 1770 3500 2500 4910 3550 6820 5450 10230 16 GB 3580 7050 5040 9880 7160 13720 10980 20590 Aspect ratio W Picture size 7 5M 3648k2056 5 5M 3072k1728 3 5M 2560k1440 2M 1920k1080 Quality A A A A Built in Memory Approx 50 MB 13 26 18 37 27 53 47 92 Card 16 MB 3 6 4 10 7 14 12 25 32 MB 7 15 10 21 15 30 27 53 64 MB 15 32 22 45 32 63 57 105 128 MB 33 65 46 92 66 125 115 220 256 MB 65 125 91 18...

Страница 147: ... 1 min 11 s 3 min 35 s 256 MB 2 min 45 s 8 min 10 s 8 min 10 s 24 min 2 min 20 s 7 min 512 MB 5 min 30 s 16 min 20 s 16 min 20 s 47 min 50 s 4 min 40 s 14 min 1 GB 11 min 32 min 50 s 32 min 50 s 1 h 35 min 9 min 20 s 28 min 10 s 2 GB 22 min 30 s 1 h 7 min 1 h 7 min 3 h 15 min 19 min 20 s 57 min 30 s 4 GB 44 min 20 s 2 h 11 min 2 h 11 min 6 h 22 min 38 min 1 h 53 min 8 GB 1 h 30 min 4 h 28 min 4 h ...

Страница 148: ...4k Extra optical zoom Max 7 1k Focus Normal Macro Face detection 9 area focusing 1 area focusing High speed 1 area focusing Focus range Normal 50 cm to Macro Intelligent auto 5 cm Wide 50 cm Tele to Scene mode There may be differences in the above settings Shutter system Electronic shutteriMechanical shutter Motion picture recording When the aspect ratio setting is X 640k480 pixels 30 frames secon...

Страница 149: ...ctures immediately after formatting When using a Card Max 100 pictures differs depending on the type of Card and the recording conditions ISO sensitivity AUTO 100 200 400 800 1600 HIGH SENS mode 1600 to 6400 Shutter speed 8 seconds to 1 2000th of a second STARRY SKY mode 15 seconds 30 seconds 60 seconds White balance Auto white balance Daylight Cloudy Shade Halogen White set Exposure AE Programme ...

Страница 150: ...ixels Only when using a Card 320k240 pixels When the aspect ratio setting is W 848k480 pixels Only when using a Card Quality Fine Standard Recording file format Still Picture JPEG based on Design rule for Camera File system based on Exif 2 21 standard DPOF corresponding Motion pictures QuickTime Motion JPEG motion pictures with audio Interface Digital USB 2 0 Full Speed Analogue video audio NTSC P...

Страница 151: ... 151 Others Battery Charger Information for your safety Input 110 V to 240 V 50 60 Hz 0 2 A Output CHARGE 4 2 V 0 8 A Battery Pack lithium ion Information for your safety Voltage capacity 3 6 V 1000 mAh ...

Отзывы: