Panasonic Lumix DC-G95 Скачать руководство пользователя страница 70

Wi-Fi/Bluetooth

70

DVQX1749 (ENG) 

Use Wi-Fi to connect the camera and a smartphone that does not support Bluetooth Low 
Energy.

• You can also connect via Wi-Fi to a smartphone that supports Bluetooth Low Energy by 

following the same steps.
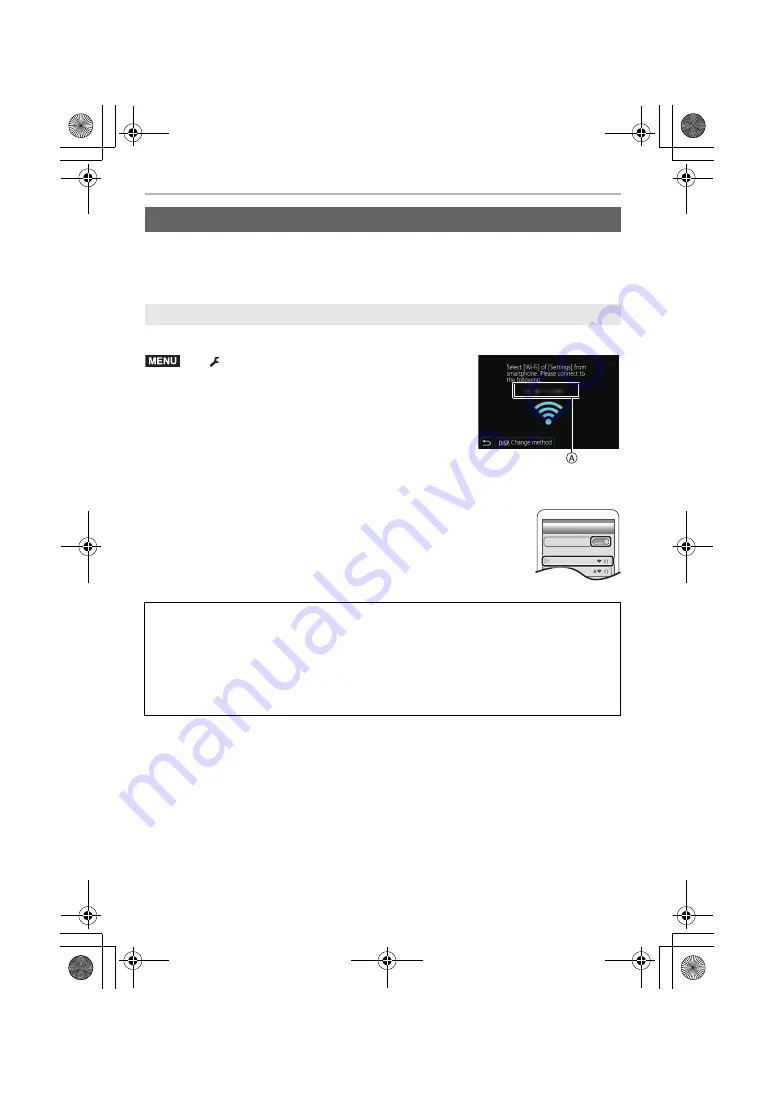
(On the camera)

A

SSID

• The information required for directly connecting your 

smartphone to this unit (SSID) is displayed.

• You can also display the information by pressing [Wi-Fi] on the 

camera.

(On your smartphone)

1

Turn on the Wi-Fi function in the setup menu.

2

On the Wi-Fi setting screen, select the SSID displayed on the 
camera.

3

Start “Image App”.

• When the connection confirmation screen is displayed on the camera, 

select [Yes] to connect. (For first time connection only)

Connecting to a Smartphone (Wi-Fi connection)

Connecting Without Entering a Password

>

[Setup] 

>

 [Wi-Fi] 

>

 [Wi-Fi Function] 

[New Connection] 

[Remote Shooting & 

View]

At the time of purchase, [Wi-Fi Password] is set to [OFF].

Before connecting to a Wi-Fi network, ensure that the device displayed on the 
connection confirmation screen is the one you actually want to connect to. When a 
wrong device is displayed, if you select [Yes], the camera will automatically connect to 
that device.
We recommend that you set [Wi-Fi Password] to [ON] if, for example, there is another 
Wi-Fi device nearby.

MENU

Wi-Fi

0123456789ABC

DC-G95PP-DVQX1749_eng.book  70 ページ  2019年3月29日 金曜日 午後1時31分

Содержание Lumix DC-G95

Страница 1: ...support PP P Please read these instructions carefully before using this product and save this manual for future use More detailed owner s manual is available in Owner s Manual for advanced features PD...

Страница 2: ...or other published or broadcast material for purposes other than your own private use may infringe copyright laws Even for the purpose of private use recording of certain material may be restricted Fo...

Страница 3: ...lowing measures Reorient or relocate the receiving antenna Increase the separation between the equipment and receiver Connect the equipment into an outlet on a circuit different from that to which the...

Страница 4: ...FCC ID VPYLB1JS955 This transmitter must not be co located or operated in conjunction with any other antenna or transmitter This equipment complies with FCC radiation exposure limits set forth for an...

Страница 5: ...any health problems are associated with using low power wireless devices There is no proof however that these low power wireless devices are absolutely safe Low power Wireless devices emit low levels...

Страница 6: ...etal objects Do not disassemble remodel heat or throw into fire If any electrolyte should come into contact with your hands or clothes wash it off thoroughly with water If any electrolyte should come...

Страница 7: ...noise adversely affecting the pictures and or sound Recorded data may be damaged or pictures may be distorted by strong magnetic fields created by speakers or large motors Electromagnetic wave radiati...

Страница 8: ...he card may be damaged or lost due to electromagnetic waves static electricity or breakdown of the camera or the card We recommend storing important data on a PC etc Do not format the card on your PC...

Страница 9: ...ket Recording 41 Live View Composite Recording 43 Image Stabilizer 44 Recording Motion Pictures 46 Creative Video Mode 49 Playback Playing Back Pictures 52 Playing Back Motion Pictures 52 Deleting Ima...

Страница 10: ...oisture water or dust Splash Resistant does not guarantee that damage will not occur if this camera is subjected to direct contact with water In order to minimize the possibility of damage please be s...

Страница 11: ...le lens H FS12060 For U S A only If accessories are lost customers can visit us at http shop panasonic com support for further information about obtaining replacement parts For Canada only If any acce...

Страница 12: ...h only Keep the memory card out of reach of children to prevent swallowing SD Memory Card 512 MB to 2 GB This unit is compatible with UHS I UHS II UHS Speed Class 3 standard SDHC SDXC memory cards Ope...

Страница 13: ...est version To check the firmware version of the interchangeable lens attach it to the camera body and select Version Disp in the Setup menu To view the latest information on the firmware or to downlo...

Страница 14: ...Lamp 13 Motion picture button P46 14 Mode dial P27 15 Flash 16 Hot shoe Hot shoe cover P16 Keep the hot shoe cover out of reach of children to prevent swallowing 17 Stereo microphone Be careful not to...

Страница 15: ...tton P30 Fn2 button P30 Delete button P53 Cancel button P29 46 DISP button 47 Battery door P18 48 DC coupler cover When using an AC adaptor ensure that the Panasonic DC coupler DMW DCC8 optional and A...

Страница 16: ...by arrow 2 while pressing it in the direction indicated by arrow 1 Quick Start Guide Check that the camera is turned off Attach the shoulder strap when using the camera to prevent it from dropping H...

Страница 17: ...may vary depending on how the battery has been used The charging time for the battery in hot cold environments or a battery that has not been used for a long time may be longer than normal 1 Connect...

Страница 18: ...ct Being careful about the battery orientation insert all the way until you hear a locking sound and then check that it is locked by lever A To remove Push the lever A in the direction of the arrow to...

Страница 19: ...d 4 Insert the AC adaptor supplied into the power outlet Charge the battery using the camera Charging time Approx 180 min Use the products supplied with the camera for charging The battery inserted in...

Страница 20: ...outlet for power saving You can also charge the battery by connecting a USB device PC etc and the camera with the USB connection cable supplied In that case charging may take a while Do not use any o...

Страница 21: ...traight out Turn the camera off and wait for the LUMIX display on the monitor to clear before removing the card Change lenses where there is not a lot of dirt or dust Do not press the lens release but...

Страница 22: ...ET 5 Press 2 1 to select the items year month day hour minute and press 3 4 to set 6 Press MENU SET to set 7 When The clock setting has been completed is displayed press MENU SET 8 When Please set the...

Страница 23: ...mode dial to 2 Hold the camera gently with both hands keep your arms still at your side and stand with your feet slightly apart Do not cover the flash A AF Assist lamp B microphone C or speaker D wit...

Страница 24: ...n flashes 4 Press the shutter button fully push it in further and take the picture Free angle shooting The monitor can be rotated to suit your needs This is convenient as it allows you to take picture...

Страница 25: ...d playback Rotating Selects an item or numeric value This is expressed as follows in this document When rotating the control dial to the left or right Rotating Selects an item or numeric value This ow...

Страница 26: ...als while the guide is displayed 4 Press MENU SET and set You can also complete this step by performing either of the operations below Press the shutter button halfway Press the Fn button Mode dial Fr...

Страница 27: ...e The shutter speed is automatically determined by the aperture value you set Shutter Priority AE Mode The aperture value is automatically determined by the shutter speed you set Manual Exposure Mode...

Страница 28: ...consumption set Power Save LVF Shooting in Economy Touch To touch and release the touch screen Drag A movement without releasing the touch screen Pinch enlarge reduce On the touch screen spread pinch...

Страница 29: ...e next screen by rotating the rear dial 6 Press 3 4 of the cursor button to select the setting and press MENU SET Depending on the menu item its setting may not appear or it may be displayed in a diff...

Страница 30: ...n button settings select Restore to Default Select Off when not setting a function in the Fn button Fn button settings at the time of purchase Custom Operation Fn Button Set Setting in REC mode Settin...

Страница 31: ...n press MENU SET Intelligent Auto menu Intelligent Auto Intelligent Auto Mode allows you to adjust some settings such as the brightness and color tone while also using for other settings so that you c...

Страница 32: ...press Fn2 on the blurriness setting screen Setting brightness 1 Press 2 Rotate the rear dial to adjust brightness In the Custom Operation menu Exposure Comp Disp Setting you can change the functions...

Страница 33: ...he shutter button halfway The recording screen will be displayed Button operation Touch operation Description of operation 3 4 2 1 Dragging Moves the enlarged area Pinching out in Enlarges reduces the...

Страница 34: ...the drive mode dial to P34 2 Select the recording method Single When the shutter button is pressed only one picture is recorded Burst Recordings are made in succession while the shutter button is pre...

Страница 35: ...er button is pressed and held Press the button fully slightly in advance Recording starts approximately 0 5 seconds after it has been pressed fully A Press and hold B Recording is performed 4K Burst S...

Страница 36: ...layback screen and press 3 If the image was recorded with 4K Pre Burst proceed to step 3 2 Drag the slide bar to make a rough selection of scenes Touching allows you to switch to the marker operation...

Страница 37: ...arkers may not be set by the Auto Marking function depending on the recording conditions and the status of subjects The camera is moving because of panning or jitter The movement of a subject is slow...

Страница 38: ...allows you to take 4K burst pictures while shifting the focus to different areas After taking these pictures you can select the desired focus area This function is suited for recording still objects...

Страница 39: ...ne adjust the focus by dragging the slide bar during enlarged display You can also perform the same operation by pressing 2 1 3 Touch to save the picture The picture will be saved in JPEG format When...

Страница 40: ...cking Auto Merging Automatically selects pictures that are suited to be merged and merges them into a single picture Priority will be given to pictures with closer focus Perform the focus stacking and...

Страница 41: ...becomes slightly narrower when pictures are merged Pictures may be merged into an unnatural picture in the following cases When the subject moves during recording When the distance between subjects i...

Страница 42: ...ith an interval of 1 EV Sequence Sets the order in which pictures are taken Single Shot Setting 1 Takes one picture each time you press the shutter button Takes all the pictures set to be taken when y...

Страница 43: ...kground 1 Set the mode dial to M 2 Rotate the rear dial to set the shutter speed to LC 3 Select the menu 4 Select the exposure time per frame shutter speed This can be set in a range of 1 2 SEC to 60...

Страница 44: ...n your lens The icon for the currently activated image stabilizer is displayed on the recording screen We recommend using a tripod or the Shutter Remote Control DMW RS2 optional for Live View Composit...

Страница 45: ...stabilization function requires that the focal length be set to match the attached lens Set the focal length in accordance as prompted by the message This can also be set using the menu P46 Applicable...

Страница 46: ...n pictures may become narrower I S Lock Video Allows you to enhance the image stabilization effect during motion picture recording ON OFF This effect works only during recording is displayed on the re...

Страница 47: ...B but the motion picture file will be divided MP4 motion pictures with a Rec Quality size of FHD or HD You can continue recording without interruption even if the continuous recording time exceeds 30...

Страница 48: ...24p 1920k1080 24p 24 frames second 24 Mbps Item Size Recording frame rate Sensor output Bit rate 4K 100M 30p 2 3840k2160 30p 30 frames second 100 Mbps 4K 100M 24p 2 3840k2160 24p 24 frames second 100...

Страница 49: ...touch icons allows silent operation while recording motion pictures When using an interchangeable lens that supports power zoom electronic zoom 4 Press the motion picture button or shutter button aga...

Страница 50: ...cording The angle of view becomes narrower 1 Set the mode dial to 2 Select the menu Settings Frame rate for recording Rec Quality for storage Slow motion effect 120fps FHD 120 frames second FHD 20M 30...

Страница 51: ...hanging the position and size of a crop frame Press 2 while the recording screen is displayed and perform steps 3 and 4 To cancel 4K Live Cropping recording Set to OFF in 4K Live Cropping in step 2 Bu...

Страница 52: ...laying Back Motion Pictures This unit was designed to play motion pictures using the AVCHD and MP4 formats Select an icon indicated with and then press 3 to play it back A Motion picture recording tim...

Страница 53: ...ect Delete Multi or Delete All and then press MENU SET After selecting Delete All if you select Delete All Non rating you can delete all pictures except for those with ratings When Delete Multi is sel...

Страница 54: ...ideo Exposure Mode P49 High Speed Video P49 4K Live Cropping P50 Custom Mode Scene Guide Scene Switch Creative Control Filter Effect Simultaneous Record w o Filter Rec Aspect Ratio P56 Flash Self Time...

Страница 55: ...ton Expo Meter Exposure Comp Reset ISO Displayed Setting MF Guide Exposure Comp Disp Setting LVF Monitor Disp Set Focus Release Shutter Q MENU Monitor Info Disp AF AE Lock Dial Set Rec Area AF AE Lock...

Страница 56: ...ss Connection Lamp USB Power Supply Demo Mode Beep TV Connection Approved Regulations Headphone Volume Language Format P23 Economy Version Disp My Menu My Menu Setting Playback Slide Show 4K PHOTO Bul...

Страница 57: ...16 9 L 14 5M 5184k2920 M 10M 3712k2784 M 8M 3840k2160 S 5M 2624k1968 S 2M 1920k1080 3 2 L 17M 5184k3456 1 1 L 14 5M 3888k3888 M 9M 3712k2480 M 7 5M 2784k2784 S 4 5M 2624k1752 S 3 5M 1968k1968 Quality...

Страница 58: ...e D Monochrome effect that creates a dynamic impression with enhanced highlights and shadows Scenery An effect appropriate for sceneries with vivid blue skies and greens Portrait An effect appropriate...

Страница 59: ...and the darkness in the picture Sharpness r The picture is sharply defined s The picture is softly focused Noise Reduction r The noise reduction effect is enhanced Picture resolution may deteriorate s...

Страница 60: ...ound e g person in spotlight on stage backlighting Silent Mode Rec Silent Mode Audio from the speaker will be muted and the flash and the AF Assist lamp will be disabled The following settings are fix...

Страница 61: ...set to MP4 Settings 0 255 16 255 This will be fixed at 16 255 when the Rec Format is AVCHD The setting is fixed at 0 255 in the following cases When taking pictures including picture taking during mo...

Страница 62: ...ing Playback RAW Processing White Balance Highlight Noise Reduction Brightness correction Shadow i Resolution Photo Style Saturation Color Tone Sharpness i Dynamic Filter Effect More Settings P63 Cont...

Страница 63: ...Reinstate Adjustments Returns the settings to the ones you used during the recording Color Space Allows you to select a Color Space setting from sRGB or Adobe RGB Picture Size Allows you to select the...

Страница 64: ...ore frames for combining Reselect Discards the frame selected immediately before and lets you select a different image 3 Repeat steps 1 and 2 to select more frames to combine You can select 3 to 40 fr...

Страница 65: ...to as the Wi Fi button By default Wi Fi is assigned to Fn4 when the camera is in Recording Mode while it is assigned to Fn1 when the camera is in Playback Mode For information about the Fn button refe...

Страница 66: ...a sent and received via radio waves may be intercepted by a third party Do not use the camera in areas with magnetic fields static electricity or interference Do not use the camera in areas with magne...

Страница 67: ...type of smartphone being used Refer to the support site below for details about the Image App https panasonic jp support global cs dsc This Site is English only When downloading the app on a mobile n...

Страница 68: ...a enable to be registered list Bluetooth connection between the camera and the smartphone will be made For Android devices A Wi Fi connection will be made by selecting Connection Connecting to a Smart...

Страница 69: ...th 3 Select the camera device name you want to connect to from the Camera registered list End Bluetooth Connection To terminate the Bluetooth connection turn off the Bluetooth function of the camera E...

Страница 70: ...mera 3 Start Image App When the connection confirmation screen is displayed on the camera select Yes to connect For first time connection only Connecting to a Smartphone Wi Fi connection Connecting Wi...

Страница 71: ...the SSID displayed on the camera 3 Enter the password displayed on the camera into the smartphone For first time connection only 4 Start Image App 1 Set the camera to Recording Mode Press the shutter...

Страница 72: ...t to make a Wi Fi connection automatically iOS devices Depending on the connection status of the smartphone you may need to change the connected device on the Wi Fi setup screen Follow the on screen m...

Страница 73: ...en connected via Bluetooth Select Remote operation iOS devices If you need to change the connected device on the Wi Fi setup screen follow the on screen message to change the setting 1 Select 2 Record...

Страница 74: ...lay back the image 2 Touch the image to enlarge it When you play a motion picture image quality differs from that of the actual recorded motion picture The image quality may deteriorate or the sound m...

Страница 75: ...e to edit RAW format images Edited images can be saved in a format JPEG TIFF etc that can be displayed on a personal computer For details on how to use the SILKYPIX Developer Studio refer to the Help...

Страница 76: ...cording mode P46 Photo Style P58 Flash Mode Flash Extra Tele Conversion when recording motion pictures Recording format Recording quality P47 Snap Movie Aspect Ratio P56 Picture size P57 Extra Tele Co...

Страница 77: ...ogram AFS AFF AFC MF AFS BKT AFL LOW STAR 3 Name 2 Number of days that have passed since the departure date 3 Age 2 Location 3 Current date and time Travel destination setting 3 Exposure meter Focal d...

Страница 78: ...2 98 Number of recordable pictures r20 Maximum number of pictures that can be taken continuously Available recording time 1 BKT AWB AWBc AWBw 1 1 R 8m30s 6 Touch tab Touch zoom Touch Shutter Touch AF...

Страница 79: ...e Flash Mode Flash AWB 0 0 0 Fn 98 ISO AUTO OFF L 4 3 AFS AFS 1 60 F3 5 C1 1 EXPS EXPS ISO AUTO 0 0 WL 3 Single Burst 4K Photo P34 Post Focus P38 Self timer Focus Mode P32 AF Mode A Quality P57 Aspect...

Страница 80: ...omputer is low The battery is drained Charge the battery P17 If the problem is not resolved it may be improved by selecting Reset on the Setup menu When I shake the camera I hear a rattling sound When...

Страница 81: ...the lens and not the subject The shutter speed will become slower and the stabilizer function may not work properly when recording in dark places In these cases use a tripod and the self timer when r...

Страница 82: ...s not a malfunction When using a large capacity card you may not be able to record for a while after turning on the camera Recording motion picture using the SD card requires an SD card of a supported...

Страница 83: ...tion error is displayed If you place the camera on a metal table or shelf the radio waves may be adversely affected In such cases you may not be able to establish a connection Move the camera away fro...

Страница 84: ...mit after dividing the motion picture with Video Divide It may take longer time to transmit when distance to the wireless access point is far Transmit closer to the wireless access point File format o...

Страница 85: ...060 is used 2 3 W When playing back with Monitor When the Interchangeable lens H FS12060 is used Type Type Digital Single Lens Mirrorless camera Recording media SD Memory Card SDHC Memory Card SDXC Me...

Страница 86: ...etting is 1 1 2880k2880 pixels 4K photo 3888k3888 pixels L 2784k2784 pixels M 1968k1968 pixels S Image quality for pictures Fine Standard RAWiFine RAWiStandard RAW Recording format for motion picture...

Страница 87: ...en Extended ISO is set 100 to 25600 Image stabilizer Image stabilizer type Compliant with Image sensor shift type 5 axis stabilizer Dual I S 2 Image stabilizer effect 5 0 stops Based on the CIPA stand...

Страница 88: ...by Panasonic Minimum illumination Approx 9 lx when i Low light is used the shutter speed is 1 30 of a second When the Interchangeable lens H FS12060 is used Flash Flash Built in pop up flash GN 9 0 e...

Страница 89: ...SCH FRAN AIS ESPA OL PORTUGU S ITALIANO Interface USB USB 2 0 High Speed Micro B HDMI micro HDMI Type D REMOTE 2 5 mm jack MIC 3 5 mm jack Headphones 3 5 mm jack Splash Resistant Yes Dimensions Mass D...

Страница 90: ...umidity 10 RH to 80 RH Wi Fi Compliance standard IEEE 802 11b g n standard wireless LAN protocol Frequency range used central frequency 2412 MHz to 2462 MHz 1 to 11 ch Encryption method Wi Fi complian...

Страница 91: ...m aperture value F22 Angle of view 84x Wide to 20x Tele In focus distance Wide 0 20 m 0 66 feet to Tele 0 25 m 0 82 feet to from the focus distance reference line Maximum image magnification 0 27k 35...

Страница 92: ...es and or model numbers may vary between countries Consult your local dealer For lens related optional accessories such as compatible lenses and filters refer to catalogs Web pages etc For U S A only...

Страница 93: ...nd or 5 open source software other than the software licensed under the GPL V2 0 and or LGPL V2 1 The software categorized as 3 5 are distributed in the hope that it will be useful but WITHOUT ANY WAR...

Страница 94: ...This warranty only applies to products purchased and serviced in the United States This warranty is extended only to the original purchaser of a new product which was not sold as is Mail In Service On...

Страница 95: ...rized Servicer or damage that is attributable to acts of God THERE ARE NO EXPRESS WARRANTIES EXCEPT AS LISTED UNDER LIMITED WARRANTY COVERAGE THE WARRANTOR IS NOT LIABLE FOR INCIDENTAL OR CONSEQUENTIA...

Страница 96: ...96 Others DVQX1749 ENG PARTS AND SERVICE WHICH ARE NOT COVERED BY THIS LIMITED WARRANTY ARE YOUR RESPONSIBILITY As of July 2015 DC G95PP DVQX1749_eng book 96...

Страница 97: ...efund will be made by Panasonic Canada Inc This warranty is given only to the original purchaser or the person for whom it was purchased as a gift of a Panasonic brand product mentioned above sold by...

Страница 98: ...nety 90 days from date of original purchase THIS EXPRESS LIMITED WARRANTY IS IN LIEU OF ALL OTHER WARRANTIES EXPRESS OR IMPLIED INCLUDING ANY IMPLIED WARRANTIES OF MERCHANTABILITY AND FITNESS FOR A PA...

Страница 99: ...ol are trademarks of Dolby Laboratories HDAVI Control is a trademark of Panasonic Corporation Adobe is a trademark or registered trademark of Adobe Systems Incorporated in the United States and or oth...

Страница 100: ...ks or trademarks of the manufacturers who developed the system or product concerned This product is licensed under the AVC Patent Portfolio License for the personal use of a consumer or other uses in...

Отзывы: