background image

7. Convert PowerPoint data to still/moving images 

17 

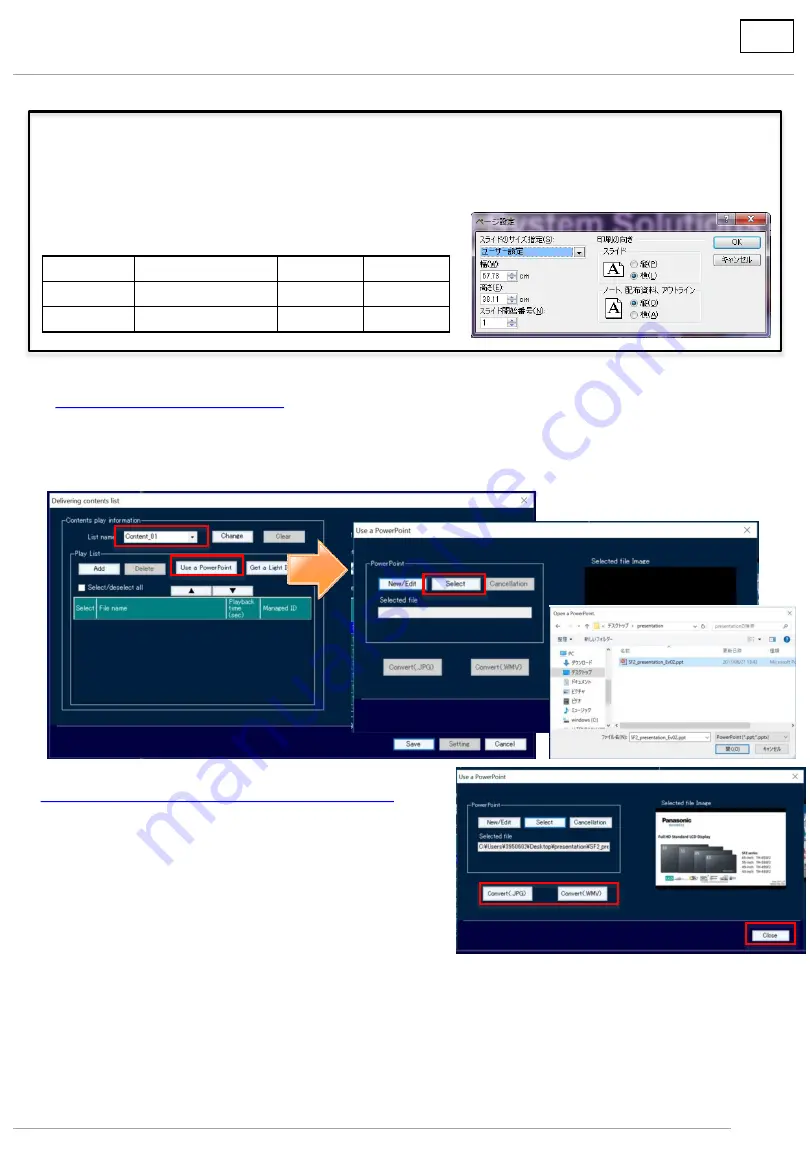
1. Import PowerPoint data. 

(1) Select [Content list name] to save the converted PowerPoint data. 
(2) Click [Use a PowerPoint]. 
(3) Click [Select], select the PowerPoint data to be converted, and click [Open]. 

*  Compatible with Microsoft PowerPoint 2010/2013. 

*  Depending on settings, resolution may be lost when converting from PowerPoint, so we recommend that you configure these 

settings beforehand. 

*  These settings are for PowerPoint 2010. Depending on the version, the size may be slightly different. In that case, please fine-tune 

the width and height. 

   Start PowerPoint and open [Design] 

 [Page Setup]. In the case of  

Configure the settings as follows.


Configure PowerPoint page settings in advance! 

Slide size 

Slide size settings (S) 

Width (W) 

Height (E) 

16:9 

User setting 

67.73cm 

38.11cm 

4:3 

User setting 

50.80cm 

38.10cm 

Files created with PowerPoint can be converted to still or moving images and delivered as content. 

(Caution) If there is a PowerPoint file being edited, please save it in advance. 


2. Convert the imported PowerPoint data. 

(1)   To convert to a still image: Click [Convert (.JPG)]. 

To convert to a moving image: Click [Convert (.WMV)]. 

(2)   When conversion is completed, a [Process complete] message 

will be displayed under the image. 

(3)   Click [Close] to close the screen. 
(4)   The converted data will be displayed on the content list. 

Click [Save] to save to USB memory. 

 
Even when not saving to USB memory, click [Save] to save the content list. 
(The explorer screen will open, but close it without performing any operations.) 
 
* When converting to still images, animation effects, etc. will be discarded. 
* When converting to moving images, conversion may take time depending on set conditions such as animation effects, 

number of slides, etc.


(1) 

(2) 

(3) 

(1) 

(3) 

Содержание LFE Series

Страница 1: ...USB Media Player User Guide Ver 1 0 ...

Страница 2: ...ration HUB B Save content scenario files on the USB memory and play You can set play duration and order of each content as you choose 6 2 Set date time of delivery playback and deliver For both Single and Multi Playback Page 15 7 Convert PowerPoint data to still moving images Page 17 8 Light ID setting SF1H series only Page 18 1 Compatible Models Page 3 2 Supported devices and formats Page 4 3 Lim...

Страница 3: ... TH 55LF8 TH 42LF80 TH 49LF80 TH 55LF80 LFV Series TH 55LFV6 TH 55LFV60 TH 55LFV70 2 VF Series TH 55VF1H AF Series 2 TH 42AF1J TH 49AF1J TH 55AF1J 1 Main microcomputer versions of 2 02 and later on displays are compatible with the LFE series Refer to the website about how to verify the version https panasonic net cns prodisplays download software multi 2 AF series and TH 55LFV70 are not compatible...

Страница 4: ...g on the type of a USB memory device it may come in contact with the periphery such as a back cover and cannot be attached Use a commercially sold extension cable or use a small type of a USB memory device connectable to this unit Only jpg files except progressive JPEG can be used for still images when using multiple monitoring control software Extension Codec Video Audio avi MPEG4 AVC H 264 MPEG ...

Страница 5: ...r less supported Limitation Audio Codec Sampling frequency kHz Bit rate kbps MP3 8 10 025 12 16 22 05 24 32 44 1 48 8 320 WMA Standard 32 384 WMA 9 32 384 WMA 10 Pro 32 384 LPCM 64 1536 Corresponding quantization bit 8 16 24 32 AAC 8 1440 HE AAC 8 256 Maximum size per one file is 2 GB Some files may not be played back even if their formats are supported as described here Files protected by Digital...

Страница 6: ...etween video files Adjust Plays with a black image approx 2 seconds inserted at the joint between video files Depending on format some moving image files may not make correct transitions between files In this case set to Adjust 3 Resume play Factory setting is On On When the media player finishes by being switched off the content playing at the finish time will be played next time it is switched o...

Страница 7: ...mory using a computer Files are played in alphanumerical order in the USB memory Smaller number bigger number alphabetical order When the portrait setting please check direction of rotation for using display before create the content Save the content in the root directory e g E and not in a folder 2 Insert USB memory into display 1 Insert USB memory with content saved into the USB port on the disp...

Страница 8: ...ate MMCS 3 Right click on Group and display the menu 4 Select Content list editing and delivery 5 Select Content list editing Download from here https panasonic net cns prodisplays download software index html 2 Create the content list Save the content on a computer beforehand 1 Select the content list name Maximum of 50 content lists can be created List names can be arbitrarily changed Within 16 ...

Страница 9: ... or button 5 Insert USB memory and use 5 6 7 3 Save content list on USB memory 1 Set the USB memory on which content is to be saved in the USB port of the computer 2 Click Save and select a device of your choice 3 A message will appear when saving is completed 5 Insert USB memory in main display 1 Insert the USB memory on which the content is saved in the USB port on the display 2 Change to USB in...

Страница 10: ...d 3 LAN set up Factory setting is as the right figure shows When using an existing network set up the LAN on this screen The display to be connected and the computer operated should be in the same network 4 Network status This screen is to confirm the network settings Check 1 LAN cable Use LAN cables compatible with CAT5 and later Note that LAN cables compatible with CAT5e and later are necessary ...

Страница 11: ...lti Monitoring Control Software MMCS from the Website and install it on the computer 2 Activate MMCS Download from here https panasonic net cns prodisplays download software index html 5 Register the display 1 Click File 2 Click Create New Device Device creation screen will appear After MMCS is activated it will take a little time before Create New Device becomes active 3 Enter the IP address to b...

Страница 12: ... the explorer opens select the folder in which the content was saved 6 Select the content you want to play More than one content item can be selected at a time 7 Click Open 8 Selected content will be displayed in the play list 9 Set up the play time for one content Still images Set up within from 3 86 400 sec Moving images The play time for the moving image is displayed 10 Set up the playing order...

Страница 13: ...Registered content lists can be selected from the pull down menu 2 Set Playback mode setting Single Playback No synchronous play on each display Multi Playback Synchronous play on each display Select Single playback at this time 3 Click Delivery 4 When delivery is completed a successful message will appear on the bottom of the screen When it fails an error message will appear The maximum number of...

Страница 14: ...ay on each display Select Multi Playback at this time 3 Under Parent put a check the display that will be the parent Content changes according to the play duration of the parent display 4 Select Group number Set the display for synchronized playback to the same group 5 Click Deliver 6 When delivery is completed a successful message will appear on the bottom of the screen When it fails an error mes...

Страница 15: ...tent list is large it takes time to deliver We recommend you to set an earlier time calculating back from the time you want to start playback 4 In the control settings select Delivering content list 5 On the device list setting screen set the content list to be delivered and the play mode 6 Click OK when setting is completed A maximum of 100 lists can be set on the schedule 6 Deliver content on US...

Страница 16: ...ct USB 10 Click OK when the setting is completed The schedule setting screen will be displayed Click Close to close the screen The set schedule can be verified on the Option Schedule List screen When delivering and configuring operational settings according to schedule please keep the computer s power turned on The display s should be set to Network Standby mode Off with the remote control 6 Deliv...

Страница 17: ...ht E 16 9 User setting 67 73cm 38 11cm 4 3 User setting 50 80cm 38 10cm Files created with PowerPoint can be converted to still or moving images and delivered as content Caution If there is a PowerPoint file being edited please save it in advance 2 Convert the imported PowerPoint data 1 To convert to a still image Click Convert JPG To convert to a moving image Click Convert WMV 2 When conversion i...

Страница 18: ...ion tab 3 Select Get a Light ID and Import bin data on MMCS 4 Input the password HEXKEY obtained from LinkRay portal site or administrator for light ID 5 Imported Managed ID of the Light ID will be displayed on the screen 2 3 4 5 A separate contract for a Light ID license requiring a fee must be concluded to configure a Light ID system ...

Страница 19: ... When using Light ID Multi playback is not possible 1 Right click on Group or registered device number and display the menu 2 Click Content list editing and delivery and the following message will appear When you have necessary data into the USB memory click Cancel and save the data beforehand 3 Click Content list editing 4 Select the name of the content list 5 Select Managed ID linked to contents...

Страница 20: ... for Professional Displays https panasonic net cns prodisplays Video introducing our professional displays https www youtube com user PanasonicProDisplay Panasonic Corporation Connected Solutions Company June 2017_Ver 1 ...

Отзывы: