Phonebook
13
Using the phonebook
The phonebook allows you to make calls
without having to dial manually. You can
add 100 names and phone numbers to the
phonebook and search for phonebook
entries by name.
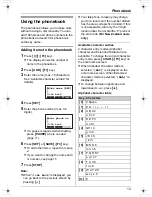
Adding items to the phonebook
1
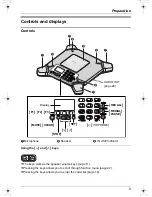
Press
{k}
(
{
F3
}
key).
L
The display shows the number of
items in the phonebook.
2
Press
{
ADD
}
(
{
F1
}
key).
3
Enter the name (max. 16 characters.
See “Available character entries” for
details).
4
Press
{
SET
}
.
5
Enter the phone number (max. 32
digits).
L
If a pause is required when dialling,
press
{
PAUSE
}
where needed
(page 11).
6
Press
{
SET
}
or
{
SAVE
}
(
{
F3
}
key).
L
To add other items, repeat from step
2.
L
If you want to change the name and/
or number, see page 15.
7
Press
{
STOP
}
.
Note:
L
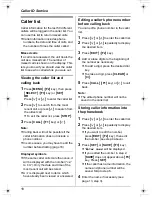
When “
>
=Go back
” is displayed, you
can go back to the previous screen by
pressing
{
>
}
.
L
Your telephone company may charge
you for a local call if the number dialled
has the area code prefix included. If this
is unacceptable, dial only the 7-digit
local number. Do not dial the “0” prefix or
the area code
(For New Zealand users
only)
.
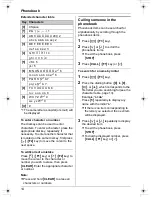
Available character entries
2 character entry modes (Alphabet
character and Extended character) are
available. To change the current character
entry mode, press
{
CHAR.
}
(
{
F3
}
key) on
the enter name screen.
L
When Alphabet character mode is
selected, “
[ABC]
” is displayed on the
enter name screen. When Extended
character mode is selected, “
[AÄÅ]
” is
displayed.
L
To change between uppercase and
lowercase (A
→
a), press
{*}
.
Alphabet character table
Enter name [ABC]
CHAR.
>
=Go back
Enter phone no.
>
=Go back
Key Characters
{
0
}
0 Space
{
1
}
# & ’ ( )
@
, – . / 1
{
2
}
A B C 2
a b c 2
{
3
}
D E F 3
d e f 3
{
4
}
GH I 4
g h i 4
{
5
}
J K L 5
j k l 5
{
6
}
M N O 6
m n o 6
{
7
}
P Q R S 7
p q r s 7
{
8
}
T U V 8
t u v 8
{
9
}
W X Y Z 9
w x y z 9
{#}
#
TS730AZ.book 13 ページ 2005年11月9日 水曜日 午後4時34分

