Panasonic KX-TG6311 Скачать руководство пользователя страница 3

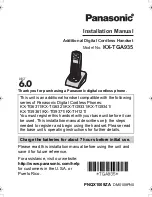
For assistance, please visit http://www.panasonic.com/help

3

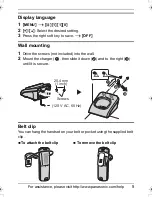
Battery installation and battery charge

Important:

L

Use the supplied rechargeable batteries (Part No. HHR-65AAABU).

L

When installing the batteries:
– Wipe the battery ends (

S

T

) with a dry cloth.

– Avoid touching the battery ends (

S

T

) or the unit contacts.

– Ensure correct polarities (

S

T

).

L

When replacing the batteries:
– USE ONLY rechargeable Ni-MH batteries AAA (R03) size.
– Do NOT use Alkaline/Manganese/Ni-Cd batteries.
– We recommend using the Panasonic rechargeable batteries noted 

in the base unit’s operating instructions for replacement battery 
information.

1

 Release the battery cover 

latch and lift the cover open.

2

 Insert the batteries negative 

(

T

) end first.

Place the handset on  
the charger for about  
7 hours before initial  
use.

5

Fasten the battery  
cover latch.

4

Close the handset  
cover.

3

TGA935(e).fm  Page 3  Tuesday, January 15, 2008  7:47 PM

Содержание KX-TG6311

Страница 1: ...owing series of Panasonic Digital Cordless Phones KX TG6311 KX TG6321 KX TG9331 KX TG9341 KX TG9361 KX TG9371 KX TH1211 You must register this handset with your base unit before it can be used This in...

Страница 2: ...nd support information LTo order additional replacement accessories call 1 800 332 5368 LTTY users hearing or speech impaired users can call 1 866 605 1277 Connection Note LUse only the supplied Panas...

Страница 3: ...polarities S T LWhen replacing the batteries USE ONLY rechargeable Ni MH batteries AAA R03 size Do NOT use Alkaline Manganese Ni Cd batteries We recommend using the Panasonic rechargeable batteries no...

Страница 4: ...d hold LOCATOR for 4 seconds until the registration tone sounds LIf all registered handsets start ringing press the same button to stop Then repeat this step LThe next step should be completed within...

Страница 5: ...ft key to save i OFF Wall mounting 1 Drive the screws not included into the wall 2 Mount the charger A then slide it down B and to the right C until it is secure Belt clip You can hang the handset on...

Страница 6: ...re etc resulting in a fire LUnplug the product from power outlets if it emits smoke an abnormal smell or makes an unusual noise These conditions can cause fire or electric shock Confirm that smoke has...

Страница 7: ...ies provided with or identified for use with this product only in accordance with the instructions and limitations specified in this manual LOnly use a compatible base unit or charger to charge the ba...

Страница 8: ...charger is not designed to be splash resistant Do not place the handset on the base unit charger if the handset is wet Drop resistance handset only The handset is designed to be drop resistant howeve...

Страница 9: ...its for a Class B digital device pursuant to Part 15 of the FCC Rules These limits are designed to provide reasonable protection against harmful interference in a residential installation This equipme...

Страница 10: ...ay not comply and must be avoided Notice LFCC ID can be found inside the battery compartment or on the bottom of the unit Notice L L LThis product is designed for use in the United States of America S...

Страница 11: ...tely insured LDo not send your unit to Panasonic Consumer Electronics Company listed below or to executive or regional sales offices These locations do not repair consumer products Panasonic Consumer...

Отзывы: