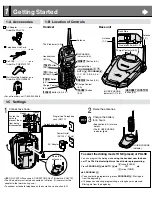
background image

Getting Started

1

1-A Accessories

To select the dialing mode TONE (preset) or PULSE

You can program the dialing mode 

using the handset near the base

unit

The TALK indicator light must be off before programming.

(#)

twice (PULSE)

Press 

PROGRAM 

á

\

AUTO 

Ü

\

OR

\

(*)

twice (TONE)

\

PROGRAM 

á

.

To cancel during programming, press 

PROGRAM 

á

. Start again

from the beginning.

If 3 beeps sound during programming, a wrong key was pressed. 
Start again from the beginning.

1-C Settings

1-B Location of Controls

Handset

Base unit

AC Adaptor ....................one
Order No. PQLV1Z

Telephone Line Cord

.......................................one

Belt Clip .........................one
Order No. PQKE10127Z1

For extra orders, call 1-800-332-5368.

USE ONLY WITH Panasonic AC ADAPTOR PQLV1 (Order No. PQLV1Z).

The AC adaptor must remain connected at all times. (It is normal for the
adaptor to feel warm during use.)

To connect a standard telephone on the same line, see section 6-G.

2

Raise the antennas.

3

Charge the battery
for 6 hours.

See section 6-A for more
details.

The IN USE/CHARGE

indicator lights.

1

Connect as shown.

Back Side

Antenna 
(1-C) 

Antenna
(1-C) 

Cradle Lock Switch (1-D)

(HANDSETÒLOCATOR)


Button (5-E)

Charge Contacts (6-A)

IN USE/CHARGE 
Indicator (1-C, 5-E)

TALK

4

PAUS

E

PAUSE

FLAS

H

FLASH

TON

E

TONE

7

8

9

0

CH

CH

REDIAL

REDIAL

1

2

3

5

6

AUTO

PROGRAM

DIRE

CT

DIRECT

LOUD 

LOUD 

RINGE

R

RINGER

ON

OF

F

Navigator Key 

(

LOUD/RINGER

     ,     ,     

AUTO      , PROGRAM


   ) 

(1-C, 2-A, 2-B, 3-A, 4-A, 
5-F)

TALK Indicator (2-A)

RECHARGE 
Indicator (6-A)

Antenna

(FLASH)

 Button (5-A, 5-F) 

(TONE)

 Button 

(5-C) 

(TALK)

 Button 

(2-A) 

Charge Contact 
(6-A)

Charge Contact 
(6-A)

(CH)

 (Channel) 

Button (2-A) 

Headset Jack 
(6-C)

(PAUSE)

 Button 

(5-D)

(REDIAL)

 Button (2-A)

(DIRECT)

 Button (4-A)

IN USE/CHARGE
Indicator 

AC Adaptor

Telephone Line Cord

Power Outlet 
(AC 120 V, 60 Hz)

Raise the
antennas.

Fasten the 
cords to 
prevent them 
from being 
disconnected.

Single-Line Telephone 
Jack (RJ11C)

Hooks

Hooks

STOP

Wall Mounting Adaptor ..one
Order No. PQKL10038Z3

Содержание KX-TG2403B

Страница 1: ...ico ONLY When you ship the product Carefully pack your unit preferably in the original carton Attach a letter detailing the symptom to the outside of the carton Symptom Send the unit to an authorized servicenter prepaid and adequately insured Do not send your unit to the Panasonic Consumer Electronics Company listed below or to executive or regional sales offices These locations do not repair cons...

Страница 2: ...phone on the same line see section 6 G 2 Raise the antennas 3 Charge the battery for 6 hours See section 6 A for more details The IN USE CHARGE indicator lights 1 Connect as shown Back Side Antenna 1 C Antenna 1 C Cradle Lock Switch 1 D HANDSETÒLOCATOR Button 5 E Charge Contacts 6 A IN USE CHARGE Indicator 1 C 5 E TALK 4 PAUSE PAUSE FLASH FLASH TONE TONE 7 8 9 0 CH CH REDIAL REDIAL 1 2 3 5 6 AUTO ...

Страница 3: ... can also answer a call by pressing any dialing button 0 to 9 or Any Key Talk OR If on the base unit just lift up 2 B Answering Calls 2 A Making Calls 1 Press TALK The TALK indicator lights If an alarm tone sounds see 6 F 2 Dial a phone number 3 To hang up press TALK or place the handset on the base unit The indicator light goes out For best operating performance see section 6 D This unit can be m...

Страница 4: ...ts misdialing when you redial or dial a stored number Pressing PAUSE more than once increases the length of the pause between numbers 5 E Handset Locator You can locate the handset or page the handset user with beep tones 1 Press HANDSETÒLOCATOR on the base unit The IN USE CHARGE indicator flashes and the handset beeps for 1 minute 2 To stop paging press HANDSETÒLOCATOR again or press TALK twice o...

Страница 5: ...s optional such as call waiting Selecting the flash time The flash time depends on your telephone exchange or host PBX You can select the following flash times 90 100 110 250 300 400 600 700 msec milliseconds using the handset near the base unit Your phone comes from the factory set to 700 msec The TALK indicator light must be off before programming Press PROGRAM á AUTO Ü FLASH 1 90 msec 2 100 mse...

Страница 6: ...se dust or high humidity Otherwise the battery may not charge properly If the battery is fully charged you do not have to place the handset on the base unit until the RECHARGE indicator flashes This will maximize the battery life The battery cannot be overcharged 1 Carefully insert a flat metal object in the slot and push forward to release the lock Remove the cover 2 Replace the battery Place the...

Страница 7: ...oes not work An alarm tone sounds Static sound cuts in out fades Interference from other electrical units The unit does not ring While storing a phone number the unit starts to ring You cannot store a phone number in memory Previously programmed information is erased You cannot redial by pressing REDIAL HANDSET LOCATOR does not function The RECHARGE indicator flashes or the unit beeps intermittent...

Страница 8: ...ante 1 minuto Para detener la localización presione de nuevo HANDSET LOCATOR o presione dos veces TALK en la unidad portátil Número de teléfono hasta 22 dígitos Número de estación Número de estación Número de teléfono hasta 22 dígitos Cuando el indicador RECHARGE parpadee o la unidad emita pitidos intermitentemente cargue la batería Para hacer llamadas Presione TALK Marque un número de teléfono Pa...

Отзывы: