


8
For assistance, please visit http://shop.panasonic.com/support
Getting Started
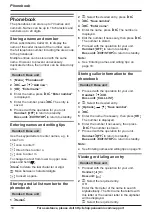
Charger
1
Connect the AC adaptor to the unit by
pressing the plug firmly.
2
Fasten the cord by hooking it.
3
Connect the AC adaptor to the power outlet.
Note:
Use only the supplied AC adaptor
AT-332A-060045A or MN0063-L060040.
Battery installation
1
Press down at
1
.
2
Slide the handset cover
2
.
3
Insert the batteries, then close the handset
cover.
● USE ONLY the supplied GPI International Ltd
.
rechargeable Ni-MH batteries 55AAAHC (
A
).
● Do NOT use alkaline/manganese/Ni-Cd
batteries.
● Confirm correct polarities.
Setting up
Connections
Base unit
1
Connect the AC adaptor to the unit by
pressing the plug firmly.
2
Connect the telephone line cord to the unit
until you hear a click.
3
Fasten the AC adaptor cord and the telephone
line cord by hooking it.
4
Connect the AC adaptor to the power outlet.
5
Connect the telephone line cord to the
single-line telephone jack (RJ11C) until
you hear a click.
6
A DSL/ADSL filter (not supplied) is required if
you have a DSL/ADSL service.
7
Connect the corded handset cord to the corded
handset and the base unit until you hear a click.
Note:
Use only the supplied AC adaptor
AT-332A-060045A or MN0063-L060040.
1
2
A
+
–
+
–
7
7
5
6
4
SERIAL NO.
LINE
USE SPECIFIED ADAPTOR
ONLY
6V DC
DESK STAND
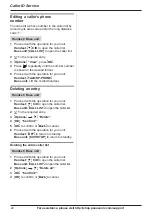
1
2
3
3
3
Hook
USE SPECIFIED AC ADAPTOR
ONLY
6 V DC
1
2
3
Hook