background image

10

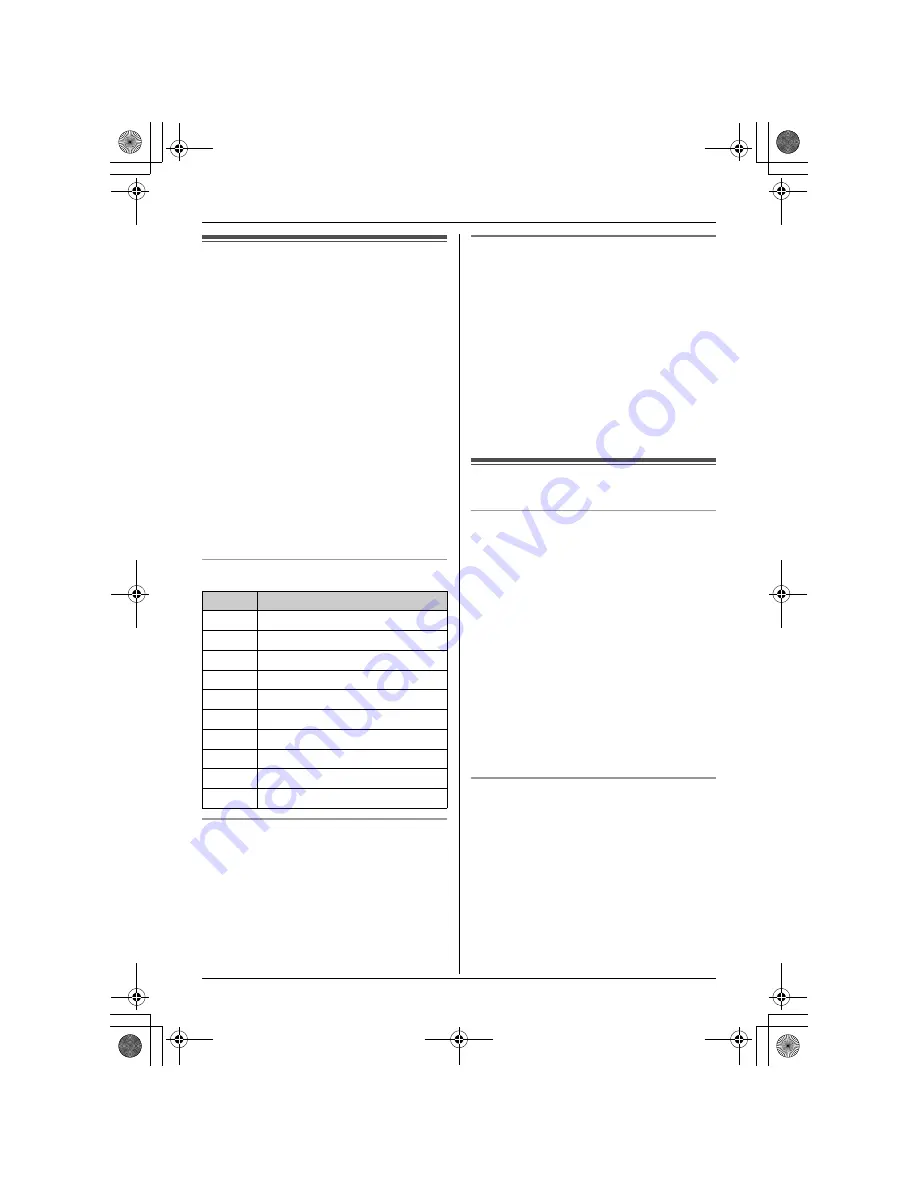
Phonebook

 Phonebook

Adding entries to the 
phonebook

The phonebook allows you to make calls 
without having to dial manually. You can add 
50 names and phone numbers to the 
phonebook.

1

{j

/OK

}

 2 times

2

Enter the party’s phone number (24 digits 
max.). 

i


{j

/OK

}

3

Enter the party’s name (9 characters 
max.). 

i


{j

/OK

}


i


{ih}

Note:

L

When caller information is received and it 
matches a phone number stored in the 
unit’s phonebook, the stored name will be 
displayed.

Character table

To edit/correct a mistake

1

Press 

{<}

 or 

{>}

 to move the cursor to 

the right of where you want to correct the 
number/character.

2

{

C

}


i

 Enter the correct number/

character.

Making calls/Editing/Erasing

1

{k}


i

 Press 

{e}

 or 

{v}

 to display 

the desired entry.

2

 Making calls:

{C}

 Editing:

{>}


i

 “

EDIT

” 

i


{>}


i

 Edit the 

phone number. 

i


{j

/OK

}


i

 Edit 

the name. 

i


{j

/OK

}

 Erasing:

{>}


i

 “

CLEAR

” 

i


{>}


i

 “

YES

” 

i


{>}


i


{ih}

Hot key (quick dial)

Assigning an entry in the phonebook to a 
hot key

Dial keys 

{

1

}

 to 

{

9

}

 can each be used as a 

“hot key”, allowing you to dial a number from 
the phonebook by simply pressing a dial 
key.

1

{k}


i

 Press 

{e}

 or 

{v}

 to display 

the desired entry. 

i


{j

/OK

}

2

HOT KEY REG

” 

i


{>}

3

Select the desired dial key. 

i


{>}

L

If the dial key is already assigned as a 
hot key, the displayed number will 
flash.

4

YES

” 

i


{>}


i


{ih}

Making calls/Erasing

1

Press and hold the desired hot key (

{

1

}

 to 

{

9

}

).

2

 Making calls:

{C}

 Erasing:

{>}

 2 times 

i

 “

YES

” 

i


{>}


i


{ih}

Keys

Characters

{

1

}

#

[

]

*

,

/

1

{

2

}

A

B

C 2

{

3

}

D E

F

3

{

4

}

G H I

4

{

5

}

J

K

L

5

{

6

}

M N O 6

{

7

}

P

Q R S

7

{

8

}

T

U V

8

{

9

}

W X

Y

Z

9

{

0

}

(Space)

0

TG1100_1102FX(e-e).book  Page 10  Wednesday, February 15, 2006  11:42 AM

Содержание KX-TG1100FX

Страница 1: ... Caller ID Please read these operating instructions before using the unit and save them for future reference You must subscribe to Caller ID service to use this feature Operating Instructions Model No KX TG1100FX KX TG1102FX Digital Cordless Phone KX TG1100 Charge the batteries for about 7 hours before initial use TG1100_1102FX e e book Page 1 Wednesday February 15 2006 11 42 AM ...

Страница 2: ... of Radio Telecommunications Terminal Equipment R TTE Directive 1999 5 EC Declarations of Conformity for the relevant Panasonic products described in this manual are available for download by visiting http www doc panasonic de Contact Panasonic Services Europe a Division of Panasonic Marketing Europe GmbH Panasonic Testing Centre Winsbergring 15 22525 Hamburg Germany Your phone Note L The handsets...

Страница 3: ...P03P L We cannot be responsible for any damage to the unit or degradation of performance which may occur from using non Panasonic rechargeable batteries No Accessory items Quantity KX TG1100 KX TG1102 1 AC adaptor for base unit Part No PQLV19CE 1 1 2 Telephone line cord 1 1 3 Rechargeable batteries AAA R03 size Part No HHR 55AAAB or HHR 4EPT 2 4 4 Handset cover 1 1 2 5 Charger Part No PQLV30018 1 ...

Страница 4: ... the AC outlet is installed near the unit and is easily accessible Warning L To prevent the risk of electrical shock do not expose this product to rain or any other type of moisture L Unplug this unit from power outlets if it emits smoke an abnormal smell or makes unusual noise These conditions can cause fire or electric shock Confirm that smoke has stopped and contact an authorised service centre...

Страница 5: ... details of your nearest designated collection point Penalties may be applicable for incorrect disposal of this waste in accordance with national legislation For business users in the European Union If you wish to discard electrical and electronic equipment please contact your dealer or supplier for further information Information on Disposal in other Countries outside the European Union This symb...

Страница 6: ...r batteries not to reach full capacity at the initial charge Maximum battery performance is reached after a few complete cycles of charge discharge use L Actual battery performance depends on a combination of how often the handset is in use and how often it is not in use standby L Even after the handset is fully charged the handset can be left on the base unit or charger without any ill effect on ...

Страница 7: ... F G I J H N LINE B A Icons Meaning w Within range of base unit 0w4 Out of range no registration or no power on base unit x Paging intercom mode or accessing base unit k Making or answering a call C Phonebook mode l Setting mode 5 Battery strength Call bar is on page 11 Direct call is on page 11 Key lock is on page 9 Ringer volume is off page 11 Displayed when you press If BS NO is selected for st...

Страница 8: ...ce 1 j OK 2 Press e or v to select SETTING BS i i 3 3 Enter base unit PIN default 0000 L If you forget your PIN see page 18 4 1 5 Select the desired setting by pressing 1 for tone dialling mode or 2 for pulse dialling mode 6 i ih Date and time 1 j OK 2 Press e or v to select SETTING BS i i 3 Enter the current hour and minute 24 hour time entry L If you make a mistake press C Digits will be cleared...

Страница 9: ...ccess touch tone services e g telephone banking services 1 Make a call 2 Press when prompted to enter your code or PIN then press the appropriate dial keys L The dialling mode will return to pulse when you hang up Redial functions Redialling Storing Editing before calling Erasing 1 R i Press e or v to select the desired number 2 Redialling C Storing i SAVE TEL NO i i j OK i Enter the name 9 charac...

Страница 10: ... k i Press e or v to display the desired entry 2 Making calls C Editing i EDIT i i Edit the phone number i j OK i Edit the name i j OK Erasing i CLEAR i i YES i i ih Hot key quick dial Assigning an entry in the phonebook to a hot key Dial keys 1 to 9 can each be used as a hot key allowing you to dial a number from the phonebook by simply pressing a dial key 1 k i Press e or v to display the desire...

Страница 11: ...RM Change alarm frequency OFF RINGER OPT RINGER VOL Handset ringer volume level 6 EXT RINGER Ringer type for external calls RING TYPE 1 INT RINGER Ringer type for internal calls RING TYPE 1 PAGING Ringer type for page RING TYPE 1 ALARM Ringer type for alarm RING TYPE 1 TONE OPT KEY TONE Keytones on off ON CALL WAITING Call waiting tone on off ON RANGE ALARM Range alarm on off OFF BATTERY LOW Batte...

Страница 12: ...is displayed 3 Enter the desired code number Follow the instructions in the Feature column of the chart L To exit the operation press ih OTHER OPT HSPIN CHANGE Change handset PIN 0000 4 Enter the current 4 digit handset PIN 2 Enter the new 4 digit handset PIN Enter the new 4 digit handset PIN again AUTO TALK Auto talk on off OFF 5 RESET HS Reset handset to its default settings Follow steps 1 2 and...

Страница 13: ...git base unit PIN 2 Enter the new 4 digit base unit PIN Enter the new 4 digit base unit PIN again 6 Call restriction 5 Setting call restriction Enter base unit PIN default 0000 2 i Press the desired handset numbers i Enter the phone number to be restricted 8 digits max L To select a different memory location press and enter a number Turning on off call restriction Enter base unit PIN default 0000 ...

Страница 14: ...nformation after a few rings follow these instructions to set DTMF mode 1 j OK 2 SETTING BS i i 3 3 Enter base unit PIN default 0000 L If you forget your PIN see page 18 4 4 5 Select DTMF mode by pressing 2 6 i ih L To cancel DTMF mode press 1 in step 5 Storing Editing Erasing 1 Press e or v to display the desired entry i 2 Storing SAVE TEL NO i i j OK i Enter the party s name 9 characters max pag...

Страница 15: ...ndset 2 1 Handset 1 During an outside call press INT i Press 2 desired handset number L The outside call will be put on hold L If there is no answer press INT to return to the outside call 2 Handset 2 Press C to answer the page L Handset 2 can talk with handset 1 3 Handset 1 To complete the call transfer press ih To establish a conference call press 3 Transferring a call without speaking to the ot...

Страница 16: ...ources such as antennas and mobile phones L The handset registration is cancelled Register the handset to the base unit using the following method 1 j OK 2 SETTING HS i 3 REGISTRATION i 4 REGISTER HS i 5 Press and hold x on the base unit for about 5 seconds L If all registered handsets start ringing press x to stop then start again from step 1 L The rest of the procedure must be completed within 1...

Страница 17: ... again Static sound cuts in out fades Interference from other electrical units L Place the handset and the base unit away from other electrical appliances L Move closer to the base unit L Your unit is connected to a telephone line with DSL service We recommend connecting a filter contact your DSL service provider to the telephone line between the base unit and the telephone line jack Noise is hear...

Страница 18: ...it and the telephone line jack I cannot remember the PIN L Change the PIN using the following method Handset PIN 1 j OK 2 SETTING HS i 3 OTHER OPT i 4 HSPIN CHANGE i 5 Press 7 0 0 0 6 Enter the new 4 digit handset PIN 7 Enter the new 4 digit handset PIN again 8 ih Base unit PIN 1 j OK 2 SETTING BS i 3 Press 5 4 Press 7 0 0 0 5 Enter the new 4 digit base unit PIN 6 Enter the new 4 digit base unit P...

Страница 19: ... W Operating conditions 5 C 40 C 20 80 relative air humidity dry Dimensions Base unit Approx 58 mm 123 mm 115 mm Handset Approx 143 mm 48 mm 32 mm Charger 1 Approx 60 mm 86 mm 84 mm Mass weight Base unit Approx 180 g Handset Approx 120 g Charger 1 Approx 120 g 1 KX TG1102 only Note L Specifications are subject to change L The illustrations used in these operating instructions may differ slightly f...

Страница 20: ...righted by Panasonic Communications Co Ltd and may be reproduced for internal use only All other reproduction in whole or in part is prohibited without the written consent of Panasonic Communications Co Ltd 2006 Panasonic Communications Co Ltd All Rights Reserved PQQX15249ZA DC0206DU0 TG1100_1102FX e e book Page 20 Wednesday February 15 2006 11 42 AM ...

Отзывы: