background image

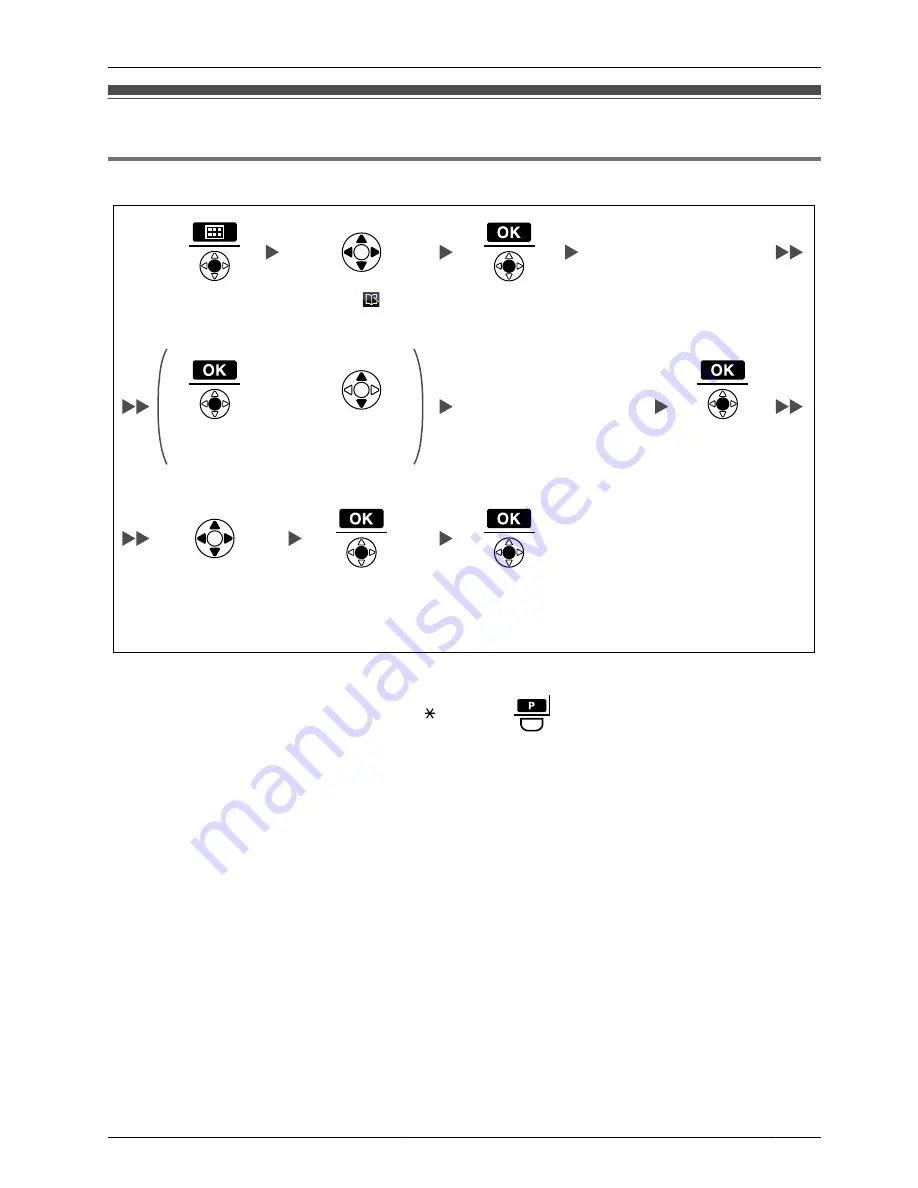
Storing an Item in the Handset Phonebook

Storing a New Item

Enter 

name.

(max. 16 characters)

OR

Enter 

phone number

.

(max. 32 digits)

Select the desired 

category number


(1-9) or 

"Off"

.

Press 

Up 

or 

Down

.

Select 

"


New 

Phonebook"

.

Press 

Centre

.

Press 

Centre


for "

Save

".

Press 

Centre

.

Press 

Centre

.

Press 

Centre

.

Press 

Centre

.

To enter characters, see page 55.

The valid digits are "0" through "9", " ", "#", "P (

)".

When storing an outside phone number, you should first store a line access number.

45

Using the Handset Phonebook

Содержание KX-TCA175

Страница 1: ...table Station Please read this manual carefully before using this product and save this manual for future use Please use only the battery provided and charge the battery for about 7 hours before using the handset for the first time Note In this manual the suffix of each model number is omitted unless necessary ...

Страница 2: ...off while Ringing 15 Adjusting the Receiver Speaker Headset Volume 16 Display 17 Soft Keys 18 Operation Outline 20 Function Menus 21 Function Keys 22 Flexible Keys 24 Operation 25 Making Calls 25 Searching for an item stored in the Phonebook 29 Receiving Calls 33 Caller ID 34 During a Conversation 35 Useful Features 37 Making Use of the Voice Mail Service 42 Using the Handset Phonebook 44 Handset ...

Страница 3: ...ored Items 58 Deleting Stored Items in Handset Phonebook Hot Key Dial Outgoing Call Log Incoming Call Log 58 Handset Phonebook 58 Hot Key Dial 59 Outgoing Call Log 60 Incoming Call Log 60 Configuring Handset Settings 61 Changing the Initial Settings 61 Handset Setting Menu Layout 62 Memo Alarm Setting 72 Troubleshooting and Error Messages 75 Troubleshooting 75 Error Messages 77 Important Informati...

Страница 4: ...tructions For System Requirements see page 86 Accessories included AC adaptor 1 Charger 1 Part No For KX TCA175CE users PQLV219CE For KX TCA175UK users PQLV219E For KX TCA175AL users PQLV219AL Battery 3 Belt Clip 1 Battery Cover 1 Part No HHR 4EPT 4 Before Initial Use Before Initial Use ...

Страница 5: ...ected Fasten the AC adaptor cord to the cord holder Use only the included Panasonic AC adaptor For KX TCA175CE users Part No PQLV219CE For KX TCA175UK users Part No PQLV219E For KX TCA175AL users Part No PQLV219AL WARNING To reduce the risk of fire or electric shock do not overload AC outlets and extension cords Do not bundle the charger s AC adaptor cord with the power cords of machines located n...

Страница 6: ... screw size is M4 x 20 2 Mount the charger securely on the wall When you print out this page for wall mounting purposes the printed output distance may deviate slightly from the indicated measurement In this case use the measurement indicated When mounting the charger ensure that the correct screws are used for the type of wall Make sure that the wall that the charger will be attached to is strong...

Страница 7: ...ing the Belt Clip You can attach the handset to your belt by following the steps below To attach Insert the clip into the designated notches in the handset To remove Remove the belt clip 7 Before Initial Use ...

Страница 8: ...See page 57 Manual Password or Auto Password for Key lock type See Key Option on page 65 Reset Handset See Other Option on page 71 Select Setting Handset Select Other Option Enter new password 1 2 4 digits 0 9 Press Centre Press Centre Press Centre Press Centre Select Change Password Verify new password 1 To avoid unauthorised access to this product Set a password that is random and cannot be easi...

Страница 9: ...f the key confirms a selection Back View P F A Ringer Charger Indicator B Receiver C Headset Jack D TALK SP PHONE Speakerphone Used to make or answer calls or toggle between the Receiver Hands free 1 mode during a conversation E HOLD Used to place a call on Hold F Strap holes Used to attach phone straps and similar items G Message Used to leave a message waiting indication or to call back the part...

Страница 10: ...exit the Phonebook or Function mode or turn the handset on or off M Navigator Key Used to adjust the ringer receiver volume or move the cursor to select an item Pressing down the centre of the key confirms a selection N TRANSFER CLEAR Used to transfer a call to another party or to clear digits or characters O INTERCOM Used to make or answer intercom calls P Speaker 1 You can talk with the other pa...

Страница 11: ... Password for Key lock type you need to enter the password for unlocking If no password has been set you cannot select Manual Password or Auto Password for Key lock type To set the password see Setting the Password on page 8 Power Save Mode Power Save Mode turns off the ringer LCD backlight or key backlight automatically after a set number of seconds has passed while receiving calls To adjust powe...

Страница 12: ... Language Select Setting Handset Press Centre Press Centre 1 You can select Auto or one of the 16 languages below When set to Auto the language settings of the PBX will be used The display language of both the handset and PBX can be selected and both should be set to the same language For more information refer to the user documentation for your PBX 12 Before Operating the Handset ...

Страница 13: ...andset is in standby mode Select Setting Handset Select Display Option Select Standby Display Select Edit Enter name max 16 characters Press Centre Press Centre Press Centre Press Centre Press Centre Press Centre To enter characters see page 55 13 Before Operating the Handset ...

Страница 14: ... Setting Handset Select Key Option Select the desired Flexible Key Enter name max 12 characters Select Flex Key Name Select the desired base Base 1 4 Press Centre Press Centre Press Centre Press Centre Press Centre Press Centre Press Centre To enter characters see page 55 14 Before Operating the Handset ...

Страница 15: ...receiving a call To adjust the ringer volume Press Up or Down to adjust the volume 1 To turn the ringer off OR Press Centre Press CANCEL 1 The adjusted volume level will also be used for subsequent calls If you attach the headset while receiving an incoming call the ring from the handset does not switch to the headset If you attach the headset before receiving an incoming call and headset tone is ...

Страница 16: ...ing the Receiver Speaker Headset Volume During a conversation Press Up or Down to adjust the volume Receiver Volume Level 1 5 Speaker Volume Level 1 6 Headset Volume Level 1 5 16 Before Operating the Handset ...

Страница 17: ...r Do Not Disturb See page 37 Call Forwarding See page 37 Ringer Volume Off See page 15 Date and Time Display Soft Keys For more information see page 18 Extension Number and Name To edit the standby display name see page 13 Incoming Call Log Status 1 See Battery Information on page 78 Example images of the display in this manual are samples only and the actual screen on your phone may vary in colou...

Страница 18: ...ok Turns the ringer off Opens the PBX Extension Phonebook Opens the main menu Pressing this key for more than 2 seconds locks all keys Displays the caller information stored in the Handset Phonebook while receiving a call Returns to the previous display Displays the caller information stored in the system while receiving a call Opens the list menu edit delete in the Phonebook etc Establishes a mul...

Страница 19: ... entry mode Pressing this key switches to Alphabetic character entry mode Displayed when it is possible to use an arrow key to make a selection Displays the Outgoing Call Log Displayed when the corresponding soft key has no function Displays the last dialled number Opens the Incoming Call Log Used for System Personal Speed Dialling Opens the Incoming Call Log Group Used to set clear the Auto Answe...

Страница 20: ...ain Menu Handset Phonebook Incoming Call Log 2 Outgoing Call Log PBX System Phonebook PBX Extension Phonebook Incoming Call Log Group Function Keys In standby mode 1 Flexible Keys 1 You can select whether the guidance display is shown or not See Display Option on page 68 2 Pressing the Navigator Key displays the phone number The selected item changes colour 20 Before Operating the Handset ...

Страница 21: ...es the Setting Handset settings PBX Program Enters PBX Personal Programming mode For PBX Personal Programming refer to the user documentation for your PBX Press to exit from PBX Personal Programming mode Memo Alarm Accesses the Memo Alarm settings Sub Menu While Off hook During a Conversation Phonebook Opens the Phonebook New Phonebook Stores a new item in the Phonebook Outgoing Log Enters the Out...

Страница 22: ...e A Ans is displayed in standby mode 5 Conference Establishes a multiple party conversation 6 Pause Inserts a dialling pause 7 H S Phonebook Makes a call using the Handset Phonebook 8 PBX Phonebook Makes a call using the PBX System Phonebook 9 EXT Phonebook Makes a call using the PBX Extension Phonebook 0 PBX Program Enters PBX Personal Programming mode Press to exit PBX Personal Programming mode ...

Страница 23: ...onebook Fwd DND PBX Phonebook Flash Recall EXT Phonebook Auto Answer PBX Program Conference Incoming Log Pause Outgoing Log For operation see page 25 To edit the function key list see Key Option on page 65 23 Before Operating the Handset ...

Страница 24: ...ll on this line An outside call is coming in on a single extension flashing slowly You have a call on hold on this line Red on This line is in use by someone else flashing rapidly You have an incoming call on this line An outside call is coming in on multiple extensions simultaneously flashing slowly Someone has a call on hold on this line No colour This line is idle 1 The meanings of these colour...

Страница 25: ...tside Phone No OR Outside Line Group No Using Flexible Keys OR idle Flexible Key No 0 9 idle Flexible Key Outside Phone No Using the Outgoing Call Log 1 Using the Incoming Call Log Using the Incoming Call Log Group Incoming Call Log Group No Using the Handset Phonebook 2 Name 3 OR if required 25 Operation Operation ...

Страница 26: ...k 2 Name 3 OR if required One touch Dialling To store Flexible Key Desired No OR PBX Program To dial One touch Dialling key Hot Key Dialling 4 To dial Press the dialling key assigned as a Hot Key for more than 1 second OR Press a Hot Key No 0 9 for a set number of seconds 5 if required 26 Operation ...

Страница 27: ...k ring Outside Phone No 1 When a call is made using the PBX System Phonebook the called party s name is not stored in the Outgoing Call Log To log the name as well as the number copy the item into the Handset Phonebook before dialling it See page 50 2 To store an item in the Phonebook see page 45 To search for an item stored in the Phonebook see page 29 3 This step can be omitted 4 To assign a pho...

Страница 28: ... entire number while predialling press for more than 1 second If an outside call is received from a phone number stored in the Handset Phonebook the number and name of the caller will be displayed in the call log To cancel dialling press If flashes move closer to the CS and dial again For more information refer to the user documentation for your PBX 28 Operation ...

Страница 29: ...n repeatedly Searching by name or first character s of name Press Up or Down Press the left soft key Enter name or the first character s of the desired name OR Select the desired item if required Press Centre Searching using first characters of name to narrow down items Press the left soft key Enter the first characters of the desired name 1 Select the desired item if required Press Centre 29 Oper...

Страница 30: ...ding names appear as the characters are entered 2 This step can be omitted To enter characters see page 55 While an item is displayed you can Return to the Enter Name display by pressing then search for another item Search for another item by pressing the dial key that corresponds to the letter you are searching for If there is no entry that corresponds to the letter you selected the next entry wi...

Страница 31: ...ame OR Press the left soft key Press Up or Down Select the desired item if required Press Centre To enter characters see page 55 While an item is displayed you can Return to the Enter Name display by pressing then search for another item Search for another item by pressing the dial key that corresponds to the letter you are searching for If there is no entry that corresponds to the letter you sele...

Страница 32: ...name OR Press the left soft key Press the left soft key Press Up or Down Select the desired item if required Press Centre To enter characters see page 55 While an item is displayed you can Return to the Enter Name display by pressing then search for another item Search for another item by pressing the dial key that corresponds to the letter you are searching for If there is no entry that correspon...

Страница 33: ...d Group Extension No Group No 2 digits You can also answer a call using the following features Any Key Answer See Answer Option on page 65 Quick Answer See Answer Option on page 65 Auto Answer See Answer Option on page 65 You can select the ringer pattern and LED pattern for each type of incoming call See Incoming Option on page 64 For more information refer to the user documentation for your PBX ...

Страница 34: ...PBX and in the handset for the same caller you can choose which information will be displayed on the handset Caller information stored in the PBX is displayed by default See Display Option on page 68 If you set the handset to display the caller information stored in the handset caller information stored in the PBX will only be displayed if the caller information is not stored in the handset When r...

Страница 35: ...ding To hold Regular Hold To hold Exclusive Call Hold To retrieve a call An Intercom Call An Outside Call slowly flashing Flexible Key OR slowly flashing Flexible Key 0 9 Three party Conference To add another party during a conversation Talk to the new party Talk with multiple parties Desired Phone No To leave a conference 35 Operation ...

Страница 36: ...epends on the Call Hold mode Regular Hold Exclusive Call Hold Ask your manager what the current mode is To hold several outside calls you need to assign Flexible Keys Single Line Loop Line Trunk Group as necessary beforehand For more information refer to the user documentation for your PBX 36 Operation ...

Страница 37: ...el Your Extension No Follow Me Follow Me Cancel Intercom Calls Both Calls Outside Calls Do Not Disturb Both Calls Set Cancel Outside Calls Intercom Calls Sending a Call Waiting Tone 1 While hearing a busy tone Wait for an answer Call Waiting To set cancel for intercom calls No Call Tone To set cancel for outside calls No Tone Tone 37 Operation ...

Страница 38: ...terminate the current status To hold and then talk to the new party rapidly flashing Flexible Key OR OR Disregard this step if both parties are extensions rapidly flashing Flexible Key 0 9 Paging To page Paging Group No 2 digits Announce Wait for an answer To answer 38 Operation ...

Страница 39: ... Day In a Meeting Enter required no 2 To cancel Log in Log out ICD Group Incoming Call Distribution Group Specified ICD Group Extension No All For Log in For Log out Extension Feature Clear Extension Dial Lock 3 To lock To unlock Extension PIN max 10 digits PIN Personal Identification Number 39 Operation ...

Страница 40: ...has set the Data Line Security feature 2 Enter the desired value in the positions You must enter the correct number of characters as represented by the using 0 to 9 or To change the default messages and create your personal messages Message no 9 refer to the documentation for your PBX 3 If you do not set an extension PIN you cannot lock and unlock your extension For more information refer to the u...

Страница 41: ...To clear message waiting indications one touch operation One touch dialling key For more information refer to the user documentation for your PBX 41 Operation ...

Страница 42: ...es End Call KX TVP series Listen to Message Deliver Message Check Mailbox Distribution Automated Attendant Mailbox Management Other Features End Call VPS Extension No Mailbox Password 1 If you have no password you can skip the last step VPS Voice Processing System From someone else s extension VPS Extension No Mailbox No Mailbox Password 1 If you have no password you can skip the last step 42 Oper...

Страница 43: ...no password you can skip the last step From your own extension Mailbox Password 1 From someone else s extension Mailbox No Mailbox Password 1 During Playback Repeat Voice Guidance Exit Menu 1 For more information on the Mailbox Password refer to the user documentation for the VPS Some feature access numbers may vary depending on the market Please consult your local dealer for details 43 Operation ...

Страница 44: ... copy of your Handset Phonebook in case data becomes unrecoverable due to product malfunction Private Ring You can organise entries in the Phonebook into one of 9 Private Ring Categories It is possible to set a different ringer pattern and LED pattern 1 for each category When the displayed Caller ID 2 matches a phone number or name stored in the Phonebook the handset rings according to the Private...

Страница 45: ...desired category number 1 9 or Off Press Up or Down Select New Phonebook Press Centre Press Centre for Save Press Centre Press Centre Press Centre Press Centre To enter characters see page 55 The valid digits are 0 through 9 P When storing an outside phone number you should first store a line access number 45 Using the Handset Phonebook ...

Страница 46: ...re Press Centre Press Centre Press Centre Press Centre for Save 1 This step can be omitted To enter characters see page 55 To search for an item in the Phonebook see page 29 The valid digits are 0 through 9 P To change a character or digit press the Navigator Key or to highlight it press to delete it then enter the new character or digit To clear an entire line press for more than 1 second To move...

Страница 47: ... max 32 digits Enter name max 16 characters Select the desired category number 1 9 or Off OR Edit phone number max 32 digits if required Press Up or Down Press Centre Press Centre Press Centre Press Centre Press Centre for Save 47 Using the Handset Phonebook ...

Страница 48: ...Save Phonebook Press Centre Press Centre Press Centre for Save 1 Press to confirm each entry name max 16 characters phone number max 32 digits When storing an outside phone number the line access number will be stored automatically The line access number must be identical to the handset s Line Access CD setting See Other Option on page 71 48 Using the Handset Phonebook ...

Страница 49: ...s Up or Down Press the right soft key Press Centre Press Centre for Save Press Centre 1 Press to confirm each entry name max 16 characters phone number max 32 digits When storing an outside phone number the line access number will be stored automatically The line access number must be identical to the handset s Line Access CD setting See Other Option on page 71 49 Using the Handset Phonebook ...

Страница 50: ...category number 1 9 or Off 2 Select Save Phonebook Press Up or Down Select the desired item if required Press Centre Press Centre Press Centre Press Centre for Save 1 This step can be omitted 2 Press to confirm each entry name max 16 characters phone number max 32 digits To search for an item in the Phonebook see page 29 50 Using the Handset Phonebook ...

Страница 51: ...nd select the category number 1 9 or Off 2 Select Save Phonebook Press Up or Down Select the desired item if required Press Centre Press Centre Press Centre Press Centre for Save 1 This step can be omitted 2 Press to confirm each entry name max 16 characters phone number max 32 digits To search for an item in the Phonebook see page 29 51 Using the Handset Phonebook ...

Страница 52: ...n the Handset Phonebook Select Category Name Select the desired category number 1 9 Enter name max 13 characters Select Display Option Select Setting Handset Press Centre Press Centre Press Centre Press Centre Press Centre Press Centre 52 Using the Handset Phonebook ...

Страница 53: ...Select a blank hot key number 0 9 Select the desired item if required OR Press Up or Down Press Centre Press Centre Press Centre Press Centre Press Centre Press Centre for Save 1 This step can be omitted To search for an item in the Phonebook see page 29 A will be displayed next to hot key numbers that have a Phonebook item registered to them 53 Using the Handset Phonebook ...

Страница 54: ...d Hot Key Select the desired item Select one of the following Manual Auto Select Automatic Call Press the dialling key for more than 1 second Press Centre Press Centre Press Centre To select the number of seconds before the call is automatically made see Key Option on page 65 54 Using the Handset Phonebook ...

Страница 55: ...he right soft key Alphabetic Numeric Greek Extended 2 Extended 1 Example To enter Anne in Alphabet Mode To switch between uppercase and lowercase press To enter a character located on the same dialling key as the previous character move the cursor by pressing the Navigator Key then enter the desired character If you enter a different character by mistake press the Navigator Key or to highlight the...

Страница 56: ... 2 3 4 5 6 7 8 9 0 Press before or after entering a character to change between uppercase and lowercase Pressing a key repeatedly will cycle through the characters associated with that key For example to enter the letter C in Alphabet Mode press 3 times 56 Using the Handset Phonebook ...

Страница 57: ...y for more than 2 seconds Locked Unlocking the Handset Phonebook Press the left soft key for more than 2 seconds Enter your password 1 You can view the Phonebook and use it to make calls Press CANCEL Unlocked Unlocking the Handset Phonebook Temporarily Press the left soft key for less than 2 seconds Enter your password 1 You can view the Phonebook and use it to make calls Press CANCEL Still locked...

Страница 58: ...R Enter name 1 Select Delete 2 Select Yes Press Up or Down Select the desired item if required Press Centre Press Centre Press Centre Press Centre Press Centre 1 This step can be omitted 2 Select Delete All if you want to delete all items To search for an item in the Phonebook see page 29 58 Deleting Stored Items Deleting Stored Items ...

Страница 59: ...ing key for more than 1 second Select Yes Press Centre Press Centre Press Centre 1 Select Delete All if you want to delete all items If you delete a Phonebook item that you also assigned to a Hot Key the Hot Key Dial is also deleted See page 53 59 Deleting Stored Items ...

Страница 60: ...esired item Select Delete Select Yes Press Centre Press Centre Press Centre Incoming Call Log Press the right soft key Select the desired item Select Delete Select Yes Press the right soft key Press Centre Press Centre Press Centre 60 Deleting Stored Items ...

Страница 61: ...ng Handset Select the desired main item Select the desired sub item Follow the setting Press Centre Press Centre Press Centre Press Centre Press Centre To return to the previous menu item press To cancel press at any time The handset will beep to indicate that the new settings have been saved 61 Configuring Handset Settings Configuring Handset Settings ...

Страница 62: ... Volume Headset Volume Headset Mic Vol Talk On Charger Headset Button Answer Option Any Key Answer Quick Answer Auto Answer Auto Ans Delay Key Option Flex Key Name Function Key Soft Key Edit Soft Key Name Key Lock Type Auto Lock Time Hot Key Time Display Option Language Backlight LCD Contrast Standby Display Category Name Guidance Date Time Form Caller ID Disp 62 Configuring Handset Settings ...

Страница 63: ...ur Scheme Tone Option Key Tone Range Alarm System Option Register H S Cancel Base Select Base System Lock Change PIN Other Option Change Password Line Access CD Reset Handset 63 Configuring Handset Settings ...

Страница 64: ...le a handset is set on the charger 1 On On Off Memo Alarm Ringer Pattern Selects the ringer pattern for each Memo Alarm Bell 1 10 Bell 1 Melody 1 10 LED Pattern Selects the LED pattern for each Memo Alarm Red Green Green Orange R G O Power Save Power Save Time Selects the number of seconds before automatically turning off the Power Save Items below when receiving a call 0 s 60 s 30 s Power Save It...

Страница 65: ... conversation Mute Mute Terminate 1 For details regarding compatible headsets consult your dealer Answer Option Sub Item Description Setting Default Any Key Answer Answers a call by pressing any dialling key On Off Off Quick Answer Answers a call while the phone is charging by just lifting up a handset from the charger On Off Off Auto Answer Selects the types of calls that can be answered by Auto ...

Страница 66: ...Log Incoming LogGrp Outgoing Log None 1 Soft Key Edit Softkey Left Softkey Right Edits the soft keys Standby Talking Default Not stored Flexible Key Function Key Hot Key Dial 2 Soft Key Name Softkey Left Softkey Right Edits the names of the soft keys Standby Talking Max 5 characters Not stored Key Lock Type Selects the type of key lock Manual Manual Manual Password 3 4 Auto Auto Password 3 4 Auto ...

Страница 67: ...and held 1 s 20 s 2 s 1 Used to cancel the settings 2 Displayed only when Standby is selected 3 To avoid unauthorised access to this product Set a password that is random and cannot be easily guessed Change the password regularly 4 If no password has been set you cannot select Manual Password or Auto Password for Key lock type 67 Configuring Handset Settings ...

Страница 68: ...3 Standby Display Selects what is shown on the display while in standby mode 1 Handset Number Handset Number Base H S No Edit Edits the name displayed on the LCD while in standby mode Max 16 characters 4 digits Not stored Category Name Edits the names of the categories Max 13 characters x Category 1 9 Not stored Guidance Selects whether the guidance display is shown or not in standby mode On On Of...

Страница 69: ...e Handset Phonebook or the PBX can be displayed H S Phonebook PBX Setting PBX Setting Colour Scheme Selects the colour scheme of the LCD Dark Dark Light 1 If an extension name is stored in the PBX the extension name is displayed when Handset Number or Base H S No is selected Depending on the number of characters stored for the extension name the end of the extension name may not be displayed 2 The...

Страница 70: ...1 4 2 Not selected Select Base 1 Selects a base Auto Auto Base 1 4 System Lock Selects whether to lock the System Option setting or not On 3 Off Off Change PIN Before registering your handset with a PBX enter the PBX s PIN here Once you have registered the handset with a PBX this PIN can be changed so that the handset can be registered to an additional PBX Enter the PIN number max 8 digits 1234 1 ...

Страница 71: ...1 0 9 4 No 2 8XX 5 No 3 Not Stored Reset Handset Returns the handset settings to its default settings Enter Password 4 digits Not selected Select the desired item s Press OK 1 To avoid unauthorised access to this product Set a password that is random and cannot be easily guessed Change the password regularly 2 Make a note of the password so that you will not forget it 3 If a password has not alrea...

Страница 72: ...To set Select the alarm number 1 3 Select Memo Alarm Press Centre Press Centre Press Centre You can select the following settings Alarm mode Once Daily Alarm mode Weekly Alarm mode Off Select the alarm mode Once Daily Enter memo Once Enter date and time 1 Daily Enter the time Press Centre Press Centre Press Centre for Save 72 Configuring Handset Settings ...

Страница 73: ...re Press Centre for Save 1 You can select the format for the date and time See Display Option on page 68 2 A will be displayed next to the day of the week that has been set You can select the ringer pattern and LED pattern for each Memo Alarm See Incoming Option on page 64 If you are on a call at the time that the alarm is set to sound it will sound after you have ended the call 73 Configuring Han...

Страница 74: ...m mode setting Select the alarm number 1 3 Select Memo Alarm Press the right soft key Select Yes Press Centre Press Centre Press Centre To stop the alarm Press any key other than soft keys 74 Configuring Handset Settings ...

Страница 75: ...dio channel is busy or a radio communication error occurred Try again later You cannot dial The number that you dialled is restricted by the PBX Consult your dealer Key lock mode is on To cancel the mode press for about 2 seconds See Key Lock on page 11 The radio channel is busy or a radio communication error occurred Try again later The handset stops working during operation Turn the handset off ...

Страница 76: ... radio signal is weak Move closer to the CS The charge indicator flashes red rapidly The charger is not connected properly Make sure the battery is inserted properly Set the handset in the charger properly You charged the battery for 7 hours but the beep tones sound and needs to be charged flashes after a few telephone calls The battery charge contacts may be dirty Clean the battery charge contact...

Страница 77: ...the CS or PBX Wait for a moment Charge Battery The handset battery has little charge remaining Charge the battery fully See Charging the Battery on page 6 No Entries When trying to view the Phonebook No items have been stored See Storing an Item in the Handset Phonebook on page 45 When trying to view the Incoming or Outgoing Call Log No logs have been stored Memory Full The Phonebook is full and c...

Страница 78: ...s flashes and the alarm sounds 1 Charge Battery is displayed In this situation the handset cannot be operated 1 If the low battery warning occurs during a conversation the call will be automatically disconnected one minute after the alarm sounds Replacing the Battery If flashes after using the phone for a short time even when the battery has been fully charged the battery should be replaced Before...

Страница 79: ...lide it as indicated by the arrow A 3 Open the cover and replace the batteries Insert a finger into the side gap to remove the batteries easily B 4 Close the cover and charge the handset A B Please use a Panasonic battery with the service part number HHR 4EPT only 79 Important Information ...

Страница 80: ...ply to your home consult your dealer or local power company Do not allow anything to rest on the power cord Do not locate the charger where the power cord may be stepped on or tripped on To reduce the risk of electric shock do not disassemble this product Only qualified personnel should service this product Opening or removing covers may expose you to dangerous voltages or other risks Incorrect re...

Страница 81: ...duct with a soft cloth Do not clean with abrasive powders or with chemical agents such as benzene or thinner Do not use liquid cleaners or aerosol cleaners When you operate this product the AC outlet should be near the product and easily accessible The product should never be placed near or over a radiator or other heat source Use only the AC adaptor battery and charger indicated in this manual Do...

Страница 82: ...completely i e use them in the handset until on the display starts flashing Then recharge them as described in the manual After the memory effect has occurred it is possible to achieve almost complete capacity of the Ni MH batteries by charging and discharging several times one after another Ni MH batteries can also self discharge This self discharge depends on the ambient temperature At temperatu...

Страница 83: ... appliances and devices that generate electrical noise such as fluorescent lamps and motors These noise sources can interfere with performance of the product Do not place the product in rooms where the temperature is less than 5 C or greater than 40 C Allow 10 cm clearance around the product for proper ventilation Avoid environments with excessive smoke dust moisture mechanical vibration shock or ...

Страница 84: ...t dependent on local power is available for emergency use in emergencies When a failure occurs which results in the internal parts becoming accessible disconnect the AC adaptor immediately and return this unit to the place of purchase or service centre This apparatus is designed to aid the visually handicapped to locate dial keys and buttons 999 and 112 can be dialled on the apparatus after access...

Страница 85: ...ier Spacing 1728 kHz Bit Rate 1152 kbps Carrier Multiplex TDMA 24 Tx12 Rx12 slots per frame Frame Length 10 ms Modulation Scheme GFSK Roll off factor 0 5 50 roll off in the transmitter Data Coding for Modulator Differential Coding Voice CODEC 32 kbps ADPCM CCITT G 721 Transmission Output Average 10 mW Peak 250 mW 85 Important Information ...

Страница 86: ...er KX TDA0142CE KX TDA100 KX TDA200 PMPR Software File Version 5 0000 or later KX TDA600 PLMPR Software File Version 5 0000 or later KX TDE100 KX TDE200 PMMPR Software File Version 1 0000 or later KX TDE600 PGMPR Software File Version 2 0000 or later KX TDA0158CE KX TDA30 PSMPR Software File Version 5 0000 or later KX TDA100 KX TDA200 PMPR Software File Version 5 0000 or later KX TDA600 PLMPR Soft...

Страница 87: ...product is compatible with all of Telecom s network services PTC200 4 12 2 b Handset Instability 2 When attached to some longer lines this Panasonic KX TCA175 DECT Cordless Handset may display instability immediately after dialling if the handset is placed facedown on a hard surface This is a temporary condition that will revert to a normal level after a short duration Please do not report it to t...

Страница 88: ...rmation about collection and recycling of old products and batteries please contact your local municipality your waste disposal service or the point of sale where you purchased the items Penalties may be applicable for incorrect disposal of this waste in accordance with national legislation For business users in the European Union If you wish to discard electrical and electronic equipment please c...

Страница 89: ...res that this equipment is in compliance with the essential requirements and other relevant provisions of Radio Telecommunications Terminal Equipment R TTE Directive 1999 5 EC Declarations of Conformity for the relevant Panasonic products described in this manual are available for download by visiting http www doc panasonic de Contact to Authorised Representative Panasonic Testing Centre Panasonic...

Страница 90: ... is copyrighted by Panasonic Communications Co Ltd and may be reproduced for internal use only All other reproduction in whole or in part is prohibited without the written consent of Panasonic Communications Co Ltd Panasonic Communications Co Ltd 2009 PSQX4970ZA KK0609KH0 CE UK AL ...

Отзывы: