background image

3

Insert the tab (

C

) and rib (

D

).

C

D

Caution:

R

When moving the base unit, be sure to hold by
the grip. Do not hold by the handset unit.

Correct

Incorrect

Note:

R

While talking to the other party, you can send a fax
using the scanner glass by pressing 

M

Start

N

, and

then 

M

1

N

 (To receive a fax, press 

M

2

N

).

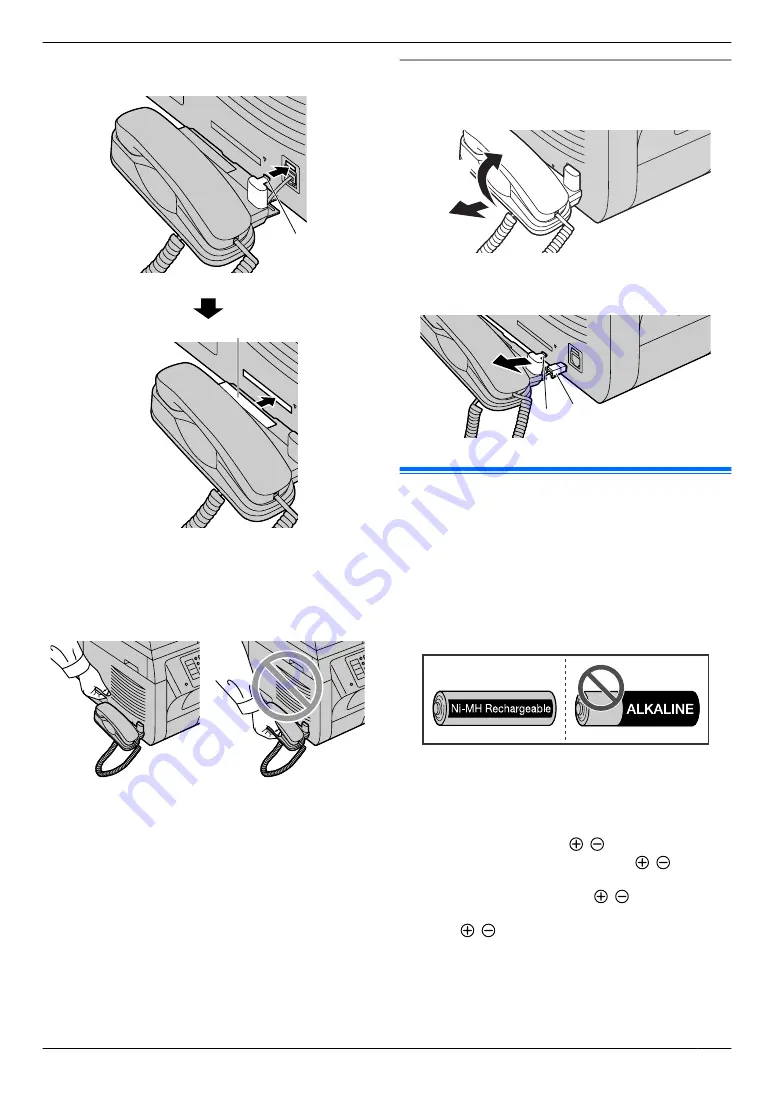
To remove the handset unit
1.

Pull the handset unit slightly forward (

A

), then lift it

in the direction of the arrow (

B

) to remove the rib.

A

B

2.

Remove the tab (

C

), then disconnect the handset

connector (

D

).

C D

1.11 Battery installation /
replacement (KX-MB2060
optional)

Important:

R

USE ONLY Ni-MH batteries AAA (R03) size.
Do NOT use alkaline/Manganese/Ni-Cd batteries
etc.

R

Use the supplied rechargeable batteries. For
replacement, we recommend using the
Panasonic rechargeable batteries noted on
page 7.

R

Wipe the battery ends ( ,  ) with a dry cloth.

R

Avoid touching the battery ends ( ,  ) or the
unit contacts.

R

Confirm correct polarities ( ,  ).

R

Install the batteries without touching the battery
ends ( ,  ) or the unit contacts.

For assistance, please visit http://www.panasonic.com/help

19

1. Introduction and Installation

Содержание KX-MB2061

Страница 1: ...do so during the setup of Multi Function Station CD ROM 1 2 For hearing or speech impaired TTY users TTY 1 877 833 8855 Important L To use cordless handset features with KX MB2060 please purchase an a...

Страница 2: ...t to energy saving designs from greater product reusability to waste conscious packaging practices For U S A only Please visit www panasonic com environmental for more information Trademarks R Microso...

Страница 3: ...han 5 minutes Do not touch or scratch the black drum surface Do not place the drum cartridge near dust or dirt or in a high humidity area Do not expose the drum cartridge to direct sunlight R To exten...

Страница 4: ...s Near obstacles such as hills tunnels underground near metal objects such as wire fences etc R Operating the product near electrical appliances may cause interference Move away from the electrical ap...

Страница 5: ...tions 35 3 2 Easy Print Utility 36 4 Scanner Scanner 4 1 Scanning from the base unit Push Scan 37 4 2 Scanning from a computer Pull Scan 40 5 Copier Copy 5 1 Making a copy 42 5 2 More copying features...

Страница 6: ...11 2 Cordless handset programming KX MB2060 optional 99 12 Multi unit Operation KX MB2060 optional Additional Units 12 1 Operating additional units 104 12 2 Registering a cordless handset to a base u...

Страница 7: ...use cordless handset features with KX MB2060 please purchase an additional digital cordless handset Note R Save the original carton and packing materials for future shipping and transportation of the...

Страница 8: ...9 am to 9 pm EST 1 Except for cordless handset 1 3 Button descriptions of the base unit DEFGHIJK L M A C N P Q RS T U VWXY Z O B Station keys R To use the one touch dial feature page 51 58 MManual Bro...

Страница 9: ...ettings R To adjust the volume page 27 R To search for a stored item page 58 MSetN R To store a setting during programming MToneN R To change from pulse to tone temporarily during dialing when your li...

Страница 10: ...e base unit Line in use Someone is using the line Soft keys The cordless handset features 3 soft keys By pressing a soft key you can select the feature shown directly above it on the display Symbols u...

Страница 11: ...nput tray Rear cover Telephone line jack USB interface connector 1 6 3 Cordless handset KX MB2060 optional A D C B E F G Charge indicator Ringer indicator Message indicator Nonslip pad Speaker Headset...

Страница 12: ...long time It will decrease the toner life R We cannot be responsible for any damage to the unit or degradation of print quality which may occur from the use of a non Panasonic toner and drum cartridge...

Страница 13: ...er roller J R If the lower glass K is dirty clean it with a soft and dry cloth K 7 Install the drum and toner cartridge L by holding the tabs L R Make sure that the arrows M match to install the drum...

Страница 14: ...es properly we recommend the use of Panasonic toner and drum cartridges See page 7 for accessory information R To maintain print quality and machine life we recommend you to clean slots and openings p...

Страница 15: ...ted paper the number of sheets may vary depending on the usage environment Remove the printed paper before the output tray becomes full If the top part of the extender is detached 1 With the top part...

Страница 16: ...Paper that will melt vaporize discolor scorch or emit dangerous fumes near 200 C 392 F such as vellum paper These materials may transfer onto the fusing roller and cause damage Moist paper Inkjet pap...

Страница 17: ...into the base unit lifting the front part of the tray Then push it completely into the base unit Note R If the paper is not loaded correctly re adjust the paper guides or the paper may jam R If the p...

Страница 18: ...grasps the paper and a single beep is heard A B Note R To print from the manual input tray when printing with the computer select 2 for the printer properties when making a copy set the copy input tr...

Страница 19: ...the tab C then disconnect the handset connector D C D 1 11 Battery installation replacement KX MB2060 optional Important R USE ONLY Ni MH batteries AAA R03 size Do NOT use alkaline Manganese Ni Cd bat...

Страница 20: ...terminal first Close the cordless handset cover Attention A nickel metal hydride battery that is recyclable powers the product you have purchased Please call 1 800 8 BATTERY 1 800 822 8837 for inform...

Страница 21: ...disturb the network condition of the device Using surge protectors R The warranty does not cover damage due to power line surges or lightning For additional protection we recommend using a surge prot...

Страница 22: ...ries are fully charged the charge indicator A goes OFF and Fully charged is displayed A C B Note R It is normal for the cordless handset to feel warm during charging R Clean the charge contacts of the...

Страница 23: ...t eco mode KX MB2060 optional This feature automatically reduces cordless handset power consumption by suppressing cordless handset transmission power when the cordless handset is close to the base un...

Страница 24: ...2 6 Selecting the operation mode Scan Copy Fax You can select the desired mode by pressing one of the following buttons MScanN Select this mode when using the unit as a scanner page 37 MCopyN Select t...

Страница 25: ...that any ink paste or correction fluid has dried completely R Remove clips staples or other fasteners R Do not insert the following types of documents Make a copy of the document using the scanner gl...

Страница 26: ...t weight R Single sheet 60 g m2 to 75 g m2 16 lb to 20 lb R Multiple sheets 60 g m2 to 75 g m2 16 lb to 20 lb 2 8 Help function The unit contains helpful information which can be printed for reference...

Страница 27: ...N soft key A 2 Press MCN or MDN to select Initial setting A MSELECTN soft key A 3 Press MCN or MDN to select Ringer setting A MSELECTN soft key A 4 Press MCN or MDN to select Ringer volume A MSELECTN...

Страница 28: ...anguage feature 110 on page 78 the time is set using a 24 hour clock Example 15 15 Press M1NM5NM1NM5N To correct a mistake Press MFN or MEN to move the cursor to the incorrect number and make the corr...

Страница 29: ...s press and hold MStopN 2 12 Your fax number You can program your fax number so that it appears on the top of each page sent MSetN MMenuN MFNMEN MFlashN MStopN 1 MMenuN A MBNM1NM0NM3N A MSetN 2 Enter...

Страница 30: ...RESS A MSetN 2 Enter the IP address of the unit A MSetN For the subnet mask 1 Press M5NM0NM2N to display SUBNET MASK A MSetN 2 Enter the subnet mask of the network A MSetN For the default gateway 1 Pr...

Страница 31: ...receiving fax documents using your computer Listening to voice messages on your computer PC TAM To use Multi Function Station on your computer the following are required Operating System Windows 2000...

Страница 32: ...ice Monitor page 107 will also be installed 5 The Connection Type dialog box appears For USB connection 1 Connect directly with a USB cable A Next R The Connect Device dialog box will appear 2 Connect...

Страница 33: ...All Programs or Programs A Panasonic A the unit s name A Uninstall Then follow the on screen instructions 2 15 Starting Multi Function Station Start A All Programs or Programs A Panasonic A the unit s...

Страница 34: ...be saved Viewer File Email OCR Custom To change scanning settings for Multi Function scan application Note R Assign a unique name for the PC name to avoid errors or the scanned image may be sent to t...

Страница 35: ...s of paper on the unit before purchasing large quantities You can change or display the settings on the following tabs Basic Paper size media type pages per sheet etc Output Number of prints collate e...

Страница 36: ...w the print image without test print Printer settings You can change or display the settings on the following tabs in step 5 Basic Paper size layout printing Output Number of prints paper source media...

Страница 37: ...f you want to scan several pages and save as a single file select TIFF or PDF as the file format 6 When using the scanner glass MStartN A The unit will scan 1 page Place the next document on the scann...

Страница 38: ...or PDF formats R The scanned image will be automatically saved in the folder selected in the Settings window page 34 4 1 4 Scan to OCR With OCR software you can convert an image into text data that ca...

Страница 39: ...sired destinations using station keys To use this feature register email addresses to station keys beforehand page 98 1 Set the original page 25 2 MScanN 3 Using station 1 3 Press the desired station...

Страница 40: ...e document cover when scanning a document with the automatic document feeder 4 2 1 Using Multi Function scan application By clicking an application icon the selected application starts automatically a...

Страница 41: ...eed as follows 1 Set the original page 25 2 Start an application that supports TWAIN or WIA scanning 3 For TWAIN scanning Select Acquire Image from the File menu For WIA scanning Select From Scanner o...

Страница 42: ...uto AnswerN light is ON the unit can receive faxes automatically even when in the copy mode To select the copy size 1 Press MCopy SizeN repeatedly to select ORIGINAL SIZE 2 Press MCN or MDN repeatedly...

Страница 43: ...m rate that fits the size of your document and recording paper ZOOM 100 1 50 200 1 Press MCN or MDN repeatedly to change the zoom rate by 1 at a time from 25 to 400 You can also enter the desired perc...

Страница 44: ...4 3 2 1 4 3 2 1 4 4 3 3 2 2 1 1 Collated pages Uncollated pages Note R The unit will store the documents into memory while collating the copies If the memory becomes full while storing the unit will o...

Страница 45: ...PE or PORTRAIT A MSetN 6 If necessary enter the number of copies up to 99 7 Quick ID copy feature 1 MStartN R The unit will scan 1 page 2 Place the next document on the scanner glass and press MSetN R...

Страница 46: ...per 1 Set the original page 25 R To make a portrait copy set the original in portrait direction To make a landscape copy set the original in landscape direction 2 Press MPage LayoutN repeatedly to sel...

Страница 47: ...ing the dial keypad A MSetN 6 Press MCN or MDN repeatedly to select SHORT EDGE A MSetN 7 Enter the desired edge width of short edge using the dial keypad A MSetN 8 If necessary enter the number of doc...

Страница 48: ...5 2 While PC PRINTING or PRINTING is displayed press MCopyN 3 Make necessary settings such as number of copies resolution zoom features and page layout features A MStartN R COPY RESERVED will be displ...

Страница 49: ...conversation While mute is turned ON you can hear the other party but the other party cannot hear you 1 Press MMUTEN soft key A during conversation R MMUTEN soft key A flashes 2 To return to the conv...

Страница 50: ...rn the ringer OFF temporarily by pressing M N soft key A 6 3 Silent mode Silent mode allows you to select a period of time during which the base unit and the cordless handset KX MB2060 optional will n...

Страница 51: ...items The shared phonebook allows you to make calls without having to dial manually The base unit and any cordless handset registered to the base unit can use the shared phonebook You can store 100 it...

Страница 52: ...ature is available for Caller ID subscribers page 54 6 4 4 Editing a stored item Important R Following phonebook items cannot be edited Items stored with broadcast keys page 59 Items stored with delay...

Страница 53: ...y R To search for symbols press M1N 4 Press MCN or MDN repeatedly to display LISA R To dial the displayed party press M N or M N To search for a name by group Cordless handset only KX MB2060 optional...

Страница 54: ...printing the Caller ID list Base unit only To print manually see page 137 To print automatically after every 50 new calls activate feature 216 page 80 For call waiting or Call Waiting Caller ID servic...

Страница 55: ...the remaining information press MEN To return to the previous screen press MFN 3 Press M N or M N to return the call To edit a telephone number before calling back storing You can edit a telephone nu...

Страница 56: ...see page 52 R If you assign an item to a station key which already contains an item the previous item will be replaced R Station 1 and 2 can be used alternatively as broadcast keys page 59 R One touch...

Страница 57: ...els low to high are available Press MContrastN repeatedly A MSetN Note R You can save the previous contrast setting feature 462 on page 81 To redial the last number MRedialN R If the line is busy the...

Страница 58: ...ne touch dial feature and phonebook page 51 R Make sure that the MFaxN light is ON 8 2 1 Using the scanner glass 1 Set the original page 25 2 If necessary change the resolution page 57 and the contras...

Страница 59: ...tems into the broadcast memory 1 Press MMenuN repeatedly to display PHONEBOOK SET 2 Select the desired broadcast key For BROADCAST 1 MBroadcastN 2 Press MCN or MDN repeatedly to select BROADCAST For M...

Страница 60: ...re programmed parties To send the same document using the scanner glass 1 Set the original page 25 2 If necessary change the resolution page 57 and the contrast page 57 3 Press MBroadcastN or MManual...

Страница 61: ...tuation select the way you prefer to use your unit Use as a telephone answering machine and or fax TAM FAX mode Use only as a fax FAX ONLY mode Use mostly as a telephone TEL mode 8 5 1 Use as a teleph...

Страница 62: ...ls by yourself If a fax call is received you must receive the fax manually Setup Set the unit to TEL mode page 64 by pressing MAuto AnswerN repeatedly R The MAuto AnswerN light on the base unit turns...

Страница 63: ...when the unit rings for the 4th time You can then hang up without being charged for the call Transferring received fax document voice message automatically to email address You can transfer the receiv...

Страница 64: ...e the fax to email address feature 452 on page 86 Program the email server settings page 97 and the email destinations page 98 Set the fax to email destinations page 87 Note R To check the status of t...

Страница 65: ...t match the ones on a programmable junk fax prohibitor list Important R This feature does not work if you receive faxes manually 8 8 1 Activating the junk fax prohibitor 1 Press MMenuN repeatedly to d...

Страница 66: ...isplay a received fax document in your web browser and print or save the necessary document after you confirm the image Important R Web fax preview will not be activated when using the unit for the fi...

Страница 67: ...The display speed depends on the contents and size of the document R The received fax document is saved as an image file PDF format Adobe Reader is required to view it What means on the display means...

Страница 68: ...ure 161 on page 101 If you select a melody you will not be able to distinguish lines by their ringers 9 3 Using three or more phone numbers on a single telephone line You may wish to use three or more...

Страница 69: ...message will be deleted The pre recorded greeting message will be played when a call is received R If you change the maximum recording time of incoming messages to GREET ONLY Greeting only feature 305...

Страница 70: ...ssage to email address see page 71 R To transfer the voice message to a computer see page 71 10 4 2 Useful features during playback To repeat a message Press MFN while listening to the message R If yo...

Страница 71: ...continue transfer other voice messages press MSetN then repeat steps 1 to 4 R To exit from this feature press MStopN Note R The maximum size of the voice message that can be sent is 5 MB approximately...

Страница 72: ...message is recorded on the unit your computer will receive the voice message through the unit Note R Multi Function PC TAM window appears automatically after the voice message is received on your com...

Страница 73: ...ayback code feature 368 on page 73 A Submit R A list of the received voice messages will be displayed 6 Click the desired icon to play back save or delete a voice message R While playing back the voic...

Страница 74: ...ing mode will be set to TAM FAX or FAX ONLY mode depending on the setting of feature 400 page 81 3 Hang up the handset Note R You cannot turn ON the auto answer setting when the unit is set to TEL mod...

Страница 75: ...can call the caller back while listening to a message 1 Press MPAUSEN soft key A during playback 2 Call back A MSELECTN soft key A Note To edit the number before calling back 1 Press MPAUSEN soft key...

Страница 76: ...A M NM2NM1NM1N 2 Select the desired setting A MSAVEN soft key A A MOFFN Note R You can also program this feature with the base unit feature 211 on page 80 To change the maximum recording time for inco...

Страница 77: ...ge R You can also access the unit by entering its IP address on the web browser 2 Select the desired category from the menu bar Device Configuration features of the unit Network Configuration network...

Страница 78: ...number MBNM1NM0NM3N Enter your fax number using the dial keypad See page 29 for details Selecting the language 2 MBNM1NM1NM0N The display and reports will be in the selected language M1N ENGLISH defau...

Страница 79: ...u you can change the start time 1 MMenuN A MBNM1NM5NM8N A MSetN 2 Enter the maintenance start time R The default time is 12 00PM R Press MGN repeatedly to select AM or PM R If you select Spanish for t...

Страница 80: ...list will not be printed automatically but the base unit will keep a record of the information for the last 50 callers M1N ON The Caller ID list will be printed automatically each time the base unit l...

Страница 81: ...M1N TAM FAX default Telephone Answering Machine Fax mode page 62 M2N FAX ONLY Fax only mode page 63 Setting the waiting time for the power save mode MBNM4NM0NM3N To set the length of time before the...

Страница 82: ...e base unit the setting for the cordless handset KX MB2060 optional will also be changed and vice versa 2 This setting can be changed individually for the base unit and the cordless handset KX MB2060...

Страница 83: ...nit will not print a journal report but will keep a record of the last 30 fax transmissions and receptions M1N ON default The unit will print a journal report automatically after every 30 new fax tran...

Страница 84: ...ransmission until the former sending is completed Note R To cancel this setting after programming press MStopN while the unit is idle and then press MSetN Setting the Error Correction Mode ECM MBNM4NM...

Страница 85: ...e M1N ON default You will hear a beeping sound Note R If documents are stored into memory due to some printing problem the beeps will continue until you solve the problem If a message is displayed see...

Страница 86: ...M4NM5NM0N See page 66 for details Setting notification of fax reception MBNM4NM5NM1N M0N OFF default Deactivates this feature M1N ON The computer connected to your unit using USB LAN will receive a no...

Страница 87: ...ed only through the web browser interface Select email destinations where you want to send received fax document automatically up to 6 destinations Important R Program the email server settings page 9...

Страница 88: ...ng message time is 16 seconds M2N 60s Maximum greeting message time is 60 seconds See page 69 for details Receiving a voice message into the computer MBNM3NM6NM5N If you wish to receive a voice messag...

Страница 89: ...Configuration Web Page A Device Configuration 3 Type root as the user name then enter the password feature 155 on page 79 A OK 4 Select the TAM FEATURE tab 5 Click Edit next to DESTINATION 6 Click Add...

Страница 90: ...s this feature M1N ENABLED The unit will hold the previous setting Holding the previous zoom setting MBNM4NM6NM8N M0N DISABLED default Deactivates this feature M1N ENABLED The unit will hold the previ...

Страница 91: ...4N A MSetN 2 Enter the desired data timeout setting from 005 seconds to 600 seconds using the dial keypad R The default setting is 060 seconds 3 MSetN A MMenuN Setting mutual A4 letter print MBNM7NM7N...

Страница 92: ...r setting is programmed page 92 SMB FOLDER will be displayed when the SMB folder setting is programmed page 93 Holding the previous scanning parameter for Push Scan MBNM4NM9NM4N M0N DISABLED default D...

Страница 93: ...art Multi Function Station 2 Utilities A Configuration Web Page A Device Configuration 3 Type root as the user name then enter the password feature 155 on page 79 A OK 4 Select the SCAN FEATURE tab 5...

Страница 94: ...he dial keypad A MSetN A MMenuN Setting the primary DNS server for the LAN connection MBNM5NM0NM4N This feature is available when feature 500 is deactivated 1 MMenuN A MBNM5NM0NM4N A MSetN 2 Enter the...

Страница 95: ...ocated automatically without using a DHCP Dynamic Host Configuration Protocol server Setting HTTPD for the LAN connection MBNM5NM3NM4N M0N DISABLED Denies access to the web browser M1N ENABLED default...

Страница 96: ...A MBNM5NM7NM8N 2 Press M1N to select YES A MSetN 3 Press M1N to select YES A MSetN A MMenuN To erase FTP destinations 1 MMenuN A MBNM5NM7NM8N 2 Press M1N to select YES A MSetN 3 Press M0N to select N...

Страница 97: ...default router address for IPv6 Consult your service provider or network administrator for details Setting the information for scan to FTP FTP FEATURE Enter the FTP server information to send scanned...

Страница 98: ...own list if necessary 8 Submit 9 Close the web browser Setting the error notify feature ERROR NOTIFY ENABLED The unit will send an email to registered destinations when a problem occurs DISABLED defau...

Страница 99: ...ding on the feature being programmed R To exit the operation press MOFFN Top menu Sub menu 1 Sub menu 2 Feature default setting Caller list page 55 Answering device Play new msg Play new messages page...

Страница 100: ...Keytones ON OFF On Auto talk 9 Auto talk ON OFF Off page 50 Registration Register handset page 104 Change language Display 3 Display language English page 103 Programming using the direct commands MO...

Страница 101: ...04 for details Date and time 1 M1NM0NM1N See page 28 for details Alarm M7NM2NM0N M0N Off M1N Once M2N Daily See page 103 for details Ringer volume 3 4 M1NM6NM0N M0N Off M1N Level 1 M2N Level 2 M3N Lev...

Страница 102: ...he base unit ringtone for outside calls see feature 161 on page 79 To set the base unit silent mode see feature 237 and feature 238 on page 50 To set the base unit LCD display contrast see feature 145...

Страница 103: ...R To stop the alarm press any dial key or place the cordless handset on the charger R When the cordless handset is in use the alarm will not sound until the cordless handset is in standby mode Display...

Страница 104: ...nection with the system 1 MMENUN soft key A M NM1NM3NM1N R All cordless handsets registered to the base unit are displayed 2 Select the cordless handset you want to cancel A MSELECTN soft key 3 Yes A...

Страница 105: ...on hold 2 Cordless handset To page the base unit press M0N To page another cordless handset press MCN or MDN repeatedly to select the desired cordless handset A MSELECTN soft key 3 Base unit Lift the...

Страница 106: ...ocated on the same dial key press MEN to move the cursor to the next space then press the appropriate dial key If you do not press any dial key of the cordless handset within 5 seconds after entering...

Страница 107: ...Some characters that have been entered on the unit page 106 may not be displayed correctly due to the language setting of your computer 13 2 2 Using Device Monitor You can confirm the setting informa...

Страница 108: ...MStopN repeatedly to display STOP PRINTING To cancel scanning Press MStopN repeatedly to display STOP SCANNING To cancel copying Press MStopN repeatedly to display STOP COPYING To cancel sending or r...

Страница 109: ...ng paper or a recording paper jam Load paper page 16 or remove the jammed paper page 126 R If the PC fax setting feature 442 on page 86 is set to ALWAYS check the connection between the computer and t...

Страница 110: ...ayed also change the recording paper size setting feature 380 on page 80 R The recording paper size setting feature 380 on page 80 is set to B5 ISO B5 JIS or 16K so received faxes have been stored int...

Страница 111: ...ty of the unit Press MStopN to clear the message Divide the document into sections R There is no space to store new items in the phonebook Erase unnecessary items page 52 MESSAGE FULL R There is no ro...

Страница 112: ...provider telephone company for service availability Once you receive caller information this message will not be displayed TONER EMPTY CHANGE SUPPLIES R The toner is empty Replace the toner cartridge...

Страница 113: ...ve caller information after subscribing to a Caller ID service this message will not be displayed Use rechargeable battery R A wrong type of battery such as Alkaline or Manganese was inserted Use only...

Страница 114: ...or PC FAX and Remote Control Transmission errors will be displayed as printing errors Multi Function Station does not work properly R If the USB cable is connected to a USB hub connect the cable direc...

Страница 115: ...inkled or folded when printed R Make sure that the recording paper is loaded properly page 16 R Try turning the recording paper over or rotating it 180 degrees The printing quality is poor e g has smu...

Страница 116: ...the unit as a scanner R Remove the document in the automatic document feeder and re insert it Even after clicking Cancel scanning continues R Please wait It may take a while for the cancel request to...

Страница 117: ...r to 14 3 2 Printing problems page 115 R The original document is too dark or too light Change the contrast page 57 and try again The other party complains that received documents are too dark and can...

Страница 118: ...x setting feature 442 on page 86 is set to ALWAYS check the connection between the computer and the unit R If the fax preview mode feature 448 on page 66 is set to ON use the web browser on the comput...

Страница 119: ...tive Ring is set feature 430 on page 68 Whenever I try to retrieve my voice mail messages I am interrupted by the fax tone R You are probably entering MGN MBN M9N This is the default setting for the f...

Страница 120: ...handset does not turn on even after installing charged batteries R Place the cordless handset on the charger to turn ON the cordless handset The cordless handset does not work R Make sure that the bat...

Страница 121: ...nnot make long distance calls with the cordless handset R Make sure that you have long distance service Caller information is slow to display R Depending on your service provider telephone company the...

Страница 122: ...5 255 0 0 172 xx 0 1 172 xx 255 254 1 Class C 255 255 255 0 192 168 xx 1 192 168 xx 254 2 1 xx should be the same value for the unit and for the computer as shown in the following example Example 172...

Страница 123: ...age 62 The other party complains that they cannot leave a voice message R You may have subscribed to a voice mail service due to service packs offered by your telephone company Fax and voice message r...

Страница 124: ...users 1 Start A Control Panel A Security Center R The Windows Security Center window will appear 2 Windows Firewall R The Windows Firewall dialog box will appear 3 Click the Exceptions tab 4 Confirm...

Страница 125: ...this software Click OK 2 Easy installation 3 Modify A Next 4 Select Modify Utility or Add Printer Driver A Next Then follow the on screen instructions Important R For users of versions prior to 1 12 d...

Страница 126: ...recording paper has jammed inside of the unit The display will show the following PAPER JAMMED L OPEN TOP COVER CHECK REAR COVER Case 1 When the recording paper has jammed near the manual input tray 1...

Страница 127: ...ecording paper has jammed near the drum and toner cartridge 1 Pull open the paper input tray A A 2 Open the top cover B by holding the indentations C on both sides of the base unit D E B C C Caution R...

Страница 128: ...ully by pulling it upwards F Remove the jammed paper G carefully by pulling it toward you G 4 Close the paper input tray 5 Close the top cover by holding the indentations on both sides of the base uni...

Страница 129: ...n both sides of the base unit D A B B C Caution R The fuser unit C gets hot Do not touch it Note R Do not touch the transfer roller D 2 Lift both green levers E until they stop E 3 Remove the jammed p...

Страница 130: ...ding paper and straighten 2 Re load the recording paper 3 Insert the paper input tray into the base unit lifting the front part of the tray Then push it completely into the base unit Note R If the mes...

Страница 131: ...ications and re install recording paper See page 18 for details 15 2 Document jams Automatic document feeder Caution R Do not pull out the jammed document forcibly before lifting the ADF cover 1 Open...

Страница 132: ...2 Remove the jammed document C carefully When the document has jammed near the document entrance C When the document has jammed near the document exit C 3 Close the ADF cover 132 15 Paper Jams...

Страница 133: ...the other party Caution R Be careful when handling the drum and toner cartridge See the caution for the drum cartridge on page 12 for details R Do not use paper products such as paper towels or tissu...

Страница 134: ...he indentations B on both sides of the base unit D A B B C Caution The fuser unit C gets hot Do not touch it Note R Do not touch the transfer roller D 3 Remove the drum and toner cartridge E by holdin...

Страница 135: ...arrows H match to install the drum and toner cartridge correctly H 6 Close the top cover by holding the indentations on both sides of the base unit until locked Caution R To prevent injuries be carefu...

Страница 136: ...er products such as paper towels or tissues for cleaning 1 Turn the power switch OFF 2 Open the ADF cover A while holding the document cover B A B 3 Clean the document feeder rollers C with a cloth mo...

Страница 137: ...nsmission 2 n Scanning density Scanning resolution Up to 600 1 200 dpi Optical Up to 9 600 9 600 dpi Interpolated Copy resolution Up to 600 600 dpi Fax resolution Horizontal 8 pels mm 203 pels inch Ve...

Страница 138: ...2 Transmission speed is based on the ITU T No 1 Test Chart with original mode If the capability of the other party s machine is inferior to your unit the transmission time may be longer ITU T No 1 Tes...

Страница 139: ...X ONLY Table of Contents2 1 Table of Contents 1 1 Included accessories 1 2 Accessory information Finding the Controls 1 3 Description of buttons 1 4 Overview Installation1 5 Toner cartridge and drum u...

Страница 140: ...egularly The maximum drum life is approx 6 000 pages Note R There are various factors that determine the actual drum cartridge life such as temperature humidity type of paper and how much toner you us...

Страница 141: ...SUBSTITUTE GOODS OR SERVICES LOSS OF USE DATA OR PROFITS OR BUSINESS INTERRUPTION HOWEVER CAUSED AND ON ANY THEORY OF LIABILITY WHETHER IN CONTRACT STRICT LIABILITY OR TORT INCLUDING NEGLIGENCE OR OT...

Страница 142: ...eserved Copyright c 1988 Stephen Deering Copyright c 1988 University of Utah Copyright c 1988 1989 1993 The Regents of the University of California All rights reserved Copyright c 1988 1991 1993 The R...

Страница 143: ...c All rights reserved Copyright c 1999 2001 The NetBSD Foundation Inc All rights reserved Copyright c 2000 The NetBSD Foundation Inc All rights reserved Copyright c 2000 2001 The NetBSD Foundation Inc...

Страница 144: ...s Technology Inc copyright notice BSD Copyright c 2001 2003 Networks Associates Technology Inc All rights reserved Redistribution and use in source and binary forms with or without modification are pe...

Страница 145: ...NCLUDING NEGLIGENCE OR OTHERWISE ARISING IN ANY WAY OUT OF THE USE OF THIS SOFTWARE EVEN IF ADVISED OF THE POSSIBILITY OF SUCH DAMAGE Part 4 Sun Microsystems Inc copyright notice BSD Copyright 2003 Su...

Страница 146: ...PERFORMANCE OF THIS SOFTWARE R This product contains NetBSD software and is using it based on the following license conditions Copyright c 1990 The Regents of the University of California All rights...

Страница 147: ...PROFITS OR BUSINESS INTERRUPTION HOWEVER CAUSED AND ON ANY THEORY OF LIABILITY WHETHER IN CONTRACT STRICT LIABILITY OR TORT INCLUDING NEGLIGENCE OR OTHERWISE ARISING IN ANY WAY OUT OF THE USE OF THIS...

Страница 148: ...DING BUT NOT LIMITED TO PROCUREMENT OF SUBSTITUTE GOODS OR SERVICES LOSS OF USE DATA OR PROFITS OR BUSINESS INTERRUPTION HOWEVER CAUSED AND ON ANY THEORY OF LIABILITY WHETHER IN CONTRACT STRICT LIABIL...

Страница 149: ...WAY OUT OF THE USE OF THIS SOFTWARE EVEN IF ADVISED OF THE POSSIBILITY OF SUCH DAMAGE R This product contains NetBSD software and is using it based on the following license conditions Copyright c 199...

Страница 150: ...CLUDING BUT NOT LIMITED TO THE IMPLIED WARRANTIES OF MERCHANTABILITY AND FITNESS FOR A PARTICULAR PURPOSE ARE DISCLAIMED IN NO EVENT SHALL THE REGENTS OR CONTRIBUTORS BE LIABLE FOR ANY DIRECT INDIRECT...

Страница 151: ...des software developed by the OpenSSL Project for use in the OpenSSL Toolkit http www openssl org THIS SOFTWARE IS PROVIDED BY THE OpenSSL PROJECT AS IS AND ANY EXPRESSED OR IMPLIED WARRANTIES INCLUDI...

Страница 152: ...isplay the following acknowledgement This product includes cryptographic software written by Eric Young eay cryptsoft com The word cryptographic can be left out if the rouines from the library being u...

Страница 153: ...eception 30 448 Fax preview mode 66 450 Web fax preview access code 66 451 Fax receive notify 86 452 Fax to email address setting 86 459 Set fax to default 86 460 Input tray setting for copy 90 461 De...

Страница 154: ...Proof set 44 Quick ID 44 Reserve 47 Zoom 43 Copy features 90 Copy size 42 Cordless handset Canceling Feature 131 104 Eco mode 23 Group name 52 Handset name Feature 104 103 Locator 104 Registration Fe...

Страница 155: ...437 85 Memory redial 49 Message alert Feature 340 76 Missed calls 54 Mode timer Feature 464 81 Multi Function Station software Activating 33 Installing 31 Uninstalling 33 Mutual A4 letter print Featu...

Страница 156: ...er volume Feature 160 27 Ringtone Feature 161 79 101 S Scale selection Feature 147 79 Scan features 92 Scan mode Feature 493 92 Scan parameter hold Feature 494 92 Scanner glass 25 42 57 Sending faxes...

Страница 157: ...157 Notes...

Страница 158: ...158 Notes...

Страница 159: ...159 Notes...

Страница 160: ...PNQX2928ZA CM0910SY0 CD For hearing or speech impaired TTY users TTY 1 877 833 8855...

Отзывы: