background image

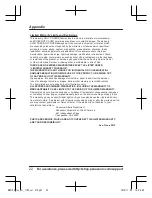
Limited Warranty Limits and Exclusions

(As examples, this excludes damages for lost time, travel to and from the servicer, 
loss of or damage to media or images, data or other memory or recorded content. 
The items listed are not exclusive, but for illustration only.)

This warranty ONLY COVERS failures due to defects in materials or workmanship, 
and DOES NOT COVER normal wear and tear or cosmetic damage. The warranty 
ALSO DOES NOT COVER damages which occurred in shipment, or failures which 
are caused by products not supplied by the warrantor, or failures which result from 
accidents, misuse, abuse, neglect, mishandling, misapplication, alteration, faulty 
installation, set-up adjustments, misadjustment of consumer controls, improper 
maintenance, power line surge, lightning damage, modification, introduction of sand, 
humidity or liquids, commercial use such as hotel, office, restaurant, or other business 
or rental use of the product, or service by anyone other than a Factory Service Center 
or other Authorized Servicer, or damage that is attributable to acts of God.

THERE ARE NO EXPRESS WARRANTIES EXCEPT AS LISTED UNDER 

“LIMITED WARRANTY COVERAGE”.

THE WARRANTOR IS NOT LIABLE FOR INCIDENTAL OR CONSEQUENTIAL 

DAMAGES RESULTING FROM THE USE OF THIS PRODUCT, OR ARISING OUT 

OF ANY BREACH OF THIS WARRANTY.

ALL EXPRESS AND IMPLIED WARRANTIES, INCLUDING THE WARRANTY OF 

MERCHANTABILITY, ARE LIMITED TO THE PERIOD OF THE LIMITED WARRANTY.

PARTS AND SERVICE, WHICH ARE NOT COVERED BY THIS LIMITED WARRANTY, 

ARE YOUR RESPONSIBILITY.

Some states do not allow the exclusion or limitation of incidental or consequential damages, 
or limitations on how long an implied warranty lasts, so the exclusions may not apply to you.
This warranty gives you specific legal rights and you may also have other rights which vary 
from state to state. If a problem with this product develops during or after the warranty period, 
you may contact your dealer or Service Center. If the problem is not handled to your 
satisfaction, then write to:
 

                        Consumer Affairs Department


                        Panasonic Corporation of North America


                        661 Independence Pkwy 

                                          Chesapeake, VA 23320

As of June 2015

22

For assistance, please visit http://shop.panasonic.com/support

Appendix

HNS104_(en_en)_1102_ver.310.pdf   22

2015/11/02   14:58:49

Содержание KX-HNS104

Страница 1: ... unit and save it for future reference For assistance please contact us at 1 800 272 7033 or visit our Web site http shop panasonic com support for customers in the U S A Please register your product http shop panasonic com support In order to use this device R Download the latest version of the Home Network app R Update your hub to the latest firmware version version 5 55 or later For more inform...

Страница 2: ...tor 8 Setup overview 8 Inserting the batteries 9 Registering the sensor 10 Confirming the usage area 11 Information about sensor features 12 Wall mounting 14 Appendix Adjusting the sensor sensitivity 17 Features available when using the Home Network app 17 Accessing the User s Guide 17 Specifications 18 FCC and other information 19 Customer services 20 Limited Warranty ONLY FOR U S A 21 2 Table of...

Страница 3: ...ications are subject to change without notice R The illustrations in these instructions may vary slightly from the actual product Trademarks R iPhone and iPad are registered trademarks of Apple Inc R Android is a trademark of Google Inc R Microsoft Windows and Internet Explorer are either registered trademarks or trademarks of Microsoft Corporation in the United States and or other countries R All...

Страница 4: ...o property that occurs in the event of wireless communication error or failure For your safety To prevent severe injury and loss of life property read this section carefully before using the product to ensure proper and safe operation of your product WARNING Power connection R Use only the power source marked on the product R Do not connect non specified devices Installation R To prevent the risk ...

Страница 5: ... risk of leakage overheating and rupture Do not attempt to use a battery if it is leaking R Do not intentionally pour water on the battery or allow it to get wet There is a risk of fire and smoke If the battery becomes wet remove it immediately and contact an authorized service center Important safety instructions When using your product basic safety precautions should always be followed to reduce...

Страница 6: ...y make false detections in noisy locations such as where there is noise from metallic blinds opening and closing or metallic bells of alarm clocks Avoid installing the sensor in these locations R The sounds of doors opening and closing may cause false detections Do not install the sensor near doors R Do not place screens or shielding such as sound blocking curtains between the glass and sensor Thi...

Страница 7: ...ems please contact your local authorities or dealer and ask for the correct method of disposal Note for the battery removal procedure Refer to Inserting the batteries on page 9 Notice For assistance please visit http shop panasonic com support 7 Warnings and Product Limitations Important Information HNS104_ en_en _1102_ver 310 pdf 7 2015 11 02 14 58 48 ...

Страница 8: ...lowly Registration mode You pressed and held M N Off No battery power Note R The LED indicator does not indicate sensor status if the sensor has not been registered page 10 Setup overview 1 Initial setup Make sure you can access the system using your mobile device For details refer to the System Setup Guide included with your hub 2 Insert the batteries The sensor is battery powered 3 Registration ...

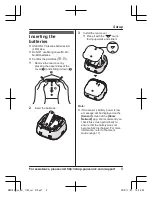
Страница 9: ... rear cover R Place it with the mark facing upwards and slide it Note R If the sensor s battery power is low a message will be displayed on the Sensor screen of the Home Network app We recommend you check this screen periodically to ensure that the battery does not become fully discharged For more information refer to the User s Guide page 17 For assistance please visit http shop panasonic com sup...

Страница 10: ... and hold M OTHER DEVICEN until the LED indicator blinks slowly in green 2 Sensor Press and hold M N until the LED indicator blinks slowly in green page 8 R When registration is complete the hub sounds one long beep Note R To cancel without registering the sensor press M N on the hub and on the sensor again R If registration fails the hub sounds several short beeps Using the app When you register ...

Страница 11: ... can check the sensor s communication status by pressing M N If the LED indicator is lit in green or red the sensor is communicating properly with the hub If the LED indicator blinks in red it is out of range of the hub Usage area cautions Using the sensor in the following areas may cause deformation malfunction or operational failure R In direct sunlight R Areas exposed to grease or steam such as...

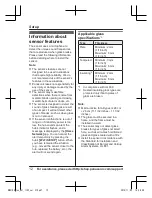
Страница 12: ... is displayed by the Home Network app You can cancel the alert temporarily by pressing the hub s MWi Fi SETUPN button When you have remedied the situation e g moved the sensor closer to the hub replaced the battery etc the alert will not sound again Applicable glass specifications 1 Type Thickness Plate Minimum 2 mm 1 16 inch Maximum 6 mm 1 4 inch Tempered Minimum 3 mm 1 8 inch Maximum 6 mm 1 4 in...

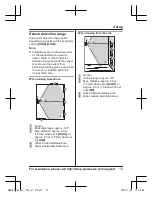
Страница 13: ...en looking from above A B E D E D E C Sensor Horizontal range approx 120 Max distance approx 4 6 m 15 feet when set to MHIGHN or approx 2 3 m 7 5 feet when set to MLOWN Glass inside detectable area Glass outside detectable area When looking from the side A B D D E C Sensor Vertical range approx 120 Max distance approx 4 6 m 15 feet when set to MHIGHN or approx 2 3 m 7 5 feet when set to MLOWN Glas...

Страница 14: ...ndow R Install the sensor such that there are no obstacles between the sensor and the window that may block the sound of glass breaking R Ambient noise such as the sound of tableware glass or metal objects contacting each other explosive noises children s voices howling of dogs etc may cause false detections False detections may occur when the sensor is armed if it is installed in a kitchen garage...

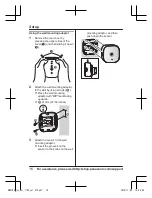
Страница 15: ... screws 1 R Place the rear cover with UP mark facing upwards R 2 37 mm 1 15 32 inches UP 2 1 UP 1 3 Attach the sensor to the rear cover R Insert the grooves on the sensor to the 4 tabs on the rear cover and then push down the sensor UP For assistance please visit http shop panasonic com support 15 Setup HNS104_ en_en _1102_ver 310 pdf 15 2015 11 02 14 58 48 ...

Страница 16: ...g screws 1 R Place the wall mounting adaptor with UP mark facing upwards R 2 21 mm 27 32 inches 2 UP 1 1 3 Attach the sensor to the wall mounting adaptor R Insert the grooves on the sensor to the 4 tabs on the wall mounting adaptor and then push down the sensor 16 For assistance please visit http shop panasonic com support Setup HNS104_ en_en _1102_ver 310 pdf 16 2015 11 02 14 58 48 ...

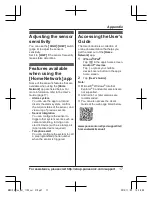
Страница 17: ...electric device such as a lamp etc Appropriate device required Telephone alert You can configure the system to call a preprogrammed phone number when the sensor is triggered Accessing the User s Guide The User s Guide is a collection of online documentation that helps you get the most out of the Home Network app 1 iPhone iPad Tap in the app s home screen Android devices Tap or press your mobile de...

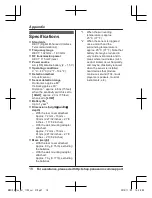
Страница 18: ...wall mounting adaptor attached Approx 72 mm 73 mm 61 mm 2 27 32 inches 2 7 8 inches 2 13 32 inches R Mass weight With the rear cover attached Approx 69 g 0 15 lb excluding the batteries With the wall mounting adaptor attached Approx 76 g 0 17 lb excluding the batteries 1 When the surrounding temperature is approx 25 C 77 F 2 When the sensor is triggered once a month and the surrounding temperature...

Страница 19: ...ouraged to try to correct the interference by one or more of the following measures Reorient or relocate the receiving antenna Increase the separation between the equipment and receiver Connect the equipment into an outlet on a circuit different from that to which the receiver is connected Consult the dealer or an experienced radio TV technician for help Some devices operate at frequencies that ma...

Страница 20: ...r Panasonic products Accessories Parts for your Camera Phone A V products TV Computers Networking Personal Care Home Appliances Headphones Ba eries Backup Chargers more For Product Informa on Opera ng Assistance Parts Owner s Manuals Dealer and Service info go to http shop panasonic com support For the hearing or speech impaired TTY 1 877 833 8855 As of June 2015 20 For assistance please visit htt...

Страница 21: ...atteries antennas and cosmetic parts cabinet This warranty only applies to products purchased and serviced in the United States This warranty is extended only to the original purchaser of a new product which was not sold as is Home Network System Products microSD card Included model only 90 days N A When shipping the unit carefully pack include all supplied accessories listed in the Owner s Manual...

Страница 22: ...s attributable to acts of God THERE ARE NO EXPRESS WARRANTIES EXCEPT AS LISTED UNDER LIMITED WARRANTY COVERAGE THE WARRANTOR IS NOT LIABLE FOR INCIDENTAL OR CONSEQUENTIAL DAMAGES RESULTING FROM THE USE OF THIS PRODUCT OR ARISING OUT OF ANY BREACH OF THIS WARRANTY ALL EXPRESS AND IMPLIED WARRANTIES INCLUDING THE WARRANTY OF MERCHANTABILITY ARE LIMITED TO THE PERIOD OF THE LIMITED WARRANTY PARTS AND...

Страница 23: ...sonic com support LFAQ and troubleshooting hints are available For your future reference We recommend keeping a record of the following information to assist with any repair under warranty Serial No Date of purchase found inside the battery compartment Name and address of dealer Attach your purchase receipt here Two Riverfront Plaza Newark NJ 07102 5490 Panasonic System Networks Co Ltd 2015 HNS104...

Страница 24: ...arlo en el futuro Para obtener ayuda comuníquese con nosotros llamando al 1 800 272 7033 o visite nuestro sitio web http shop panasonic com support para clientes en los EE UU solo en inglés Por favor registre su producto http shop panasonic com support Para utilizar este dispositivo R Descargue la versión más reciente de la aplicación Home Network R Actualice el hub a la versión de firmware más re...

Страница 25: ...ción de las baterías 4 Registro del sensor 5 Confirmación del área de uso 6 Información acerca de las características del sensor 8 Montaje en la pared 10 Apéndice Ajuste de sensibilidad del sensor 13 Acceso a la Guía del usuario 13 2 Tabla de Contenido HNS104_ es_es _1104_ver 310 pdf 2 2015 11 04 9 25 55 ...

Страница 26: ... fuera de al cance del hub Verde par padeando lentamente Modo de registro Opri mió y mantuvo oprimido M N Apagado Sin batería Nota R El Led indicador no indica el estado del sensor si el sensor no se ha registrado página 5 Resumen de configuración 1 Configuración inicial Asegúrese de poder acceder al sistema mediante su dispositivo móvil Para obtener más detalles consulte la Guía de configuración ...

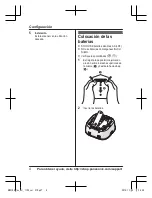
Страница 27: ...baterías de manganeso Ni Cd Ni MH R Verifique las polaridades 1 Extraiga la tapa posterior ejerciendo presión sobre los lados superiores de la misma A y deslícela hacia abajo B A B 2 Inserte las baterías 4 Para obtener ayuda visite http shop panasonic com support Configuración HNS104_ es_es _1104_ver 310 pdf 4 2015 11 04 9 25 55 ...

Страница 28: ...gistrar cada dispositivo en el hub Puede registrar cada unidad mediante los botones de registro o la aplicación Home Network Nota R Para obtener información acerca de cómo eliminar dispositivos del registro consulte la Guía del usuario página 13 Uso de los botones de registro 1 Hub Oprima y mantenga oprimido M OTHER DEVICEN hasta que el Led indicador parpadee lentamente en verde 2 Sensor Oprima y ...

Страница 29: ...uertas o pantallas metálicas R Paredes que contengan aislamiento de aluminio R Paredes de hormigón o hierro corrugado R Ventanas de vidrio doble R Varias paredes R Cuando los dispositivos están en pisos o edificios diferentes Nota R Puede verificar el estado de la comunicación del sensor presionando M N Si el Led indicador está iluminado en verde o rojo el sensor se está comunicando de forma adecu...

Страница 30: ...manes R Áreas sujetas a cambios extremos de temperatura como cerca de aires acondicionados R Cerca de dispositivos que emiten ondas de radio potentes como teléfonos móviles Para obtener ayuda visite http shop panasonic com support 7 Configuración HNS104_ es_es _1104_ver 310 pdf 7 2015 11 04 9 25 55 ...

Страница 31: ...mensaje Puede cancelar temporalmente la alerta al omitir el botón MWi Fi SETUPN del hub Cuando haya normalizado la situación por ejemplo movió el sensor más cerca del hub reemplazó la batería etc la alerta no volverá a sonar Especificaciones del vidrio 1 Tipo Grosor Plano Mínimo 2 mm 1 16 pul gadas Máximo 6 mm 1 4 pulga das Templado Mínimo 3 mm 1 8 pulga das Máximo 6 mm 1 4 pulga das Aislante 2 Mí...

Страница 32: ...lan Vista desde arriba A B E D E D E C Sensor Alcance horizontal aprox 120 Distancia máx aprox 4 6 m 15 pies cuando se establece en MHIGHN o aprox 2 3 m 7 5 pies cuando se establece en MLOWN Vidrio dentro del área detectable Vidrio fuera del área detectable Vista lateral A B D D E C Sensor Alcance vertical aprox 120 Distancia máx aprox 4 6 m 15 pies cuando se establece en MHIGHN o aprox 2 3 m 7 5 ...

Страница 33: ...los entre el sensor y la ventana que puedan bloquear el sonido de la rotura del vidrio R El ruido ambiente como el sonido de la vajilla u objetos de vidrio o metal que están en contacto los ruidos explosivos las voces de niños o los aullidos de perro entre otros pueden ocasionar detecciones falsas Las detecciones falsas pueden producirse cuando el sensor se activa si se instala en una cocina garag...

Страница 34: ...os 1 R Coloque la tapa posterior con la marca UP hacia arriba R 2 37 mm 1 15 32 pulgadas UP 2 1 UP 1 3 Coloque el sensor en la tapa posterior R Inserte las 4 lengüetas de la tapa posterior en los canales del sensor y luego ejerza presión hacia abajo sobre el sensor UP Para obtener ayuda visite http shop panasonic com support 11 Configuración HNS104_ es_es _1104_ver 310 pdf 11 2015 11 04 9 25 56 ...

Страница 35: ...ue el adaptador de instalación en pared con la marca UP hacia arriba R 2 21 mm 27 32 pulgadas 2 UP 1 1 3 Coloque el sensor en el adaptador de instalación en pared R Inserte las lengüetas del sensor en los 4 canales del adaptador de instalación en pared y luego ejerza presión hacia abajo sobre el sensor 12 Para obtener ayuda visite http shop panasonic com support Configuración HNS104_ es_es _1104_v...

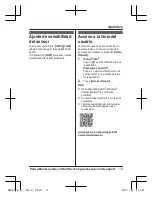
Страница 36: ...e en la pantalla de inicio de la aplicación Dispositivos Android Toque u oprima el botón menú de su dispositivo en la pantalla de inicio de la aplicación 2 Toque Guía del Usuario Nota R No se admite Microsoft Windows Internet Explorer 8 y versiones anteriores R Se recomienda Android 4 1 y versiones posteriores R También puede acceder a la Guía del usuario mediante la página web a continuación www ...

Отзывы: